Hello everyone,
I put together a quick little blog post of somethings that I found useful when dealing with Mac OS X 10.7 "Lion". I personally don't care for some of the new default options in Lion, but thankfully they are just that, options. So these tips put back some of the features that Lion automatically switches off for whatever reason. They are listed below.")
I have a blog version of this which has some screenshots and images to help you out. So if you'd like to see that you can visit my blog post here.
![lion-mouse-300x239.png]()
#1 Inverse Scrolling (Natural Scrolling): This is a feature that people either love, or they hate. Inverse scrolling (also called Natural Scrolling) mimics the iPhone’s scrolling habits, meaning if you move your scroll wheel or trackpad down, the page will scroll up. And if you move it up it’ll scroll down. Make sense? No? Don’t worry you can shut it off. Simply go into System Preferences and click on either ‘Mouse’ (if you’re using a mouse) or ‘Trackpad’ (if you’re using a trackpad). The first option is titled “Scroll direction: natural”, just uncheck the box next to it and you’re done! Thankfully Apple has given us a choice in the matter.
![lion-dashboard-300x222.png]()
#2 Dashboard (Widgets): In Lion Dashboard takes on a Spaces approach. Dashboard is accessed by swiping your multitouch pointing device to the right, which pushes in a big empty window with your widgets on them. So can we change this back to the old way of showing things? Yes we can! All you have to go is once again open up ‘System Preferences’ click on ‘Mission Control’ and uncheck the box that reads ‘Show Dashboard as a space’. It’s just that easy, again I’m thankful that Apple has given us an option for this, as the new way may not work well for some people.
![lion-mail-300x272.png]()
#3 Mail’s New View: Like many things in Lion they seem to be pulled directly from the iPhone or iPad. The new Mail app allows you to read Mail in a few new views, you can view a two-column or three-column view similar to how the iPad would display your email. Now this is a personal preference, but here’s how you can put Mail back to looking how it did in Snow Leopard. First off, if you want to see all of your inboxes click the ‘Show All’ button at the top left of your mail window. That’s simple enough, now you can see all of your folders and boxes.
Now to change the viewing format you want to use simply go to the Mail app, go to the Mail menu and select ‘Preferences’ [Or while in Mail simply do the following keyboard shortcut, Command (Apple Key) , (comma)]. Select the ‘Viewing’ tab up top and check the first checkbox titled ‘Use classic layout’. Here you also have some more options. But that checkbox will make you feel much more at home if you don’t care for the new layout.
![finder-bars-226x300.png]()
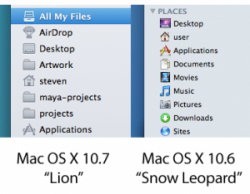
#4 Restore Finder Window Details (Path Bar & Status Bar): After upgrading to Lion I knew something was missing, but I couldn’t quite put my finger on it. Then I realized it, the Path bar and Status bar on my Finder windows was missing! Some of you may not even realize what these are or even car, but the Path bar is the bar at the bottom of a window that tells you it’s location and what folder it’s in. The status bar tells you how many items are in a folder and how much disk space is available as well.
While this is nothing essential for most users, I personally like to know the path of the folder I’m in and the disk space available on the window I have open. Apple turns this off by default, but we can quickly turn it back on. Simply open any Finder window, now go to the ‘View’ menu and select ‘Show Path Bar’, the other option ‘Show Status Bar’ is right below it. So there you go, everything is back to normal. Now doesn’t that feel better?
![lion-dmg.png]()
#5 Need a Lion Install DVD?: Apple sure loves it’s new App Store. It saves them from making discs and shipping them to their store, it saves the planet some green too so it’s all well and good. It’s a great way for them to distribute their new OS. If you’ve installed Lion by now you know it’s a download-only operating system. It weighs in at about 3.76 GB and thankfully easily fits onto a single-layer DVD-R. The days of looking for a dual-layer DVD disc to burn a Mac OS X Install disc onto are thankfully behind us! A DVD copy of Lion is handy for those who don’t want to re-download a nearly 4GB file everytime you need to install Lion or need to use it as a bootup disk to diagnose a problem with a computer, or even use it when you replace your hard drive. It’s also handy for those who do not have easy access to a high-speed internet connection or have to install Lion on multiple machines. Thankfully the Install Lion app is pretty simple and you can easily share it on a network to do help with installing on multiple Macs. Apple officially offers a Lion installable USB flash drive, but it’s $69. You can save a bit by doing this yourself, you can use a friend’s internet connection to download Lion for $29, buy a 8GB USB flash drive for $12 and make your own bootable Lion USB installer! But that’s a whole other story…
To make a DVD of Lion simply find your ‘Install Mac OS X Lion.app’ and right-click it, select ‘Show Package Contents’ to expand what files are actually inside of this app. Now go to ‘Contents>SharedSupport’ and you’ll find a file named ‘InstallESD.dmg’ this is the Mac OS X Lion install disk image. To make a bootable DVD out of this open up Disk Utility (found under the Utilities folder of your Application folder). Drag the ‘InstallESD.dmg’ file from the Finder window to the bottom half of the sidebar on the Disk Utility window. Select the ‘InstallESD.dmg’ file from the sidebar in Disk Utility and click Burn, insert a regular ol’ blank 4.7GB DVD-R disc and you’re done! You can also make a Lion bootable USB drive or hard drive, but other places online have this covered.
I may add to this list if I come across anything else I find interesting. I hope some of these tips and tricks were useful to you!
-Steve
I put together a quick little blog post of somethings that I found useful when dealing with Mac OS X 10.7 "Lion". I personally don't care for some of the new default options in Lion, but thankfully they are just that, options. So these tips put back some of the features that Lion automatically switches off for whatever reason. They are listed below.
I have a blog version of this which has some screenshots and images to help you out. So if you'd like to see that you can visit my blog post here.

#1 Inverse Scrolling (Natural Scrolling): This is a feature that people either love, or they hate. Inverse scrolling (also called Natural Scrolling) mimics the iPhone’s scrolling habits, meaning if you move your scroll wheel or trackpad down, the page will scroll up. And if you move it up it’ll scroll down. Make sense? No? Don’t worry you can shut it off. Simply go into System Preferences and click on either ‘Mouse’ (if you’re using a mouse) or ‘Trackpad’ (if you’re using a trackpad). The first option is titled “Scroll direction: natural”, just uncheck the box next to it and you’re done! Thankfully Apple has given us a choice in the matter.

#2 Dashboard (Widgets): In Lion Dashboard takes on a Spaces approach. Dashboard is accessed by swiping your multitouch pointing device to the right, which pushes in a big empty window with your widgets on them. So can we change this back to the old way of showing things? Yes we can! All you have to go is once again open up ‘System Preferences’ click on ‘Mission Control’ and uncheck the box that reads ‘Show Dashboard as a space’. It’s just that easy, again I’m thankful that Apple has given us an option for this, as the new way may not work well for some people.

#3 Mail’s New View: Like many things in Lion they seem to be pulled directly from the iPhone or iPad. The new Mail app allows you to read Mail in a few new views, you can view a two-column or three-column view similar to how the iPad would display your email. Now this is a personal preference, but here’s how you can put Mail back to looking how it did in Snow Leopard. First off, if you want to see all of your inboxes click the ‘Show All’ button at the top left of your mail window. That’s simple enough, now you can see all of your folders and boxes.
Now to change the viewing format you want to use simply go to the Mail app, go to the Mail menu and select ‘Preferences’ [Or while in Mail simply do the following keyboard shortcut, Command (Apple Key) , (comma)]. Select the ‘Viewing’ tab up top and check the first checkbox titled ‘Use classic layout’. Here you also have some more options. But that checkbox will make you feel much more at home if you don’t care for the new layout.

#4 Restore Finder Window Details (Path Bar & Status Bar): After upgrading to Lion I knew something was missing, but I couldn’t quite put my finger on it. Then I realized it, the Path bar and Status bar on my Finder windows was missing! Some of you may not even realize what these are or even car, but the Path bar is the bar at the bottom of a window that tells you it’s location and what folder it’s in. The status bar tells you how many items are in a folder and how much disk space is available as well.
While this is nothing essential for most users, I personally like to know the path of the folder I’m in and the disk space available on the window I have open. Apple turns this off by default, but we can quickly turn it back on. Simply open any Finder window, now go to the ‘View’ menu and select ‘Show Path Bar’, the other option ‘Show Status Bar’ is right below it. So there you go, everything is back to normal. Now doesn’t that feel better?

#5 Need a Lion Install DVD?: Apple sure loves it’s new App Store. It saves them from making discs and shipping them to their store, it saves the planet some green too so it’s all well and good. It’s a great way for them to distribute their new OS. If you’ve installed Lion by now you know it’s a download-only operating system. It weighs in at about 3.76 GB and thankfully easily fits onto a single-layer DVD-R. The days of looking for a dual-layer DVD disc to burn a Mac OS X Install disc onto are thankfully behind us! A DVD copy of Lion is handy for those who don’t want to re-download a nearly 4GB file everytime you need to install Lion or need to use it as a bootup disk to diagnose a problem with a computer, or even use it when you replace your hard drive. It’s also handy for those who do not have easy access to a high-speed internet connection or have to install Lion on multiple machines. Thankfully the Install Lion app is pretty simple and you can easily share it on a network to do help with installing on multiple Macs. Apple officially offers a Lion installable USB flash drive, but it’s $69. You can save a bit by doing this yourself, you can use a friend’s internet connection to download Lion for $29, buy a 8GB USB flash drive for $12 and make your own bootable Lion USB installer! But that’s a whole other story…
To make a DVD of Lion simply find your ‘Install Mac OS X Lion.app’ and right-click it, select ‘Show Package Contents’ to expand what files are actually inside of this app. Now go to ‘Contents>SharedSupport’ and you’ll find a file named ‘InstallESD.dmg’ this is the Mac OS X Lion install disk image. To make a bootable DVD out of this open up Disk Utility (found under the Utilities folder of your Application folder). Drag the ‘InstallESD.dmg’ file from the Finder window to the bottom half of the sidebar on the Disk Utility window. Select the ‘InstallESD.dmg’ file from the sidebar in Disk Utility and click Burn, insert a regular ol’ blank 4.7GB DVD-R disc and you’re done! You can also make a Lion bootable USB drive or hard drive, but other places online have this covered.
I may add to this list if I come across anything else I find interesting. I hope some of these tips and tricks were useful to you!
-Steve
Last edited: