Become a MacRumors Supporter for $50/year with no ads, ability to filter front page stories, and private forums.

VirtualRain

macrumors 603
Original poster
Aug 1, 2008
6,304
118
Vancouver, BC
I spent some time this evening downloading Lightroom 4.3 and Capture One Pro 7 to compare their image adjustment capabilities to Aperture. I worked with a couple different Canon 5D Mark III RAW files almost exclusively at 100%. Here are my observations.

(It's late and I want to get this posted, but if there's interest, I'll post some comparison 100% crops to support some of my comments later this week).
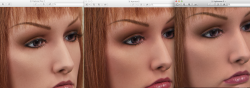
RAW conversion:

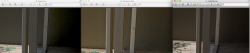
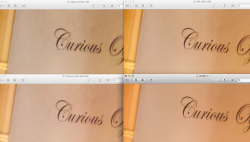
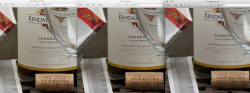
Sharpness and Noise: Without making any adjustments, Capture One clearly has a better set of RAW conversion settings for the Canon 5D3 than either Apple or Adobe. The images have less noise and are sharper right out of the gate. While this is easily compensated for in both Aperture and Adobe, Capture One could save a bit of time when working on lots of images.

Saturation and Tone: Aperture files are bit more saturated than either of the other two. I was able to get Aperture's saturation to match the other two by pulling it back a couple of notches on the slider. So again, you can easily adjust this to taste in all three RAW converters. All three programs offer ever so slightly different tonal characteristics.

Basic Adjustments:

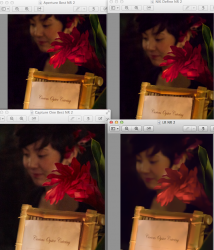
Histogram: Since the Histogram is the key tool I like to monitor when tweaking my images, I found the histogram display in Aperture to be the most helpful in that it is wide and appears to show blown highlights and crushed shadows a little better than the other two.

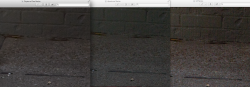
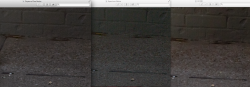
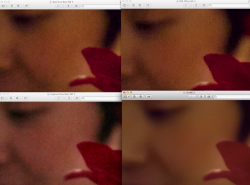
Lifting Shadows: Capture One rules here. It’s shadow slider does an amazing job of lifting the shadows with less noise, more contrast, and better saturation than the other two programs. In Aperture and Lightroom I needed to use both the shadow recovery slider and black adjustment slider to get similar results to Capture One. In addition both needed a bit of extra noise reduction and saturation to match Capture One. Again it seems Capture One makes things faster. While a lot of people say Lightroom has much better shadow recovery, I didn’t find this at all. It actually seems remarkably similar in what can be accomplished. Aperture’s shadow slider seems to offer more latitude but it’s less useful on the extreme because the loss of contrast is so great. It’s good up to it’s mid point which is about the same as Lightroom at 100. Then you need to finesse either program further with the blacks adjustment.

Noise Reduction (on low ISO images): I didn’t need to play with this on Capture One. It’s default noise reduction seems fantastic. Lightroom does have a lot more capability here than Aperture, but to be honest, for the images I was working on (shadow noise at low ISO) where a Luminance NR setting in LR of 25 was good, I could get Aperture NR to look similar with the RAW De-Noise control set to 0.5. I need to play with NR on some high ISO images to get a better feel for it. But if all you want to do is clean up noise on well exposed shadows, then all of these programs are certainly up to the task with Capture One being better out of the gate.

Lens Correction: I didn’t spend a lot of time on this, but it is one area where both Capture One and LR have an advantage over Aperture, and again Capture One seems to have the better set of tools. I use PTLens in Aperture which works fine, but it’s a bit of a waste having to create a large TIFF for this.

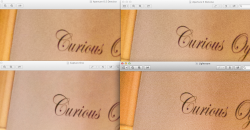
Definition/Clarity: All three applications offer this micro-contrast control and at first glance they all appear to do a similar job perhaps with the exception of LightRoom… it seems to do something strange by boosting the whole histogram up like it’s on steroids. The other two programs (Capture One and Aperture) are more subtle micro-contrast adjustments. This needs a bit more investigation but my first impression is that the Lightroom Clarity control has to be used very carefully compared to Definition in Aperture. FWIW, I actually prefer the “Structure” control in NIK.

Early Conclusions:

After playing around with all three of these programs this evening, I think Capture One is the clear winner in offering a better RAW conversion engine for my camera with better default settings. However, all of these programs can probably make nearly any image indistinguishable at 100%, never mind at fit-to-screen resolutions, if you spend a bit of time making the necessary adjustments.

The tool that really took my photos to another level in post recently is NIK’s plugins and while I wish they were native tools in Aperture, I’ll make do with them as plug-ins.

I will explore Capture One a bit further, particularly it’s local adjustments tools since that’s one of the key features of Viveza which I rely on. However, I notice it uses either a gradient or brush mask, unlike Viveza’s unique tonal mask control points. So I’m not sure that Capture One is going to offer the same speed of local adjustments I enjoy from Viveza.

I’m also going to spend some time working with some high ISO images in all three programs (including NIK Dfine) to see how these programs handle that kind of task.

At this point, I don’t see anything that makes me want to move away from Aperture/NIK.
 
Last edited:

r.harris1

macrumors 68020
Feb 20, 2012
2,190
12,628
Denver, Colorado, USA
Nicely done. It's great to see comparisons of the tools as RAW processors (rather than as strictly DAM) and some of the over and above image capabilities of each.
 

snberk103

macrumors 603
Oct 22, 2007
5,503
91
An Island in the Salish Sea
I've also been comparing Capture One - to just Lightroom in my case. But I've not been as thorough as your review. Nicely done.

My conclusion/impression is that Capture One has a suite of tools that are more complete than Lightroom, and that often they are more powerful. I really like some of the adjustments I can make with C1. However, I find the interface too fiddly - but I've been using Lr for a long time, and it may simply be a adjustment to the interface. However, I find it easy to make mistakes with C1 (for instance - forgetting to click back onto the background layer when you are in the local adjustments section, before moving to a different section, where the adjustments may or may not be applied to local adjustment layer or the whole image.) Things like that.

But some of the tools are vey powerful.

Thanks for the review... I look forward to updates. Makes me resolve to continue learning C1.
 

VirtualRain

macrumors 603
Original poster
Aug 1, 2008
6,304
118
Vancouver, BC
Attached are a couple of 100% crop comparisons of the RAW images before any adjustments were applied. (I took screen caps of each programs image preview zoomed to 1:1/100%). The program used is in the title bar of it's respective preview window.

The first shows the difference in sharpness and noise reduction during the RAW conversion. Look at the text on the wine label and the wall behind the wine bottle. As I mentioned above, Capture One provides the best default RAW conversion looking at this but the other two can easily match this with a bit of tweaking.

The second shows the subtle differences in saturation and tones for each program. These are all very close and differences are only obvious in side-by-side comparisons like this. Furthermore, each program can be tweaked to match the others.

More to come when time permits.
 

Attachments

  • Sharpness & Noise.png
    Sharpness & Noise.png
    1.6 MB · Views: 1,212
  • Saturation and Tone.png
    Saturation and Tone.png
    1.7 MB · Views: 1,272

Padaung

macrumors 6502
Jan 22, 2007
470
104
UK
Dude, thank you! Very interesting to see the subtle differences in tones and sharpness they all produce 'out of the box'.

Like you, I'm a stalwart for Aperture/Nik. I just love the work flow, and have got used to how to use them to get the best out of my files.
 

VirtualRain

macrumors 603
Original poster
Aug 1, 2008
6,304
118
Vancouver, BC
This evening I spent some time flirting with this rather challenging over-exposed image someone posted on POTN...

elephantovercooked.jpg

(Since the owner posted the RAW file to share, I'm assuming they won't mind me using it in my analysis... and perhaps they won't mind if you use it for your own evaluation as well?)

While the image is completely recoverable simply by dragging the exposure down in all three programs, where the challenge lies is in trying to preserve some detail (wrinkles) in the shadows of the elephants hind leg and under the ear.

This is where you really test how each programs shadow (and maybe highlights) slider works. Since you need to pull the exposure back by at least -2 in each program, these darker areas start to loose detail. But a poorly implemented shadow slider, that pulls more than just the darkest shadows will send your highlights back into over-exposure.

This is exactly the problem I found with Lightroom. If I started by adjusting the exposure to -2.45 to rescue the highlights, the shadows were pitch black. Pulling those up with the shadow slider moved the whole histogram (except for the extreme right end) to the right, over exposing the high tones again. To compensate, you need to pull in the highlights slider. But again, the highlights slider moves the whole histogram to the left (including dark tones). Its maddening. I'd love someone who uses Lightroom 4 to chime in with their thoughts on this. It's completely nonsensical to me. Highlights should only adjust the high tones, not the mid tones and certainly not the dark tones. Similarly shadows should only adjust the dark tones, not the mid tones and especially not the high tones. Yet this is exactly what Lightrooms shadow and highlight sliders seem to do.

In Aperture the shadow and highlight sliders are not great either... they still affect the mid-tones but not nearly to the same extreme as in Lightroom. Aperture's sliders tend to move the top half or bottom half of the histogram respectively. They still influence the mid-tones too much for my liking.

Only Capture One properly implements shadow and highlight sliders in my opinion. They only adjust the extreme ends of the shadow or highlight ends of the histogram, leaving the mid-tones completely untouched. That's the way it should be (IMHO).

Bottom line, I'm beginning to like Capture One more and more. It's controls seem to be very well implemented. Aperture was ok in this analysis but not the easiest tool to work with on this image. And... I'm stumped why people like the shadow and highlight recovery in Lightroom. I must be doing it wrong :)

Chime in with your thoughts and poke holes in my analysis... please!

More to come.
 

VirtualRain

macrumors 603
Original poster
Aug 1, 2008
6,304
118
Vancouver, BC
I had a bit more time this evening to play around with these applications further.

In this post, I'm working on another very challenging image where the highlights in this bright sunny court yard were exposed correctly, but where almost nothing is visible in the shadows out of the camera.

p1439207602-4.jpg


This image, like the last one, is not one of my own, but was posted to the CR Forums with permission to use it as you wish.

There are three attachments that go with each of the following three sections in order...

1. Max out the shadows adjustment:

The first thing I did in each program was pull the "Shadows" slider to the extreme to see how much I could pull the shadows with that one control. The results are attached (with the program used, visible in the title bar of the Preview window).

Here you can see that once again, Capture One, just works the way you want it to. It recovered the shadows nicely with just one slider. Lightroom was a bit better, but to lighten up the shadows to look like Capture One, I also had to max the blacks slider and also adjust the Shadows slider on the Tone Curve. It also needed a bit of clarity to recover some contrast in the mid-tones. Aperture was the worst of the lot with the shadows slider pulled to the extreme, there were still crushed blacks. Only using the blacks slider, or better yet, the curves tool, could I get it to look like the other two and it was even more difficult to maintain contrast in the mid-tones with Aperture requiring tweaks to Definition, Mid Contrast, and the Curves Tool to get something that looked as good as Capture One.

At any rate, all three programs are very capable of shadow recovery work, it's just how much effort it takes to get the results you want!

One other thing with Capture One is that for this picture, it's out of the box setting for saturation was just a bit too much so I had to pull that back to get it looking more realistic.

2. Low ISO Noise comparison:

After recovering the shadows, I had a 100% pixel peek at the low ISO noise that was present in the corner. (See the next attachment).

Amazingly, there was virtually no nasty noise present in the Capture One image. I didn't feel I needed to do any further noise reduction at all on that image. I also felt fairly happy with the Aperture file. Although that is with my default NR in RAW Fine Tuning set to the mid-point (0.5)... so there is NR going on here as part of the RAW conversion. If I set it to 0, it looks very similar to the Lightroom noise. So, evidently Lightroom doesn't do any NR during the RAW conversion and it's obvious.

3. Noise Reduction in Lightroom:

Now I'm no expert at noise reduction in Lightroom, but it seems you have Luminance noise and Color noise controls. I had to max the color noise slider which helps eliminate noise without impacting sharpness. Then I played with the luminance slider and the best compromise was definitely around 50... although even there it seemed to compromise a lot of sharpness and still left some obvious green and purple blotches on the bricks. While I'm sure someone more competent than myself with Lightroom NR could produce better results, my first impression of the NR controls in LR are that they are not any kind of magic. In fact, the luminance noise reduction works very similarly to the RAW Fine Tuning De-Noise slider in Aperture (something I think many people miss). At any rate, I still need to do some work on a high ISO noisy image before I jump to any real conclusions about NR.

The third attachment shows how the LR NR looks compared to the Aperture and Capture One images (with their default RAW conversion NR).

Again, I'd like to invite someone intimately familiar with LR to school me here :) As it stands, my impression is that I'm not missing anything in Aperture compared to Lightroom. And, I'm more and more impressed with how much time I could save using Capture One... getting better results with less adjustments. :)
 

Attachments

  • Shadows Maxed.png
    Shadows Maxed.png
    836.2 KB · Views: 647
  • Low ISO Noise Comparison.png
    Low ISO Noise Comparison.png
    1.8 MB · Views: 606
  • Noise Comparison With LR NR Applied.png
    Noise Comparison With LR NR Applied.png
    1.7 MB · Views: 562

VirtualRain

macrumors 603
Original poster
Aug 1, 2008
6,304
118
Vancouver, BC
Ok, so now I see what all the fuss is about :D :p

In this update, I'm using one of my own pictures shot at 25,600 ISO, to evaluate high ISO noise reduction...


5DM31830 by Chris-VirtualRain, on Flickr

This image was shot with my 24-105 at the tele end at f4. Only part of the text on the menu board is sharply in focus, and the girl in the background is almost bokeh. At any rate, it's a good image to play around with high ISO noise reduction.

Attachments:

There are four attachments for this post. The first shows a 100% crop of the menu board after import to illustrate the amount of noise you're grappling with when you get to work. The others show different parts of the image after the best NR adjustments I could come up with were applied. They are 100% crops of the menu, 100% crops of the girls cheek, and crops of the fit-to-window size in each program (suitable for sharing on the web or Facebook for example).

Each attachment has an image for Aperture, Capture One, and Lightroom, with an extra thrown in to show what NIK Define can do as an Aperture Plugin.

Noise upon import:

All three programs show obvious noise in the image on import, although, once again, Capture One impresses me with it's settings out of the box. I've shown two 100% crops from Aperture... one using the denoise control in RAW Fine Tuning at the mid point (0.5) and the other without any RAW denoise applied. As noted above, this little known Aperture control for NR is actually very effective at reducing low ISO noise, but its limitations become more obvious with this kind of high ISO noise. As before, Lightroom shows the most obnoxious noise on import.

Aperture:

About the best you can do in Aperture natively, and it isn't bad, is use the RAW denoise adjustment (to about 0.7) and then add the noise reduction adjustment and leave it at default settings. You will get rid of a lot of noise, but you will also muddy the details in the process. It's basically unsuitable for high ISO images like this. If you shoot a lot of 12,000+ ISO shots in the dark, you're going to want one of these other tools.

NIK Define:

NIK uses an innovative algorithm to measure the noise in various parts of your image and then reduce it. It's very effective with noise on continuous tones. You can see how it's done a great job on the paper and text, but with changing tones like those on the girls cheek, it has more trouble. You can help NIK fine tune the noise reduction by selecting a small area with your mouse that it will use as part of its noise sampling and measuring algorithm... so if there's a particular part of your image you want to kill noise on, you can make sure it's included in the process. I've found this very effective. Overall NIK saves Aperture from being a write-off with high ISO noise reduction.

Capture One:

Again Capture one offers one of the best images right after import and with a simple adjustment of the luminance noise slider, cleans up even better. Capture One has the least post NR artifacts of all the images. It hasn't created any oddities with the text but it's also not the cleanest either. I'd personally say that Capture One provides the most realistic noise clean-up with very good detail retention free of artifacts.

Lightroom:

Ok, now I get it. :eek: Now I get why everyone's so enamoured with the noise reduction in Lightroom. Moving the Luminance Noise slider in LR to the far right, has this amazing effect... it completely melts your noise away. :eek: It leaves a buttery smooth finish where noise once lived and it does an amazing job at preserving detail that sharpens up well (albeit with a bit of artifacts). Lightroom has no real competition when it comes to creating buttery smooth images from high ISO noise. If you get carried away, and arguably I did here in my enthusiasm for this control, it will melt your image into little more than a painting resembling it's former self. So be careful! :) Looking at the "fit-to-scree" size images with the girl, flower, and menu together, you can see I've probably gone too far here... while it's totally free of noise, it's also lost a lot of detail and saturation... the flower has become mush.

Conclusion:

Lightroom definitely has the most powerful NR for eliminating high-ISO noise, but such power must be wielded wisely :p Otherwise you will turn your images into noise free finger paintings. :D

Looking at the "fit-to-screen" images, I actually prefer results after sending the image from Aperture through NIK Define... it offers a great balance of NR, detail, and saturation. However, since this is my goto solution, it's perhaps not surprising that I can get the best results from that software. With a bit of time and effort, I'm certain I could do some great stuff with Lightroom's NR and maybe Capture One would yield to my will with a bit more investment too.

In the end, while LR definitely holds the high-ISO NR crown, it's got enough other problems from my earlier analysis that I probably won't consider it as a replacement for Aperture/NIK. I think the jury is still out on how much I might benefit from Capture One's relatively amazing images right after import. I could see it saving me a lot of time. I need to explore it's local adjustment capabilities more before I go much further, as that's a key part of the NIK tool set for me.

Again, I'm always open for input, feedback, and alternate opinions, which are usually never in short supply in this forum, although strangely absent from this thread :confused:
 

Attachments

  • After Import.png
    After Import.png
    1.6 MB · Views: 615
  • After NR (100% Text).png
    After NR (100% Text).png
    1.5 MB · Views: 544
  • After NR (100% Face).png
    After NR (100% Face).png
    2.2 MB · Views: 654
  • After NR (Fit to Screen).png
    After NR (Fit to Screen).png
    956.8 KB · Views: 656
Last edited:

twitch31

macrumors regular
Feb 12, 2013
107
0
This is exactly the problem I found with Lightroom. If I started by adjusting the exposure to -2.45 to rescue the highlights, the shadows were pitch black. Pulling those up with the shadow slider moved the whole histogram (except for the extreme right end) to the right, over exposing the high tones again. To compensate, you need to pull in the highlights slider. But again, the highlights slider moves the whole histogram to the left (including dark tones). Its maddening. I'd love someone who uses Lightroom 4 to chime in with their thoughts on this.

You need to use whites (which only affects extreme right) and blacks (only extreme left) sliders in conjunction with shadows and highlights sliders. If you only want to affect the extremes dont use highlights or shadows at all.

----------

EDIT: I also suggest you add to your tests the CA removal capability, Aperture & Lightroom both have it in their feature set (no idea about Capture One) however the LR CA removal is light years better than Aperture, it’s the same kind of gap in capability as the noise reduction features in the 2 programs IMHO.

If you are interested I have a RAW file which "has it all" which I used to compare LR to AP; highlights recovery, shadows recovery, CA removal, lens distortion, and noise removal (in lifted shadows) all in 1 picture ;)
 
Last edited:

VirtualRain

macrumors 603
Original poster
Aug 1, 2008
6,304
118
Vancouver, BC
You need to use whites (which only affects extreme right) and blacks (only extreme left) sliders in conjunction with shadows and highlights sliders. If you only want to affect the extremes dont use highlights or shadows at all.

----------

EDIT: I also suggest you add to your tests the CA removal capability, Aperture & Lightroom both have it in their feature set (no idea about Capture One) however the LR CA removal is light years better than Aperture, it’s the same kind of gap in capability as the noise reduction features in the 2 programs IMHO.

If you are interested I have a RAW file which "has it all" which I used to compare LR to AP; highlights recovery, shadows recovery, CA removal, lens distortion, and noise removal (in lifted shadows) all in 1 picture ;)

Thanks for the clarification on the shadows/highlights. I'll keep that in mind.

I don't do a lot of CA removal currently, most of the wide aperture stuff I shoot is not high contrast.

However, I'd be interested in your RAW file and your final result to see if I could easily replicate your results in both LR and the other apps. :)
 

twitch31

macrumors regular
Feb 12, 2013
107
0
Thanks for the clarification on the shadows/highlights. I'll keep that in mind.

I don't do a lot of CA removal currently, most of the wide aperture stuff I shoot is not high contrast.

However, I'd be interested in your RAW file and your final result to see if I could easily replicate your results in both LR and the other apps. :)

I'll PM you a link in the next day or so once I upload the file, I'll be interested to see how you go with it. I shot the scene with a lens that is fairly sharp but specialises in PF at all apertures, this lens is one reason I love LR CA removal so much.
 
Register on MacRumors! This sidebar will go away, and you'll see fewer ads.