I would like to see the details about the upgrade please send them to me.
rabidz7: I'm just quoting what I already wrote earlier in this thread (see below). I suggest you read the whole thread or you might miss something important. Here you go:
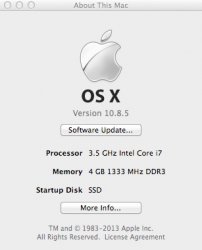
Ok, here are more details regarding the Upgrade:
2011 iMac 27” Upgrade
Starting Config:
Core i5-2500S (2.7ghz ) Processor
Radeon HD 6770 (512mb)
16gb 1333mhz RAM
Upgraded Config:
Core i7-2700K (3.5ghz ) Processor
Radeon HD 6970 (2gb)
32gb 1333mhz RAM
Component Purchases:
1. RAM Memory from http://www.macsales.com : OWC1333DDR3S32S, 32.0GB (8GB x 4) 317.99 (kit)
2. Processor from http://www.tigerdirect.com : Intel Core i7-2700K item#: I69-2700K $304
3. Graphics Card from http://www.dvwarehouse.com : AMD Radeon HD 6970M 2GB for iMac 27" Mid 2011 661-5969 - NEW (661-5969) $588
Materials I used:
1) http://www.macsales.com
OWC Internal SSD DIY Kit
For All Apple 27" iMac 2011 Models
SKU: OWCDIYIM27SSD11 $44.99
Note: This Kit includes all tools necessary besides the medium-head Phillips screwdriver for taking off the CPU & GPU heatsinks, and the small Phillips for changing out the RAM.
2) http://www.tigerdirect.com
-Cooler Master Thermal Compound Item#: C283-1147 $7.99
(This is for putting on the new CPU before you re-attach the Heatsink)
-StarTech.com ESD Anti Static Wrist Strap Item#: YYI1-CH4525 $9.89
3) Soft Packing Material (foam-like sheets) that I got from an HP Workstation computer box. I used this to place the motherboard and components on.
Videos / Walkthroughs
1. OWC SSD Drive install to 2011 iMac Video Walkthrough. http://www.youtube.com/watch?v=03Lg4IgJd04
The above video took me to where I had a few wires left to disconnect before I could remove the Motherboard:
Several wires in the lower right and lower left corners, and drive connectors & main power connector at top, backside (you have to pull the MB slightly toward you to reach in and disconnect them). After this I could swivel and ease the MB out completely to get to the CPU & GPU.
2. TECH REPUBLIC 2011 iMac Teardown
http://www.techrepublic.com/photos/c...237041?seq=138
this Teardown contains 138 photos of the 2011 iMac disassembly. It gave me a peek at the CPU and GPU so I knew what to expect before getting there. Both Heaksinks need to be removed; CPU needs to then be replaced (use Thermal Grease on new CPU before replacing Heatsink). GPU is one piece total and so is more simple (no Thermal Grease required). Take time disassembling so you know how to put the new ones on.
NOTE: the Heatsinks on both CPU & GPU have the same medium-head Phillips screws holding them on (4 on each Heatsink). They are easy enough to remove, but to get the Heatsinks back on, you have to hold your finger on the little screw on the other side of MB or else the big screw will just keep turning (not tighten). In other words, each of these big Phillips screws tighten by somehow screwing into a smaller screw, the head of which is on the opposite side of MB.
TIP: when everything is done and you’re putting the MB back in, before you put the MB screws in, look at the RAM ports at bottom and make sure they are lined up. Mine weren’t and I had to take my screen back off, unscrew and realign the MB to get it right.
TIP: Lastly, make sure all wires are connected to motherboard before replacing screen. All wire connectors in same area are different sizes, so there's no danger of connecting a wire incorrectly. All wire connectors should be occupied with a wire, except for one connector at middle, top facing the iMac screen. Sorry I didn't note the connector's label, but I'm sure this connector was unoccupied from the start.
That's it.