Become a MacRumors Supporter for $50/year with no ads, ability to filter front page stories, and private forums.

Cave Man

macrumors 604
Original poster
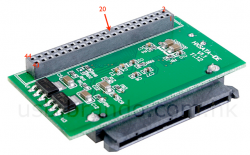
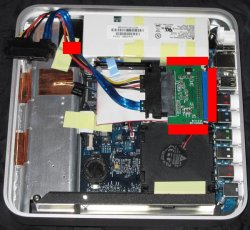
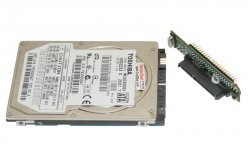
OK, if I've got this straight, pin 20 should be blocked. Since the 2.5" drive connector is 44 pins and the 3.5" drive connector is 40 pins, this gives us an asymmetric connection for the 44-pin connector, such that we can easily identify pin 20 on this adapter. That means we can locate all the other pins, and in the attached image pins 1, 2, 43 and 44 are noted. If this is correct, then when this adapter is seated on the ATV it should be pointed in the "right" direction so as not to interfere with the power supply. Pins 41 and 42 carry the 5V lines for the hard drive and controller and as you can see from this post (other attached photo) that should put those two pins in the right place.

So, I think this adapter will seat; however, it does not necessarily mean it will support booting of the ATV as these adapters have a history of being iffy. Everyone study this hard to make sure I didn't screw up the logic...:cool:
 

Attachments

  • adapter.png
    adapter.png
    353.8 KB · Views: 232
  • attachment-1.jpg
    attachment-1.jpg
    547.8 KB · Views: 315

JBX74205

macrumors newbie
Mar 3, 2010
13
0
Hey All! I got my adapter today. I plugged everything in and it's working like a charm! The only problem I have is that my 640GB drive is only registering as 591...I find it hard to believe that 50GB just vanished into thin air. Can anyone be of assistance?

Thanks!
 

JBX74205

macrumors newbie
Mar 3, 2010
13
0
It didn't; it's because drive space is calculated in base 2 under Tiger. Base 10 didn't appear until Snow Leo.

Oh that's right. I forgot this thing runs the older OS. Thanks!

I'm trying to figure out how to close this bad boy up...it's a pretty tight fit in there and when I tried the first time, I got the blinking HD on my display. Opening it up seemed to get things back on track, but I'm going to have to figure out a way to make it work with RichyScot1's setup. Any tips?
 

richyscot1

macrumors member
Dec 8, 2008
55
0
Derby, UK
So, I think this adapter will seat; however, it does not necessarily mean it will support booting of the ATV as these adapters have a history of being iffy. Everyone study this hard to make sure I didn't screw up the logic...:cool:

If my memory recalls me correctly, this has been mentioned in either this post or another similar one (I remember writing in 2 very similar threads quite a while ago). IF, it was the same adapter that was suggested to me, i believe it should go the correct way round. I do specifically remember asking this question, therefore I do know it is documented somewhere on this forum :)

Hopefully somebody will give it a go!! (to my knowledge) i was the 2nd person to attempt the internal mod (first to dicument it), which involved cutting a section of Apple TV's internal bracing up. This would be such a better solution..if it works, as most people don't fancy doing the 'internal PATA-SATA' mod as it involves taking a cutter to you beloved Apple TV....So who's gonna 'Take one for the team'??
 

JBX74205

macrumors newbie
Mar 3, 2010
13
0
Hopefully somebody will give it a go!! (to my knowledge) i was the 2nd person to attempt the internal mod (first to dicument it), which involved cutting a section of Apple TV's internal bracing up. This would be such a better solution..if it works, as most people don't fancy doing the 'internal PATA-SATA' mod as it involves taking a cutter to you beloved Apple TV....So who's gonna 'Take one for the team'??

Hey there! I've actually given it a try and hacked into my AppleTV's brace. It's pretty flimsy and I was able to remove it from the ATV completely and chop it up with nothing more than a good pair of scissors. I thought about removing the brace completely, but I decided against it.

I think the problem that I'm running into is that the Brando adapter that I have is slightly longer than the Advantech one, so it makes the positioning of the whole thing a little more difficult. It's not MUCH longer, but within the confines of the ATV, it makes a difference.

Richy, I searched back a bit and found your pictures, which were very helpful. Is the image below how you had it set up before closing the top? It looks like the drive is resting on top of the IDE cable and also on part of the plastic tab. Did you screw the drive back into the bottom half of the case, or just let it sit free this way? I'm thinking that it might not be necessary to remount the drive since the ATV will just be sitting still anyway.

Thanks again for the help!
 

Attachments

  • IMG_1203.jpg
    IMG_1203.jpg
    437.2 KB · Views: 412

richyscot1

macrumors member
Dec 8, 2008
55
0
Derby, UK
Richy, I searched back a bit and found your pictures, which were very helpful. Is the image below how you had it set up before closing the top? It looks like the drive is resting on top of the IDE cable and also on part of the plastic tab. Did you screw the drive back into the bottom half of the case, or just let it sit free this way? I'm thinking that it might not be necessary to remount the drive since the ATV will just be sitting still anyway.

That's exactly what I did. My drive is effectively upside down in the enclosure. The threaded mounting holes on the drive now point towards the middle of Apple TV, instead of towards the outer casing to allow you to secure the drive. I found that if I got it the right way around the cable twisted way too much and it became difficult to close the case.

It's worth noting that the drive does fit in mine...i.e. it doesn't touch the power stuff, under the white plastic flap.

As far as I'm concerned as long as you don't have a habit of mounting your Apple TV to your bicycle or anything stupid like that, once you've closed it up, everything sits pretty snuggly in there anyway.
 

nathanjbrown

macrumors 6502
Apr 9, 2008
265
57
Santa Barbara, CA
Hopefully somebody will give it a go!!

I've already placed my order and expect to have the right-angle adapter next week. I'll be the crash test dummy on this one. Let's hope nothing dramatic takes place (i.e. catastrophic failure of Apple TV power supply). :)

We'll see how it all fits together. I fear the problem may actually end up being the SATA/Power cable. In a space that tight, 8 inches of cable is more than we tend to imagine. It will all depend on how the cable can be routed around and into the hard drive.

JBX - Be careful when squeezing things back together. I somehow killed one of my PATA/SATA adapters trying to make it all fit (thankfully I planned ahead and ordered two; one to break and one to successfully install). :) The key is to fold the IDE cable (as seen on page two of this thread) so that the PATA/SATA adapter sits right on top of the WiFi card and backs into the audio/video jacks between the power supply and CPU. The SATA cable then needs to run between the hard drive and the power supply with the extra one to two inches of slack forced into the vacant space near the AppleTV's front-right corner (near the LED light). It also helps to bend the SATA cable toward the power supply right where it plugs into the PATA/SATA adapter (if that makes sense).

I hope that mess of instruction helps in some way.

Nathan
 

nathanjbrown

macrumors 6502
Apr 9, 2008
265
57
Santa Barbara, CA
Oh! And be sure to place something between the PATA/SATA adapter and the aluminum base of the AppleTV so that it doesn't short out. I used three half-inch x four-inch strips of nylon electrical tape rated for high heat (running from the power supply to the CPU fan). Not only did the tape insulate the adapter, but it also helped to hold it in place while running the SATA cable and putting things back together.
 

JBX74205

macrumors newbie
Mar 3, 2010
13
0
Oh! And be sure to place something between the PATA/SATA adapter and the aluminum base of the AppleTV so that it doesn't short out. I used three half-inch x four-inch strips of nylon electrical tape rated for high heat (running from the power supply to the CPU fan). Not only did the tape insulate the adapter, but it also helped to hold it in place while running the SATA cable and putting things back together.

So...I had everything set up and working, but when I closed it up, I got the alternating yellow and white lights. I assume something is getting shorted out, but I'm not sure what it is. When I open up the ATV, everything works fine again. I'll try more tape and see what happens...but it's very odd.
 

nathanjbrown

macrumors 6502
Apr 9, 2008
265
57
Santa Barbara, CA
So...I had everything set up and working, but when I closed it up, I got the alternating yellow and white lights. I assume something is getting shorted out, but I'm not sure what it is. When I open up the ATV, everything works fine again. I'll try more tape and see what happens...but it's very odd.

I was getting the exact same alternating amber/white light until I taped down the PATA/SATA adapter as I described. Don't get discouraged. There is a way to make it work. I fiddled with it for a couple of hours before finding the right placement.

Please pardon the terribly basic graphic I've attached. I'm at work with no access to my AppleTV or Photoshop. But I wanted to give you an idea of the electrical tape placement (red) and cabling path (blue/green) I used to get it up and running. Again...I used an electrical tape that's white and made out of nylon that apparently withstands higher heats than the black tape I ordinarily use.

Hope this helps.

Nathan

4426066712_1c93909dab_o.jpg
 

JBX74205

macrumors newbie
Mar 3, 2010
13
0
I was getting the exact same alternating amber/white light until I taped down the PATA/SATA adapter as I described. Don't get discouraged. There is a way to make it work. I fiddled with it for a couple of hours before finding the right placement.

Please pardon the terribly basic graphic I've attached. I'm at work with no access to my AppleTV or Photoshop. But I wanted to give you an idea of the electrical tape placement (red) and cabling path (blue/green) I used to get it up and running. Again...I used an electrical tape that's white and made out of nylon that apparently withstands higher heats than the black tape I ordinarily use.

Hope this helps.

Nathan

Thanks for the pic and the advice! I tried something similar to your setup, although for some reason, every time I put the tape across the top of adapter, it wouldn't work. To get around that, I lined the bottom of the case with the electrical tape, so when it made contact, it wouldn't hit the metal. I'm using the black tape that's rated to 200 degrees F, so I figure that should be enough.

I pretty much taped around everything else that had the potential to touch the adapter. Here's my crude illustration! Tape locations are in red. For the IDE cable, I taped the bottom since it touched the metal of the cable ports. I know it's plastic and probably wouldn't cause problems, but I figured why not just be safe? I also taped under the adapter on that little set of wires next to the power source, as well as on the white plastic. I didn't screw the HD back in since I felt like that was causing problems too. That final piece of tape near the SATA cable just helped me keep it in place while I connected everything, so I left it when I closed it back up. So far, it seems to be working.
 

Attachments

  • atv.jpg
    atv.jpg
    89 KB · Views: 412

nathanjbrown

macrumors 6502
Apr 9, 2008
265
57
Santa Barbara, CA
Hello All,

It is with sadness I must report that the right-angle adapter is a no-go. For whatever reason, the drive receives no power and, therefore, fails to spin up and boot. Nothing but a flashing question mark, I'm afraid. I've finished up my HDD upgrade with the adapter we've been using all along.

It's really a shame...The fit was fantastic.

Nathan
 

JBX74205

macrumors newbie
Mar 3, 2010
13
0
Hello All,

It is with sadness I must report that the right-angle adapter is a no-go. For whatever reason, the drive receives no power and, therefore, fails to spin up and boot. Nothing but a flashing question mark, I'm afraid. I've finished up my HDD upgrade with the adapter we've been using all along.

It's really a shame...The fit was fantastic.

Nathan

That stinks...at least your original setup worked though!
 

comimax

macrumors newbie
Apr 21, 2010
2
0
Cooldrive 2.5 "SATA Hard Drive IDE a 44 pin adapter

Good day to all, are new, but I would ask you if someone has tested this product and if you know you tell me if this works with the Apple TV.
Thank you all for the answer and any advice
 

Attachments

  • cooldrives_2074_37542403.jpg
    cooldrives_2074_37542403.jpg
    62.9 KB · Views: 337

comimax

macrumors newbie
Apr 21, 2010
2
0
Sata adapter to ide

hank you very much for that reply, I have understood in part as I do not speak well the English, if you could tell me what in a more simple, are Italian. Thank you sincerely comimax
 

AppleTVGuru

macrumors newbie
Apr 29, 2010
1
0
Apple TV Hard Drive Cable

I purchased an appletv already modified with external 1tb Hard drive (using eSata cable). Unfortunately the external drive failed and I'm frustrated. I want to install an internal drive instead. One slight problem, The HDD cable on apple tv isn't original and it's too short. Can someone tell me what type of Hard Drive cable appletv uses and where to purchase the ribben cable for appletv.
 

carl21

macrumors newbie
Jul 15, 2010
1
0
12.5 mm drive

I am intending on following richyscot1's instructions to upgrade my atv drive, however, I am hesitating between a Western Digital 2.5" 750gb 9.5mm drive and a 2.5" 1TB 12.5mm drive... Does anyone know if a 12.5 mm-thick drive could fit in there? (without overheating)?
 

kar200

macrumors newbie
Jul 16, 2010
1
0
Hi all,

I have been goign throught these threads to update my apple tv. I just wanted to say that I bought an adapter from ebay "$10 delivered" which is working.

The adapter is a hxsata-ide. I think it is the main one on ebay. This is what it looks like

http://cgi.ebay.com.au/7-15-Serial-..._Components&hash=item2a07465f2d#ht_3092wt_940

I also found a tutorial in google code on how to backup and restore the apple tv. They have a section on how to restore the apple tv from scratch which I used.

First you create a bootable USB using this
http://code.google.com/p/atv-bootloader/

Then you can do a restore using this tutorial:
http://code.google.com/p/atv-bootloader/wiki/ATVBackup

See on the bottom on how to create a restore from scratch. I actually used it a couple of times already and I just put the HDD I have "even with data in it" and do everything from telnet. You need to do that over a ethernet cable as it won't work with wireless.

The other thing to consider is the way you use "dd". the tutorial only shows the main drives of the apple tv"80 and 160". bascially the first 2 partitions are the same and you justy need to ajust the fourth one

Code:
# 4-Media
parted -s /dev/sda mkpart primary HFS 2732016s 77878015s

you just need to ajust the last value with your hard drive "77878015s".

The only issue is that I squeezed the lot back in and it does not close properly. I just need not to get a short 7+15 sata cable and I Should be able to put back everything the way it was and find a spot for that adapter.

if anyone can recomend a cheap short cable from ebay that would be great.

K.
 

kaliraver

macrumors newbie
Sep 7, 2010
4
0
Da BaY, CA
Success!

Hello, this is my first post on this forum and just wanted to thank everyone who has shared their information on how to install a SATA hard drive into an ATV. I successfully managed to install a 750GB hard drive into my ATV (originally 40GB). I ended up ordering the Brando IDE to SATA adapter and also the SATA power and data 8 inch cable from CPUstuff.com. I ended up setting it up like how nathanjbrown installed it on his ATV. I ended up taping (Scotch black electrical tape rated for 200F) the bottom of the ATV where the adapter might make contact with the case and also taped the ends where the adapter was connecting to the SATA power and data extender. I ended up also breaking the extra pin that was on the brando adapter as well since it's just extra. I also cloned my old HD using the instructions provided on iClarified's website and that worked out great for me, super easy actually. So again many thanks to everyone who helped out, I am now a proud owner of a 750GB :apple:TV :cool:
 

kaliraver

macrumors newbie
Sep 7, 2010
4
0
Da BaY, CA
That's great to hear. So all you needed was the bridge and the SATA extender cable? Is this the order of items:

1. ATV IDE interface
2. ATV IDE ribbon cable
3. Brandon IDE>SATA bridge
4. CPU Stuff SATA extender
5. 750 gb 2.5" SATA drive

Yup, exactly how I connected it and yes Cave Man those are the only parts I bought besides the HD. It worked from the very first time I plugged in everything. No yellow light or anything, loving this set up :D BTW, it seems like the ATV is actually running much faster with the new hard drive even though it's a 5400 RPM Western Digital HD. This is the hard drive I purchased as well that I bought from newegg.com; Western Digital Scorpio Blue WD7500BPVT.
 
Register on MacRumors! This sidebar will go away, and you'll see fewer ads.