Guys,
in THIS thread, there is a discussion of the need for optimization. It was there that I've noticed I haven't even posted my optimization tutorials here at MR. Now it's here. Hope you'll find it useful.
The first post discusses the optimization process itself; the second one the way you can quickly find out whether a particular MOV (mp4 / m4v) file is optimized.
Tutorial & benchmarks: optimizing your MP4 (MOV / M4V) video files + Apple TV 3 streaming tips
You may already have noticed the word “Optimize” in the most popular video remuxing tools: Subler, iFlicks etc. In this article, I elaborate on when you will want to use it.
Some apps like the above-mentioned iFlicks doesn't let you disable it. Neither does the current beta of another highly recommended remuxer, MP4Tools. The, currently, probably most recommended remuxer, Subler, however, forces you to manually optimize if you want.
The reason for this is that Subler is much more than “only” a plain remuxer. With it, you can add (and remove) any track to / from the file. For example, it was with Subler that I've added an AC3 and, then, in another step, a downmixed AAC audio track to the originally no-audio Birds test video (original one) used below.
A sidetrack: How you can add audio to MP4 (MOV / M4V) files, you may ask. I took the 2:18 .AC3 file, originally exported from the MKV by MKVTools in exactly the same way as exporting BD subtracks. For slicing the original Avatar MKV into 2:18-long parts, I used Mkvtoolnix in its Global > Splitting > Enable Splitting mode. Nevertheless, there are tons of other MKV editors or handlers capable of slicing an MKV file into slices of predefined length; for example, the above-mentioned MKVTools.
To add an (additional) audio (or any) track to an MP4 file with Subler, just open (File > Open) the target file you'd like to add the new track to, click “+”, select the new track to be added and, in the “Action” column, select what should be done to the info you're importing. With an AC3 audio track, you basically have two choices: keep it as AC3 (“Passthru”) or downmix it to AAC (with selectable target channel configuration). By repeating the same step (+ and selecting the same input file), you can add the same audio file using different target audio formats: for example, both as AC3 and AAC. Just remember to change the “Action” entry. Now, however, back to the main subject.
If you add any new track, however small it may be, to a file, it becomes unoptimized (if it was optimized before). To optimize it again, even high-end configurations need some time. For example, optimizing my direct Iron Sky BD rip (16 Gbytes) took 5m:30s on my late 2009 2.8 GHz 17” MBP with ML and a 256GByte Vertex 4 SSD as both the source and target disk with Subler. Subler doesn't force you to always do this step; in this way, makes work like adding new sound / subtitle tracks very-very fast. With mandatory re-optimization, its processing speed would suffer a lot.
Do you need to optimize at all?!
As a rule of thumb, you won't want to use optimization if you never stream your videos over your home network or over the Internet (by, say, placing your video file on your homepage – not to be mistaken for YouTube / Vimeo-hosted videos!) and never burn/copy them to optical or mechanical hard disc/ks to be watched from there. Local playback from local flash (solid-state) memory, let it be the storage of an iPad or iPhone or an SSD (non-mechanical) hard disk in your desktop computer, will be as efficient without optimization as with it.
In all other cases you will want to optimize; that is,
- when you stream it in any way, including playing it back on an Apple TV
- if you plan to play it back from an optical drive (or, to a lesser degree, mechanical hard disk).
Optimizing in Subler
As has already been explained, other well-known remuxers like iFlicks and MP4Tools always optimize your videos. Not so with Subler, where it's another, separate step.
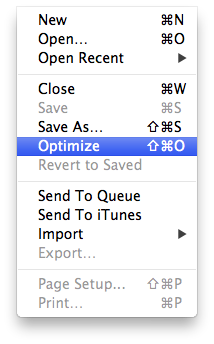
Basically, if you open an MP4 (MOV / M4V) file (or open an MKV file and save it so that it's remuxed into MP4/M4V), you can optimize it via File > Optimize:
![59dad53b1037b9b8403b5fb8af0530e4-214x344.png]()
If it's deactivated, you either don't have the necessary free disk space on your target disk or have opened an MKV file and still haven't saved it as an MP4.
If you use the queued mode, optimizing is enabled by default. Should you want to disable it, click the arrow pointing downwards (the opposite of the annotated “upwards” arrow in the next screenshot) and deselect the “Optimize” checkbox (also annotated):
![12a1b3a9433dbf2745082fd86369b6bf-573x602.png]()
Benchmarks
I've run tons of benchmarks on both iOS devices (in this case, an iPad 3) and the Apple TV 3 to find out how much optimizing videos help in reducing startup times.
In every single case, optimization has resulted in measurable gains – between 9% and 30-40% in general; in a single case, even more (but with additional buffering during playback – see below).
For the tests, I've used the following videos (I also provide you with them so that you can play with them yourself, feed them to your ATV / iDevice etc):
1.) A 31 Mbyte slice of a direct Iron Sky rip with a 22 Mbps video stream to check 3G and Wi-Fi Web streaming to the iPad 3 in Safari
Optimized:
3G: 1:15 (after preloading it to about 60%)
Wifi: 1:18
Non-optimized:
3G: 1:24, also starts at 60%
Wi-Fi: 1:25
As you can see, with this video, the playback of the optimized version is started 9% earlier.
2.) my standard 60fps benchmark counter video (see THIS) with a very low video bitrate, making it much-much easier to play back even over slow connections; also streaming to the iPad 3; now, only via 3G:
Optimized:
3G: 0:18, 0:16 (measured twice)
Non-optimized:
3G: 0:26, 0:24 (measured twice)
As you can see, when streaming to Web browsers, there is a fast-start advantage to optimizing.
Now, let's take a look at streaming over the local network to the AppleTV 3 and the iPad 3.
3,) a 704 Mbyte m4v file with a 40 Mbps video track + and two audio tracks totalling 500 kbps. (Basically, the video is the standardized Birds benchmark video joined together.)
Non-optimized version (the one I linked to):
Cabled (Ethernet) ATV3, streaming from a late 2009 17” MBP on Wi-Fi, using Home Sharing: 2:50, 3:04 (measured twice) to pre-buffer
Both ATV3 and MBP cabled: 2:13, 2:18
Optimized (after having optimized it in Subler):
Both ATV3 and MBP cabled: 0:09, but stopped at 0:08, 0:56, 1:27, 2:19 for further buffering - no additional buffering happened with the non-optimized version. This was the only case I've found the optimized versions' resulting in a worse user experience than the non-optimized ones – after all, it's much more acceptable to wait a little bit longer before starting playback for buffering than several times during it. Nevertheless, should you encounter the same problem, just pause playback for some time at startup so that the ATV can do some additional buffering, making later pauses more rare, if at all. That is, even if you may encounter this problem, you can always easily fix it with a manual pause.
(Also see THIS post with my results.)
As you can see, there is only about 27% time difference between the cases of the MBP being connected to the access point via Wi-Fi or Ethernet. Connecting the ATV3 via Wi-Fi (as opposed to a cabled Ethernet connection), however, to the same access point, independent of the way the stream source MBP is connected, would have resulted in astonishingly bad loading speed and times – the ATV3 seems to have a particularly ineffective / bad Wi-Fi module; far worse than that of, say, the iPad 3.
Speaking of the iPad 3, I've re-run the tests with it, streaming to it via the same Home Sharing in exactly the same circumstances as I've done to the ATV3. That is, I've placed the iPad to exactly the same location where the ATV3 produced dismal (pretty much useless) streaming “performance”. The results are as follows: the iPad 3 started the playback of the optimized video at 1:45 / 2:15 (measured twice). However, it buffered long (for several minutes) after 3:40. Nevertheless, it still produced way superior streaming results to the Apple TV, which really shouldn't be used over wireless. (At least not with my access point – a Linksys WRT320N. Other AP's may behave better.)
Of special interest is the iPad 3's playback (over the same Wi-Fi connection, also in the same stock Video player, streaming from the iTunes via Home Sharing from my MBP) of the non-optimized version of the same video. While the optimized version was played back pretty well (apart from some frame delays, to which I'll devote to another article, along with the bitrate and fps restrictions of the ATV3), the non-optimized version of the same video (the one I have on Dropbox) couldn't be played back with more than 1-2 fps on average. Read: it stuttered really-really bad.
Interestingly, I haven't encountered such problems with the non-optimized version of the same high-bitrate video on my ATV3.
Additional threads
We're having a VERY interesting discussion on the video bitrate playback capabilities of the ATV3 HERE. Again, I'll dedicate an entire article to these questions; in the meantime, however, feel free to check out the discussion.
UPDATE (06/Oct/2012): if you remove an existing track from a MP4 file using Subler using the second, "Stop" icon on the toolbar, the storage taken by the removed track won't be freed up - that is, the size of the file will remain the same. This may mean some 200-300 Mbytes with a regular, say, 448 kbps AC-3 track. You'll need to optimize the video file to regain the storage and make the file smaller.
in THIS thread, there is a discussion of the need for optimization. It was there that I've noticed I haven't even posted my optimization tutorials here at MR. Now it's here. Hope you'll find it useful.
The first post discusses the optimization process itself; the second one the way you can quickly find out whether a particular MOV (mp4 / m4v) file is optimized.
Tutorial & benchmarks: optimizing your MP4 (MOV / M4V) video files + Apple TV 3 streaming tips
You may already have noticed the word “Optimize” in the most popular video remuxing tools: Subler, iFlicks etc. In this article, I elaborate on when you will want to use it.
Some apps like the above-mentioned iFlicks doesn't let you disable it. Neither does the current beta of another highly recommended remuxer, MP4Tools. The, currently, probably most recommended remuxer, Subler, however, forces you to manually optimize if you want.
The reason for this is that Subler is much more than “only” a plain remuxer. With it, you can add (and remove) any track to / from the file. For example, it was with Subler that I've added an AC3 and, then, in another step, a downmixed AAC audio track to the originally no-audio Birds test video (original one) used below.
A sidetrack: How you can add audio to MP4 (MOV / M4V) files, you may ask. I took the 2:18 .AC3 file, originally exported from the MKV by MKVTools in exactly the same way as exporting BD subtracks. For slicing the original Avatar MKV into 2:18-long parts, I used Mkvtoolnix in its Global > Splitting > Enable Splitting mode. Nevertheless, there are tons of other MKV editors or handlers capable of slicing an MKV file into slices of predefined length; for example, the above-mentioned MKVTools.
To add an (additional) audio (or any) track to an MP4 file with Subler, just open (File > Open) the target file you'd like to add the new track to, click “+”, select the new track to be added and, in the “Action” column, select what should be done to the info you're importing. With an AC3 audio track, you basically have two choices: keep it as AC3 (“Passthru”) or downmix it to AAC (with selectable target channel configuration). By repeating the same step (+ and selecting the same input file), you can add the same audio file using different target audio formats: for example, both as AC3 and AAC. Just remember to change the “Action” entry. Now, however, back to the main subject.
If you add any new track, however small it may be, to a file, it becomes unoptimized (if it was optimized before). To optimize it again, even high-end configurations need some time. For example, optimizing my direct Iron Sky BD rip (16 Gbytes) took 5m:30s on my late 2009 2.8 GHz 17” MBP with ML and a 256GByte Vertex 4 SSD as both the source and target disk with Subler. Subler doesn't force you to always do this step; in this way, makes work like adding new sound / subtitle tracks very-very fast. With mandatory re-optimization, its processing speed would suffer a lot.
Do you need to optimize at all?!
As a rule of thumb, you won't want to use optimization if you never stream your videos over your home network or over the Internet (by, say, placing your video file on your homepage – not to be mistaken for YouTube / Vimeo-hosted videos!) and never burn/copy them to optical or mechanical hard disc/ks to be watched from there. Local playback from local flash (solid-state) memory, let it be the storage of an iPad or iPhone or an SSD (non-mechanical) hard disk in your desktop computer, will be as efficient without optimization as with it.
In all other cases you will want to optimize; that is,
- when you stream it in any way, including playing it back on an Apple TV
- if you plan to play it back from an optical drive (or, to a lesser degree, mechanical hard disk).
Optimizing in Subler
As has already been explained, other well-known remuxers like iFlicks and MP4Tools always optimize your videos. Not so with Subler, where it's another, separate step.
Basically, if you open an MP4 (MOV / M4V) file (or open an MKV file and save it so that it's remuxed into MP4/M4V), you can optimize it via File > Optimize:
If it's deactivated, you either don't have the necessary free disk space on your target disk or have opened an MKV file and still haven't saved it as an MP4.
If you use the queued mode, optimizing is enabled by default. Should you want to disable it, click the arrow pointing downwards (the opposite of the annotated “upwards” arrow in the next screenshot) and deselect the “Optimize” checkbox (also annotated):

Benchmarks
I've run tons of benchmarks on both iOS devices (in this case, an iPad 3) and the Apple TV 3 to find out how much optimizing videos help in reducing startup times.
In every single case, optimization has resulted in measurable gains – between 9% and 30-40% in general; in a single case, even more (but with additional buffering during playback – see below).
For the tests, I've used the following videos (I also provide you with them so that you can play with them yourself, feed them to your ATV / iDevice etc):
1.) A 31 Mbyte slice of a direct Iron Sky rip with a 22 Mbps video stream to check 3G and Wi-Fi Web streaming to the iPad 3 in Safari
Optimized:
3G: 1:15 (after preloading it to about 60%)
Wifi: 1:18
Non-optimized:
3G: 1:24, also starts at 60%
Wi-Fi: 1:25
As you can see, with this video, the playback of the optimized version is started 9% earlier.
2.) my standard 60fps benchmark counter video (see THIS) with a very low video bitrate, making it much-much easier to play back even over slow connections; also streaming to the iPad 3; now, only via 3G:
Optimized:
3G: 0:18, 0:16 (measured twice)
Non-optimized:
3G: 0:26, 0:24 (measured twice)
As you can see, when streaming to Web browsers, there is a fast-start advantage to optimizing.
Now, let's take a look at streaming over the local network to the AppleTV 3 and the iPad 3.
3,) a 704 Mbyte m4v file with a 40 Mbps video track + and two audio tracks totalling 500 kbps. (Basically, the video is the standardized Birds benchmark video joined together.)
Non-optimized version (the one I linked to):
Cabled (Ethernet) ATV3, streaming from a late 2009 17” MBP on Wi-Fi, using Home Sharing: 2:50, 3:04 (measured twice) to pre-buffer
Both ATV3 and MBP cabled: 2:13, 2:18
Optimized (after having optimized it in Subler):
Both ATV3 and MBP cabled: 0:09, but stopped at 0:08, 0:56, 1:27, 2:19 for further buffering - no additional buffering happened with the non-optimized version. This was the only case I've found the optimized versions' resulting in a worse user experience than the non-optimized ones – after all, it's much more acceptable to wait a little bit longer before starting playback for buffering than several times during it. Nevertheless, should you encounter the same problem, just pause playback for some time at startup so that the ATV can do some additional buffering, making later pauses more rare, if at all. That is, even if you may encounter this problem, you can always easily fix it with a manual pause.
(Also see THIS post with my results.)
As you can see, there is only about 27% time difference between the cases of the MBP being connected to the access point via Wi-Fi or Ethernet. Connecting the ATV3 via Wi-Fi (as opposed to a cabled Ethernet connection), however, to the same access point, independent of the way the stream source MBP is connected, would have resulted in astonishingly bad loading speed and times – the ATV3 seems to have a particularly ineffective / bad Wi-Fi module; far worse than that of, say, the iPad 3.
Speaking of the iPad 3, I've re-run the tests with it, streaming to it via the same Home Sharing in exactly the same circumstances as I've done to the ATV3. That is, I've placed the iPad to exactly the same location where the ATV3 produced dismal (pretty much useless) streaming “performance”. The results are as follows: the iPad 3 started the playback of the optimized video at 1:45 / 2:15 (measured twice). However, it buffered long (for several minutes) after 3:40. Nevertheless, it still produced way superior streaming results to the Apple TV, which really shouldn't be used over wireless. (At least not with my access point – a Linksys WRT320N. Other AP's may behave better.)
Of special interest is the iPad 3's playback (over the same Wi-Fi connection, also in the same stock Video player, streaming from the iTunes via Home Sharing from my MBP) of the non-optimized version of the same video. While the optimized version was played back pretty well (apart from some frame delays, to which I'll devote to another article, along with the bitrate and fps restrictions of the ATV3), the non-optimized version of the same video (the one I have on Dropbox) couldn't be played back with more than 1-2 fps on average. Read: it stuttered really-really bad.
Interestingly, I haven't encountered such problems with the non-optimized version of the same high-bitrate video on my ATV3.
Additional threads
We're having a VERY interesting discussion on the video bitrate playback capabilities of the ATV3 HERE. Again, I'll dedicate an entire article to these questions; in the meantime, however, feel free to check out the discussion.
UPDATE (06/Oct/2012): if you remove an existing track from a MP4 file using Subler using the second, "Stop" icon on the toolbar, the storage taken by the removed track won't be freed up - that is, the size of the file will remain the same. This may mean some 200-300 Mbytes with a regular, say, 448 kbps AC-3 track. You'll need to optimize the video file to regain the storage and make the file smaller.
Last edited:


