Become a MacRumors Supporter for $50/year with no ads, ability to filter front page stories, and private forums.

Enric

macrumors newbie
Original poster
Jul 30, 2013
19
2
Geneva, Switzerland
Hi everybody! this is my first post here!

I just got a defect mac classic II and I am in the process fixing it (at least trying to).
I removed the logic board. As expected, the capacitors have leaked. But worse than that, the battery also leaked and produced some oxidation.
So I unsoldered the battery support and ordered a new one (as well as a new battery and a complete set of tantalium capacitors...). The oxydation under the battery support was quite easy to clean. Some work with a magnifying glass remains to be done here:


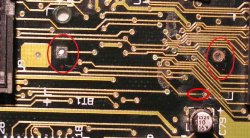
The two battery connection points are annotated with a red circle.
Now the back of the logic board:


My problem is that I do not see were the "-" connection goes... it is alone. Is some wire missing here ? (=totally destructed by oxidation), particularly on the back side ?

Many thanks for advices!
 

Enric

macrumors newbie
Original poster
Jul 30, 2013
19
2
Geneva, Switzerland
Thanks, but including the shipping costs, even for europa, would not be that cheap...
And fixing the one I got is part of the fun!

I should precise that the logic board version is the one that have only two rom chips (not four).

For the whole story, the first time I powered up this Mac, it displayed four vertical bars (famous jail bar pattern). Then I removed the oxidized battery as well as its support and made some cleaning of the whole board. I then triyed powering it up again. It did not display the jail bar pattern anymore, but a uniform white screen (but still no statrup sound).

The battery "-" connection point which is alone on both side of the PCB is really strange. It would be nice If someone that own this version of the board could have a look at this.

Maybe a wire to the end of "L11" (back side) is missing... there is also another oxidized connection point on the upper left relative to the "-" connection point ...
 

MacTech68

macrumors 68020
Mar 16, 2008
2,393
209
Australia, Perth
The negative connection for the battery will be connected to a ground plane that is sandwiched inside the circuit board. These are multi-layered PCBs, and often common voltage rails are part of the layers that you can't see.

The only track I would be a little concerned about I have circled in the attached image. Where the copper colored tracks look black is a bad sign, and these need to be checked for continuity. If you find a break, you can bridge it with prototyping wire at more easily accessible locations, such as the thru-holes on either side of the break.
 

Attachments

  • PCB etch.jpg
    PCB etch.jpg
    48.1 KB · Views: 230

Enric

macrumors newbie
Original poster
Jul 30, 2013
19
2
Geneva, Switzerland
Many thanks for the information! I wasn't expecting at all a sandwiched plane... there is indeed connectivity between the "-" connection point and the external metal of the rear connectors. So one of my concerns is solved.

Concerning the oxidized track you pointed out, there is indeed no continuity between the two flanking holes. I will then bridge them. With some luck, this will maybe allows the mac to start...
 

MacTech68

macrumors 68020
Mar 16, 2008
2,393
209
Australia, Perth
Many thanks for the information! I wasn't expecting at all a sandwiched plane... there is indeed connectivity between the "-" connection point and the external metal of the rear connectors. So one of my concerns is solved.

Concerning the oxidized track you pointed out, there is indeed no continuity between the two flanking holes. I will then bridge them. With some luck, this will maybe allows the mac to start...

You may find the same oxidized/etched tracks underneath or near leaked capacitors too.

I once did a Mac IIcx that required about 12 tracks to be bridged. A good light and a magnifying lens can help to spot them.

Hope it works out! :)
 

Enric

macrumors newbie
Original poster
Jul 30, 2013
19
2
Geneva, Switzerland
There is indeed at least one more track than need to be bridged (the hole that is up-left to the one you pointed out).

However, I was not able to solder a wire to the hole you pointed out. Despite a magnifying lens and an appropriate soldering iron, the melting do not attach to this point. Do you have any advice regarding this ? May I try to the corresponding hole on the opposite size of the board ?
 

MacTech68

macrumors 68020
Mar 16, 2008
2,393
209
Australia, Perth
There is indeed at least one more track than need to be bridged (the hole that is up-left to the one you pointed out).

However, I was not able to solder a wire to the hole you pointed out. Despite a magnifying lens and an appropriate soldering iron, the melting do not attach to this point. Do you have any advice regarding this ? May I try to the corresponding hole on the opposite size of the board ?

Yes, you certainly can. It's tedious work, but rewarding when she powers up. Hopefully that's the last one.
 

Enric

macrumors newbie
Original poster
Jul 30, 2013
19
2
Geneva, Switzerland
It was far more easy soldering the bridge on the rear side.
This allowed the mac power up with the start sound and to boot the system 7!

However, I did not see any happy mac during booting, and once the system started, there was some chirping-creacky sound (not always).

After a couple of minutes, the system hanged (system error) and after a reboot attempt... the jail pattern again...

So, let's replace the caps now!
 

MacTech68

macrumors 68020
Mar 16, 2008
2,393
209
Australia, Perth
Cool!

It doesn't really matter where the bridging wire is, though it's usually a good idea to run it adjacent to the broken track and making it a similar length.

The caps should solve the other problem now.

Anticipation builds. :)
 
Register on MacRumors! This sidebar will go away, and you'll see fewer ads.