Update: Announcing "Apple WIIe"!
Ultimately I found the Pi a little too slow on some emulators (particularly LinApple sadly), and overly complex to get working. I therefore say to you...
Welcome to Apple WIIe
An Apple //e concealing a hacked Nintendo Wii emulating... an Apple //e!
Video of turning on the Apple //e with the Wiimote:
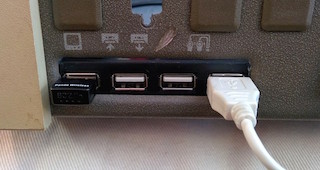
This is largely the same concept as my Raspberry "Apple Piie", however I have taken the same USB keyboard adapter from the //e but this time connected it to a Nintendo Wii:
![Apple%20WIIe.jpg]()
With the HDMI adapter it sits a little better if placed diagonally in the box. The power brick also fits in there, just like with the original Apple //e!
The processor is better than the Pi, so the //e emulator (WinApple) works much better!
![IMG_20140605_132917.jpg]()
Mmm, Option 11 please!
Shopping list:
- Apple //e case
- Apple //e keyboard > USB adapter: https://www.tindie.com/products/option8/retroconnector-keyboard-shield-for-apple-iie/
- Nintendo Wii
- SD Card (recommend 16GB)
- Optional Wii > HDMI adapter (see picture above)
- Optional USB hub if you want to add peripherals/USB drive/IIe joystick adapter: http://www.amazon.com/gp/product/B0...=as2&tag=secure0dd-20&linkId=O4RMMMEJNGWUFIFL
- Optional 3.5mm jack if you want to connect the HDMI adapter to the Apple //e case's speaker (as per Apple Piie)
- LetterBomb Hack (incl. HackMii installer & Homebrew Channel): http://please.hackmii.com/
- Homebrew Browser: http://wiibrew.org/wiki/Homebrew_Browser
![IMG_20140605_132942.jpg]()
Instructions:
- Find your Wii MAC address within Wii network settings
- Enter it at the LetterBomb download page (above)
- Download & copy LetterBomb Hack files to root of a blank SD card
- Place SD card in Wii
- Go to Wii messages and the hack message will soon appear, so just open it and enjoy!
- Put Homebrew Browser on the SD card (using PC again) and then open it from Homebrew Channel
- Install the emulators you want from Homebrew Browser incl. of course "WiiApple"
- I recommend also installing WiiXplorer which lets you click "Start > FTP Server" then access your SD card over your Wi-Fi using Cyberduck or similar. Yup, this //e has Wi-Fi too!
- Copy the Apple .dsk files to the SD card (to browse from them, hit "3" on the //e keyboard which emulates "F3")
![IMG_20140502_154149.jpg]()
As shown in the video above, the Wiimote is able to 'turn on' the //e because really the Wii is just supplying power to the USB connector that powers the keyboard, and so the keyboard light! I thought that was pretty cool – a remote control Apple //e ;-)
![IMG_20140503_103911.jpg]()
Any questions let me know!
Ultimately I found the Pi a little too slow on some emulators (particularly LinApple sadly), and overly complex to get working. I therefore say to you...
Welcome to
Apple WIIeAn Apple //e concealing a hacked Nintendo Wii emulating... an Apple //e!
Video of turning on the Apple //e with the Wiimote:
This is largely the same concept as my Raspberry "Apple Piie", however I have taken the same USB keyboard adapter from the //e but this time connected it to a Nintendo Wii:

With the HDMI adapter it sits a little better if placed diagonally in the box. The power brick also fits in there, just like with the original Apple //e!
The processor is better than the Pi, so the //e emulator (WinApple) works much better!

Mmm, Option 11 please!
Shopping list:
- Apple //e case
- Apple //e keyboard > USB adapter: https://www.tindie.com/products/option8/retroconnector-keyboard-shield-for-apple-iie/
- Nintendo Wii
- SD Card (recommend 16GB)
- Optional Wii > HDMI adapter (see picture above)
- Optional USB hub if you want to add peripherals/USB drive/IIe joystick adapter: http://www.amazon.com/gp/product/B0...=as2&tag=secure0dd-20&linkId=O4RMMMEJNGWUFIFL
- Optional 3.5mm jack if you want to connect the HDMI adapter to the Apple //e case's speaker (as per Apple Piie)
- LetterBomb Hack (incl. HackMii installer & Homebrew Channel): http://please.hackmii.com/
- Homebrew Browser: http://wiibrew.org/wiki/Homebrew_Browser

Instructions:
- Find your Wii MAC address within Wii network settings
- Enter it at the LetterBomb download page (above)
- Download & copy LetterBomb Hack files to root of a blank SD card
- Place SD card in Wii
- Go to Wii messages and the hack message will soon appear, so just open it and enjoy!
- Put Homebrew Browser on the SD card (using PC again) and then open it from Homebrew Channel
- Install the emulators you want from Homebrew Browser incl. of course "WiiApple"
- I recommend also installing WiiXplorer which lets you click "Start > FTP Server" then access your SD card over your Wi-Fi using Cyberduck or similar. Yup, this //e has Wi-Fi too!
- Copy the Apple .dsk files to the SD card (to browse from them, hit "3" on the //e keyboard which emulates "F3")
As shown in the video above, the Wiimote is able to 'turn on' the //e because really the Wii is just supplying power to the USB connector that powers the keyboard, and so the keyboard light! I thought that was pretty cool – a remote control Apple //e ;-)

Any questions let me know!
Last edited:
")
 I hope this continues to invigorate interest in restoring vintage computers!
 ️
️

