I'm trying to remove the front fan assembly on the 2006 Mac Pro and it's giving me a hard time. The top part near the screw popped out easy but the bottom is stuck. I'm not sure how much force to use or in which direction to pull, straight out of the case (2) or upwards toward the hard drive bays (1)? I tried easing it in both directions but it won't budge. Thanks.
Become a MacRumors Supporter for $50/year with no ads, ability to filter front page stories, and private forums.
Removing front fan assembly on Mac Pro
- Thread starter dbv
- Start date
- Sort by reaction score
You are using an out of date browser. It may not display this or other websites correctly.
You should upgrade or use an alternative browser.
You should upgrade or use an alternative browser.
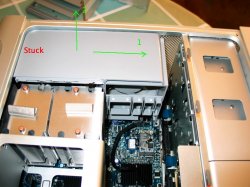
You need something like a PCI slot-cover to use as a puller. Tuck the short bit under the plastic at the top-right of your photo and give it a good (but not excessive) tug in direction (2). As long as you've removed the screw, it should pop out OK.
Thanks. I already did that. The top right (near the screw) is completely lose already. Something is holding it on the other end. Where are those clips exactly? Is there one where I marked 'stuck'?
edit: never mind, it's out. It just needed a good forceful tug. I love plastic latches. Thanks.
edit: never mind, it's out. It just needed a good forceful tug. I love plastic latches. Thanks.
Ooops!
For anyone who comes to this thread in future, I meant the top left of the photo...
Sorry for any confusion.
For anyone who comes to this thread in future, I meant the top left of the photo...
Sorry for any confusion.
Maybe I should mention in case someone finds this that there is a rail on the left side where it was stuck. It's kind of tight but the assembly slides straight out (2) after unlatching it on the right. Not really difficult at all, if you've done it once.
Mac Pro Fan Assembly Removal
I spent quite some time going over this yesterday trying to add a new SATA optical drive to my Mac Pro (early 2008). On the 8 core models, there is a screw on the left side of your picture as well.
To get to it, you need to remove the CPU cover. You do not have to do anything to the RAM risers or assembly, just leave them alone. To remove the CPU cover, reach down toward the motherboard and grab the lip of the cover. Gently pull outward, then up, and it should come right off, exposing the heatsinks for the CPUs. The other screw it tucked under the lip of the fan assembly. You will probably have to get close to the computer to see it, but it's pretty obvious. Once this screw is out, along with the one on the motherboard, then the fan assembly gently comes out.
I shredded my fingers and probably came close to breaking my computer trying to yank the dang thing out before removing this screw. I found some documentation on Apple's site about adding a RAID card and it described this process for removing the fan assembly.
I'd be happy to post a video tutorial on my site if anyone is interested.
Err.. We know about the screw, thanks.
From the OP:
and from post 2:
and from post 3:
Or are you saying there's a second screw on the later model?
*edit* Ah, that is what you meant. Sorry.
From the OP:
*snip*
The top part near the screw popped out easy...
*snip*
and from post 2:
*snip*
(2). As long as you've removed the screw, it should pop out OK.
and from post 3:
Thanks. I already did that. The top right (near the screw) is completely lose (sic) already.
*snip*
Or are you saying there's a second screw on the later model?
*edit* Ah, that is what you meant. Sorry.
Hey Cal,
Per your edit, I assume that you know that I do not mean the screw that attaches to the motherboard, but a new one, I believe, that screws to the lowermost heatsink (for the second CPU). I think this was added in the early 2008 edition of the Mac Pro, which is why it wasn't discussed earlier. I just wanted to post it since this listing comes up in Google searches on the subject. Since I was one of the readers of the post, I figured I would help future upgraders with that model Mac Pro as well.
Since there isn't much mention for people trying to update the early 2008 model Mac Pro, I'm videoing a tutorial now to place on youtube for this very reason.
-Scott
I found some documentation on Apple's site about adding a RAID card and it described this process for removing the fan assembly.
The RAID card installation is the clearest with lots of pictures.
The link is here
As promised, I posted a video for removing the fan assembly in a Mac Pro (early 2008) model. This will hopefully help a few of you out there.
Click here to view it.
Click here to view it.
El truco es que el ventilador debe salir casi perfectamente recto, eso es muy dificil solo con dos manos.
En mi experiencia, le puse una placa de las cubre slot entre el "ventilador" y el "frente" del chasis(para evitar que se desvie hacia adelante el ventilador) y voala, al hacer fuerza , ahora si salio derecho y sin tanta fuerza (solo la suficiente)
The trick is that the fan should come out almost perfectly straight, that is very difficult with just two hands.
In my experience, I put a plate of the slot covers between the "fan" and the "front" of the chassis (to prevent the fan from going forward) and voala, when doing force, now if it went straight and without so much force (only enough)
Hey Cal,
Per your edit, I assume that you know that I do not mean the screw that attaches to the motherboard, but a new one, I believe, that screws to the lowermost heatsink (for the second CPU). I think this was added in the early 2008 edition of the Mac Pro, which is why it wasn't discussed earlier.
-Scott
Scott, your hints about the second screw were absolutely critical!
I just completed a task on a Mac Pro 3,1, early 2008, A1186; I installed a pair of SSDs in the optical bay. This required running a pair of SATA cables from the motherboard to the optical bay, which in turn required removing the front fan assembly.
On this model, I didn’t have to do anything with the RAM cage as directed in some instructions. I removed the screw that fastens the fan assembly to the motherboard, and I removed the CPU cover (fastened with magnets — just pull and it comes off), Removing the CPU cover reveals another screw right at the corner between the heat sink and the fan assembly. After both screws are removed, the fan assembly comes off easily.
Several of the hints indicate that you just have to pull harder to get the fan assembly out after removing the mother board screw. Take care! Be sure and remove the second screw.
Once I got that screw out, the fan lifted out easily.
For later models, this step will be unnecessary, since later models have the SATA cables already installed to the optical bay. "Those people" with their new-fangled modern 2009+ Mac Pros won't even look at this page!
Not answered: Are the IDE cables still present in the later models, or have they been removed? If Apple replaced the IDE optical drive with a SATA drive (requiring the SATA cables), then you'll face the question of whether to sacrifice your optical to get a second SSD into the optical bay.
Last edited:
Thanks mate, spent about a day screwing around with the stupid thing and watching loads of youtube tutorials to try get it out but this is the only thing that worked, thanks bro, have a great dayYou need something like a PCI slot-cover to use as a puller. Tuck the short bit under the plastic at the top-right of your photo and give it a good (but not excessive) tug in direction (2). As long as you've removed the screw, it should pop out OK.
Hi, I've found the screw in question, but it's the devils own job to get it out! I've been trying for about 30 mins but it just won't turn. If I drill it out will it cause any damage other than the screw and the plastic of the fan assembly?
Last edited:
Register on MacRumors! This sidebar will go away, and you'll see fewer ads.