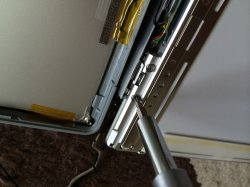
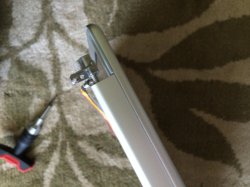
After recently getting a PowerBook that had a hinge that was loose on one side along with major heat issues, I decided I should do it all in one repair job. For this guide to be useful, your hinge must have play between the LCD and clutch cover assembly. Start by opening and closing your display slowly and see if a gap forms between the clutch cover and the bottom of the LCD bezel. If it does, this guide is for you. Just a side note, this guide is not for the faint of heart or those who have low patience with repairs. It is very difficult and a hard to do.
The tools necessary are going to be a Phillips 0, Phillips 00, Torx T6, and a Torx T8 screw driver. You will also need a spudger, a guitar pick, an old credit or debit card, coffee filters, and at least 90% isopropyll alcohol. It is also necessary to have a fresh thermal pad and at least a tube of quality thermal paste like Artic Silver 5 or Ceramique 2.
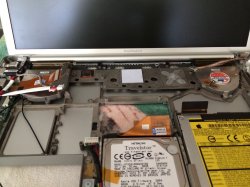
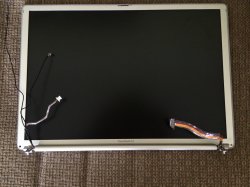
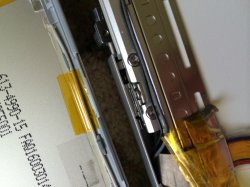
Start by following iFixit's guide to removing the display assembly itself. It will come out as one part. With the display assembly removed, find a soft carpet in your home. It is best to sit on the floor so that you do not risk scratching the aluminum parts. Begin by removing the Torx T6 screws at the bottom of the display assembly. Then insert the guitar pick and begin going around the assembly to remove the rear panel. You want the top to come off first as there are taped on wires at the bottom. Do not separate the back portion from the front at the bottom. Using the guitar pick and credit card, go around the assmembly until the clips are all undone. In my experience, one corner will be hard to maneuver around, so you just need to keep trying and take your time. Resist the urge to jerk it off as the clips are rather delicate. You want to keep your metal spudger away as you do not want to scratch the aluminum parts.
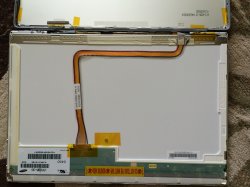
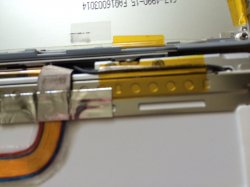
Once you are inside you can tighten the Torx screws. Do not over torque them as you risk damage to the LCD and LCD frame. Torque them until they are snug + 1/2 a turn. Repeat for all four Torx screws. Then re-snap together the display assembly while paying careful note to the rubber standoffs at the LCD latch and along the right and left side. When reinstalling the bottom Torx bits into the display assembly, do not torque them too tight that you would not be able to get them on an angle. If you ever need to repeat the repair, you do not want to remove the display assembly again. The screws do little result so just ensuring they are flush with the aluminum is just fine!
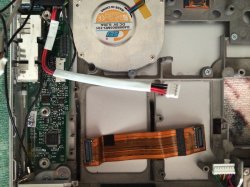
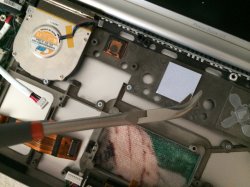
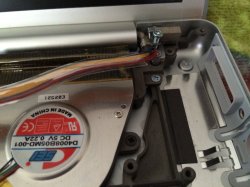
When reinstalling the display, be sure to insert the metal grounding screw onto the 10 MM Torx T8 screw on the right side. Be sure that your torque all of the four Torx screws that hold the hinge to the bottom case. You do not want your repair negated by poor hinge reinstallation. When you are ready to reinstall the Logic Board, replace the pad on the system controller and the paste on the heat sink for the GPU and CPU. For the GPU, according to the maunals sent to me by iMacC2D, you must make an X across the heat sink, with a line across the middle. The CPU gets the traditional pea shape. Since I did not have any pads and I had no choice to remove the controller's pad due to the poor condition from heat damage, I used a decent amount of paste. No issues here and I don't predict any due to the thin nature of the pad.
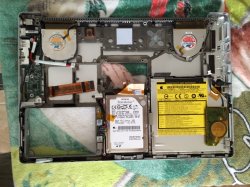
When reinstalling the top case, ensure the Bluetooth board that you removed when disconnecting the antenna is properly seated. You do not want to damage the board when reinstalling the top case. Also ensure all of the EMI gaskets are in place on top of the ports and ribbon cables if equipped originally when you put on the top case.
This problem is really common on older MacBook Pros and PowerBooks where the owners would always open and close the display by grabbing one side rather than the middle. Try to always open and close the screen by lifting and closing it in the middle by the latch. While a royal pain to do, I definitely enjoy the new tight hinge on my PowerBook.
Note that if you tilt the display back on some PowerBooks, you can remove the screws without taking off the display assembly. This greatly depends on the hinge's range of motion and may work for some. Some alternate directions and pictures for this method are available here!
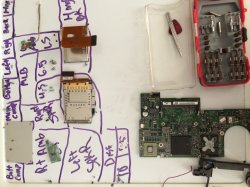
The picture of the white board is how I keep track of parts and screws when following the guide. I just wanted to include it to help others who have trouble keeping parts organized like I do.
The tools necessary are going to be a Phillips 0, Phillips 00, Torx T6, and a Torx T8 screw driver. You will also need a spudger, a guitar pick, an old credit or debit card, coffee filters, and at least 90% isopropyll alcohol. It is also necessary to have a fresh thermal pad and at least a tube of quality thermal paste like Artic Silver 5 or Ceramique 2.
Start by following iFixit's guide to removing the display assembly itself. It will come out as one part. With the display assembly removed, find a soft carpet in your home. It is best to sit on the floor so that you do not risk scratching the aluminum parts. Begin by removing the Torx T6 screws at the bottom of the display assembly. Then insert the guitar pick and begin going around the assembly to remove the rear panel. You want the top to come off first as there are taped on wires at the bottom. Do not separate the back portion from the front at the bottom. Using the guitar pick and credit card, go around the assmembly until the clips are all undone. In my experience, one corner will be hard to maneuver around, so you just need to keep trying and take your time. Resist the urge to jerk it off as the clips are rather delicate. You want to keep your metal spudger away as you do not want to scratch the aluminum parts.
Once you are inside you can tighten the Torx screws. Do not over torque them as you risk damage to the LCD and LCD frame. Torque them until they are snug + 1/2 a turn. Repeat for all four Torx screws. Then re-snap together the display assembly while paying careful note to the rubber standoffs at the LCD latch and along the right and left side. When reinstalling the bottom Torx bits into the display assembly, do not torque them too tight that you would not be able to get them on an angle. If you ever need to repeat the repair, you do not want to remove the display assembly again. The screws do little result so just ensuring they are flush with the aluminum is just fine!
When reinstalling the display, be sure to insert the metal grounding screw onto the 10 MM Torx T8 screw on the right side. Be sure that your torque all of the four Torx screws that hold the hinge to the bottom case. You do not want your repair negated by poor hinge reinstallation. When you are ready to reinstall the Logic Board, replace the pad on the system controller and the paste on the heat sink for the GPU and CPU. For the GPU, according to the maunals sent to me by iMacC2D, you must make an X across the heat sink, with a line across the middle. The CPU gets the traditional pea shape. Since I did not have any pads and I had no choice to remove the controller's pad due to the poor condition from heat damage, I used a decent amount of paste. No issues here and I don't predict any due to the thin nature of the pad.
When reinstalling the top case, ensure the Bluetooth board that you removed when disconnecting the antenna is properly seated. You do not want to damage the board when reinstalling the top case. Also ensure all of the EMI gaskets are in place on top of the ports and ribbon cables if equipped originally when you put on the top case.
This problem is really common on older MacBook Pros and PowerBooks where the owners would always open and close the display by grabbing one side rather than the middle. Try to always open and close the screen by lifting and closing it in the middle by the latch. While a royal pain to do, I definitely enjoy the new tight hinge on my PowerBook.
Note that if you tilt the display back on some PowerBooks, you can remove the screws without taking off the display assembly. This greatly depends on the hinge's range of motion and may work for some. Some alternate directions and pictures for this method are available here!
The picture of the white board is how I keep track of parts and screws when following the guide. I just wanted to include it to help others who have trouble keeping parts organized like I do.