Hey Mac Rumors dudes,
Just a couple minutes ago i found out something about iTunes 4 and iPods that I never knew before, and wanted to share it with you guys.
Have you ever wanted to make your iPod only play songs with a check in the checkbox to the left of the name? For example, you go out and buy an iTrip, install the songs that change the station, but don't want to hear those songs unless you really do wanna change the channel.
Here's how you do it:
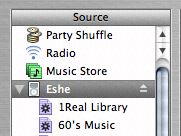
1. First make sure that your iPod's Library is selected. Simply click on your iPod's name in iTunes.
![attachment.php]()
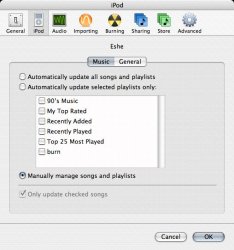
2. Next, make sure that your iPod is set to manually manage songs and playists. You can change this setting by plugging your iPod in to your computer, right clicking on it in iTunes (control clicking also works), and selecting "iPod Options...," then select the radial button "Manually manage songs and playlists." Press OK to close out of here. If you get a warning message, you can just ignore it and hit OK.
![attachment.php]()
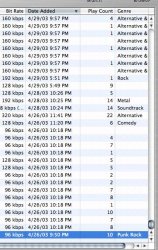
3. Sort your library by date added. if you don't see a "Date Added" column in iTunes, right click on any column title ("My Rating" for example) and click on "Date Added." Now, you should see a Date Added column with an upside down triangle to the right of it. Scroll to the bottom of your library and look at the very last song. Remember the date of the last song listed in "Date Added."
![attachment.php]()
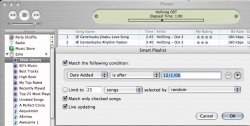
4. Now, click the menu labled "File" and select "New Smart Playlist." click on the drop-down list currently labled "Artist," and change it to "Date Added." Next click on "is," and change it to "is after." Now in the next text entry field, enter any date earlier than the one you found in step 3. Here comes the key to this whole thing; Check the box labled "Match only checked songs." Now make sure that the "Limit to.." box is unchecked, and that the "Live updating" box is checked, and hit OK.
![attachment.php]()
5. Next rename your newly created smart playlist to anything you want. I labled mine "1Real Library" so that it would appear at the top of my playlists.
6. Lastly, just remember to always use this smart playlist instead of your library, and only checked songs will be played.
Voilah, now you dont ever have to listen to another "BEEP BEEP BEEPEDY-DOO-DA-BEEP . . . BEEP BEEP" again!
Cheers,
~~outerspaceapple~~
Just a couple minutes ago i found out something about iTunes 4 and iPods that I never knew before, and wanted to share it with you guys.
Have you ever wanted to make your iPod only play songs with a check in the checkbox to the left of the name? For example, you go out and buy an iTrip, install the songs that change the station, but don't want to hear those songs unless you really do wanna change the channel.
Here's how you do it:
1. First make sure that your iPod's Library is selected. Simply click on your iPod's name in iTunes.
2. Next, make sure that your iPod is set to manually manage songs and playists. You can change this setting by plugging your iPod in to your computer, right clicking on it in iTunes (control clicking also works), and selecting "iPod Options...," then select the radial button "Manually manage songs and playlists." Press OK to close out of here. If you get a warning message, you can just ignore it and hit OK.
3. Sort your library by date added. if you don't see a "Date Added" column in iTunes, right click on any column title ("My Rating" for example) and click on "Date Added." Now, you should see a Date Added column with an upside down triangle to the right of it. Scroll to the bottom of your library and look at the very last song. Remember the date of the last song listed in "Date Added."
4. Now, click the menu labled "File" and select "New Smart Playlist." click on the drop-down list currently labled "Artist," and change it to "Date Added." Next click on "is," and change it to "is after." Now in the next text entry field, enter any date earlier than the one you found in step 3. Here comes the key to this whole thing; Check the box labled "Match only checked songs." Now make sure that the "Limit to.." box is unchecked, and that the "Live updating" box is checked, and hit OK.
5. Next rename your newly created smart playlist to anything you want. I labled mine "1Real Library" so that it would appear at the top of my playlists.
6. Lastly, just remember to always use this smart playlist instead of your library, and only checked songs will be played.
Voilah, now you dont ever have to listen to another "BEEP BEEP BEEPEDY-DOO-DA-BEEP . . . BEEP BEEP" again!
Cheers,
~~outerspaceapple~~
") My cousin hid the iTrip issue the other day.
My cousin hid the iTrip issue the other day.