Become a MacRumors Supporter for $50/year with no ads, ability to filter front page stories, and private forums.

MacJediDude

macrumors member
Original poster
Jul 12, 2007
47
0
Need some opinions -
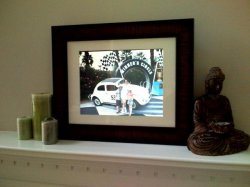
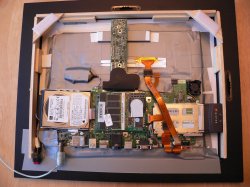
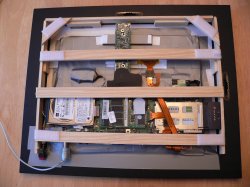
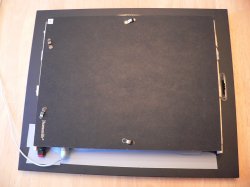
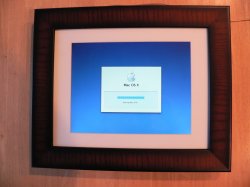
I have a perfect condition G3 Lombard Powerbook I have stopped using the last year or so. Rather than collecting dust I was considering tearing this apart and building a wireless photoframe. I would keep OSX fully functional along with the DVD drive and all external ports.

Would you crack this baby open or keep it intact? :confused:
 

Sherman Homan

macrumors 6502
Oct 27, 2006
463
0
It certainly sounds like a good idea! But I'm not sure I understand why you need to crack it open. How do you want to run the photoframe?
 

MacJediDude

macrumors member
Original poster
Jul 12, 2007
47
0
Re: Why crack open?

My plans would be to "gut" the casing to remove the display and all - then stuff these parts behind an actual picture frame. The computer will still work but this will no longer be a laptop (the trackpad and existing keyboard would be removed) to use the computer I would most likely use a bluetooth keyboard & mouse when needed, otherwise my iPhoto library would be running in slideshow mode. :eek:

It certainly sounds like a good idea! But I'm not sure I understand why you need to crack it open. How do you want to run the photoframe?
 

spjonesi

macrumors member
Oct 10, 2006
73
0
Do it!!! I'd love to see something like this done...if it has been done before, where can I see how to do this? Write up??...Maybe this would be a good idea for my iBook G4 that is crapping out on me and will be replaced. I'm interested.

spjoneSi

EDIT: Found one...well one that isn't very good. But enough for me. I'll be doing this to the old iBook as soon as my new MBP shows up and I have all files transferred!
 

Mal

macrumors 603
Jan 6, 2002
6,252
18
Orlando
IIRC, the power button is a simple plug in connection on the G3's, so you just pull it, remove it from the casing and mount it somewhere, then plug it back in. Make sure it'll reach, though, or you'll have to splice it and add some wire.

jW
 

spjonesi

macrumors member
Oct 10, 2006
73
0
IIRC, the power button is a simple plug in connection on the G3's, so you just pull it, remove it from the casing and mount it somewhere, then plug it back in. Make sure it'll reach, though, or you'll have to splice it and add some wire.

jW


I should have been more clear. I'm going to do this with an iBook G4 1.2 12". IDK if the power button is the same as that. Let me know if anybody remembers what the 'guts' look like inside.

joneSi
 

MacJediDude

macrumors member
Original poster
Jul 12, 2007
47
0
G3 Lombard is now a wireless pictureframe!

I took the leap and couldn't be more pleased! :p
Here is a quick shot from my iPhone ( early morning - low light ) I will take some better shots both front & back later today.
 

Attachments

  • frame.JPG
    frame.JPG
    35.7 KB · Views: 135

RedTomato

macrumors 601
Mar 4, 2005
4,155
442
.. London ..
Very cool!

I'm thinking about doing something like this too. I have an old IBM thinkpad Pentium II 266mhz windows 95 that I'm thinking of doing this to. However, I'd rather deal with OSX :)

Will you post a step by step guide on what you did?

Also how many cables do you have going into it? Wired ethernet or wireless? Did you keep the optical drive?

How do you handle putting new media into it?
 

MacJediDude

macrumors member
Original poster
Jul 12, 2007
47
0
I will post complete build instructions and photos ASAP

The quick answer to your questions - only 1 cable exits the frame - the original AC power adapter cord; a belkin PCMCIA card resides to provide network/internet access (OSX sees the card as an airport card ... sweet) I did keep a spot open to dock the DVD drive, that I can pop in and out as needed.

The best part - adding new photos is EASY via a shared folder on my wireless home network so anyone on the network can add to the slideshow:D

Very cool!

I'm thinking about doing something like this too. I have an old IBM thinkpad Pentium II 266mhz windows 95 that I'm thinking of doing this to. However, I'd rather deal with OSX :)

Will you post a step by step guide on what you did?

Also how many cables do you have going into it? Wired ethernet or wireless? Did you keep the optical drive?

How do you handle putting new media into it?
 

MacJediDude

macrumors member
Original poster
Jul 12, 2007
47
0
yes - but not a 15" screen frame (essentially fits a 8.5" x 11" frame mat) with a 60GB hard drive running OSX on my wireless network. Besides you can pick up a similar old Powerbook to build for a fraction of the price of the retail frames. ;) Isn't it fun to find a great new use for an aging mac that was collecting dust?

You can buy wireless picture frames at walmart you know :p
anyway nice job!
 

spjonesi

macrumors member
Oct 10, 2006
73
0
That really looks good. I'd love to see more pictures posted and a how to, if you have time, or point me in a direction. I'm ready to tear this thing apart.

spjoneSi
 

MacJediDude

macrumors member
Original poster
Jul 12, 2007
47
0
I know - it was very hard to start the surgery & remove the first screw. But now that it is done, I am very happy with the results. The options were keep an old slow powerbook intact and unused, or build the frame & use it every day. The best part is I can still use it as a computer if necessary via usb or bluetooth mouse & keyboard.

Looks nice, but on the other hand, you had to butcher a Powerbook :eek:
 

deraven

macrumors newbie
Mar 13, 2006
1
0
That looks great!

I was thinking of doing something similar with an old Pismo that has a dead battery, a worn case, and rapidly failing screen hinges and came across this thread. I'd love to see some more pictures of your setup, especially how you fit in into the frame and matted it and such.

Well done! :)
 

MacJediDude

macrumors member
Original poster
Jul 12, 2007
47
0
More G3 Lombard wireless picture frame photos

Ok here is a shot of the inside - note all exterior casing has been removed, including the trackpad and keyboard. A 1/2" frame has been hot glued on 3 sides and a new on/off switch has been mounted next to the adapter plug.

The Belkin wireless G card currently resides in the PCMCIA slot.

The frame was then finished out & velcro added to attach the original fame backing. This is a certificate frame with a pre-cut mat @ 8.5" x11"

Space has been left inside the frame to dock the DVDrom when needed, a usb bluetooth adapter has been added to use a bluetooth mouse & keyboard. All original ports are still intact if needed.

The velcro frame cover allows about a 5mm slot on all sides for great airflow.

Final steps will be to paint out the backing, but I am in no hurry as you can not see it from the front or sides.
 

Attachments

  • P1010484.JPG
    P1010484.JPG
    1 MB · Views: 100
  • P1010485.JPG
    P1010485.JPG
    1.1 MB · Views: 86
  • P1010486.JPG
    P1010486.JPG
    1,015.8 KB · Views: 75
  • P1010491.JPG
    P1010491.JPG
    996.2 KB · Views: 137
  • P1010499.JPG
    P1010499.JPG
    1 MB · Views: 73

spyderracer393

macrumors regular
Jan 8, 2006
137
0
Ok here is a shot of the inside - note all exterior casing has been removed, including the trackpad and keyboard. A 1/2" frame has been hot glued on 3 sides and a new on/off switch has been mounted next to the adapter plug.

The Belkin wireless G card currently resides in the PCMCIA slot.

The frame was then finished out & velcro added to attach the original fame backing. This is a certificate frame with a pre-cut mat @ 8.5" x11"

Space has been left inside the frame to dock the DVDrom when needed, a usb bluetooth adapter has been added to use a bluetooth mouse & keyboard. All original ports are still intact if needed.

The velcro frame cover allows about a 5mm slot on all sides for great airflow.

Final steps will be to paint out the backing, but I am in no hurry as you can not see it from the front or sides.

...I'm drooling. I definitely want to do that.

........but not to my wonderful 12" PBG4:D
I will have to start looking on craigslist and ebay:rolleyes:
 

ktbubster

macrumors 6502a
Jan 20, 2007
794
1
US
1. Find old inexpensive laptop on ebay

2. tear apart

3. make picture frame.

Got my first 3 steps on my to do list now! Now to find the old laptop!!! :-D

I think i need to design a really sweet designerly frame though... perhaps I can combine this into something neat for my portfolio....

this is SWEEEEET

ps. are those wood slats the velcro is on? aren't you a little worried with the wood next to the computer parts? heat wise? I guess it wouldn't get too hot just slideshowing....
 
Register on MacRumors! This sidebar will go away, and you'll see fewer ads.