Become a MacRumors Supporter for $50/year with no ads, ability to filter front page stories, and private forums.
Running your Mac OS X Partition in Ubuntu Linux in a Window
- Thread starter slooksterPSV
- Start date
- Sort by reaction score
You are using an out of date browser. It may not display this or other websites correctly.
You should upgrade or use an alternative browser.
You should upgrade or use an alternative browser.
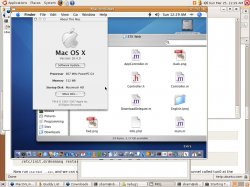
Some of you may want to know how I did this right? Ok well here's how to do it:
--NOTE I NOR ARE THE DEVELOPERS RESPONSIBLE FOR ANY DATA LOST DUE TO DOING THIS.
--NOTE 2 I ALREADY HAD THE FW FILES FROM RUNNING LINUX PREVIOUSLY SO I KNOW AND WAS QUICKLY ABLE TO GET MY WIRELESS RUNNING
--NOTE 3 TO GET YOUR WIRELESS RUNNING LOOK UP INFORMATION ON AIRPORT FOR UBUNTU LINUX -- ALSO BURN THE NEEDED FILES TO A CD AS YOU MAY NOT HAVE INTERNET ACCESS TO GET THEM
--NOTE 4 THIS WORKS WITH MY IBOOK G4 I CANNOT GUARANTEE THAT IT WILL WORK FOR YOUR OTHER COMPUTERS
--NOTE i LEFT 8 GB AVAILABLE FOR THE LINUX PARTITION
1 - Download the latest (not beta) version of Ubuntu (mine is Edgy Eft 6.10) and get the Desktop version: http://www.ubuntu.com
2 - Burn to a CD-R
3 - Restart your Mac and boot off of the CD (hold C before the chime)
4 - When Linux Starts up (if you got the desktop version, the only one I know how to do) open a terminal by going to Applications->Accessories->Terminal then type in the following that is in bold
5 - Restart back into Linux, yes that means you have to go to System then to Quit... then Restart
6 - Once back in start the installer, fill out the information, and when it comes to partitioning choose Larges continuous space (NOTE YOU MAY WANT TO REMOVE ALL EXTERNAL DRIVES YOU HAVE ATTACHED AS THIS MAY NOT ALLOW THE PARTITIONER TO FUNCTION CORRECTLY WHEN CHOOSING THAT OPTION)
7 - Install Linux and make sure everything is correct before continuing
===Whew coffee break... that's just the installation of Linux!===
The install takes about 15 minutes so its quick. When finished restart your computer into Linux and continue to step 8.
AIRPORT WIRELESS USERS ONLY ALL OTHERS SKIP THIS STEP
--------------------------------------------------------------------------------
8 - Once inside Linux again, but now booting off of the HDD we can continue with the networking side. If you took my notes above and chose to follow them then hopefully on an external or burned cd you have the files it asks for fwcutter, and AppleAirport2 file I think it calls for.
9 - Open terminal and navigate to the directory where your fw files that you extracted are by doing the cd command. Hopefully you've had some experience with terminal before.
10 - Type in: sudo cp *.fw /lib/firmware
11 - Type in: sudo modprobe bcm43xx
12 - Type in: iwconfig eth1 essid "YOUR_ESSID_FOR_NETWORK" ap any eth1 may be different for you, and YOUR ESSID FOR NETWORK could be anything like ACTIONTEC, CEUWireless, etc.
13 - Type in: sudo ifconfig eth1 up
14 - You may have to fiddle around for a bit to get the wireless working, if those commands don't work go to System->Administration->Networking and activate it there.
==Now we're done with networking, test it and make sure it works, phew, now finally Mac-On-Linux - MOL==
15 - Open a terminal if you don't have one open and navigate to /etc/apt and type in: sudo pico sources.list - go through and remove all of the # where it starts # deb or # deb-src so you can have more sources, then add this one at the bottom:
deb http://people.debian.org/~jensen woody/ notice the space between ~jensen and woody/
16 - Press CTRL+O to save then CTRL+X to exit
17 - Now type in: sudo apt-get update
18 - Then type in sudo apt-get install mol mol-drivers-macosx mol-drivers-macos
19 - Let that install then configure MOL, I suggest following these instructions then come back to # 20: https://help.ubuntu.com/community/MacOnLinuxHowto
FOLLOW THESE INSTRUCTIONS IF YOU WANT TO BOOT FROM YOUR ALREADY EXISTING MAC OS X PARTITION
20 - Ok now we want to know how I booted up my partition, correct? Ok remember in the MacOnLinuxHowto we had to edit the molrc.osx file? Well go back in and lets edit that file again:
# MOL will boot from CD if it invoked through 'startmol -X --cdboot'.
#blkdev: /dev/cdrom -cd ${cdboot}
blkdev: /dev/hda3 -boot -rw
find those lines and the last one the blkdev: /dev/hda3 -boot -rw add that, your OSX partition could be on hda2 hda4 etc, mine was on hda3 cause I remember the partitioning section.
21 - Now save the file and exit pico, now type in: sudo startmol -X and voila, it should work. If you get an error stating about there isn't enough memory, check the HowTo section taht I posted on #19 for the bootx file that you need to get it to work. Post if it didn't work and I'll try to help you out.
Extra side notes:
Did you install bootx? See # 19 towards the bottom of the how to article
--NOTE I NOR ARE THE DEVELOPERS RESPONSIBLE FOR ANY DATA LOST DUE TO DOING THIS.
--NOTE 2 I ALREADY HAD THE FW FILES FROM RUNNING LINUX PREVIOUSLY SO I KNOW AND WAS QUICKLY ABLE TO GET MY WIRELESS RUNNING
--NOTE 3 TO GET YOUR WIRELESS RUNNING LOOK UP INFORMATION ON AIRPORT FOR UBUNTU LINUX -- ALSO BURN THE NEEDED FILES TO A CD AS YOU MAY NOT HAVE INTERNET ACCESS TO GET THEM
--NOTE 4 THIS WORKS WITH MY IBOOK G4 I CANNOT GUARANTEE THAT IT WILL WORK FOR YOUR OTHER COMPUTERS
--NOTE i LEFT 8 GB AVAILABLE FOR THE LINUX PARTITION
1 - Download the latest (not beta) version of Ubuntu (mine is Edgy Eft 6.10) and get the Desktop version: http://www.ubuntu.com
2 - Burn to a CD-R
3 - Restart your Mac and boot off of the CD (hold C before the chime)
4 - When Linux Starts up (if you got the desktop version, the only one I know how to do) open a terminal by going to Applications->Accessories->Terminal then type in the following that is in bold
Code:
~$ [b]parted[/b]
---info here--
(parted) [b]print[/b]
--drive information is printed here, find your drive it may say 134MB to 40GB (for iBook) that is the drive we want to use--
--my command was as follows
(parted) [b]resize 3[/b] --NOTE YOURS MAY BE DIFFERENT
START: [134MB] [b]134MB[/b]
END: [40.0GB] [b]32.0GB[/b] --NOTE YOU CAN RESIZE IT TO WHATEVER YOU WANT
(parted) [b]quit[/b]
~$ [b]exit[/b]6 - Once back in start the installer, fill out the information, and when it comes to partitioning choose Larges continuous space (NOTE YOU MAY WANT TO REMOVE ALL EXTERNAL DRIVES YOU HAVE ATTACHED AS THIS MAY NOT ALLOW THE PARTITIONER TO FUNCTION CORRECTLY WHEN CHOOSING THAT OPTION)
7 - Install Linux and make sure everything is correct before continuing
===Whew coffee break... that's just the installation of Linux!===
The install takes about 15 minutes so its quick. When finished restart your computer into Linux and continue to step 8.
AIRPORT WIRELESS USERS ONLY ALL OTHERS SKIP THIS STEP
--------------------------------------------------------------------------------
8 - Once inside Linux again, but now booting off of the HDD we can continue with the networking side. If you took my notes above and chose to follow them then hopefully on an external or burned cd you have the files it asks for fwcutter, and AppleAirport2 file I think it calls for.
9 - Open terminal and navigate to the directory where your fw files that you extracted are by doing the cd command. Hopefully you've had some experience with terminal before.
10 - Type in: sudo cp *.fw /lib/firmware
11 - Type in: sudo modprobe bcm43xx
12 - Type in: iwconfig eth1 essid "YOUR_ESSID_FOR_NETWORK" ap any eth1 may be different for you, and YOUR ESSID FOR NETWORK could be anything like ACTIONTEC, CEUWireless, etc.
13 - Type in: sudo ifconfig eth1 up
14 - You may have to fiddle around for a bit to get the wireless working, if those commands don't work go to System->Administration->Networking and activate it there.
==Now we're done with networking, test it and make sure it works, phew, now finally Mac-On-Linux - MOL==
15 - Open a terminal if you don't have one open and navigate to /etc/apt and type in: sudo pico sources.list - go through and remove all of the # where it starts # deb or # deb-src so you can have more sources, then add this one at the bottom:
deb http://people.debian.org/~jensen woody/ notice the space between ~jensen and woody/
16 - Press CTRL+O to save then CTRL+X to exit
17 - Now type in: sudo apt-get update
18 - Then type in sudo apt-get install mol mol-drivers-macosx mol-drivers-macos
19 - Let that install then configure MOL, I suggest following these instructions then come back to # 20: https://help.ubuntu.com/community/MacOnLinuxHowto
FOLLOW THESE INSTRUCTIONS IF YOU WANT TO BOOT FROM YOUR ALREADY EXISTING MAC OS X PARTITION
20 - Ok now we want to know how I booted up my partition, correct? Ok remember in the MacOnLinuxHowto we had to edit the molrc.osx file? Well go back in and lets edit that file again:
# MOL will boot from CD if it invoked through 'startmol -X --cdboot'.
#blkdev: /dev/cdrom -cd ${cdboot}
blkdev: /dev/hda3 -boot -rw
find those lines and the last one the blkdev: /dev/hda3 -boot -rw add that, your OSX partition could be on hda2 hda4 etc, mine was on hda3 cause I remember the partitioning section.
21 - Now save the file and exit pico, now type in: sudo startmol -X and voila, it should work. If you get an error stating about there isn't enough memory, check the HowTo section taht I posted on #19 for the bootx file that you need to get it to work. Post if it didn't work and I'll try to help you out.
Extra side notes:
Did you install bootx? See # 19 towards the bottom of the how to article
Register on MacRumors! This sidebar will go away, and you'll see fewer ads.