Become a MacRumors Supporter for $50/year with no ads, ability to filter front page stories, and private forums.

OutThere

macrumors 603
Dec 19, 2002
5,730
3
NYC
If you run Photoshop, the way I do it is to edit the image all I want, go to the history palette, take a Snapshot of the current state, desaturate the image, and then use the Art History brush to paint on what you want to colorize...it gives you a lot of control over the brush and the location of where you want it to go.

You can also get more control over your desaturated version if you play with the Channels palette, in which you can select the various RGB channels...giving you different feeling B&W images.

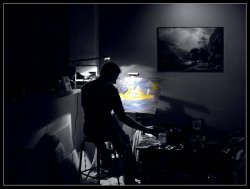
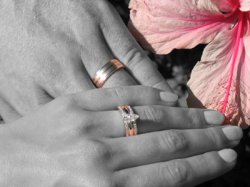
Edit: here's an example of something I did with my method in Photoshop CS1


BakedBeans

macrumors 68040
May 6, 2004
3,054
0
What's Your Favorite Posish
As a photographer that prints images on a very large scale, I cant afford to use methods like new layer+eraser or history brush, its all just a little inacurate for large prints, using the selection tools in conjunction with the selective color and hue/saturation menu gives a much more accurate result.

but for web images the layer+eraser is adequate :)
 

efoto

macrumors 68030
Nov 16, 2004
2,624
0
Cloud 9 (-6)
Just to throw another option into the mix (for PS, not sure on GIMP):

Once the image is open go to your History Palette, click the little arrow in the upper right corner (dropdown) and click "New Snapshot".

With the Snapshot selected, go to Image > Adjustments > Channel Mixer and then select Monochrome at the bottom (checkbox). Mess with your sliders to get the right monochrome mix you want (R, G, and B values effect a B&W/monochrome differently, so play around for a depth you like but keep them totaling 100).

Go to the main tools palette and select your History Brush. Simply paint through the Snapshot revealing the color in the original image. The Snapshot adds a 'layer' to the History palette, but not the Layers palette, although admittedly I'm not sure what the overall difference is.

I found this to be a pretty quick and simple way to do this type of alteration to images.
 

BrandonSi

macrumors regular
Oct 13, 2005
114
0
Chicago, IL
Neat thread! Here's one I did with a photo I took a while back.
 

Attachments

  • Color_is_My_Freedom_small.jpg
    Color_is_My_Freedom_small.jpg
    72.3 KB · Views: 161

yellow

Moderator emeritus
Oct 21, 2003
16,018
6
Portland, OR
I did this one a while back.. Just cut out the colored pieces I wanted, erased the edges, and them copied them back over the top of a B&W'd version of the same picture.
 

Attachments

  • Ringz.jpg
    Ringz.jpg
    29.5 KB · Views: 146

FrankieTDouglas

macrumors 68000
Mar 10, 2005
1,554
2,882
002.jpg


I have about three layers there. I used a quickmask to pull the colored butt out of the top layer, and removed everything else but that image. I then de-saturated another layer of it, copied it, applied a Gaussian blur to one of the bottom layers and soft light blended it, then blended the color butt on top so it'd "match" better.
 

Sam/B

macrumors member
Dec 31, 2005
88
0
Newport - South Wales
love that image tag posted with the eye, this one came up whilst looking through some of the others, i've never been able to get that same effect as good as this. Can anyone tell me how would be the best way to get that lighting flare/effect over the black backdrop to the same quality as this one? Really like the pastel/charcoal drawing scanned in of the women when used wiht that effect. I bet you could even go as far then to applying colours and gradients over the top and laying them into it:

http://usunet.ru/ug/albums/userpics/10003/Mind_ReInstallation~0.jpg

hmmm, even better

http://usunet.ru/ug/albums/userpics/10001/Succuba_in_sine.jpg

but for different reasons maybe :eek: ;)

looks good with a background like this aswell (can't think of the word for this style of work:

http://img239.imageshack.us/img239/7407/motogpwallpaper8sl.jpg
 
Register on MacRumors! This sidebar will go away, and you'll see fewer ads.