I am in the non-profit (lol) business to help as many MR members and visitors as possible. I have been taking my experience, research, free time, and documentation skills (I do a lot of documentation in the IT field) and put them to use by creating easy on the eyes, readable and helpful HOW TO GUIDES for the MR Community. Feel free to PM me directly or make a post to add contributions, update existing information, or remove any inaccuracies to this thread and I will update the thread to reflect the changes.
Source: Martin's Weekend Coding
Credit: Martin's Weekend Coding
DISCLAIMER: APPLY TWEAKS AT OWN RISK, IN NO EVENT WILL MACRUMORS.COM OR ORLANDOECH(.COM) BE LIABLE FOR ANY CONSEQUENTIAL DAMAGES IN CONNECTION, RELATED OR UNREALTED WITH APPLYING OR PERFORMING ANY OF THE “TWEAKS” REFERENCED IN THIS POST INCLUDING, BUT NOT LIMITED TO, LOSS OF DATA, DATA CORRUPTION, APPLICATION/PROGRAMS CORRUPTION, OPERATING SYSTEM CORRUPTION, OR HARDWARE FAILURE.
DISCLAIMER #2: ALL "TWEAKS" ARE PERSONAL PREFERENCE. SOME USERS MAY FIND VALUE IN SOME OR ALL OF THE "TWEAKS" WHILE OTHERS MAY NOT, MOST NOTABLY STEP #5.
CONTENTS
1. Use Trim Enabler [3rd Party SSD's only]
2. Turn off local Time Machine snapshots [laptops only]
3. Turn off hibernation [laptops only] - *UPDATED 01.16.2013 -
4. Set noatime flag
MacOS (like other unix-based systems) by default records last access time for every file. I.e. every time you read a file, a write is made on the filesystem to record this action. There is no point in doing it and no side effects if you disable that by mounting the root filesystem with noatime flag set. To do that create a file named for example “com.nullvision.noatime.plist” (you can pick any other name you wish) in the directory /Library/LaunchDaemons with the following content:
And execute the following command in Terminal:
Restart the machine.
You can verify that it worked by executing the following in Terminal:
You should get the following output (i.e. see noatime in the list in parentheses):
This tweak was taken from blogs.nullvision.com, which seems to not be available anymore, but I found a mirror of the old content here: http://www.icyte.com/saved/blogs.nullvision.com/441781
And the same trick (inspired by the same blog) is here: http://blog.philippklaus.de/2011/04/ssd-optimizations-on-mac-os-x/
5. Move user home directories to HDD [SSD+HDD only]
This tweak is only useful if you have both SSD as well as HDD in your Mac. I’m using this in my iMac. I moved all the content of /Users folder to the HDD and created a symbolic link from the SSD to it (so that I don’t have to change the home folder location in the user settings, as I read some applications don’t like it and may not work correctly). To do that execute the following commands in Terminal:
UPDATE: To be safe, you should also go to System Preferences, click on Users & Groups, click the lock icon to unlock advanced editing (password prompt will appear). Once unlocked, you should be able to right-click on each user account and choose Advanced Options from the pop-up menu. Once in the Advanced Options dialog, change the Home directory of the user from “/Users/user-name” to the new location (e.g. “/Volumes/HDD/Users/user-name”).
Now, check if your home folders are showing up correctly in Finder. If so, restart your computer.
Finally, delete the back-up of your Users folder on the SSD by typing the following into the Terminal:
6. Use RAM disk or HDD for temporary files
7. Turn off sudden motion sensor [no HDD only]
If SSD is the only drive in your Mac, there is no point in using the Sudden Motion Sensor. You can switch it off by executing the following in the Terminal:
8. Turn off hard drive sleep [no HDD only]
Some websites mention SSD may freeze when the hard drive sleep feature is on, so it is recommended to turn it off. However, you probably don’t want to do this if you also have a HDD in your Mac. To switch the hard drive sleep off, go to System Preferences->Energy Saver and uncheck “Put the hard disk(s) to sleep when possible”.
Taken from http://poller.se/2010/08/optimizing-mac-os-x-for-ssd-drives/
9. Misc Tweaks
Disable waking up when LID opens
No hibernate
Disabling Sudden Motion Sensor
Verify applied tweaks
Screen capture save format
Screen capture save location
Mac login window display System Time
Safari single window mode
Add a “Recent files” stack to Dock
Make Dock app icons spring-loaded
Snow Leopard Stack Highlight
Reload Dock
10. Benchmark Tools/Utilities - *UPDATED 01.22.2013 -
11. References
Source: Martin's Weekend Coding
Credit: Martin's Weekend Coding
DISCLAIMER: APPLY TWEAKS AT OWN RISK, IN NO EVENT WILL MACRUMORS.COM OR ORLANDOECH(.COM) BE LIABLE FOR ANY CONSEQUENTIAL DAMAGES IN CONNECTION, RELATED OR UNREALTED WITH APPLYING OR PERFORMING ANY OF THE “TWEAKS” REFERENCED IN THIS POST INCLUDING, BUT NOT LIMITED TO, LOSS OF DATA, DATA CORRUPTION, APPLICATION/PROGRAMS CORRUPTION, OPERATING SYSTEM CORRUPTION, OR HARDWARE FAILURE.
DISCLAIMER #2: ALL "TWEAKS" ARE PERSONAL PREFERENCE. SOME USERS MAY FIND VALUE IN SOME OR ALL OF THE "TWEAKS" WHILE OTHERS MAY NOT, MOST NOTABLY STEP #5.
CONTENTS
- Use Trim Enabler [3rd Party SSD's only]
- Turn off local Time Machine snapshots [laptops only]
- Turn off hibernation [laptops only]
- Set noatime flag
- Move user home directories to HDD [SSD+HDD only]
- Use RAM disk or HDD for temporary files
- Turn off sudden motion sensor [SSD+HDD only]
- Turn off hard drive sleep [SSD+HDD only]
- Misc Tweaks
- Benchmark Tools/Utilities
- References
1. Use Trim Enabler [3rd Party SSD's only]
NOTE: This IS NOT NEEDED for any OEM Apple SSDs in any iMac, Mac Mini, MacBook Pro Retina, MacBook Pro, MacBook Air.
TRIM support is essential for keeping the SSD healthy. Unfortunately, MacOS supports TRIM only for Apple-supplied SSD’s. If you bought a 3rd party one like I did, you have to tweak the system to be able to turn on the TRIM support. Trim Enabler is a simple utility that does this for you. Download TrimEnabler.
TRIM support is essential for keeping the SSD healthy. Unfortunately, MacOS supports TRIM only for Apple-supplied SSD’s. If you bought a 3rd party one like I did, you have to tweak the system to be able to turn on the TRIM support. Trim Enabler is a simple utility that does this for you. Download TrimEnabler.
2. Turn off local Time Machine snapshots [laptops only]
If you are using the SSD in a laptop, and you turned the Time Machine backups on, you should know that OS X Lion does local snapshots at times when your Time Machine disk is not available. This is quite common – you are typically connecting your external TM disk only once in a while or you are using Time Capsule at home but take your laptop to the office every day for 8+ hours. You can confirm if the local TM backups are on by opening Time Machine Preferences:

There is no GUI switch to turn these local backups off, but it can easily be done on the command line. Just start Terminal.app and execute the following command:
Once you do this, the TM Preferences panel will immediately reflect it – the text will change from “Time Machine keeps local snapshots as space permits, and:” to “Time Machine keeps:”. To turn it back on, you can simply run the following in the Terminal:
Also note, this feature gets turned on automatically whenever you turn off and on the Time Machine – so don’t forget to turn the local backups back off again whenever you do that.
I found out about how to turn off the local backups from this article: http://osxdaily.com/2011/09/28/disable-time-machine-local-backups-in-mac-os-x-lion/
There is no GUI switch to turn these local backups off, but it can easily be done on the command line. Just start Terminal.app and execute the following command:
Code:
sudo tmutil disablelocalOnce you do this, the TM Preferences panel will immediately reflect it – the text will change from “Time Machine keeps local snapshots as space permits, and:” to “Time Machine keeps:”. To turn it back on, you can simply run the following in the Terminal:
Code:
sudo tmutil enablelocalAlso note, this feature gets turned on automatically whenever you turn off and on the Time Machine – so don’t forget to turn the local backups back off again whenever you do that.
I found out about how to turn off the local backups from this article: http://osxdaily.com/2011/09/28/disable-time-machine-local-backups-in-mac-os-x-lion/
3. Turn off hibernation [laptops only] - *UPDATED 01.16.2013 -
Another feature of Mac OS turned on by default on laptops is, that it saves all the memory to disk when entering sleep mode. This is to ensure your laptop does not lose your work if it runs out of battery while “sleeping”. The more RAM you have, the more gigabytes it writes to the disk every time you close the lid/put it to sleep. I typically do this at least twice a day – when leaving the office and when going to sleep in the evening. If you are in a similar situation and you have 8GB of RAM, that means your MacBook writes 16 to 24 GB of hibernation data to your SSD every day. Here is how you can turn this off – it will not only make your SSD’s life longer, but also significantly speed up the time it takes for your laptop to enter the sleep mode:
*Once you turn off hibernation, you can also remove the sleep image file that will free up several GB of disk space (depending on how much RAM you have):
*Then create a blank zero-byte file so OS X cannot rewrite the file:
*Last, make the file immutable:
Code:
sudo pmset -a hibernatemode 0*Once you turn off hibernation, you can also remove the sleep image file that will free up several GB of disk space (depending on how much RAM you have):
Code:
sudo rm /Private/var/vm/sleepimage*Then create a blank zero-byte file so OS X cannot rewrite the file:
Code:
sudo touch /Private/var/vm/sleepimage*Last, make the file immutable:
Code:
sudo chflags uchg /Private/var/vm/sleepimage
4. Set noatime flag
MacOS (like other unix-based systems) by default records last access time for every file. I.e. every time you read a file, a write is made on the filesystem to record this action. There is no point in doing it and no side effects if you disable that by mounting the root filesystem with noatime flag set. To do that create a file named for example “com.nullvision.noatime.plist” (you can pick any other name you wish) in the directory /Library/LaunchDaemons with the following content:
Code:
<?xml version="1.0" encoding="UTF-8"?>
<!DOCTYPE plist PUBLIC "-//Apple//DTD PLIST 1.0//EN"
        "http://www.apple.com/DTDs/PropertyList-1.0.dtd">
<plist version="1.0">
    <dict>
        <key>Label</key>
        <string>com.nullvision.noatime</string>
        <key>ProgramArguments</key>
        <array>
            <string>mount</string>
            <string>-vuwo</string>
            <string>noatime</string>
            <string>/</string>
        </array>
        <key>RunAtLoad</key>
        <true/>
    </dict>
</plist>
And execute the following command in Terminal:
Code:
sudo chown root:wheel /Library/LaunchDaemons/com.nullvision.noatime.plistRestart the machine.
You can verify that it worked by executing the following in Terminal:
Code:
mount | grep " / "
Code:
/dev/disk0s2 on / (hfs, local, journaled, noatime)This tweak was taken from blogs.nullvision.com, which seems to not be available anymore, but I found a mirror of the old content here: http://www.icyte.com/saved/blogs.nullvision.com/441781
And the same trick (inspired by the same blog) is here: http://blog.philippklaus.de/2011/04/ssd-optimizations-on-mac-os-x/
5. Move user home directories to HDD [SSD+HDD only]
This tweak is only useful if you have both SSD as well as HDD in your Mac. I’m using this in my iMac. I moved all the content of /Users folder to the HDD and created a symbolic link from the SSD to it (so that I don’t have to change the home folder location in the user settings, as I read some applications don’t like it and may not work correctly). To do that execute the following commands in Terminal:
Code:
sudo ditto /Users /Volumes/your_hdd_name/Users
sudo mv /Users /Users.bak
sudo ln -s /Volumes/your_hdd_name/Users /Users
UPDATE: To be safe, you should also go to System Preferences, click on Users & Groups, click the lock icon to unlock advanced editing (password prompt will appear). Once unlocked, you should be able to right-click on each user account and choose Advanced Options from the pop-up menu. Once in the Advanced Options dialog, change the Home directory of the user from “/Users/user-name” to the new location (e.g. “/Volumes/HDD/Users/user-name”).
Now, check if your home folders are showing up correctly in Finder. If so, restart your computer.
Finally, delete the back-up of your Users folder on the SSD by typing the following into the Terminal:
Code:
sudo rm -rf /Users.bak6. Use RAM disk or HDD for temporary files
If you have enough RAM, you can dedicate (typically around 256 to 512 MB) of RAM to a RAM disk. RAM disk is a virtual disk that only resides in memory, so is suitable for storing data that need to live only until you shut down your computer. Temporary files are ideal for this. You can create a RAM disk during the boot time and redirect all the temporary files there. To do that, create a file named “MoveTempFoldersToRamDisk.sh” in your home directory and put the following content in:
Now, run the following in the Terminal:
This creates two RAM disks on startup – one 256MB large for /private/tmp (command “RAMDisk /private/tmp 256? in the middle of the above script) and another one 64MB large for /var/run. You can now delete ~/MoveTempFoldersToRamDisk.sh from your computer.
For the changes to take effect, you have to restart.
If you decide to undo this tweak in the future, you can do it simply by deleting /System/Library/StartupItems/RamFS directory from your Mac. E.g. by executing the following command in the Terminal:
Again, restart is needed for this to take effect.
There are some small drawbacks to applying this tweak:
RAM disk portion of this tweak taken from here: http://blog.philippklaus.de/2011/04/ssd-optimizations-on-mac-os-x/
Originally suggested by blogs.nullvision.com (mirror at http://www.icyte.com/saved/blogs.nullvision.com/441781)
Code:
#!/bin/bash

# +----------------------------------------------------------------------+
# | |
# | Set up Mac OS X to store temporary files in RAM rather than on disk.|
# | |
# | By Philipp Klaus <http://blog.philippklaus.de> |
# | |
# | Originally by Ricardo Gameiro <http://blogs.nullvision.com/?p=357> |
# | Changes by Daniel Jenkins |
# | <http://blogs.nullvision.com/?p=357#comment-1140> |
# | |
# +----------------------------------------------------------------------+

cd /System/Library/StartupItems
sudo mkdir RamFS
sudo chown -R root:wheel RamFS
sudo chmod -R u+rwX,g+rX,o+rX RamFS
cat << "EOF" | sudo tee RamFS/RamFS > /dev/null
#!/bin/sh
# Create a RAM disk with same perms as mountpoint

RAMDisk() {
    mntpt=$1
    rdsize=$(($2*1024*1024/512))
    echo "Creating RamFS for $mntpt"
    # Create the RAM disk.
    dev=`hdik -drivekey system-image=yes -nomount ram://$rdsize`
    # Successfull creation...
    if [ $? -eq 0 ] ; then
        # Create HFS on the RAM volume.
        newfs_hfs $dev
        # Store permissions from old mount point.
        eval `/usr/bin/stat -s $mntpt`
        # Mount the RAM disk to the target mount point.
        mount -t hfs -o union -o nobrowse $dev $mntpt
        # Restore permissions like they were on old volume.
        chown $st_uid:$st_gid $mntpt
        chmod $st_mode $mntpt
    fi
}

# Test for arguments.
if [ -z $1 ]; then
echo "Usage: $0 [start|stop|restart] "
    exit 1
fi

# Source the common setup functions for startup scripts
test -r /etc/rc.common || exit 1
. /etc/rc.common

StartService () {
    ConsoleMessage "Starting RamFS disks..."
    RAMDisk /private/tmp 256
    RAMDisk /var/run 64
    #RAMDisk /var/db 1024
    #mkdir -m 1777 /var/db/mds
}
StopService () {
    ConsoleMessage "Stopping RamFS disks, nothing will be done here..."
    # diskutil unmount /private/tmp /private/var/run
    # diskutil unmount /private/var/run
}

RestartService () {
    ConsoleMessage "Restarting RamFS disks, nothing will be done here..."
}

RunService "$1"
EOF
sudo chmod u+x,g+x,o+x RamFS/RamFS


cat << EOF | sudo tee RamFS/StartupParameters.plist > /dev/null
<?xml version="1.0" encoding="UTF-8"?>
<!DOCTYPE plist SYSTEM "file://localhost/System/Library/DTDs/PropertyList.dtd">
<plist version="0.9">
<dict>
<key>Description</key>
<string>RamFS Disks Manager</string>
<key>OrderPreference</key>
<string>Early</string>
<key>Provides</key>
<array>
<string>RamFS</string>
</array>
<key>Uses</key>
<array>
<string>Disks</string>
</array>
</dict>
</plist>
EOF
Now, run the following in the Terminal:
Code:
chmod 755 ~/MoveTempFoldersToRamDisk.sh
~/MoveTempFoldersToRamDisk.sh
This creates two RAM disks on startup – one 256MB large for /private/tmp (command “RAMDisk /private/tmp 256? in the middle of the above script) and another one 64MB large for /var/run. You can now delete ~/MoveTempFoldersToRamDisk.sh from your computer.
For the changes to take effect, you have to restart.
If you decide to undo this tweak in the future, you can do it simply by deleting /System/Library/StartupItems/RamFS directory from your Mac. E.g. by executing the following command in the Terminal:
Code:
sudo rm -rf /System/Library/StartupItems/RamFSAgain, restart is needed for this to take effect.
There are some small drawbacks to applying this tweak:
- After applying it it takes a few seconds (2-3 on my machine) to shut down
- It lowers the size of RAM usable for applications
Code:
sudo ditto /private/tmp /Volumes/your_hdd_name/private/tmp
sudo rm -rf /private/tmp
sudo ln -s /Volumes/your_hdd_name/private/tmp /private/tmp
RAM disk portion of this tweak taken from here: http://blog.philippklaus.de/2011/04/ssd-optimizations-on-mac-os-x/
Originally suggested by blogs.nullvision.com (mirror at http://www.icyte.com/saved/blogs.nullvision.com/441781)
7. Turn off sudden motion sensor [no HDD only]
If SSD is the only drive in your Mac, there is no point in using the Sudden Motion Sensor. You can switch it off by executing the following in the Terminal:
Code:
sudo pmset -a sms 08. Turn off hard drive sleep [no HDD only]
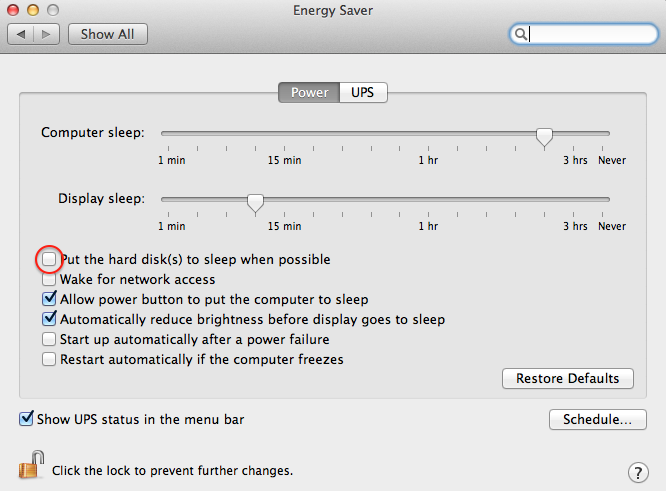
Some websites mention SSD may freeze when the hard drive sleep feature is on, so it is recommended to turn it off. However, you probably don’t want to do this if you also have a HDD in your Mac. To switch the hard drive sleep off, go to System Preferences->Energy Saver and uncheck “Put the hard disk(s) to sleep when possible”.
Taken from http://poller.se/2010/08/optimizing-mac-os-x-for-ssd-drives/
9. Misc Tweaks
Disable waking up when LID opens
Code:
sudo pmset lidwake 0No hibernate
Code:
sudo pmset -a hibernatemode 0Disabling Sudden Motion Sensor
Code:
sudo pmset -a sms 0Verify applied tweaks
Code:
pmset -gScreen capture save format
Code:
defaults write com.apple.screencapture type jpgScreen capture save location
Code:
defaults write com.apple.screencapture location [path]Mac login window display System Time
Code:
sudo defaults write /Library/Preferences/com.apple.loginwindow AdminHostInfo TimeSafari single window mode
Code:
defaults write com.apple.Safari TargetedClicksCreateTabs -bool trueAdd a “Recent files” stack to Dock
Code:
defaults write com.apple.dock persistent-others -array-add '{ "tile-data" = { "list-type" = 1; }; "tile-type" = "recents-tile"; }'Make Dock app icons spring-loaded
Code:
defaults write com.apple.dock enable-spring-load-actions-on-all-items -boolean YESSnow Leopard Stack Highlight
Code:
defaults write com.apple.dock mouse-over-hilite-stack -boolean YESReload Dock
Code:
killall Dock10. Benchmark Tools/Utilities - *UPDATED 01.22.2013 -
11. References
The tweaks that I presented are the tweaks that I thought are worth applying. None of them really limits any features. There are other tweaks, which I did not want to apply as I would be giving up on some functionality (such as disabling the Spotlight) or I was not comfortable with (e.g. disabling the swap files). You can find these and more on the following web sites:
Last edited:
