Become a MacRumors Supporter for $50/year with no ads, ability to filter front page stories, and private forums.

xMarty

macrumors newbie
Jul 26, 2023
7
2
The backlight Constant Current board has been measured to add about 80-130 nits max brightness.
With my 2017 iMac Pro D1 panel I find the R1811 brightness without the CC board to be quite adequate - I never need full brightness.

Edited for accuracy.
Thx, I ordered the Constant Current Board today.

StoneTaskin answered my order today and wrote: "I would like to remind you that the R1811 (v4) you previously purchased has already integrated the constant current board. However, for optimal performance, acquiring a separate constant current board may yield better results."

I will check my setup with and without the Constant Current Board and give feedback. I always use the full brightness on my 2017 5K iMac, so I don't want my monitor to be darker.
 
Last edited:

PaulD-UK

macrumors 6502a
Oct 23, 2009
542
254
This is the circuit of the crossover. Its more for a car with 8 ohm speakers than a 4 ohm iMac...

Xover.png


I would keep both tweeter capacitors 1 and 2 in circuit. They aren’t really big enough for 4 ohm tweeters as they cut down the mid frequencies too much. But the iMac tweeters are quite strident at about 3KHz so it may not be a bad thing. 😉
The inductor is too large (by about x2 - it will make the mid-frequency too quiet) for the tiny bass speaker in the iMac, so I would close that switch/jumper.

But the Woofer capacitor will cut down the bass response below about 200 Hz, so maybe too much. Or maybe it will only lose inaudible low bass, and will actually help the low bass you can hear.
Try it both ways?

You can test the polarity of the tweeter in the same way was the woofer, but you need more voltage - just a quick dab of current so you can see it move and then disconnect it!

It's best to mark the speaker wire polarity before you remove the plug. It goes Tweeter + - (blank blank) Woofer + -.

EDIT: Here's a guess at a frequency response plot of the crossover with the inductor (coil) in operation (no jumper B) and capacitor 3 (blue) by-passed by using jumper A. It's not accurate as I don't know the impedance of the inductor, but it's my best guess.
Both jumpers C & D are used to bring both smaller capacitors into operation.
Removing jumper A will affect the low bass (<200Hz) and not change the mid-range dip.

IF the speaker impedance is 8 ohm (twice the iMac speaker's) then the response curve will be more or less flat...

XoverPlot.png
 
Last edited:

Aiwi

macrumors member
Oct 21, 2010
79
70
I connected the original speakers to the R1811 driver board with a 2-way YLY-2088 crossover board from Amazon.
I find the sound very dull and not very nice, it is not as clear as the original iMac. :confused:

With the lab power supply at 1.5 volts and 0.5 amps, I tested whether the woofer went out or in. If it went out, then I had the plus and minus wires right. This is how I connected it.

But what about the tweeter, because no matter how hard I tried. I couldn't figure out what the plus and minus poles of the tweeter are.

Does anyone have any tips? 💡

(Photos will follow tomorrow. 🖼️🤳)

I did try some other internal amplifiers with knobs for adjusting the audio, but they had other problems. In the end I did what you did, used the included R1811 amp.

Like you, I agree that the audio is not tuned to the profile of the internal iMac speakers.

What I did as a low effort solution was to install the free software eqMac and set an EQ where the it sounds the most neutral.
 

fhall1

macrumors 68040
Dec 18, 2007
3,832
1,268
(Central) NY State of mind
How would I connect this relay to the iMac power button cables and an R1811 board or the control panel? I read a lot in the thread about soldering the iMac power button cable to the R1811 board or the control panel but found nothing about how to use the bi-stable relay you linked.
I'm not really sure what the bi-stable relay gets you. I just took off the existing iMac power switch connector - stripped the wire ends so I could solder and heat-shrink tube a couple longer wires on that would reach the power switch on the control board where I had it mounted. Now if I push the iMac power switch, the monitor comes on - push it again, the monitor goes off. What more do you need it to do?
 
  • Like
Reactions: xMarty

xMarty

macrumors newbie
Jul 26, 2023
7
2
I'm not really sure what the bi-stable relay gets you. I just took off the existing iMac power switch connector - stripped the wire ends so I could solder and heat-shrink tube a couple longer wires on that would reach the power switch on the control board where I had it mounted. Now if I push the iMac power switch, the monitor comes on - push it again, the monitor goes off. What more do you need it to do?
I honestly don't know. I asked because Aiwi mentioned the relay.
 
  • Like
Reactions: fhall1

PaulD-UK

macrumors 6502a
Oct 23, 2009
542
254
A bi-stable relay would cut off power to additional stuff like separately powered amps or fans. As well as the main video board and its PSU if that is also in the iMac case.
In switch-off S/B mode only the relay is receiving power, just like an unmodified iMac.
Its mains powered so needs proper installation….⚠️
 
Last edited:

fhall1

macrumors 68040
Dec 18, 2007
3,832
1,268
(Central) NY State of mind
A bi-stable relay would cut off power to additional stuff like separately powered amps or fans. As well as the main video board and its PSU if that is also in the iMac case.
In switch-off S/B mode only the relay is receiving power, just like an unmodified iMac.
Gotcha....since all I have in my rebuild is the driver board with no fans or audio or USB hubs etc I guess I'm not missing anything.
 
  • Like
Reactions: PaulD-UK

redheeler

macrumors G3
Oct 17, 2014
8,419
8,841
Colorado, USA
I did try some other internal amplifiers with knobs for adjusting the audio, but they had other problems. In the end I did what you did, used the included R1811 amp.

Like you, I agree that the audio is not tuned to the profile of the internal iMac speakers.

What I did as a low effort solution was to install the free software eqMac and set an EQ where the it sounds the most neutral.
Can you share the software EQ profile?
 

Aiwi

macrumors member
Oct 21, 2010
79
70
Can you share the software EQ profile?
Sure. I haven't measured anything, so it's really just a subjective EQ.

Code:
Preamp: 0 dB
Filter 1:  ON  PK  Fc 32 Hz  Gain 3.31 dB  Q 1.41
Filter 2:  ON  PK  Fc 64 Hz  Gain 4.9 dB  Q 1.41
Filter 3:  ON  PK  Fc 125 Hz  Gain 0 dB  Q 1.41
Filter 4:  ON  PK  Fc 250 Hz  Gain -13.08 dB  Q 1.41
Filter 5:  ON  PK  Fc 500 Hz  Gain -2.81 dB  Q 1.41
Filter 6:  ON  PK  Fc 1000 Hz  Gain -5.49 dB  Q 1.41
Filter 7:  ON  PK  Fc 2000 Hz  Gain -9.91 dB  Q 1.41
Filter 8:  ON  PK  Fc 4000 Hz  Gain 8.11 dB  Q 1.41
Filter 9:  ON  PK  Fc 8000 Hz  Gain 8.77 dB  Q 1.41
Filter 10:  ON  PK  Fc 16000 Hz  Gain 6.46 dB  Q 1.41

Screenshot 2024-03-11 at 10.28.14.png
 

xMarty

macrumors newbie
Jul 26, 2023
7
2
Since I could not order the Molex Male and female housings from eBay because the seller does not ship to Germany, here are the Molex part numbers for the individual parts.

If you plan to use the original iMac power port, you need:
1 Molex Micro-Fit 3.0 Plug Housing, Single Row, 3 Circuits - part number 436400300
2 Molex Micro-Fit 3.0 Crimp Terminal, Male - part number 430310001

If you want to replace the existing connector attached to the iMac power port, you need:
1 Molex Micro-Fit 3.0 Receptacle Housing, Single Row, 3 Circuits - part number 436450300
2 Molex Micro-Fit 3.0 Crimp Terminal, Female - part number 430300001

1 Molex compatible Hand Crimp Tool for Micro-Fit 3.0 Terminals, 20-30 AWG.
I ordered the SOMELINE crimp tool kit set, which already contained JST XH 2.5-2 PIN connector plugs, female and male, if you plan to exchange the stock fan of an R1811 board with a Noctua one.

Amazon.com: https://www.amazon.com/-/dp/B0C8N8JBDC/
Amazon.de: https://www.amazon.de/gp/product/B0C8N8JBDC/
The SOMELINE website: https://somelinetools.com/
 
Last edited:
  • Like
Reactions: vistavizion

i486dx2-66

macrumors 6502
Feb 25, 2013
360
398
Regarding power requirements, the only posts with actual figures are:
@i486dx2-66 posted this about his T18 board's power draw:
"...the provided no-name 19V 4.74A power adapter. This is with the T18, on a 2014 5K iMac panel, with no supplementary backlight driver board.

...

Later @i486dx2-66 added:
"I ran another set of tests with a beefy 19.5V 9.23A (180W) Dell power supply (DA180PM111, with a modified cord for a 2.5x5.5mm plug).

The <1W measurements all bumped up to 2W. But the other three measurements (0%, 50%, and 100% backlight) dropped down to 23W, 64W, and 72W!! So aside from the higher standby consumption, there are some significant efficiency differences between these supplies."


My R1811's figures (with my 24v Cincon 93% efficiency PSU which is hardly warm at all) with an M1 Mac mini 16/512:
Sleep power use: < 1w.
During the minute before Sleep kicks in, whilst the shut-down timer is displayed: 9w.
Backlight 0%: 22.5w.
Backlight 50%: 33w.
Backlight 100%: 52.5w.
Backlight 62%: 37w. This is the setting that I use for reading web pages or writing text.
Viewing Hollywood movies (shot in HDR) requires more backlight, but text pages are much too bright for me at more than ~ 65%.
The inbuilt audio chip adds up to another 7w power consumption if I turn the iMac Pro speakers which I have fitted up to screen-rattling level!!!


So the T18 seems to use at least ~50% more power than the R1811 on these figures, more with an inefficient PSU.

Sorry for the late reply. I think this might actually just be a scaling or linearity difference between the hardware or OSD controls?

On my T18 + 2014 5K panel combo, I actually settled in on zero (yes, zero) as my day-to-day brightness preference. It's good enough during the day, but not overly harsh with some dim room lighting at night. If I am working on photo editing or the like, I may adjust it up by 10%, but typically move it back down when finished. Zero brightness ("backlight") and 50% contrast on the T18 is a pretty close match for my 4K Samsung display at 57% brightness / 35% contrast. Colors on the iMac panel look awesome at 100%, but my eyes just can't take it! 🤣

So for normal usage, the power usage for my combo really is at or close to that 22.5W.
 
  • Like
Reactions: PaulD-UK

quintanth

macrumors newbie
Mar 12, 2024
1
0
Hi all, just starting my build, iMac is disassembled to confirm LCD panel version (SDC1). iMac is 2017 version.

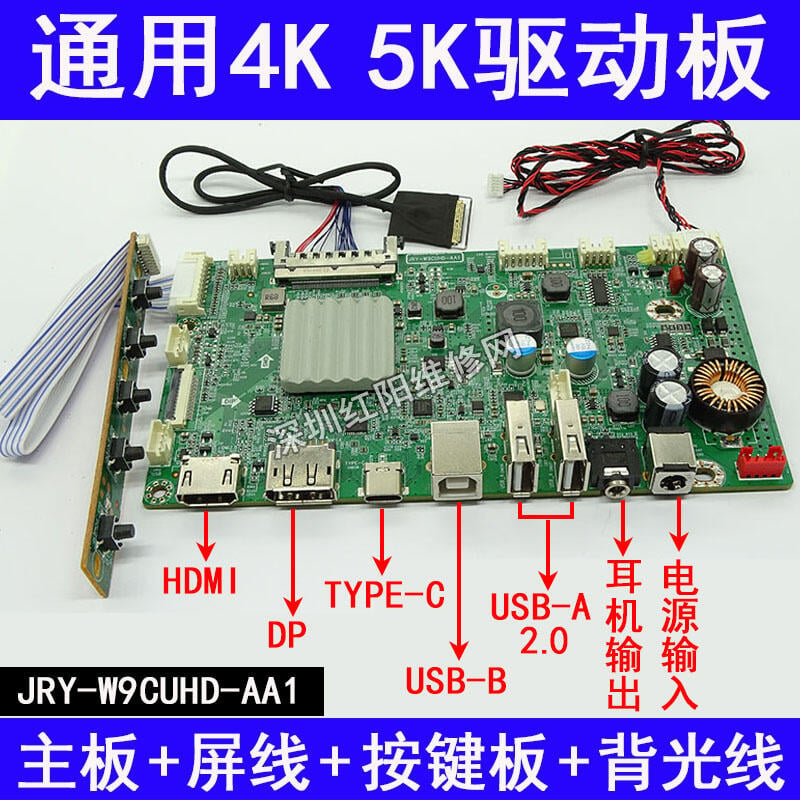
I'm still hesitating between the R9A18 and the R1811 for two reasons mostly because of the the fan, I'm afraid it's going to be loud and annoying. But also, the R1811 is almost double the price after the exchange rate to Canadian $, including shipping but excluding potential duty.

I'm planning to put a USB camera in the mac, and will connect the monitor to the computer through DP since I do not want to use the power delivery, because 1) the fan on the R1811 will run faster and 2) I've read a few scary stories about frying the host computer when connected to USB-C. And also, since I will be using a thunderbolt hub (OWC or CalDigit not sure yet) for work, I can just wire the camera directly to the hub, so no need to plug the camera directly into the R1811. Maybe I can also put the hub inside the chasis and run the usb/SD/thunderbolt/ethernet ports directly to the ones of the mac (eventually, no rush to get that done)

This leaves me two with two questions:

1- Has anyone managed to get the R9A11 to display 5k@60hz with 10 bit on a single DP 1.4? Some sellers mention the boards now can, but haven't seen anyone do it yet.
2- Since my LCD panel is SCD1, I've also read that I might need to add add a 50W current board to my build to achieve great brightness, has anyone had that issue? (also that would potentially add heat in the chasis, needing the fan to run faster, adding to my hesitation between both boards)

Thanks in advance for the help!
 

PaulD-UK

macrumors 6502a
Oct 23, 2009
542
254
Hi.
In my opinion the extra picture quality (with a single cable) makes the R1811 a more favourable choice.
The fan is not a problem, as it can be run at reduced voltage without any bad effects, and is much quieter like this.
i.e. inaudible...

1. The R9A18 v1.1 seems only to manage 5K/60 over a single cable in YUV mode (not RGB) at 8-bits.
That's all that has been shown in this thread (in pics of the OSD). Anybody know more? Please post. ;)
It does 5K/60 RGB @ 10 bits with 2 x DP cables.

2. The R9A18 and R1811 give at least 350 nits (maybe somewhat more) when the backlight is powered from the board.
Adding the DZ-LP0818 external backlight driver gives a bit more - an extra 100-130 nits to that.

At full brightness (without the add-on board) my monitor is far too bright to work with.
But I don't have direct sunlight on the screen...
 
Last edited:

fhall1

macrumors 68040
Dec 18, 2007
3,832
1,268
(Central) NY State of mind
Maybe I can also put the hub inside the chasis and run the usb/SD/thunderbolt/ethernet ports directly to the ones of the mac (eventually, no rush to get that done)
I wouldn't put the Caldigit hub (I have no experience with the OWC) inside the iMac case unless you plan to put a fan in there too. The Caldigit will run warm in the enclosed space. Plus, if for any reason you need to access the hub, you'll have to cut the screen adhesive again - not something you want to do if you don't have to. I use a Caldigit hub (externally). I have one TB cable from my M2 MB Air to the TB port on the hub, then a TB to Displayport cable from the hub to the monitor. I also have speakers, camera, external drives, etc plugged into the hub. This way if I want to travel, I unplug one cable from my MB Air and I'm on my way.
 

Regulus67

macrumors 6502
Aug 9, 2023
307
308
Värmland, Sweden
Personally, I did not find it to difficult to open my iMac 5k 27" late 2015. But I did damage one cable. As it melted from short circuit, in the stiff end. Which is not supposed to be bent at all.
I got a replacement, and had no issues afterward.

I just watched this youtube, where he tries to upgrade an iMac Pro. And ended up breaking his connectors :oops:
So it is important to be quite careful when disassembling the display.

The iMac Pros look a lot more complicated, than the regular iMacs. So I am glad I do not have to upgrade mine.

It would look pretty awesome as a DIY display as well


fhall1

macrumors 68040
Dec 18, 2007
3,832
1,268
(Central) NY State of mind
Opening the iMac wasn't bad at all the first time, with the 7 to 12 year old adhesive. People seem to have issues if something happens and they have to re-open their cases shortly after applying the new adhesive strips. Either the strips are thinner (between the two layers of adhesive) than Apple's originals or the fresher adhesive seems to give more problems.
 
  • Like
Reactions: Regulus67

jason3w

macrumors newbie
Jun 19, 2009
10
0
The second new board is the JRY-W9CUHD-AA1. The brand may be "Jiarunyuan", but that is machine translated.

It appears to be mostly available on ruten.com.tw, for a price of $3350-$5900 (presumed to be Taiwan New Dollars, so approximately $109.60 to $193.04 USD?)


A few links:


This PCB has by far the smallest heatsink of any of them. Perhaps that hints of a different brand or model of input processor being used?


View attachment 2209707

View attachment 2209705

View attachment 2209706


View attachment 2209708

View attachment 2209704


Just got one of these. There is no indication of the polarity for the power supply pin.
Does anyone know, or know of a way to find out if the inner pin or outer sleeve of the power input plug is positive?
Thanks!
 

Semmo

macrumors member
Jun 23, 2020
31
17
Received my R1811 Board today from Stonetaskin. Received very fast to Australia. 4or5days I think. Came with an Australia power cord too which is a massive bonus.
Very easy to set up. And I love it so far.

Only issue is a weird text affect when scrolling compared to my ultra fine 4K. Maybe it’s my panel who knows.

The fan is pretty quiet tbh.

Do we have a firmware library anywhere?

I would also love to change the name of the monitor in system prefs. I’ve scrolled a long way back but haven’t found the post I’m looking for. Anyone know?

Just waiting for my crossovers to arrive.
 

Regulus67

macrumors 6502
Aug 9, 2023
307
308
Värmland, Sweden
Just got one of these. There is no indication of the polarity for the power supply pin.
Does anyone know, or know of a way to find out if the inner pin or outer sleeve of the power input plug is positive?
Thanks!
You could use an electronic multimeter tool, and measure DC voltage. If it displays a negative value, just switch the probes. That way you will know which is plus and minus polarity
 
  • Like
Reactions: jason3w

PaulD-UK

macrumors 6502a
Oct 23, 2009
542
254
@Semmo 99% chance the centre pin of the barrel socket is positive, and the outer sleeve is negative.
I've only ever seen the other way on Japanese electronics, and very rarely.

In this pic I've marked the way you could test. With a multimeter see if the two BLACK solder blobs I've arrowed are connected.
The PCB is marked ground on the board, so if the sleeve is connected to ground then the sleeve is negative.
I wouldn't touch the red solder points, as the multimeter will apply a test voltage so its safer not to touch anywhere else.

JRYdetail.png
 
Last edited:
  • Like
Reactions: jason3w

Edge

macrumors regular
Jul 28, 2005
128
24
Just got one of these. There is no indication of the polarity for the power supply pin.
Does anyone know, or know of a way to find out if the inner pin or outer sleeve of the power input plug is positive?
Thanks!

Re: JRY-W9CUHD-AA1

I simply plugged in an existing 12V supply with a +centre pin, and it didn't blow up, it powered the card and display. That's how I found out.
 

Edge

macrumors regular
Jul 28, 2005
128
24
Does anyone know what the USB-B port on the JRY card is for? (It's the printer style of USB cable which isn't typically in use these days)

Unlike plugging the 12V supply in without double-checking the pin orientation, I'm loathe to plug a USB-A to USB-B cable to my Macbook Pro and find out.

EDIT: According to the page for the T18 board, the USB-B port can be used as follows;
Haijing Cool Store said:
The USB-B interface can also be used as the upper port of the USB, and the upper port can be used to control the system operation of the signal source through the two USB-A interfaces.
I'm not 100% sure what that actually means... simply controlling the two USB-A ports via a cable other than the single USB-C input? Or does the "system operation of the signal source" mean something more complicated?


Additionally, does anyone know if the exposed 6-pin USB header on the driver board behind the right USB-A port is the USB-SERIAL port indicated in System Report? And what it might be used for?

Code:
USB Serial:
  Product ID:    0x7523
  Vendor ID:    0x1a86
  Version:    2.64
  Speed:    Up to 12 Mb/s
  Location ID:    0x01140000 / 2
  Current Available (mA):    500
  Current Required (mA):    98
  Extra Operating Current (mA):    0

With thanks

EDIT: This may not be useful, but the USB hub controller is the Genesys Logic GL850G.
 
Last edited:

PaulD-UK

macrumors 6502a
Oct 23, 2009
542
254
Quote: "Does anyone know what the USB-B port on the JRY card is for?"

You are right. Reworded, the USB-B port connects to the computer:
Haijing Cool Store said:
The USB-B interface is the upstream port for the USB-A ports, so this upstream port interfaces to a hub with two USB-A downstream ports.


It looks like there is a 4 port USB hub controller, and the 6-pin socket is driven by that controller. 0x7523 is a USB to serial device, and also outputs to the socket, so the socket is for unspecified USB/serial output. This is Arduino territory - beyond my expertise!
 
Register on MacRumors! This sidebar will go away, and you'll see fewer ads.