Become a MacRumors Supporter for $50/year with no ads, ability to filter front page stories, and private forums.
Mid 2012 rMBP 15" and 4K, UHD, Samsung U28D590D Monitors
- Thread starter iphone5att64
- Start date
- Sort by reaction score
You are using an out of date browser. It may not display this or other websites correctly.
You should upgrade or use an alternative browser.
You should upgrade or use an alternative browser.
I have a Samsung U28D590D and a Macbook Pro Retina mid-2012.
This Macbook is the one with the most problems I believe because it has such an old graphics system that was revised quickly in the next MBPr.
It works from HDMI port at 4k@30hz which I knew when I bought it but I didn't realise how painful 30hz is to use with the mouse. It is basically unusable for me.
I bought a mini-DisplayPort to DisplayPort cable. I believe this is no different from having an active HDMI adapter - "active HDMI adapter" is basically wiring HDMI as if it's DisplayPort from what I understand. This has been used multiple times in this thread.
Using Picture/Picture mode (two 1920x2160 panels) HDMI and DisplayPort I can get it to work at 4K @ 60hz.
All good...so far...
How on earth do I get it to HiDPI mode so I effectively have each 1920x2160 as "Retina"-960x1080? The text is too small to use in 4k without proper scaling. It looked amazing at 4k@30hz with HDMI only setting the scaling properly.
I am really struggling with SwitchResX. I work in IT so not completely unfamiliar with computers but I am baffled by this software. It shows me screen modes where some work and some just do nothing. The ones labeled HiDPI are the exact ones I want but they just do nothing when I select them with the radio button. I've tried custom resolutions but can't make any progress from the instructions above.
Thanks - Chris
well, I use 1080-HIDPI , with MacPro 3,1 ... ATI6870 and sam4k , using DP1.2 !
I with to get 2560x1444 HiDPI !! even it's somehow lags when using mission control ! ... but beautiful experience graphics display .
any tip will be nice to get above resolution or maybe update for SwitchResX to force it
BR
I with to get 2560x1444 HiDPI !! even it's somehow lags when using mission control ! ... but beautiful experience graphics display .
any tip will be nice to get above resolution or maybe update for SwitchResX to force it
BR
Quite an old post, but will this work on a mid-2012 13-inch rMBP?
Here's the tutorial to get your 2012 Macbook Pro Retina running an external Samsung U28D590D monitor at 4K 60HZ Scaled(retina look).
What do you need :
1- MacOs 10.9.3
2- SwitchresX (legit or trial)
3- U28D590 Patch (attach to this post), filename : NORATIO-RGB_PATCH_MACOS_1093_SAMSUNG_U28D590D.zip
4- 2x HDMI cables
5- Mini Display to HDMI Accell adapter model : B086B-008B-2 (make sure you use the version Display Port 1.1 to HDMI 1.4, there are another version for DP1.2 and this is not the one that we need)
Comments : You need to be on Mac 10.9.3 because you want to use the scaled feature over HIDPI so not everything looks tiny. You need my patch/fix to override stupid Apple detection of the Samsung U28D590 as an HDTV instead of a monitor. This will correct the color space used to communicate with our monitor. And you need the Accell DP to HDMI adapter to have the second HDMI to achieved a side by side 1920x2160 at 60hz for a total of 4K at 60hz
Here's the step :
1- Open your Monitor and plug nothing for now
2- We will setup the monitor settings now because after you have a dual HDMI for some reason you can't. Go into picture.
3- Set the Brightness to 86
4- Set the contrast to 79
5- Set the sharpness to 68
6- Game Mode : Off
7- Magic Angle : Standing Mode
8- Go to color and set color tone to "Normal" and "Gamme to Mode3"
9- We'll now activate the picture on picture. Go to screen and choose PIP and turn it on
10- Make sure the size is set to "Wide" and choose the icon that is showing two side by side monitors.
11- Under source, select select HDMI1 for the left and HDMI2 for the right and click "Apply"
12- Click on "Contrast" and set it to 79/79 for both sides
13- Boot up your Macbook and login to your MacOS session
14- Go into the wallpaper and put a solid grey color as wallpaper for both monitor)
15- Extract NORATIO-RGB_PATCH_MACOS_1093_SAMSUNG_U28D590D.zip. You should see a folder called "DisplayVendorID-4c2d" (DO NOT CHANGE THE NAME).
16- Copy the folder and paste it in : /System/Library/Displays/Overrides (a popup will tell you that the folder already exist and will ask you to overwrite, you say YES. Do not just copy the file, you need to copy over the folder
17- Reboot (you should now have a real RGB monitor).
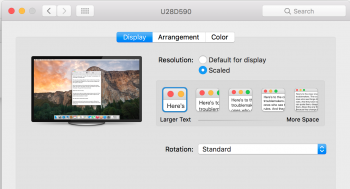
18- Go into System Preferences, displays and make sure that the color profile is set to "Color LCD" for both side. If you still see a separation, you may have to increased the contrast for one side on the monitor (I had to do +5 for one of them to match the grey perfectly, so i ended up 79/84). When I switch in Windows 8.1 mode, I have to put it back to 79/79.
19- Install Switchresx and follow options from "Sweeho", are they are again
20- Open SwitchresX and click on the first U28D590 in left panel
21- Click Custom Resolutions tab
22- Click the "+" button to add a new entry
23- Choose 'Scaled resolution' from the drop down menu
24- At the line "Scale to", put 2560 pixels 2880 lines
25- In the status bar on top, click file, save settings
26- Reboot
27- Go back in "System Preferences, click on SwitchResx to open
28- click on the first U28D590 in left panel
29- Click on "Current resolutions"
30- Find newly added resolution 2560x2880,60hz (do not select it, just find it)
31- In the Active column, click on the "Enable" text to list a choice of resolution
32- Choose 1280x1440, 60hz HiDPi
33- Reboot
34- SwitchResX offer a contextual menu, right click Desktop in the left HDMI side, SwitchResX and choose "1280x1440, 60HZ HiDPi".
35- Repeat the same thing on the right side now
36- Go to System Preferences, Mission control and uncheck "Displays have separate Spaces" (this will permit to have windows all across the full 4k resolution.
HÉ VOILÀ!!!
You now have a 4K resolution at 60HZ retina scaled display on your Macbook Prop Retina 2012 with two HDMI.
I have a Samsung U28D590D and a Macbook Pro Retina mid-2012.
This Macbook is the one with the most problems I believe because it has such an old graphics system that was revised quickly in the next MBPr.
It works from HDMI port at 4k@30hz which I knew when I bought it but I didn't realise how painful 30hz is to use with the mouse. It is basically unusable for me.
I bought a mini-DisplayPort to DisplayPort cable. I believe this is no different from having an active HDMI adapter - "active HDMI adapter" is basically wiring HDMI as if it's DisplayPort from what I understand. This has been used multiple times in this thread.
Using Picture/Picture mode (two 1920x2160 panels) HDMI and DisplayPort I can get it to work at 4K @ 60hz.
All good...so far...
How on earth do I get it to HiDPI mode so I effectively have each 1920x2160 as "Retina"-960x1080? The text is too small to use in 4k without proper scaling. It looked amazing at 4k@30hz with HDMI only setting the scaling properly.
I am really struggling with SwitchResX. I work in IT so not completely unfamiliar with computers but I am baffled by this software. It shows me screen modes where some work and some just do nothing. The ones labeled HiDPI are the exact ones I want but they just do nothing when I select them with the radio button. I've tried custom resolutions but can't make any progress from the instructions above.
Thanks - Chris
Hey Chris just wondering if you decided to keep this monitor? I have the original Retina MBP myself and am trying to find which 4K monitor has the best PBP support as I'll need to use two inputs to achieve 4K @ 60hz.
Thanks.
Can anybody help me please?
I ordered a samsung u28d590 for my rMBP 2012 13" with intel graphics hd4000. I also bought two Accell Ultraav Mini Displayport 1.1 To Hdmi Active Adapter and put it on the two mini display ports of my macbook.
But i can only use 1920x2160 @27.27Hz. Is there a difference between 13" and 15"? Because some users in this thread can run 1920x2160 @60Hz.
Thanks a lot!!!
EDIT:
http://www.planar.com/blog/2013/7/30/4k-content-to-4k-screens/#.VMuZCMZSFaM
Is it possible to change the color depth in yosemite to 8 bit?
I ordered a samsung u28d590 for my rMBP 2012 13" with intel graphics hd4000. I also bought two Accell Ultraav Mini Displayport 1.1 To Hdmi Active Adapter and put it on the two mini display ports of my macbook.
But i can only use 1920x2160 @27.27Hz. Is there a difference between 13" and 15"? Because some users in this thread can run 1920x2160 @60Hz.
Thanks a lot!!!
EDIT:
http://www.planar.com/blog/2013/7/30/4k-content-to-4k-screens/#.VMuZCMZSFaM
DisplayPort 1.1a 2 3840x2160 60Hz 8 Bit
Synchronized 2x1920x2160 Few displays support this
Is it possible to change the color depth in yosemite to 8 bit?
Attachments
Last edited:
Can anybody help me please?
I ordered a samsung u28d590 for my rMBP 2012 13" with intel graphics hd4000. I also bought two Accell Ultraav Mini Displayport 1.1 To Hdmi Active Adapter and put it on the two mini display ports of my macbook.
But i can only use 1920x2160 @27.27Hz. Is there a difference between 13" and 15"? Because some users in this thread can run 1920x2160 @60Hz.
Thanks a lot!!!
EDIT:
http://www.planar.com/blog/2013/7/30/4k-content-to-4k-screens/#.VMuZCMZSFaM
Is it possible to change the color depth in yosemite to 8 bit?
Is there anybody that knows how to make it work at 1080p HDPI via 2 HDMI?
Thanks
Hello,
Using Picture/Picture mode (two 1920x2160 panels) HDMI and DisplayPort I can get it to work at 4K @ 60hz.
On Windows 8.1 via bootcamp its really amazing working on P/P mode because you can move easily from one screen to other screen. And you can enlarge you app windows to the booth screen and work on it like a one screen (of course when you do a 3d things u can see some "errors" between). My question is how can i do this on the mac too, because in mac i cant enlarge the windows to the booth screens, i can work only in one screen with a specify application.
btw. I’m using rMBP late 2012 15"
Thank you!
non-retina MBP15 mid-2012 (9,1) and u28d590
FYI... I got this non-Retina MBP15 and U28D590 setup to work last weekend at 2160p/60Hz, using SwitchResX on Yosemite 10.10.2 and a mini-displayport to Displayport 1.2 capable cable by Star-Tech.
I had been messing around with the settings for a while, so am not sure exactly what I did to get the resolution to appear listed under "Custom." When it did (probably after a reboot), I switched to it on the fly. Worked fine. Played some UHD content and it looked good.
However, on reboot, the 3840x2160@60Hz custom res wasn't listed anymore. Display had defaulted back to 1440p60.
Will attempt to reproduce again later this week. This time, recording the steps.
Just a heads-up...
this is crazy after update to 10.10.3 ... no more 4k no 2160 only 1440
maybe they change ATI driver ! my old 6870 can't do it anymore !
all I want is 1080 HiDPI !
update: I get with 40Hz !! it's ugly !
maybe they change ATI driver ! my old 6870 can't do it anymore !
all I want is 1080 HiDPI !
update: I get with 40Hz !!
it's ugly !Attachments
Last edited:
Hey guys,
I am thinking about giving this a try like you guys have. Before I go out and buy the monitor I was hoping you could give me some insight,
First of all is the PIP option still the best way to go? Or has there been any changes since Apple released 10.10.3 that has improved things on the 2012 rMBP as well? (judging by the post above me I would say no though)...
Secondly, I travel with my Macbook and this setup would be for my my desk at home. I was just wonder, is it just a case of plugging in/unplugging as you need? Or do you have to go into like SwitchResX and reselect the resolution after you connect/disconnect the cables? Are there any downsides to this solution when it comes to taking the laptop on the road?
And lastly, how come you all decided to use the native HDMI port and one displayport? Since the Macbook has two displayports, why not use both two to avoid the different brightness/contrast/scrolling issues between the HDMI and DP?
no HiDPI
Hi guys, this is my first post ...
I've went thru all posts but I couldn't find answer to my quest how to enable at least 2560x1440 @ 60Hz HiDPI on my MBPr mid 2012 via HDMI or MiniDisplayPort to DisplayPort cable. Anyone has done this?
Now I am running 3840x2160 @ 60Hz, PiP Mode but without HiDPI its pain in the *ss : )
- You won't get proper 2560x1440 HiDPI mode on a 4K monitor. HiDPI is based on pixel doubling (horizontally as well as vertically), the procedure used by Apple for their Retina displays. 1 pixel in the graphical user interface will be made up of 4 physical pixels. In that way, HiDPI mode will be a quarter of the effective real estate of the native resolution, but give a much sharper picture.
Your proper HiDPI mode should be 1920x1080 on a 3840x2160 display.
With that said, it may also be possible to achieve some other scaled resolutions (like 2560x1440), but it won't be HiDPI in the way System Preferences uses the term.
Have a look at SwitchResX.
Hi all, I've been following this thread closely, waiting for the definitive answer re. 1080p Hidpi resolution @60Hz from a Mid 2012 Macbook Pro Retina.
Is this possible?
What is the best monitor to achieve this (if possible)?
Timbatec - how have you achieved this/what monitor are you using?
As I understand, I have to use BOTH thunderbolt ports on the macbook - each outputting 1920x1080 - to a single 4K monitor, and then use SwitchResX to enable the HiDpi resolution.
Is this correct?
I have been looking at this monitor.. would this work?
http://www.scan.co.uk/products/iiyama-28-4k-gaming-monitor
Thanks guys..
HP Z24s with a MBPr mid-2012?
Hi, congratulations to all the collaborators of this thread! It has been extremely useful for me since I'm looking for a 4K monitor for my MBPr mid-2012.
I'm looking for a 24" model and HP recently released the Z24s. It looks perfect: 1 mDP and 1 DP and supports PictureByPicture, so it should work with the workaround of this post (Even better since there is no need for a HDMI>mDP special adapter).
Have you seen this setup in action? Do you think it will do 4K@60hz taking advantage of the two mDP ports of the Macbook Pro?
Would appreciate any tips about it. Thanks guys.
hey guys.... i got this all setup with the upstar 4k display according to the instructions in this thread. has anyone figured out how to get fullscreen youtube videos to span the entire screen? right now its treating one half as a separate display (obviously)
hey guys.... i got this all setup with the upstar 4k display according to the instructions in this thread. has anyone figured out how to get fullscreen youtube videos to span the entire screen? right now its treating one half as a separate display (obviously)
Have you deselected the "Displays have separate Spaces" option under Mission Control in the System Preferences?
yeah. It works great otherwise... its just that setting anything to full screen only covers one side of the display.Have you deselected the "Displays have separate Spaces" option under Mission Control in the System Preferences?
Any chance to get 4k @60Hz with Macbook Pro mid 2012 classic? I am getting @30hz currently from DP so I was thinking if I buy miniDP to HDMI splitter then use PIP to allow it?
Last edited:
Has anyone tried this?
http://www.macvidcards.com/blog/4k-mst-60hz-hack-for-osx-1010
I also have a mid 2012 rMBP and I was thinking on a 4k monitor but without 60hz is a deal breaker.
http://www.macvidcards.com/blog/4k-mst-60hz-hack-for-osx-1010
I also have a mid 2012 rMBP and I was thinking on a 4k monitor but without 60hz is a deal breaker.
my 2015 mac book pro 15 inch retina is pushing dual 4k monitors (samsung u28d590d) at 3140 x 2160 @ 60 hz and man it looks awesome! Actually it's so good that I scaled it back down to 1440 just to fit LESS on the screen!
I spent a lot of time playing around with different configurations and here is how I got it to work.
First, I tried to hook up these monitors using a mini display port to hdmi cable. I quickly learned that the quality was there in terms of image but it could only run at 30hz. As anyone who got to this point realizes- the mouse is jumpy, games suck, and it is generally annoying.
Using the straight hdmi cable is worse and you can only hook up one monitor.
But then- JACKPOT! I came upon a mini display port to display port adapter! That is your ticket!! Get yourself two of those suckers and then use the display port cable into the back of the Samsung and Yahtzee!!
We have a mid 2012 Retina MacBook Pro 15" and bought a pair of Samsung U28D590D UHD monitors.
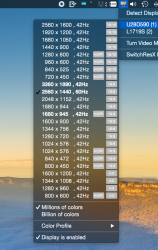
3840x2160 @ 30Hz is possible with the HDMI port. HiDPI and everything just works with 10.9.3. Everything did not just work with a mini-DisplayPort to HDMI adapter. 1920x1080 @ 60Hz was the highest resolution listed with the adapter.
3840x2160 @ 30Hz is possible with the DisplayPort by adding a custom resolution with SwitchResX. Without SwitchResX, the highest resolution listed is 2560x1440 @ 60Hz and HiDPI scaling options are not enabled. We could not find the right setting to use HiDPI with SwitchResX.
The monitors have a Picture by Picture feature. We tried to get 3840x2160 @ 60Hz by outputting 1920x2160 @ 60Hz from HDMI and DisplayPort. 1920x2160 @ 60Hz was possible with the DisplayPort. We could not set HDMI to 1920x2160. The monitor has one DisplayPort and two HDMI.
Hi, do i need the mini-DP to HDMI adapter? I have a mini-DP to DP cable, couldn't i just use one hdmi and one DP of my monitor? Thanks!
How to 4K 60HZ Macbook 2012 with Samsung U28D590D Tutorial
Here's the tutorial to get your 2012 Macbook Pro Retina running an external Samsung U28D590D monitor at 4K 60HZ Scaled(retina look).
What do you need :
1- MacOs 10.9.3
2- SwitchresX (legit or trial)
3- U28D590 Patch (attach to this post), filename : NORATIO-RGB_PATCH_MACOS_1093_SAMSUNG_U28D590D.zip
4- 2x HDMI cables
5- Mini Display to HDMI Accell adapter model : B086B-008B-2 (make sure you use the version Display Port 1.1 to HDMI 1.4, there are another version for DP1.2 and this is not the one that we need)
Comments : You need to be on Mac 10.9.3 because you want to use the scaled feature over HIDPI so not everything looks tiny. You need my patch/fix to override stupid Apple detection of the Samsung U28D590 as an HDTV instead of a monitor. This will correct the color space used to communicate with our monitor. And you need the Accell DP to HDMI adapter to have the second HDMI to achieved a side by side 1920x2160 at 60hz for a total of 4K at 60hz
Here's the step :
1- Open your Monitor and plug nothing for now
2- We will setup the monitor settings now because after you have a dual HDMI for some reason you can't. Go into picture.
3- Set the Brightness to 86
4- Set the contrast to 79
5- Set the sharpness to 68
6- Game Mode : Off
7- Magic Angle : Standing Mode
8- Go to color and set color tone to "Normal" and "Gamme to Mode3"
9- We'll now activate the picture on picture. Go to screen and choose PIP and turn it on
10- Make sure the size is set to "Wide" and choose the icon that is showing two side by side monitors.
11- Under source, select select HDMI1 for the left and HDMI2 for the right and click "Apply"
12- Click on "Contrast" and set it to 79/79 for both sides
13- Boot up your Macbook and login to your MacOS session
14- Go into the wallpaper and put a solid grey color as wallpaper for both monitor)
15- Extract NORATIO-RGB_PATCH_MACOS_1093_SAMSUNG_U28D590D.zip. You should see a folder called "DisplayVendorID-4c2d" (DO NOT CHANGE THE NAME).
16- Copy the folder and paste it in : /System/Library/Displays/Overrides (a popup will tell you that the folder already exist and will ask you to overwrite, you say YES. Do not just copy the file, you need to copy over the folder
17- Reboot (you should now have a real RGB monitor).
18- Go into System Preferences, displays and make sure that the color profile is set to "Color LCD" for both side. If you still see a separation, you may have to increased the contrast for one side on the monitor (I had to do +5 for one of them to match the grey perfectly, so i ended up 79/84). When I switch in Windows 8.1 mode, I have to put it back to 79/79.
19- Install Switchresx and follow options from "Sweeho", are they are again
20- Open SwitchresX and click on the first U28D590 in left panel
21- Click Custom Resolutions tab
22- Click the "+" button to add a new entry
23- Choose 'Scaled resolution' from the drop down menu
24- At the line "Scale to", put 2560 pixels 2880 lines
25- In the status bar on top, click file, save settings
26- Reboot
27- Go back in "System Preferences, click on SwitchResx to open
28- click on the first U28D590 in left panel
29- Click on "Current resolutions"
30- Find newly added resolution 2560x2880,60hz (do not select it, just find it)
31- In the Active column, click on the "Enable" text to list a choice of resolution
32- Choose 1280x1440, 60hz HiDPi
33- Reboot
34- SwitchResX offer a contextual menu, right click Desktop in the left HDMI side, SwitchResX and choose "1280x1440, 60HZ HiDPi".
35- Repeat the same thing on the right side now
36- Go to System Preferences, Mission control and uncheck "Displays have separate Spaces" (this will permit to have windows all across the full 4k resolution.
HÉ VOILÀ!!!
You now have a 4K resolution at 60HZ retina scaled display on your Macbook Prop Retina 2012 with two HDMI.
Could anyone confirm that this solution is still viable in 10.11 / El Capitan? Also: did anyone try this with the late 2013 13"?
And thanks for the detailed guide, noratio!
/hvedemelsbof
Last edited:
I am using Macbook Pro 13" 2015
To get 4k @ 60hz with HiDIP Make sure you get a Mini Display port to Display port cable like this one:
https://www.amazon.com/gp/product/B00C7RJQPY/ref=oh_aui_detailpage_o03_s00?ie=UT F8&psc=1
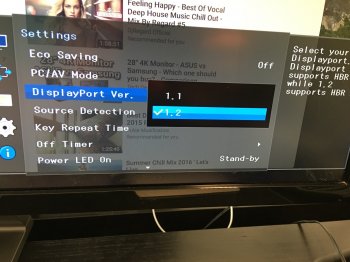
The U28D590 is set to DisplayPort 1.1 by default. Make sure you set it to DisplayPort 1.2.
To get 4k @ 60hz with HiDIP Make sure you get a Mini Display port to Display port cable like this one:
https://www.amazon.com/gp/product/B00C7RJQPY/ref=oh_aui_detailpage_o03_s00?ie=UT F8&psc=1
The U28D590 is set to DisplayPort 1.1 by default. Make sure you set it to DisplayPort 1.2.
Attachments
Register on MacRumors! This sidebar will go away, and you'll see fewer ads.