In the thread dedicated to my previous video-specific tool, "VidCam WideAngle Tweak", I've received several requests for a more straightforward way of setting the video recording bitrate of iDevices without having a way of switching to an oversampled video mode.
Unfortunately, "VidCam WideAngle Tweak" became a lot less useful under iOS7 because, it seems, you can't fine-tune the recording bitrate of the oversampled mode in the new iOS version, as opposed to previous iOS versions. This makes it impossible to reduce the bitrate to save storage when using my oversampled mode. This, unless you use the iPhone 5s, which, currently, is the only iDevice to be able to deliver steady 30 fps (at least under good light) in the oversampled mode, means the default 17...21 / 10.5 Mbps mode (on all non-720p models and the 720p iPhone 4, respectively) will be quite a bit of an overkill: encoding a 1664*1224, 15...20 fps stream at 17...21 Mbps is clearly an overkill and an unnecessary waste of storage. (Again, 30 fps encoding, as is on the 5s, would be a completely different question. Then, you don't waste much storage by not being able to force the device to record at a (much) lower bitrate.)
This makes traditional, low-resolution but full-sensor video modes like the 480p (640*480) become of much increased importance – after all, the bitrate of these streams can (still) be directly modified. This means if you don't mind the (vastly) reduced resolution or the ability to save a lot of storage is the most important for you, you can go the 480p way.
Other, Previous JB Tweaks
Up until now, there were no JB tweaks that could directly set the video recording bitrate used by the stock Camera app – particularly not for non-max-resolution (720p on the iPad 2 / iPhone 4 / iPt4G, 480p on the 3GS and 1080p on all the other iDevice models). After all, for the latter, you could simply use my "VidCam WideAngle Tweak" by not enabling oversampling, only configuring the bitrate. The most recommended stock Camera app tweak, CameraTweak, can only switch between recording resolutions but can't actively configure their bitrates.
This meant the only way of reducing the bitrate during recording was using third-party AppStore apps. This meant, in cases, vastly decreased reliability (crashes and data loss) – no one wants to see his precious for example family footage being lost because of an all-too-common crash.
Why and When Decrease the Recording Bitrate?
Given that iOS uses a pretty good video (H.264) encoder, the default bitrate is more than sufficient for shooting even the most action-packed video. What do I mean by “good encoder”? The 10.5 Mbps encoded 720p stream of all iPhone 4+ models produce far better-quality footage than, say, the 2009 Panasonic TZ7 / ZS3 cameras. (It was in early 2009, with the TZ7 / ZS3, that Panasonic added 720 recording to their popular travel zoom series.) Generally, even the iPhone 4 delivers orders of magnitude better quality than these Panasonic cameras operating at a much higher (around 16 Mbps) encoding speed. The latter, while it uses far more storage, continuously records footage with very bad pixelization when you quickly pane the camera; the iPhone never does such a thing. Even if you consistently decrease the bitrate, the iPhone's recorded footage remains great.
Basically, if you shoot static content like, say, a distant man, particularly when doing so from a tripod and in at least moderately good lighting, you can safely decrease the recording bitrate to even 1/4th (or, in cases of particularly good lighting completely getting rid of any kind of noise in the footage, 1/8th) of the original. That is, with, say, the iPhone 5 shooting 1080p video at the default 17 Mbps, you can go down to 4.25 Mbps (or even 2.125) without much quality decrease. The resulting footage will be almost as good as when shot at the nominal (and original) bitrate.
Of course, if you shoot action, particularly when doing so handheld, you will rarely go under, say, 60% of the original bitrate.
Getting my Tweak
It's compatible with both iOS6 and 7. On iOS6, it's a bit more restricted and requires another tweak (for example, CameraTweak) to select the active resolution, on iOS7, it can do the latter too. There's no iOS5 support for the time being. I, however, plan to add it some time – after all, I know how the camera should be tweaked in iOS5 as well.
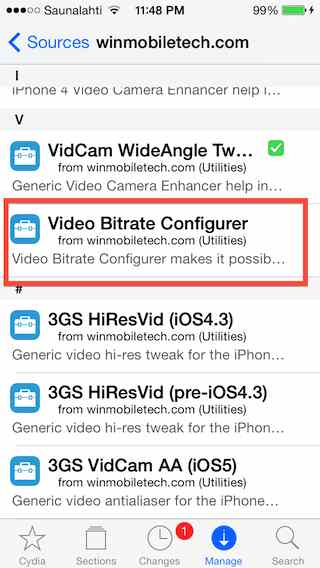
It's in my own Cydia repo at http://winmobiletech.com/cy . Look for “Video Bitrate Configurer”; an example list screenshot follows (annotation by me):
Incidentally, here's the detailed page of the app in Cydia: https://dl.dropboxusercontent.com/u/81986513/022014/24bitratesetter/bitrate-cyd2.jpeg
Direct DEB installer link: http://winmobiletech.com/cy/debs/com.winmobiletech.videobitrateconfigurer_1.0_iphoneos-arm.deb
Full sources (I've cleaned it up and commented it exhaustively so that you surely understand how it works): https://dl.dropboxusercontent.com/u/81986513/022014/24bitratesetter/VideoBitrateConfigurer-v1.0.zip . Note that, after running the DEB installer of this app (or that of my previous "VidCam WideAngle Tweak"), in which the standard “preinst” script file, basically, changes the owner of the /System/Library/Frameworks/MediaToolbox.framework/<Model-specific directory name>/AVCaptureSession.plist file and enables write access to “others” for its directory, you can directly deploy and run the tweak directly from Xcode as well. That is, if you don't want to install the DEB file, you can just compile and deploy the sources.
Using my Tweak
As has already been hinted on, the app behaves a bit differently under iOS6 and iOS7. (iOS5 will behave like iOS6 in this respect.) Under iOS6, there is only one “save” button, as can be seen in the following screenshot:
While, when run under iOS7, you'll also spot a button with the title “Make currently selected mode default” at the bottom:

The latter button not only saves the configuration (bitrate) changes you've already done, but also makes the resolution selected in the upper picker the default one. For example, with “1920x1080” active in there (as in the screenshot above), after you tap the “Make currently selected mode default” button, next time you start the stock Camera app, it'll record in Full HD. And, as you can see in the second picker, at half bitrate, that is, 8.5 Mbps on most 1080p iDevices, except for the 21 Mbps iPad3.
If you “only” use the lowermost (and, with iOS6, only) “Save configuration (without changing resolution)” button, you'll need to use another tool for switching the resolution if you want to use something other than the default one (480p for the 3GS, 720p for the iPad2/iPt4G/iPhone4 and 1080p for everything newer). Again, I recommend “CameraTweak” for this. It's commercial but has excellent features. (See my series of reviews at https://forums.macrumors.com/threads/1708305/ for more info.)
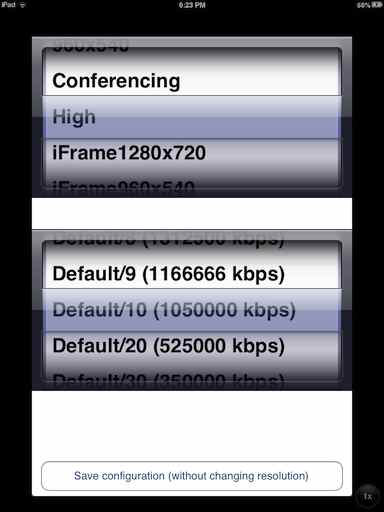
The upper picker, as has already been stated, lists the available shooting modes. It's ordered alphabetically; this is why, in the above screenshot made on an iPhone 5 it starts with 1280x720, followed by 1920x1080, 352x288, 640x480 and, then, the other modes referred to by names like “iFrame 1280x720”. If you select a value from the picker, the second picker will automatically list its default (factory) bitrate divided by an integer, and, then, some hard-coded values ranging from as low as 10 kbps to as high as 50 Mbps. (Of course, 10 kbps should only used in the lowest-resolution and -framerate pre-defined modes like “Low” (invisible in the above screenshot), which has a default bitrate of 128 kbps on most iDevices.)
The second picker always scrolls to the currently selected value, including after startup, when it dynamically reads the current configuration and accordingly shows the previously-set values. At the first run, it'll stay on the uppermost “Default/1” entry as everything will be unaltered (default).
Troubleshooting
Generally, nothing can go wrong if you decrease the bitrate from the default value. However, you can easily run into problems if you increase it. For example, on the iPad 2 / ipod touch 4G, you shouldn't increase the bitrate from the default 10.5 Mbps because even slightly increasing the bitrate to 15 Mbps will result in useless (video-less) footage. However, this won't cause any damage to your iDevice. Should you encounter such cases, you can always decrease the bitrate to a working one.
Unfortunately, "VidCam WideAngle Tweak" became a lot less useful under iOS7 because, it seems, you can't fine-tune the recording bitrate of the oversampled mode in the new iOS version, as opposed to previous iOS versions. This makes it impossible to reduce the bitrate to save storage when using my oversampled mode. This, unless you use the iPhone 5s, which, currently, is the only iDevice to be able to deliver steady 30 fps (at least under good light) in the oversampled mode, means the default 17...21 / 10.5 Mbps mode (on all non-720p models and the 720p iPhone 4, respectively) will be quite a bit of an overkill: encoding a 1664*1224, 15...20 fps stream at 17...21 Mbps is clearly an overkill and an unnecessary waste of storage. (Again, 30 fps encoding, as is on the 5s, would be a completely different question. Then, you don't waste much storage by not being able to force the device to record at a (much) lower bitrate.)
This makes traditional, low-resolution but full-sensor video modes like the 480p (640*480) become of much increased importance – after all, the bitrate of these streams can (still) be directly modified. This means if you don't mind the (vastly) reduced resolution or the ability to save a lot of storage is the most important for you, you can go the 480p way.
Other, Previous JB Tweaks
Up until now, there were no JB tweaks that could directly set the video recording bitrate used by the stock Camera app – particularly not for non-max-resolution (720p on the iPad 2 / iPhone 4 / iPt4G, 480p on the 3GS and 1080p on all the other iDevice models). After all, for the latter, you could simply use my "VidCam WideAngle Tweak" by not enabling oversampling, only configuring the bitrate. The most recommended stock Camera app tweak, CameraTweak, can only switch between recording resolutions but can't actively configure their bitrates.
This meant the only way of reducing the bitrate during recording was using third-party AppStore apps. This meant, in cases, vastly decreased reliability (crashes and data loss) – no one wants to see his precious for example family footage being lost because of an all-too-common crash.
Why and When Decrease the Recording Bitrate?
Given that iOS uses a pretty good video (H.264) encoder, the default bitrate is more than sufficient for shooting even the most action-packed video. What do I mean by “good encoder”? The 10.5 Mbps encoded 720p stream of all iPhone 4+ models produce far better-quality footage than, say, the 2009 Panasonic TZ7 / ZS3 cameras. (It was in early 2009, with the TZ7 / ZS3, that Panasonic added 720 recording to their popular travel zoom series.) Generally, even the iPhone 4 delivers orders of magnitude better quality than these Panasonic cameras operating at a much higher (around 16 Mbps) encoding speed. The latter, while it uses far more storage, continuously records footage with very bad pixelization when you quickly pane the camera; the iPhone never does such a thing. Even if you consistently decrease the bitrate, the iPhone's recorded footage remains great.
Basically, if you shoot static content like, say, a distant man, particularly when doing so from a tripod and in at least moderately good lighting, you can safely decrease the recording bitrate to even 1/4th (or, in cases of particularly good lighting completely getting rid of any kind of noise in the footage, 1/8th) of the original. That is, with, say, the iPhone 5 shooting 1080p video at the default 17 Mbps, you can go down to 4.25 Mbps (or even 2.125) without much quality decrease. The resulting footage will be almost as good as when shot at the nominal (and original) bitrate.
Of course, if you shoot action, particularly when doing so handheld, you will rarely go under, say, 60% of the original bitrate.
Getting my Tweak
It's compatible with both iOS6 and 7. On iOS6, it's a bit more restricted and requires another tweak (for example, CameraTweak) to select the active resolution, on iOS7, it can do the latter too. There's no iOS5 support for the time being. I, however, plan to add it some time – after all, I know how the camera should be tweaked in iOS5 as well.
It's in my own Cydia repo at http://winmobiletech.com/cy . Look for “Video Bitrate Configurer”; an example list screenshot follows (annotation by me):
Incidentally, here's the detailed page of the app in Cydia: https://dl.dropboxusercontent.com/u/81986513/022014/24bitratesetter/bitrate-cyd2.jpeg
Direct DEB installer link: http://winmobiletech.com/cy/debs/com.winmobiletech.videobitrateconfigurer_1.0_iphoneos-arm.deb
Full sources (I've cleaned it up and commented it exhaustively so that you surely understand how it works): https://dl.dropboxusercontent.com/u/81986513/022014/24bitratesetter/VideoBitrateConfigurer-v1.0.zip . Note that, after running the DEB installer of this app (or that of my previous "VidCam WideAngle Tweak"), in which the standard “preinst” script file, basically, changes the owner of the /System/Library/Frameworks/MediaToolbox.framework/<Model-specific directory name>/AVCaptureSession.plist file and enables write access to “others” for its directory, you can directly deploy and run the tweak directly from Xcode as well. That is, if you don't want to install the DEB file, you can just compile and deploy the sources.
Using my Tweak
As has already been hinted on, the app behaves a bit differently under iOS6 and iOS7. (iOS5 will behave like iOS6 in this respect.) Under iOS6, there is only one “save” button, as can be seen in the following screenshot:
While, when run under iOS7, you'll also spot a button with the title “Make currently selected mode default” at the bottom:
The latter button not only saves the configuration (bitrate) changes you've already done, but also makes the resolution selected in the upper picker the default one. For example, with “1920x1080” active in there (as in the screenshot above), after you tap the “Make currently selected mode default” button, next time you start the stock Camera app, it'll record in Full HD. And, as you can see in the second picker, at half bitrate, that is, 8.5 Mbps on most 1080p iDevices, except for the 21 Mbps iPad3.
If you “only” use the lowermost (and, with iOS6, only) “Save configuration (without changing resolution)” button, you'll need to use another tool for switching the resolution if you want to use something other than the default one (480p for the 3GS, 720p for the iPad2/iPt4G/iPhone4 and 1080p for everything newer). Again, I recommend “CameraTweak” for this. It's commercial but has excellent features. (See my series of reviews at https://forums.macrumors.com/threads/1708305/ for more info.)
The upper picker, as has already been stated, lists the available shooting modes. It's ordered alphabetically; this is why, in the above screenshot made on an iPhone 5 it starts with 1280x720, followed by 1920x1080, 352x288, 640x480 and, then, the other modes referred to by names like “iFrame 1280x720”. If you select a value from the picker, the second picker will automatically list its default (factory) bitrate divided by an integer, and, then, some hard-coded values ranging from as low as 10 kbps to as high as 50 Mbps. (Of course, 10 kbps should only used in the lowest-resolution and -framerate pre-defined modes like “Low” (invisible in the above screenshot), which has a default bitrate of 128 kbps on most iDevices.)
The second picker always scrolls to the currently selected value, including after startup, when it dynamically reads the current configuration and accordingly shows the previously-set values. At the first run, it'll stay on the uppermost “Default/1” entry as everything will be unaltered (default).
Troubleshooting
Generally, nothing can go wrong if you decrease the bitrate from the default value. However, you can easily run into problems if you increase it. For example, on the iPad 2 / ipod touch 4G, you shouldn't increase the bitrate from the default 10.5 Mbps because even slightly increasing the bitrate to 15 Mbps will result in useless (video-less) footage. However, this won't cause any damage to your iDevice. Should you encounter such cases, you can always decrease the bitrate to a working one.