I've gotten TWO enclosures from Coolgear.com with insufficient or defective power supplies and I just decided I'm sick of it. Over the years I've amassed some PC parts and finally just threw them into a case. However, you can build a higher quality enclosure today with expandability to 15-20 hard drives for cheap! You just need a little bit of time on your hands and a screwdriver (possibly some pliers). This requires NO soldering or technical knowledge other than "plug it in where it fits!"
So first thing you need is a case. I searched NewEgg.com for the cheapest PC case with the most 5.25" bays and came up with this really great quality one with tons of ventilation (Two big VERY silent and effective fans built in):

http://www.newegg.com/Product/Product.aspx?Item=N82E16811133180
Do an "advanced" search of the PC cases on newegg to find the one which costs what you want, has a good manufacturer (ASUS, Antec, Thermaltake--ask a nerd, he'll give you more options)
If you're really going to fill it full of hard drives, you may want to consider getting one with 6, 9, 12 bays--you'll see why later. There is a 9 bay one on newegg for $60 right now that doesn't look too bad.
Next you'll need to power it. How about the best PSU on NewEgg, that good enough?")

http://www.newegg.com/Product/Product.aspx?Item=N82E16817153023
550Watt is probably an overkill, but hell, it's cheap right?
You can also get a combined case+PSU which may save you a few bucks, I had a 550watt PSU so I just bought the case.
Next you're going to want somewhere to put the hard drives in, I recommend this:

http://www.newegg.com/Product/Product.aspx?Item=N82E16817121405
It'll require possibly bending the guiderails on your case (if they have them), but it only took me a few minutes. I used 2 dead hard drives (any hunk of metal will do) and a couple of C-clamps.
If you buy that model, you'll notice that it is very inexpensive, unfortunately the reviews say the fan is a bit loud. Luckily you can just pop in ANY 92mm fan. So how about the best damn fan on newegg?

http://www.newegg.com/Product/Product.aspx?Item=N82E16811999617
It only adds a few dollars to the cost, but it has its own thermostat! Note: to use this fan you'll need to change the jumper on the fan alarm--takes 2 seconds and it's in the instruction manual.
Instead of the 5 in 3 (5 hard drives in three 5.25" bays), you can get these much sleeker 4 in 3 devices (no bending of guiderails or screws/trays required!)

http://www.newegg.com/Product/Product.aspx?Item=N82E16817994113
My screwless model is fantastic apart from it has these 40mm fans that are a bit loud... this one appears to have a single large fan which is probably quieter (or easily replaceable).
Next you'll need a port multiplier. I've been using this SATA II compatible 5to1 beauty for years, and I just bought a new one off Amazon for $65:

http://www.addonics.com/products/ad5sarpm-e.php
For each port multiplier, you'll need one of these:
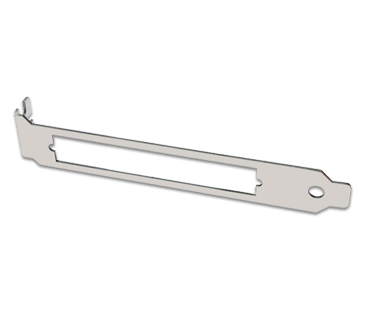
http://www.addonics.com/products/pciscbkt.php
Alternatively you could modify one of the PCI bevels on the case like I did, but it is a pain in the ass and requires a Dremel kit.
Next, you need to think about a switch...
The easiest way is to just have your PSU permanently in the on position and use the switch on the outside of your PSU. To do this, simply connect the green wire to any of the black grounding wires on the PSU Motherboard plug. Sounds hard? Not really, just get a staple or cut a section off a paperclip and bend it thusly:

Alternatively, you can solder in a parallel wire onto the green and black wires and lead them into a toggle switch. NOTE: most cases do not come with a toggle switch, just a simple close switch. Therefore you must incorporate either another switch or do the bypass "paperclip" procedure above.
So what've you got now? a Pile of parts? Well time to throw them into the case.
First, put the port multiplier on the PCI Bevel

Put the bevel into one of the case's PCI slots and secure it.
Then install the PSU, the hard drive bay you've chosen, and plug it all in (again, just plug it in where it fits).
There are several power cables coming off of the PSU. Try and spread the current to different non-parallel molex connectors. I chose to do no more than 5 hard drives and maybe a fan or two per cable. The reason for this is that in some PSU's, if any one of those power cables drains too much at one time, it turns off the entire PSU regardless of the power output. Therefore if you have your entire case running off one cable, you may see the kill switch engage.
--------------------------------
Summary: By using Simple PC parts, you can jerry-rig an extremely powerful hard drive array for a fraction of the cost of pre-built options, scalable to very large amounts of hard drives. Moreover, these parts are far better quality and the end result will be cooler, quieter, and more easy to upgrade. Plus, if you ever want to pop a motherboard, processor, GPU, and optical drive in there, you have a PC to play with!
So first thing you need is a case. I searched NewEgg.com for the cheapest PC case with the most 5.25" bays and came up with this really great quality one with tons of ventilation (Two big VERY silent and effective fans built in):
http://www.newegg.com/Product/Product.aspx?Item=N82E16811133180
Do an "advanced" search of the PC cases on newegg to find the one which costs what you want, has a good manufacturer (ASUS, Antec, Thermaltake--ask a nerd, he'll give you more options)
If you're really going to fill it full of hard drives, you may want to consider getting one with 6, 9, 12 bays--you'll see why later. There is a 9 bay one on newegg for $60 right now that doesn't look too bad.
Next you'll need to power it. How about the best PSU on NewEgg, that good enough?
http://www.newegg.com/Product/Product.aspx?Item=N82E16817153023
550Watt is probably an overkill, but hell, it's cheap right?
You can also get a combined case+PSU which may save you a few bucks, I had a 550watt PSU so I just bought the case.
Next you're going to want somewhere to put the hard drives in, I recommend this:
http://www.newegg.com/Product/Product.aspx?Item=N82E16817121405
It'll require possibly bending the guiderails on your case (if they have them), but it only took me a few minutes. I used 2 dead hard drives (any hunk of metal will do) and a couple of C-clamps.
If you buy that model, you'll notice that it is very inexpensive, unfortunately the reviews say the fan is a bit loud. Luckily you can just pop in ANY 92mm fan. So how about the best damn fan on newegg?
http://www.newegg.com/Product/Product.aspx?Item=N82E16811999617
It only adds a few dollars to the cost, but it has its own thermostat! Note: to use this fan you'll need to change the jumper on the fan alarm--takes 2 seconds and it's in the instruction manual.
Instead of the 5 in 3 (5 hard drives in three 5.25" bays), you can get these much sleeker 4 in 3 devices (no bending of guiderails or screws/trays required!)
http://www.newegg.com/Product/Product.aspx?Item=N82E16817994113
My screwless model is fantastic apart from it has these 40mm fans that are a bit loud... this one appears to have a single large fan which is probably quieter (or easily replaceable).
Next you'll need a port multiplier. I've been using this SATA II compatible 5to1 beauty for years, and I just bought a new one off Amazon for $65:
http://www.addonics.com/products/ad5sarpm-e.php
For each port multiplier, you'll need one of these:
http://www.addonics.com/products/pciscbkt.php
Alternatively you could modify one of the PCI bevels on the case like I did, but it is a pain in the ass and requires a Dremel kit.
Next, you need to think about a switch...
The easiest way is to just have your PSU permanently in the on position and use the switch on the outside of your PSU. To do this, simply connect the green wire to any of the black grounding wires on the PSU Motherboard plug. Sounds hard? Not really, just get a staple or cut a section off a paperclip and bend it thusly:
Alternatively, you can solder in a parallel wire onto the green and black wires and lead them into a toggle switch. NOTE: most cases do not come with a toggle switch, just a simple close switch. Therefore you must incorporate either another switch or do the bypass "paperclip" procedure above.
So what've you got now? a Pile of parts? Well time to throw them into the case.
First, put the port multiplier on the PCI Bevel
Put the bevel into one of the case's PCI slots and secure it.
Then install the PSU, the hard drive bay you've chosen, and plug it all in (again, just plug it in where it fits).
There are several power cables coming off of the PSU. Try and spread the current to different non-parallel molex connectors. I chose to do no more than 5 hard drives and maybe a fan or two per cable. The reason for this is that in some PSU's, if any one of those power cables drains too much at one time, it turns off the entire PSU regardless of the power output. Therefore if you have your entire case running off one cable, you may see the kill switch engage.
--------------------------------
Summary: By using Simple PC parts, you can jerry-rig an extremely powerful hard drive array for a fraction of the cost of pre-built options, scalable to very large amounts of hard drives. Moreover, these parts are far better quality and the end result will be cooler, quieter, and more easy to upgrade. Plus, if you ever want to pop a motherboard, processor, GPU, and optical drive in there, you have a PC to play with!
Last edited:


