This article is targeted at anyone wanting to do “fun” things with the cameras of their iDevices, including, among other things, creating time-lapse videos – now, for free.
In my latest article on making use of the zooming in videos, I've already reviewed the zoom capabilities of a recently-discounted camera app in AppStore, ProCam ($free). In the article, I haven't recommended it for video shooting on lossless zoom-capable devices if you plan to use the zoom.
However, the app is, otherwise, excellent and a must get now that it's gone free. While it doesn't have truly groundbreaking stuff (for example, a quality panorama stitcher or HDR algorithm of its own), it still provides an excellent interface to (almost) everything available via the API – and more. For example, it's one of the very few AppStore apps able to burning in not only time / date, but also reverse geocoded location (!) data. Let's start with.
Photo / video stamping with reverse geocoded data
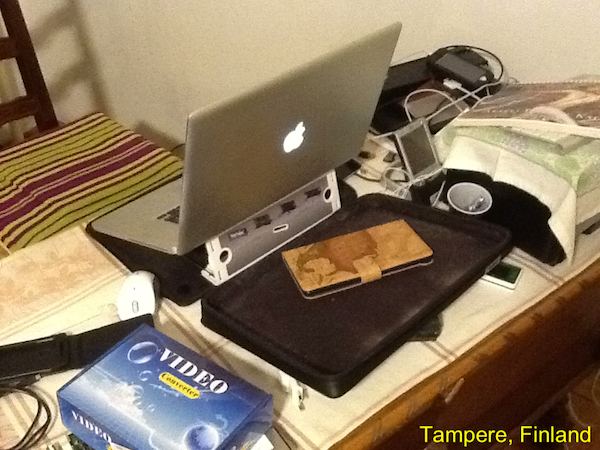
An example of the latter, with not only the usual latitude / longitude data in the EXIF header, but also the location burnt in the image itself:
![]()
Note that reverse geocoding is pretty coarse. When the exact EXIF-based location data is used for proper reverse lookup with, say, Google's API, a much more exact, human-readable location can be found. The app only burns the country and town name into the image – and nothing else. Also, while it can also stamp videos also with reverse-geocoded strings, it's static – that is, if you for example shoot a multi-hour video and move fast (on, say, a train) between towns, the title won't change. This, along with the fact that you can't burn in simple coordinates, makes this functionality pretty useless for functionality like that of UbiPix.
It also allows for burning in time / date in the images - something also VERY rare with iOS apps.
Time-lapse videos
Most timelapse apps in the AppStore are paid. This fact alone makes ProCam an absolute must to get now that it's free.
I've very thoroughly tested the time-lapse video functionality on various devices (iPhone 3GS 6.1.3 JB'n, iPod touch 4G 6.1.3 non-JB'n, iPhone 5 7.0.2 non-JB'n, iPad 3 6.1.2 JB'n, all with different export resolutions and timelapse delay settings) running for at least half an hour on all of them and found it excellent and reliable.
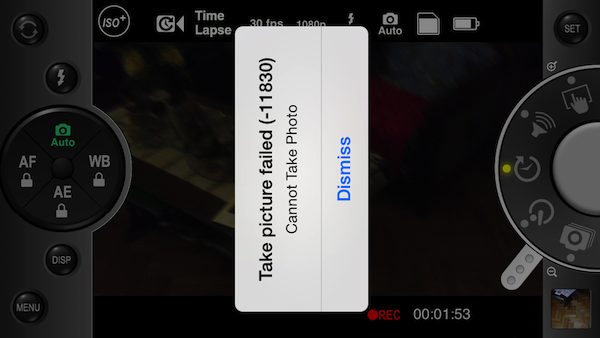
The only problem I faced was on the iPhone 5 running on 7.0.2 (again, non-jailbroken). After shooting over a hundred full-quality test images in burst mode, timelapse mode started to show me -11830 errors:
![]()
Killing the app or even a complete iPhone restart didn't help this. I needed to completely remove and reinstall the app to get rid of the problem. If you encounter the same problem, do the same.
You can even add any kind of audio to the exported time-lapse video (no need to do this on the desktop), as is shown in the following settings menu screenshot:
![]()
This is also pretty much unique with iOS apps.
Low-light shots
In my recent article on ProCamera, I've already shown how much better night / low-light shots can be if you decrease the shutter speed (while, of course, avoiding shooting handheld). The app also supports decreasing the shutter speed up to 1 second, which is also mentioned by the in-app help when (first) switching to nigh mode (see the main mode setter on the bottom):
![]()
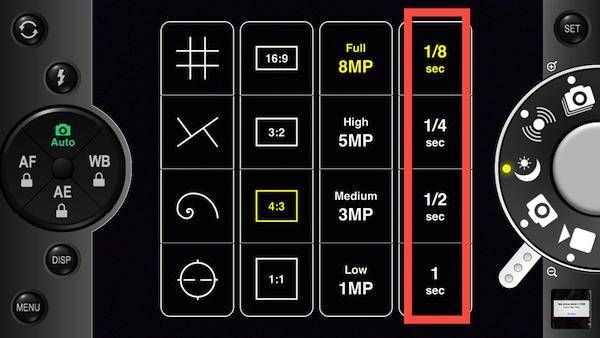
Then, you'll be able to pick the right shutter speed from the four (annotated below) you'd like to use from the mode-specific menu:
![]()
In addition, it allows you to set an automatic delay to avoid shutter icon-tapping-induced camera shake. You may also want to change (increase) it from the default zero. I've annotated this setting in the following screenshot:
![]()
Unfortunately, few other night mode-capable apps are able to do the same.
Faux exposure compensation
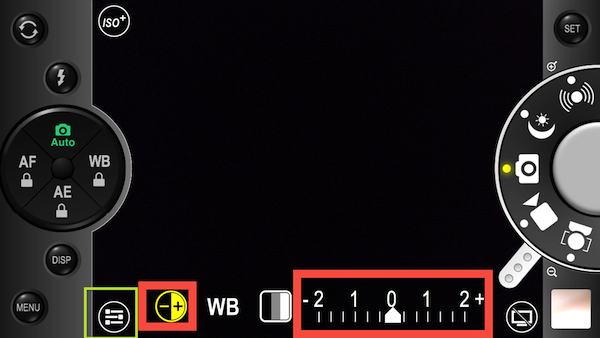
As has been explained in section “4. What about KitCam?” of my dedicated Exposure Compensation and Bracketing Bible, it's simply impossible to properly “dial in” an exposure compensation on iOS. The camera programming interface just doesn't allow it. Some app developers, therefore, provide faux exposure compensation interfaces mimicking that of other, in this regard (too) more capable mobile OS'es (Android, Windows Phone, Symbian). So do the developers of ProCam, in photo mode:
![]()
(tap the icon in the lower left corner, here, annotated by a green rectangle, to access this menu)
Do NOT assume the faux exposure compensation to work the same way as proper exposure compensation. If you for example turn it up to get a proper, noise-less shot of the shadows (while letting the highlights burn in), the app will only do post-processing and simple shadow lifting to emulate exposure compensation. This means the shadows will be noisy. The case will be the same in the opposite direction: to reduce burnt-in highlights, if you under-expose the images by dialing in a negative exposure compensation, you'll have a much harder time getting a properly exposed, non-burnt-in image with this faux exposure compensation than with a proper one.
In my latest article on making use of the zooming in videos, I've already reviewed the zoom capabilities of a recently-discounted camera app in AppStore, ProCam ($free). In the article, I haven't recommended it for video shooting on lossless zoom-capable devices if you plan to use the zoom.
However, the app is, otherwise, excellent and a must get now that it's gone free. While it doesn't have truly groundbreaking stuff (for example, a quality panorama stitcher or HDR algorithm of its own), it still provides an excellent interface to (almost) everything available via the API – and more. For example, it's one of the very few AppStore apps able to burning in not only time / date, but also reverse geocoded location (!) data. Let's start with.
Photo / video stamping with reverse geocoded data
An example of the latter, with not only the usual latitude / longitude data in the EXIF header, but also the location burnt in the image itself:
Note that reverse geocoding is pretty coarse. When the exact EXIF-based location data is used for proper reverse lookup with, say, Google's API, a much more exact, human-readable location can be found. The app only burns the country and town name into the image – and nothing else. Also, while it can also stamp videos also with reverse-geocoded strings, it's static – that is, if you for example shoot a multi-hour video and move fast (on, say, a train) between towns, the title won't change. This, along with the fact that you can't burn in simple coordinates, makes this functionality pretty useless for functionality like that of UbiPix.
It also allows for burning in time / date in the images - something also VERY rare with iOS apps.
Time-lapse videos
Most timelapse apps in the AppStore are paid. This fact alone makes ProCam an absolute must to get now that it's free.
I've very thoroughly tested the time-lapse video functionality on various devices (iPhone 3GS 6.1.3 JB'n, iPod touch 4G 6.1.3 non-JB'n, iPhone 5 7.0.2 non-JB'n, iPad 3 6.1.2 JB'n, all with different export resolutions and timelapse delay settings) running for at least half an hour on all of them and found it excellent and reliable.
The only problem I faced was on the iPhone 5 running on 7.0.2 (again, non-jailbroken). After shooting over a hundred full-quality test images in burst mode, timelapse mode started to show me -11830 errors:
Killing the app or even a complete iPhone restart didn't help this. I needed to completely remove and reinstall the app to get rid of the problem. If you encounter the same problem, do the same.
You can even add any kind of audio to the exported time-lapse video (no need to do this on the desktop), as is shown in the following settings menu screenshot:

This is also pretty much unique with iOS apps.
Low-light shots
In my recent article on ProCamera, I've already shown how much better night / low-light shots can be if you decrease the shutter speed (while, of course, avoiding shooting handheld). The app also supports decreasing the shutter speed up to 1 second, which is also mentioned by the in-app help when (first) switching to nigh mode (see the main mode setter on the bottom):

Then, you'll be able to pick the right shutter speed from the four (annotated below) you'd like to use from the mode-specific menu:
In addition, it allows you to set an automatic delay to avoid shutter icon-tapping-induced camera shake. You may also want to change (increase) it from the default zero. I've annotated this setting in the following screenshot:

Unfortunately, few other night mode-capable apps are able to do the same.
Faux exposure compensation
As has been explained in section “4. What about KitCam?” of my dedicated Exposure Compensation and Bracketing Bible, it's simply impossible to properly “dial in” an exposure compensation on iOS. The camera programming interface just doesn't allow it. Some app developers, therefore, provide faux exposure compensation interfaces mimicking that of other, in this regard (too) more capable mobile OS'es (Android, Windows Phone, Symbian). So do the developers of ProCam, in photo mode:
(tap the icon in the lower left corner, here, annotated by a green rectangle, to access this menu)
Do NOT assume the faux exposure compensation to work the same way as proper exposure compensation. If you for example turn it up to get a proper, noise-less shot of the shadows (while letting the highlights burn in), the app will only do post-processing and simple shadow lifting to emulate exposure compensation. This means the shadows will be noisy. The case will be the same in the opposite direction: to reduce burnt-in highlights, if you under-expose the images by dialing in a negative exposure compensation, you'll have a much harder time getting a properly exposed, non-burnt-in image with this faux exposure compensation than with a proper one.