Can you inform me by message what was the link for me not to buy the same?
I am seeing an ad on Aliexpress that says: "Used for imac 21.5" a1311 mid / late 2011 amd hd 4670 6750 6770 512mb update nvidia k1100m gddr5 2gb graphics card "For $ 79.
If I buy and Bios is not up to date, is the procedure to update very difficult?
(... and some Dell WX4130/WX4150 - just the 'additional mod' for V1.0 cards with 'DUFC' temperature sensor IC.)
I'd like to report another successful POST of a modded HP WX4150 card in an iMac12,2 (27' 2011 iMac). I now have two modded HP WX4150 cards happily running in two 27' 2011 machines, reported temperatures are sensible (ie. they are no different from those reported by a machine with a Dell WX4150 built in). I also ran some GPU benchmarks - I did not notice any anomalies after 30 minutes of benchmarking.
On the other hand, while the card did POST without a problem in an iMac11,2 (21.5' 2010 iMac), some sensors reported abnormal values, CPU and ODD fans ran at full speed, and I believe that CPU was throttled. (That's still better than iMac11,2 with an unmodded HP WX4150 card - sometimes it POSTs, sometimes it doesn't, definitely does not POST with a HDD connected.) I replaced it with a Dell WX4150 (from my 27' 2011 machine), which works perfectly. I'm not sure (when) I'll investigate this (iMac11,2 + modded HP WX4150) further.I (actually some of us) did investigate this further. With an additional small mod, the HP WX4150 POSTs and works properly in the whole iMac11,1 - iMac12,2 range! See additional mod below.
If your soldering skills are above basic and you have the tools required, please do try this. (Note: the additional mod requires fine soldering skills.) Here's how I did it:
a (at least) 50W soldering iron with precision tip and temperature control (80W+ is better, 50W should be enough for leaded solder)
flux (pen)
solder wick (to remove excess solder)
tweezers
magnifying glass (I did not use it, but I should.)
a (non-POSTing) HP WX4150 card
two 0R 1206 resistors (Buy more. They are really cheap and you will probably destroy one...)
0.5mm (or thinner) solder wire
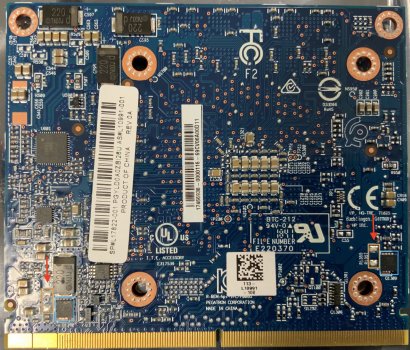
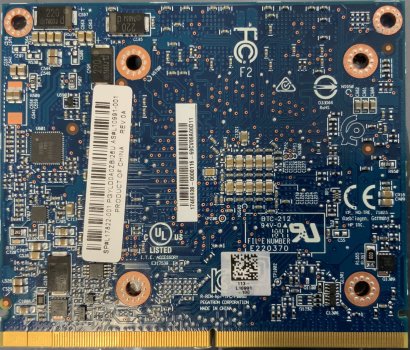
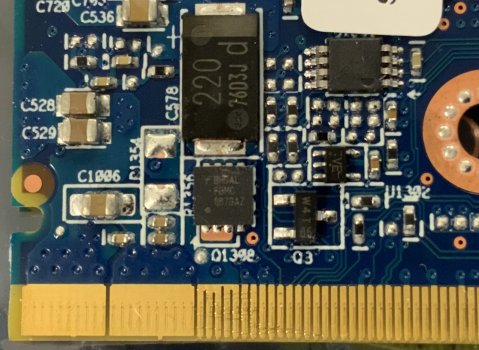
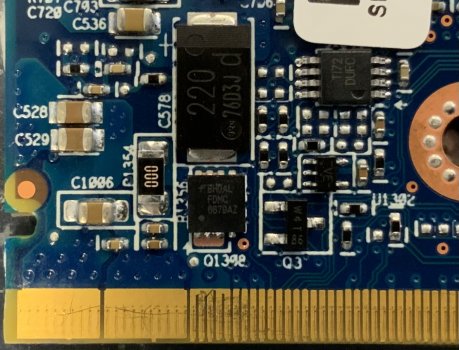
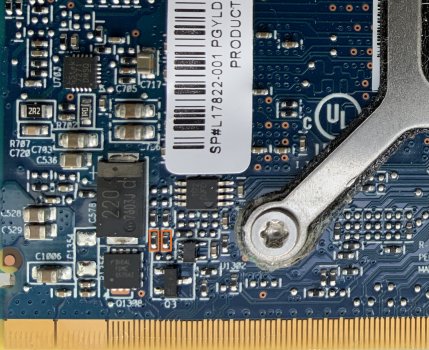
Two jumpers (the 0R 1206 resistors) are needed between the pads in the orange rectangles under the red arrows (see first four attached photos). Those pads had some excess solder on my cards. I removed it with a solder wick to facilitate soldering later. Note that those pads are a part of a (relatively) large copper area, which means that a fair amount of heat will be required to melt the solder. Be very careful not to remove tiny capacitors and other components which are in close proximity. Cover cleared pads with a generous amount of flux. Place the resistor and align it with tweezers. Take your time. Use tweezers (in your left hand) to press down on the middle of the resistor (if it moves, align it again), then pick a small amount of solder with the soldering iron (in your right hand) and solder one pad of the resistor. Remember the 'large copper area'? A certain amount of heat will be required again. (This is really important to avoid cold joints. Believe me...) Again: Be careful not to short the nearby components. If you do, remove the shorts with the solder wick. Repeat for the second pad and second resistor. (Add flux as needed, you can remove excess flux when finished with a toothbrush and isopropyl alcohol.)
This additional mod requires fine soldering skills (or rather a visit to a cell phone repair shop). It is, however, mandatory to make the card POST and function properly in 21.5' iMacs (iMac11,2 and iMac12,1). On the bottom layer, lower left corner, close to the IC with DUFC top marking, there are two 0402-sized 0R resistors (jumpers) - (again) in orange rectangles. These need to be removed. See last two photos.
I attached some photos of my card before and after the mod.
I'd like to report another successful POST of a modded HP WX4150 card in an iMac12,2 (27' 2011 iMac). I now have two modded HP WX4150 cards happily running in two 27' 2011 machines, reported temperatures are sensible (ie. they are no different from those reported by a machine with a Dell WX4150 built in). I also ran some GPU benchmarks - I did not notice any anomalies after 30 minutes of benchmarking.
On the other hand, while the card did POST without a problem in an iMac11,2 (21.5' 2010 iMac), some sensors reported abnormal values, CPU and ODD fans ran at full speed, and I believe that CPU was throttled. (That's still better than iMac11,2 with an unmodded HP WX4150 card - sometimes it POSTs, sometimes it doesn't, definitely does not POST with a HDD connected.) I replaced it with a Dell WX4150 (from my 27' 2011 machine), which works perfectly. I'm not sure (when) I'll investigate this (iMac11,2 + modded HP WX4150) further.
If your soldering skills are above basic and you have the tools required, please do try this. Here's how I did it:
a (at least) 50W soldering iron with precision tip and temperature control (80W+ is better, 50W should be enough for leaded solder)
flux (pen)
solder wick (to remove excess solder)
tweezers
magnifying glass (I did not use it, but I should.)
a (non-POSTing) HP WX4150 card
two 0R 1206 resistors (Buy more. They are really cheap and you will probably destroy one...)
0.5mm (or thinner) solder wire
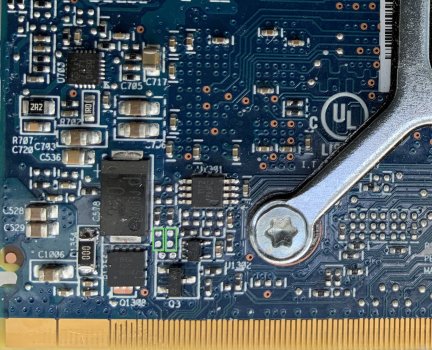
The pads in the orange triangles under the red arrows (see attached pictures) had some excess solder on my cards. I removed it with a solder wick to facilitate soldering later. Note that those pads are a part of a (relatively) large copper area, which means that a fair amount of heat will be required to melt the solder. Be very careful not to remove tiny capacitors and other components which are in close proximity. Cover cleared pads with a generous amount of flux. Place the resistor and align it with tweezers. Take your time. Use tweezers (in your left hand) to press down on the middle of the resistor (if it moves, align it again), then pick a small amount of solder with the soldering iron (in your right hand) and solder one pad of the resistor. Remember the 'large copper area'? A certain amount of heat will be required again. (This is really important to avoid cold joints. Believe me...) Again: Be careful not to short the nearby components. If you do, remove the shorts with the solder wick. Repeat for the second pad and second resistor.
I attached some photos of my card before and after the mod.
That's great and I plan to try that mod soon.
Do you think there could be any benefit of desoldering the MOSFETs which aren't there in the Dell versions of the card, like the card working better in the 21.5" 2010?
That's great and I plan to try that mod soon.
Do you think there could be any benefit of desoldering the MOSFETs which aren't there in the Dell versions of the card, like the card working better in the 21.5" 2010?
I don't think so. The mod simply bypasses those MOSFETs so that power is directly delivered to who-knows-which parts of the board. That means the MOSFETs are no longer needed, but there is no benefit in removing them. (They even don't consume power.) One additional difference between Dell and HP WX4150 is U1301 (bottom layer, lower left part of the PCB). It is a TMP431 temperature sensor IC. I'm hesitant to remove it (for now).
The following is a K1100M vbios for those of you that have the Elpida based GPU. The K1100M_EG2.rom does not have entries for -Elpida vram equipped cards and it will not function.
@The_Croupier, thank you for the headsup, you are correct, this was an issue in the past, but I think I have it solved now.
@Streetgamer010, thank you for testing <his screenshots to come>.
According to my personal database, there is also another user @Chris2020 who also uses a K1100M with Eplida.
I've kept the boost low to make sure it will be compatible as much as possible with the Eplida memory.
For now, you still will need to use OpenCore for your boot screen and brightness parameters with this vbios.
Enjoy!
I'd like to report another successful POST of a modded HP WX4150 card in an iMac12,2 (27' 2011 iMac). I now have two modded HP WX4150 cards happily running in two 27' 2011 machines, reported temperatures are sensible (ie. they are no different from those reported by a machine with a Dell WX4150 built in). I also ran some GPU benchmarks - I did not notice any anomalies after 30 minutes of benchmarking.
On the other hand, while the card did POST without a problem in an iMac11,2 (21.5' 2010 iMac), some sensors reported abnormal values, CPU and ODD fans ran at full speed, and I believe that CPU was throttled. (That's still better than iMac11,2 with an unmodded HP WX4150 card - sometimes it POSTs, sometimes it doesn't, definitely does not POST with a HDD connected.) I replaced it with a Dell WX4150 (from my 27' 2011 machine), which works perfectly. I'm not sure (when) I'll investigate this (iMac11,2 + modded HP WX4150) further.
If your soldering skills are above basic and you have the tools required, please do try this. Here's how I did it:
a (at least) 50W soldering iron with precision tip and temperature control (80W+ is better, 50W should be enough for leaded solder)
flux (pen)
solder wick (to remove excess solder)
tweezers
magnifying glass (I did not use it, but I should.)
a (non-POSTing) HP WX4150 card
two 0R 1206 resistors (Buy more. They are really cheap and you will probably destroy one...)
0.5mm (or thinner) solder wire
The pads in the orange triangles under the red arrows (see attached pictures) had some excess solder on my cards. I removed it with a solder wick to facilitate soldering later. Note that those pads are a part of a (relatively) large copper area, which means that a fair amount of heat will be required to melt the solder. Be very careful not to remove tiny capacitors and other components which are in close proximity. Cover cleared pads with a generous amount of flux. Place the resistor and align it with tweezers. Take your time. Use tweezers (in your left hand) to press down on the middle of the resistor (if it moves, align it again), then pick a small amount of solder with the soldering iron (in your right hand) and solder one pad of the resistor. Remember the 'large copper area'? A certain amount of heat will be required again. (This is really important to avoid cold joints. Believe me...) Again: Be careful not to short the nearby components. If you do, remove the shorts with the solder wick. Repeat for the second pad and second resistor.
I attached some photos of my card before and after the mod.
Great work! Is there any reason why 0R resistors are used instead of some jumper wire? The resistors obviously look a bit more professional, but a small piece of something like an LED leg clipping would do the same thing, no? I guess recommending that people use resistors lessens the chances of someone inexperienced using some nasty stranded wire and shorting everything out by mistake... (please don't do this! )
I took a look at some scans I made of my HP WX4150 before installing it into my 2010 27" iMac 11,3, but sure enough, these pads were disconnected by default on my GPU. As the GPU works, for now, I'll leave it alone, but this is great information to have in case I want to switch to a 2011 iMac someday.
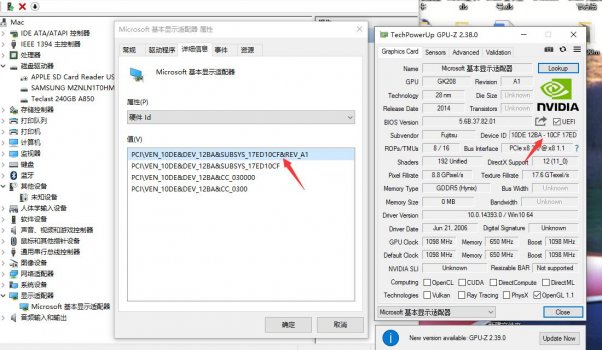
The nvidia nvidia k1100m is the most recommended card for mac 21.5 "a1311 mid / 2011 with current AMD Radeon HD 6750M card? Anyone using it can give feedback?
Agree with @ChrisCaro. This likely means that Win10 Nvidia Drivers that you chose didn't have an entry for the K1100M cards.
Try: 392.37-quadro-desktop-notebook-win10-32bit-international-whql.exe
looking at their .inf info I see:
Great work! Is there any reason why 0R resistors are used instead of some jumper wire? The resistors obviously look a bit more professional, but a small piece of something like an LED leg clipping would do the same thing, no? I guess recommending that people use resistors lessens the chances of someone inexperienced using some nasty stranded wire and shorting everything out by mistake... (please don't do this! )
I took a look at some scans I made of my HP WX4150 before installing it into my 2010 27" iMac 11,3, but sure enough, these pads were disconnected by default on my GPU. As the GPU works, for now, I'll leave it alone, but this is great information to have in case I want to switch to a 2011 iMac someday.
You're right. A jumper wire will function just as well, but it might be even more tedious to solder it into position, it has to be cut into precise length and should probably hover slightly above the PCB. (As a matter of fact, that's exactly what I did with solid bare wire as a proof of concept. I do not advise it! ) I'd advise you buy 0R 1206 SMD resistors - they are fairly large by SMD standards.
The mod may be beneficial even for the iMac11,3. I noted that unmodded HP WX4150 card makes the LED1 on the logic board shortly flash before becoming solid green after plugging in the power cord. With the modded HP WX4150 there is no short flash of LED1. (I also have two unmodded HP WX4150s in two iMac11,1s. They work, but one of the machines refused to POST with the HDD in the HDD slot - as it was a 2.5' HDD, I simply placed in the ODD slot to make it POST. The other iMac11,1 machine had no problem with the HDD in the HDD slot and an unmodded HP WX4150. Go figure.)
Yes,I known this is driver problem, but I try other driver(dell,hp,microsoft etc.),it show the same issue,but sometimes it's running normal,today I installed the directx9.0c then reboot,the normal desktop returned the upload picture mode.
Agree with @ChrisCaro. This likely means that Win10 Nvidia Drivers that you chose didn't have an entry for the K1100M cards.
Try: 392.37-quadro-desktop-notebook-win10-32bit-international-whql.exe
looking at their .inf info I see:
Agree with @ChrisCaro. This likely means that Win10 Nvidia Drivers that you chose didn't have an entry for the K1100M cards.
Try: 392.37-quadro-desktop-notebook-win10-32bit-international-whql.exe
looking at their .inf info I see:
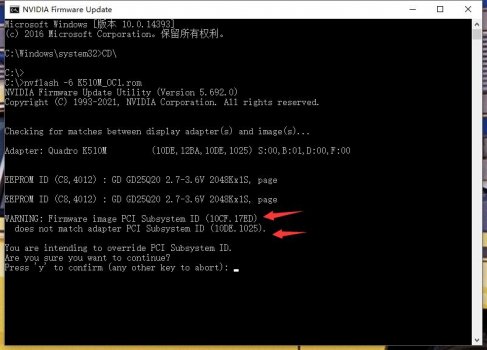
Hello @nikey22
K510M_OC1 default Nvidia ID (10DE,1025) changed to Fujitsu (10CF.17ED) do not need to disable the driver signature mode to install the driver, windows 10 system can automatically adapt to install the driver to install their own driver version tesla_24.21.13.9826_w1064.exe, install the driver reboot does not need Modify the registry system default default on the system brightness adjustment which is really great windows 7 system is also the same.
Now on a problem sometimes the screen display abnormal text blurred can not see more than a few reboots can be displayed normally.
first off, many many thanks to the people who did the work to help salvage these old Macs. I have two 2011 27" imacs that have bad 6970 GPU's that I'm trying to fix. I did have the GPU chips "reballed" but that only worked for a short while. apparently the balls on the inside/die are the issue and not the ones that attach the chip to the board.
[Edit: I just noticed I didn't post configuration info. iMac 2011 27", A1312, formerly 6970M graphics. i5 CPU, 32GB memory, 512GB SSD. Running latest update of High Sierra. New Graphics card is a K3100M purchased from eBay with the VBIOS already installed. 3-pipe heat sink was modified for installation as described in this thread]
Well anyway, I bought on ebay a K3100M with the apple firmware already on it for what seemed like a reasonable deal. I got it yesterday and installed it today. I'm getting good at disassembly of the iMac. I've done it a few times.
but I'm having issues with the machine, it won't boot. It gets about half way through the progress bar and then screen goes black and it restarts. The second time the gray screen with "your mac has a problem" shows up and it just sits there.
What does work is the boot screen and the ability to choose the boot drive. I loaded up the flasher stick from here and can list the NVidia chip and it does say that it has an iMac VBIOS installed. Apparently that is good to go.
I can boot the mac into single user mode by holding down Shift-S at boot
It will not boot fully into safe mode, the progress bar gets about 90% there with the ODD fan (sounds like) running at full tilt. Given that I've not set up MACS fan control yet for the GPU that's probably normal but I thought I'd mention it.
This thing is close to working. I can't go back to the 6970M at this point since it's pretty much dead, the system won't boot. I'd like to get both of these things working again since they're pretty good systems now that they have a lot more memory than they used to and are working from internal SSDs.
Thoughts? What should I try next? If you need me to provide more info let me know and I'll get it.
Thank you all again, if this works I'll be a happy camper! I think my next try might be a GTX880M for the other mac when I tear that one apart and flashing the Apple BIOS myself. but this was a good first step to get me there.
I'd recommend trying to set up OpenCore on a USB flash drive and using it to try booting from your existing SSD. OpenCore has a bunch of features that help solve some common GPU upgrade software issues. In addition, it will let you install Big Sur later on if you'd like. It is really good that your screen is turning on and you can see a boot picker --this likely indicates that all of the hardware aspects of your GPU upgrade have gone properly. It is likely now just a matter of fixing the software.
nvflash_linux --version
a whole bunch of stuff but relevant
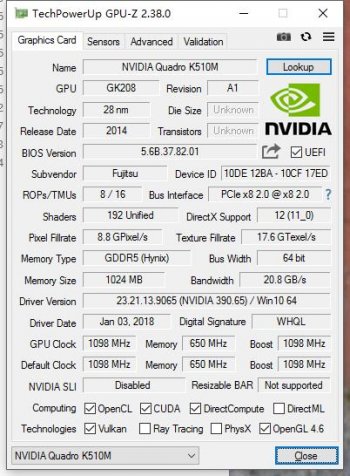
Device Name: Quadro K3100M
Board ID: E12A
Version: FE.ED.0A.C0.DE
Chip sKU: 960
Sign on message: NVIDIA Quadro 3100 Apple iMac VBIOS
@davidg5678
One of the reasons I bought that card was that I didn't have to learn OpenCore. But hey, I can do that.
Just gotta find a USB stick somewhere that doesn't have something on it that I want.
I'd recommend trying to set up OpenCore on a USB flash drive and using it to try booting from your existing SSD. OpenCore has a bunch of features that help solve some common GPU upgrade software issues. In addition, it will let you install Big Sur later on if you'd like. It is really good that your screen is turning on and you can see a boot picker --this likely indicates that all of the hardware aspects of your GPU upgrade have gone properly. It is likely now just a matter of fixing the software.
I'm confused on what I need to do this. Is "OPenCore" the same as OCLP? or is there something different? Is there a tutorial somewhere on how to build a USB flash with OpenCore?
On both system you can used OCLP to run Catalina and Big Sur - get rid of the Patched Sur installation. It never had the patches included needed for our iMacs and it was never supported or even mentioned here to be used.
i have found that the hard way, however, i have follow all your post closely and knew what the best option was.
i rather read and read and read than ask and aks, however this for some reason did not click. any way, i finally read one of your post where you suggest that we should dump the patcher and i did, when with OCLP and I have found the Way...
thanks to all of the developers and the ones that take the time to help us the newbies.
PS, working to move to the 2010 machine to OCLP with Big Sur..... I am a Happy Camper!!!
I'm confused on what I need to do this. Is "OPenCore" the same as OCLP? or is there something different? Is there a tutorial somewhere on how to build a USB flash with OpenCore?
Go to the open core legacy patcher github page. Good guide there. Read the first post. I would also reflash your card. I wouldn't trust any Bios for the K3100m besides the ones made by nikey22
I'm confused on what I need to do this. Is "OPenCore" the same as OCLP? or is there something different? Is there a tutorial somewhere on how to build a USB flash with OpenCore?
OCLP stands for Open Core Legacy Patcher, so they are one and the same. This guide is fantastic and should have all the instructions you're looking for: https://dortania.github.io/OpenCore-Legacy-Patcher/
The guy who sold it to me had a link with the description to this thread (which I had read in the past preparing for this project) so I'll bet that is where he got them. (he links directly to the K3100 topic)
I'll read the guide and get back with results. Thanks for the quick responses.
The guy who sold it to me had a link with the description to this thread (which I had read in the past preparing for this project) so I'll bet that is where he got them. (he links directly to the K3100 topic)
I'll read the guide and get back with results. Thanks for the quick responses.