I installed an Intel 660p in my 2017 Macbook Air and so far it seems to be working fine. I don't notice any behavioral difference from the original 128GB drive that was in it as far as sleep or booting.
I went with the Intel for the following reasons:
Installation was straight forward.
Supplies needed:
The chassis cover should come off pretty easy. There is a black plastic retainer in the middle that will cause some resistance, so you will need to give it a little force to pop that retainer.
With the top off, locate the battery connector and use the pull tab to remove plug.
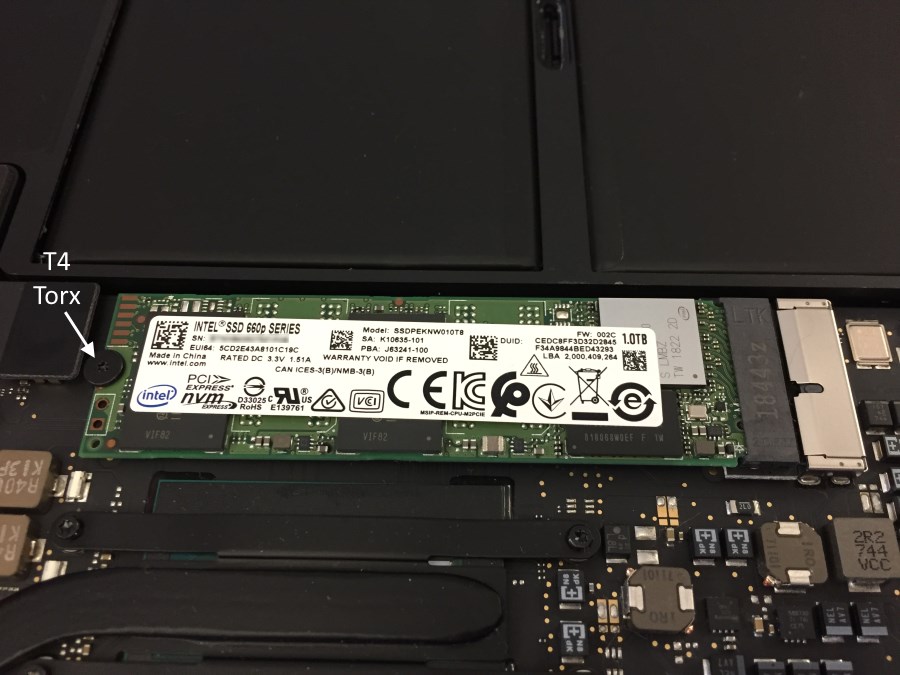
Unscrew the T4 torx screw from the stock SSD.
Insert the new NVME drive into the Sintech adapter. Slide the combination into the connector on the motherboard. You will need to push it in quiet a bit, until the half circle on the other end lines up with the screw post. Put the T4 screw back in. The original Apple SSD is physically longer than a normal NVME drive. The Sintech adapter and the NVME drive end up being the same length.
Since there is some concern about the heat build-up of aftermarket NVME drives versus the original Apple SSD's, I used some thermal tape to couple the SSD to the aluminum chassis. This does cause the bottom of the laptop to get warm, but it's a small price to pay for pulling heat away from the harddrive. It's not "hot", but is definitely warm.
To make sure the thermal tape is actually touching the chassis, I took the protective film off just one side and sat it on the SSD with the film still between the SSD and the thermal pad. Leaving the side facing the chassis sticky. I placed the chassis back on the laptop and then removed it again. The thermal tape came up with the chassis, which told me it did touch the chassis. I pushed it firmly against the chassis and then removed the protective film on the other side. Then I reinstalled the chassis. Now the SSD and chassis are stuck together with the thermal pad. This will make it more difficult to get apart in the future, but I'm hoping not to ever have to do that (part of Intel reliability and more than enough size).
Use USB Mojave installer and go to Disk Utility and initialize the drive. Set to GUID/GPT (not MBR or Apple File System). Then format with APFS. If APFS isn't an option, do the Journaled format and then in the Edit options menu select Convert To AFPS.
Drive will now be selectable for install. And that's it. Everything worked fine for me.
Drive shows up in NVMExpress under About This Mac -> System Report with x4 Link Speed.
Battery Life: My battery life has been shorter, HOWEVER, with the increased storage I now am able to use the Macbook for a lot more tasks. I now have email set up. I also installed Parallels and am using it at the same time. When I don't have Parallels running, the battery usage is much better. But I'm not in a situation where I need to be frugal with my power. I would say, with Parallels running and using it to run Foobar2000 and making lots of writes to lots of music files, I see about 10% battery usage per 30 minutes and the bottom chassis does get warm. If I'm not using parallels, the bottom chassis barely gets warm and battery life seems to be ok.
Bootcamp Observation: I have Windows 10 on a Monster brand 240GB external Thunderbolt drive (link) that works fine. I thought I would be able to install Bootcamp with no problems on this new big 1TB drive. But it seems there is a new issue with Bootcamp and Windows installer having files greater than 4GB. So Bootcamp fails while trying to copy the install media to the temporary FAT32 partition. I tried many times and many ways to get past that. In the end I installed Parallels and I am really enjoying this. It works perfectly for what I normally need Windows for. Luckily, if I need "real" Windows like to play a game or something else I have my Thunderbolt drive that I can use. But otherwise, I couldn't get Bootcamp to work, though I suspect it is not because of the drive. I did buy Winclone and was able to successfully clone my Thunderbolt install to the internal SSD. And it would boot to Windows, but it would crash while loading Windows. I suspect this is because the Thunderbolt drive uses a different harddrive controller. Where as if you had an internal Bootcamp before and did this upgrade, while the drive might be different, you are still using the same disk controller. So when I boot from the image, Windows has a problem with the drivers. I am enjoying Parallels though, so do not feel too inclined to mess with it.


I went with the Intel for the following reasons:
- Historical Intel reliability (though this is a new drive using new technology)
- Low price for 1TB (~$135-$140 as of Feb 2019)
- 660P having very low power usage (especially compared to Samsung Pro)
Installation was straight forward.
Supplies needed:
- Pentalobe P5 (1.2) screwdriver
- T4 Torx screwdriver
- Sintech NVME Adapter (bought mine on Amazon)
- USB flash stick with Mojave installer
The chassis cover should come off pretty easy. There is a black plastic retainer in the middle that will cause some resistance, so you will need to give it a little force to pop that retainer.
With the top off, locate the battery connector and use the pull tab to remove plug.
Unscrew the T4 torx screw from the stock SSD.
Insert the new NVME drive into the Sintech adapter. Slide the combination into the connector on the motherboard. You will need to push it in quiet a bit, until the half circle on the other end lines up with the screw post. Put the T4 screw back in. The original Apple SSD is physically longer than a normal NVME drive. The Sintech adapter and the NVME drive end up being the same length.
Since there is some concern about the heat build-up of aftermarket NVME drives versus the original Apple SSD's, I used some thermal tape to couple the SSD to the aluminum chassis. This does cause the bottom of the laptop to get warm, but it's a small price to pay for pulling heat away from the harddrive. It's not "hot", but is definitely warm.
To make sure the thermal tape is actually touching the chassis, I took the protective film off just one side and sat it on the SSD with the film still between the SSD and the thermal pad. Leaving the side facing the chassis sticky. I placed the chassis back on the laptop and then removed it again. The thermal tape came up with the chassis, which told me it did touch the chassis. I pushed it firmly against the chassis and then removed the protective film on the other side. Then I reinstalled the chassis. Now the SSD and chassis are stuck together with the thermal pad. This will make it more difficult to get apart in the future, but I'm hoping not to ever have to do that (part of Intel reliability and more than enough size).
Use USB Mojave installer and go to Disk Utility and initialize the drive. Set to GUID/GPT (not MBR or Apple File System). Then format with APFS. If APFS isn't an option, do the Journaled format and then in the Edit options menu select Convert To AFPS.
Drive will now be selectable for install. And that's it. Everything worked fine for me.
Drive shows up in NVMExpress under About This Mac -> System Report with x4 Link Speed.
Battery Life: My battery life has been shorter, HOWEVER, with the increased storage I now am able to use the Macbook for a lot more tasks. I now have email set up. I also installed Parallels and am using it at the same time. When I don't have Parallels running, the battery usage is much better. But I'm not in a situation where I need to be frugal with my power. I would say, with Parallels running and using it to run Foobar2000 and making lots of writes to lots of music files, I see about 10% battery usage per 30 minutes and the bottom chassis does get warm. If I'm not using parallels, the bottom chassis barely gets warm and battery life seems to be ok.
Bootcamp Observation: I have Windows 10 on a Monster brand 240GB external Thunderbolt drive (link) that works fine. I thought I would be able to install Bootcamp with no problems on this new big 1TB drive. But it seems there is a new issue with Bootcamp and Windows installer having files greater than 4GB. So Bootcamp fails while trying to copy the install media to the temporary FAT32 partition. I tried many times and many ways to get past that. In the end I installed Parallels and I am really enjoying this. It works perfectly for what I normally need Windows for. Luckily, if I need "real" Windows like to play a game or something else I have my Thunderbolt drive that I can use. But otherwise, I couldn't get Bootcamp to work, though I suspect it is not because of the drive. I did buy Winclone and was able to successfully clone my Thunderbolt install to the internal SSD. And it would boot to Windows, but it would crash while loading Windows. I suspect this is because the Thunderbolt drive uses a different harddrive controller. Where as if you had an internal Bootcamp before and did this upgrade, while the drive might be different, you are still using the same disk controller. So when I boot from the image, Windows has a problem with the drivers. I am enjoying Parallels though, so do not feel too inclined to mess with it.