I'd been given some wedding footage in AVCHD .m2ts files on a disc to include on a wedding DVD but as we all know these files (unless captured from the original camera - which I dont have) are still not supported on any major editing software on the Mac. The only program I have been able to find that will convert the AVCHD files (which is basically highly compressed H.264/AAC) is VoltaicHD.
Testing this I have to say the Mac version does a far better job than the Windows version... the Mac version converting to Apple Intermediate Codec while the Windows version converts to MPEG2 with WMV Audio! (why that is I have no idea!)
VoltaicHD is great but the demo only converts files up to 50Mb in size and costs $34.99 US, good value but I don't feel the need to pay for a program that I only envisage will ever use once to convert the 10Gb of AVCHD that I have been given to edit.
So... After some experimenting... I found a workflow to get it into FCP with the use my Canon HV20 for FREE!....unfortunately it requires me to be booted into windows for some time...
1. Boot into Windows
2. Download and install the free trial for Sony Vegas 8
3. Vegas will edit the .m2ts files natively so pull the files in and drop a clip into the timeline
4. I found none of the export functions would render out an editable format but you CAN 'print to HDV tape'
5. Plug in a compatible HDV camera and turn it to 'play' mode and insert a tape. I'm using a HV20.
6. I want the converted files, use 'Print to HDV tape' and select your HDV camera choosing either 50i (PAL) or 60i (NTSC) depending on where you are in the world.
7. Click next > and (if you want the converted file untick 'Delete after print' and you will be left with a rendered .m2t.)
8. Click next > Select 'controllable camera' (so it will automatically start recording after its rendered) and let it rip.
9. Once its all done, boot back into MacOS run FCP and recapture it from HDV.
And thats it!
Looking at the results between using this method and just using Voltaic there is a slight noticeable difference in quality (since you're converting from AVCHD h.264 to MPEG-2 to AIC -- and ultimately back into H.264 again if its going on a Blu-ray) but nothing drastic. If fine for this vid I'm doing. However if preserving as much as quality possible is important to you, I'd still recommend VoltaicHD. That way its just AVCHD > AIC > H.264 Blu-ray.
Any other suggestions... please post here... 🙂
Testing this I have to say the Mac version does a far better job than the Windows version... the Mac version converting to Apple Intermediate Codec while the Windows version converts to MPEG2 with WMV Audio! (why that is I have no idea!)
VoltaicHD is great but the demo only converts files up to 50Mb in size and costs $34.99 US, good value but I don't feel the need to pay for a program that I only envisage will ever use once to convert the 10Gb of AVCHD that I have been given to edit.
So... After some experimenting... I found a workflow to get it into FCP with the use my Canon HV20 for FREE!....unfortunately it requires me to be booted into windows for some time...
1. Boot into Windows
2. Download and install the free trial for Sony Vegas 8
3. Vegas will edit the .m2ts files natively so pull the files in and drop a clip into the timeline
4. I found none of the export functions would render out an editable format but you CAN 'print to HDV tape'
5. Plug in a compatible HDV camera and turn it to 'play' mode and insert a tape. I'm using a HV20.
- At this point there are two ways you can deal with this...
- 1. Print the AVCHD to a HDV tape and capture normally with Final Cut Pro
- 2. Sony Vegas is going to convert the AVCHD .m2ts file into a .m2t MPEG2 file (the .m2t file is not editable in FinalCut but is editable in Premiere Pro CS3.
6. I want the converted files, use 'Print to HDV tape' and select your HDV camera choosing either 50i (PAL) or 60i (NTSC) depending on where you are in the world.
7. Click next > and (if you want the converted file untick 'Delete after print' and you will be left with a rendered .m2t.)
[*]NOTE: Since you are in Windows, If you want the rendered .m2t file make sure your harddrive is not formatted to FAT32 - it has a file size limit of 4Gb and will crash once it reaches this point. Recommend a drive with plenty of space formatted to NTFS.
[*] You should also remember that although MacOS will read the NTFS file system it will not write to it.
8. Click next > Select 'controllable camera' (so it will automatically start recording after its rendered) and let it rip.
- If you dont actually want it to send to HDV tape just turn the camera off at this point. It will still save the file.
9. Once its all done, boot back into MacOS run FCP and recapture it from HDV.
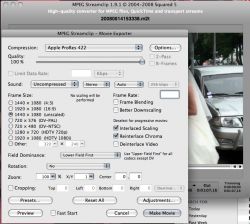
- Alternatively, if you opted to keep the .m2t files you can either convert them to ProRes422/AIC using MPEG Streamclip or edit the .m2t files natively in Premiere Pro CS3.
Remember to use the settings below converting to ProRes422 or AIC.. whatever suits you......
And thats it!
Looking at the results between using this method and just using Voltaic there is a slight noticeable difference in quality (since you're converting from AVCHD h.264 to MPEG-2 to AIC -- and ultimately back into H.264 again if its going on a Blu-ray) but nothing drastic. If fine for this vid I'm doing. However if preserving as much as quality possible is important to you, I'd still recommend VoltaicHD. That way its just AVCHD > AIC > H.264 Blu-ray.
Any other suggestions... please post here... 🙂