Mods, I'm not sure if this belongs here or in the Other OS forum, please move if you see fit.
I'm copying my post from Reddit, because, frankly, this forum was a better resource for info than Reddit was. It's the way I can give back, even if it's to convince people that they actually don't want to do this.
During this project, I didn't find a single (single as in compiled start to finish) source of information, so I'm consolidating a completed project here in the hope that someone else finds it useful. Details are specific where I have them, and I think enough that if you have the right knowledge base this would give enough to get something working going.
1st things first. This is effing with enough electricity to hurt (120v) or really mess yourself up (capacitors on the power supply). Please don't do this if you've never messed with electricity before or if you're not already experienced with assembling computers. This is not "soldering PCB" advanced, but this is definitely advanced level work once I account for needing to make various wires longer, figure out grounding, etc.
2nd note: I did this because it's too cold to mess around in the garage, and I wanted to save this computer from the recycler. It's not worth it from a time vs. dollars perspective. The only reason to do this, given the compute power involved, is because you want to say you did. Or because you want the challenge. A refurb Mini PC with a similar processor will cost you $150. If I cut out experimenting to figure out what worked and scouring the internet for information on fixing the CPU clock speed issue, this is probably 3-5 hours of direct work for this rough mounting scenario. The per hour value is definitely a hard sell.
3rd note: This is hardware from a Late 2015 27" retina with an i5. YMMV depending on year, etc.
4th note: This works based on having some familiarity with Linux and shell scripts, to make the fan work appropriately and to keep the CPU from throttling. I do not think there is a way to enable GPU acceleration. I DO think the iGPU in the CPU could be used to transcode, although I haven't had time to test this out yet.
5th note: I had Proxmox installed on this before I yanked the motherboard, so I knew I had a working Linux install beforehand. I am not really a Mac person, and I have zero recollection of what, if anything, I did to completely yank MacOS off this to begin with besides partition the hard drive and put a bootable USB in the slot.
That said, on to the guide!
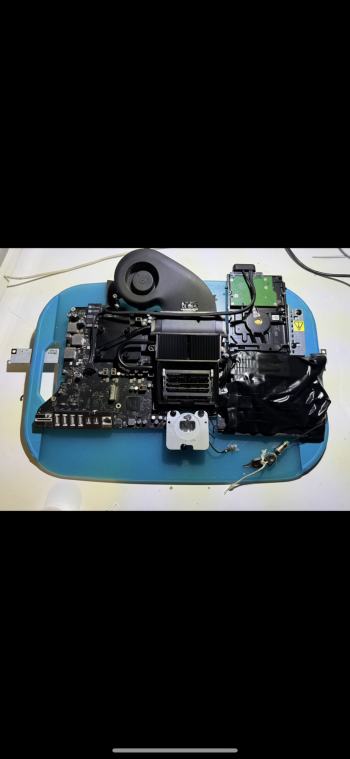
1: Gut your iMac. I followed the ifixit guide, which works well enough to get 95% of the computer apart.
2: Now go back, and gut it further. Use a heat gun to take the power button and mains power connector off. This will take a few minutes of direct heat from a heat gun or blowdryer and gentle prying with arazor blade small screwdriver. The power connector took several minutes of heat and some real fiddling to pop loose. You could (I'm just cheap) buy yourself a momentary switch and rig up a different mains hookup with the right wiring plugs.
2b: The mac I used gave no cares about the lack of camera, speakers, or Wifi/Bluetooth card, so those all went in thecloset of doom spare parts drawer.
3: Mounting:
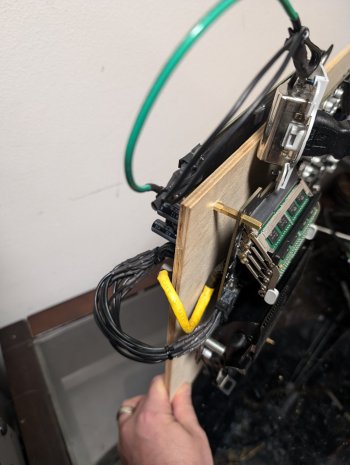
3a: Figure out placement of your hardware. Mine is presently mounted to a piece of 1/4 inch plywood I had laying around, using spare standoffs from...wherever. Now that I know it works, I'll figure out a better case to use. I'm thinking I will work out something to hang it off the side of my small rack.
3b: The fan can be zip tied through existing standoff holes on the motherboard to be held generally in the right place, with a small rigged pin through the bottom (in my pic) to support the far end. Temps appear ok so far, although I will probably add some aluminum duct tape where the fan meets the heatsink once this reaches final form. Final "case" design would also include more ventilation across the whole board.
3c: I had hoped to be able to switch to a more "normal" heatsink, but given the socket design (pressure fit), incorporation with the GPU heatsink, and lack of holes in the right places (I tried every fan spacing adapter I had and they are all too big), that's not reasonable as far as I can tell.
4: Dealing with the power supply connections:
4a: Depending on mounting scenario, YMMV. I wanted (at least initially) to mount the PSU on the back side of the logic board. This involved a bunch of splicing of both the mains voltage wires from the PSU to the motherboard, as well as splicing extra wire into the mains hookup. As a note, I THINK the leads could be unsoldered from the PSU PCB and extended with a single heavy line per output, but I didn't want my first venture into PCB soldering to be this project.
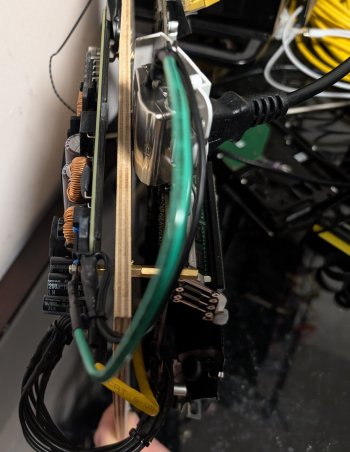
4a2: DO NOT MISS RE-CONNECTING THE GREEN WIRE TO THE GROUND STANDOFF ON THE PSU!!! Failure to do this means you're running a completely ungrounded system. NO BUENO!
4b: For the PSU-Logic Board communications line, I used a piece of cat 5 with the 8th wire cut off. (The wire gauge is significantly larger on cat 5 than the existing wire. I used a lighter to melt the casing off the existing connector wire.)
4c: If you suck at soldering like me, you will probably spend a couple hours with a soldering iron for all that, by the time you account for stripping a bunch of wires and such.
5: Once you get the power supply leads the length you want them and get it mounted,tuck the power button and mains connection somewhere convenient because you're feeling lazy find a way to secure the power button and mains connector so you don't electrocute yourself (or worse, short the board and spoil all your work).
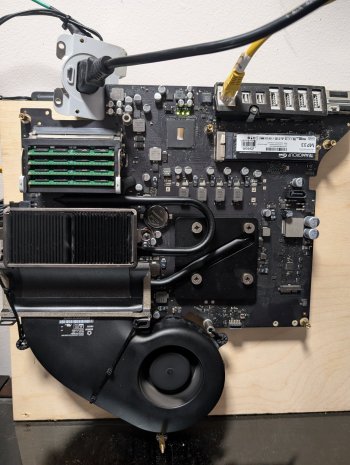
6: Grab an m.2 to iMac proprietary m.2 adapter (if your iMac supports the m.2 drive, otherwise get an SSD) https://www.amazon.com/dp/B01CWWAENG and connect up whatever m.2 drive you want to use. These are fiddly as hell, and mine took a few attempts to seat correctly. Warning that some of them may contact the metal RF shield, requiringbending the rf shield slightly the use of kapton tape.
7: Fire it up and make sure it starts! I had to reseat the stinking heatsink 3 times and bent a CPU pin that required some tedious work with tweezers to fix.
8: Install your Linux flavor of choice. Everything in Proxmox (Debian) worked right out of the box and booted/installed off the USB drive with no prompting.
9: Install fan management software to get your fan speeds under control: https://github.com/linux-on-mac/mbpfan For Debian, it's just sudo apt install mbpfan (there are some other instructions in the git, but generally that's all that's needed).
10: Fix thermal throttling: When the MSR doesn't detect a connected screen, it sets the CPU to run at 800mhz. It does that by setting BD-PROCHOT to throttle for heat. So, we need to fix that flag in the MSR. This is accomplished by installing msr-tools (sudo apt install msr-tools), and then running a script to change the hex-based flag to disable the throttling. I used the script here: https://github.com/yyearth/turnoff-BD-PROCHOT/blob/master/bdprochot_off.sh
Edit: That shell script won't work from a crontab job (at least on my system), it needs explicit locations. Below is my working shell script. I set a cron job to run the script at reboot. I don't see sleeping this computer ever, so I won't be messing with that at the time being.
You can confirm it's working by running
at the command line.
Have fun and don't burn down your damn house!
I'm copying my post from Reddit, because, frankly, this forum was a better resource for info than Reddit was. It's the way I can give back, even if it's to convince people that they actually don't want to do this.
During this project, I didn't find a single (single as in compiled start to finish) source of information, so I'm consolidating a completed project here in the hope that someone else finds it useful. Details are specific where I have them, and I think enough that if you have the right knowledge base this would give enough to get something working going.
1st things first. This is effing with enough electricity to hurt (120v) or really mess yourself up (capacitors on the power supply). Please don't do this if you've never messed with electricity before or if you're not already experienced with assembling computers. This is not "soldering PCB" advanced, but this is definitely advanced level work once I account for needing to make various wires longer, figure out grounding, etc.
2nd note: I did this because it's too cold to mess around in the garage, and I wanted to save this computer from the recycler. It's not worth it from a time vs. dollars perspective. The only reason to do this, given the compute power involved, is because you want to say you did. Or because you want the challenge. A refurb Mini PC with a similar processor will cost you $150. If I cut out experimenting to figure out what worked and scouring the internet for information on fixing the CPU clock speed issue, this is probably 3-5 hours of direct work for this rough mounting scenario. The per hour value is definitely a hard sell.
3rd note: This is hardware from a Late 2015 27" retina with an i5. YMMV depending on year, etc.
4th note: This works based on having some familiarity with Linux and shell scripts, to make the fan work appropriately and to keep the CPU from throttling. I do not think there is a way to enable GPU acceleration. I DO think the iGPU in the CPU could be used to transcode, although I haven't had time to test this out yet.
5th note: I had Proxmox installed on this before I yanked the motherboard, so I knew I had a working Linux install beforehand. I am not really a Mac person, and I have zero recollection of what, if anything, I did to completely yank MacOS off this to begin with besides partition the hard drive and put a bootable USB in the slot.
That said, on to the guide!
1: Gut your iMac. I followed the ifixit guide, which works well enough to get 95% of the computer apart.
2: Now go back, and gut it further. Use a heat gun to take the power button and mains power connector off. This will take a few minutes of direct heat from a heat gun or blowdryer and gentle prying with a
2b: The mac I used gave no cares about the lack of camera, speakers, or Wifi/Bluetooth card, so those all went in the
3: Mounting:
3a: Figure out placement of your hardware. Mine is presently mounted to a piece of 1/4 inch plywood I had laying around, using spare standoffs from...wherever. Now that I know it works, I'll figure out a better case to use. I'm thinking I will work out something to hang it off the side of my small rack.
3b: The fan can be zip tied through existing standoff holes on the motherboard to be held generally in the right place, with a small rigged pin through the bottom (in my pic) to support the far end. Temps appear ok so far, although I will probably add some aluminum duct tape where the fan meets the heatsink once this reaches final form. Final "case" design would also include more ventilation across the whole board.
3c: I had hoped to be able to switch to a more "normal" heatsink, but given the socket design (pressure fit), incorporation with the GPU heatsink, and lack of holes in the right places (I tried every fan spacing adapter I had and they are all too big), that's not reasonable as far as I can tell.
4: Dealing with the power supply connections:
4a: Depending on mounting scenario, YMMV. I wanted (at least initially) to mount the PSU on the back side of the logic board. This involved a bunch of splicing of both the mains voltage wires from the PSU to the motherboard, as well as splicing extra wire into the mains hookup. As a note, I THINK the leads could be unsoldered from the PSU PCB and extended with a single heavy line per output, but I didn't want my first venture into PCB soldering to be this project.
4a2: DO NOT MISS RE-CONNECTING THE GREEN WIRE TO THE GROUND STANDOFF ON THE PSU!!! Failure to do this means you're running a completely ungrounded system. NO BUENO!
4b: For the PSU-Logic Board communications line, I used a piece of cat 5 with the 8th wire cut off. (The wire gauge is significantly larger on cat 5 than the existing wire. I used a lighter to melt the casing off the existing connector wire.)
4c: If you suck at soldering like me, you will probably spend a couple hours with a soldering iron for all that, by the time you account for stripping a bunch of wires and such.
5: Once you get the power supply leads the length you want them and get it mounted,
6: Grab an m.2 to iMac proprietary m.2 adapter (if your iMac supports the m.2 drive, otherwise get an SSD) https://www.amazon.com/dp/B01CWWAENG and connect up whatever m.2 drive you want to use. These are fiddly as hell, and mine took a few attempts to seat correctly. Warning that some of them may contact the metal RF shield, requiring
7: Fire it up and make sure it starts! I had to reseat the stinking heatsink 3 times and bent a CPU pin that required some tedious work with tweezers to fix.
8: Install your Linux flavor of choice. Everything in Proxmox (Debian) worked right out of the box and booted/installed off the USB drive with no prompting.
9: Install fan management software to get your fan speeds under control: https://github.com/linux-on-mac/mbpfan For Debian, it's just sudo apt install mbpfan (there are some other instructions in the git, but generally that's all that's needed).
10: Fix thermal throttling: When the MSR doesn't detect a connected screen, it sets the CPU to run at 800mhz. It does that by setting BD-PROCHOT to throttle for heat. So, we need to fix that flag in the MSR. This is accomplished by installing msr-tools (sudo apt install msr-tools), and then running a script to change the hex-based flag to disable the throttling. I used the script here: https://github.com/yyearth/turnoff-BD-PROCHOT/blob/master/bdprochot_off.sh
Edit: That shell script won't work from a crontab job (at least on my system), it needs explicit locations. Below is my working shell script. I set a cron job to run the script at reboot. I don't see sleeping this computer ever, so I won't be messing with that at the time being.
You can confirm it's working by running
Code:
watch "grep 'cpu MHz' /proc/cpuinfo"
Bash:
#!/bin/bash

#local log file
exec >/root/throttlelog.txt 2>&1

/usr/sbin/modprobe msr
r=`/usr/sbin/rdmsr 0x1FC`
s='0x'$r''
f=$(($s&0xFFFFE))
/usr/sbin/wrmsr 0x1FC "obase=16;$f"|bc
echo "$r"" write to ""reg 0x1FC"
echo "BD PROCHOT off."
Have fun and don't burn down your damn house!
Attachments
Last edited:
As an Amazon Associate, MacRumors earns a commission from qualifying purchases made through links in this post.