Update: This "Apple Piie" system has been superseded by "Apple WIIe". See the post below.
Welcome to Apple Piie
I wanted to get an old Apple //e running with the games and apps I used to own and enjoy when I was 9, but realized there were a lot of restrictions. Whilst the games are readily available online as .dsk files for emulators, if I wanted to run the actual disks I'd need working drives and some way to put the files onto disks, or to buy them from eBay and hope they worked. There were other concerns too.
But I realized if I got an emulator, I wouldn't need to worry about all that, and I could also run other classic computers from my past too, not just the //e.
I decided to have a little fun and bought a faulty Apple //e, took out the innards (and sold to good homes as parts), then placed it all inside. Here's what you'll need:
Shopping List
1. A Raspberry Pi Model B (with Wi-Fi, power, 8GB SD card & more): http://www.amazon.com/gp/product/B0...=as2&tag=secure0dd-20&linkId=LVHWVXCPB5T3UH7C

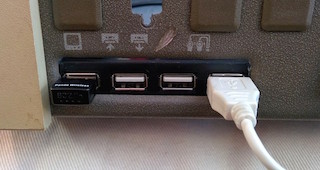
2. A powered USB hub (to fit Apple //e case slot if possible): http://www.amazon.com/gp/product/B0...=as2&tag=secure0dd-20&linkId=O4RMMMEJNGWUFIFL
(Note: Not the old one pictured – I learned that unpowered hub introduced problems, so go for this powered one.)
3. An HDMI cable.
4. An Apple //e keyboard > USB adapter: https://www.tindie.com/products/option8/retroconnector-keyboard-shield-for-apple-iie/ (see below - bottom)
NB: To toggle Function Keys on and off, use the CAPS LOCK button.

5a. Optional: An Apple //e joystick > USB adapter: https://www.tindie.com/products/opt...stick-interface-for-apple-ii/?pt=directsearch
See below: top-center, bolted neatly into the existing case slot

5b. Or better still, an Xbox 360 Wireless Controller adapter > USB, which can support 2 controllers: http://www.amazon.com/gp/product/B0...=as2&tag=secure0dd-20&linkId=ZGJLJOZUKEA4I4WT (only this official one works)

6. Upgrade!: A USB sound device if you want less glitchy sound & to use the original Apple //e case speaker, by running a cable from the headphone jack to it under the case's keyboard: http://www.amazon.com/gp/product/B0...=as2&tag=secure0dd-20&linkId=BM34XN6WJYELMM76

Using a hot glue gun I arranged all the items in the Apple case, connected all the USB devices, and lo and behold, it just works.

"Erm, we've met before, but it's been 30 years so I forgive you for forgetting."
You can send games and ROMs to the Pi via Cyberduck over your Wi-Fi. Yes, this Apple //e has Wi-Fi!

Software Setup

My total cost was about $150 including the Apple //e, but without the optional joystick adapter. After selling the Apple //e parts that were inside it, it cost approximately $0 total.
So I thought I'd share some photos of it to anyone else interested in this fun project to help anyone else wishing to do the same. Hit me up with any questions, and enjoy the trips down memory lane!")

Welcome to
Apple PiieI wanted to get an old Apple //e running with the games and apps I used to own and enjoy when I was 9, but realized there were a lot of restrictions. Whilst the games are readily available online as .dsk files for emulators, if I wanted to run the actual disks I'd need working drives and some way to put the files onto disks, or to buy them from eBay and hope they worked. There were other concerns too.
But I realized if I got an emulator, I wouldn't need to worry about all that, and I could also run other classic computers from my past too, not just the //e.
I decided to have a little fun and bought a faulty Apple //e, took out the innards (and sold to good homes as parts), then placed it all inside. Here's what you'll need:
Shopping List
1. A Raspberry Pi Model B (with Wi-Fi, power, 8GB SD card & more): http://www.amazon.com/gp/product/B0...=as2&tag=secure0dd-20&linkId=LVHWVXCPB5T3UH7C
2. A powered USB hub (to fit Apple //e case slot if possible): http://www.amazon.com/gp/product/B0...=as2&tag=secure0dd-20&linkId=O4RMMMEJNGWUFIFL
(Note: Not the old one pictured – I learned that unpowered hub introduced problems, so go for this powered one.)
3. An HDMI cable.
4. An Apple //e keyboard > USB adapter: https://www.tindie.com/products/option8/retroconnector-keyboard-shield-for-apple-iie/ (see below - bottom)
NB: To toggle Function Keys on and off, use the CAPS LOCK button.
5a. Optional: An Apple //e joystick > USB adapter: https://www.tindie.com/products/opt...stick-interface-for-apple-ii/?pt=directsearch
See below: top-center, bolted neatly into the existing case slot
5b. Or better still, an Xbox 360 Wireless Controller adapter > USB, which can support 2 controllers: http://www.amazon.com/gp/product/B0...=as2&tag=secure0dd-20&linkId=ZGJLJOZUKEA4I4WT (only this official one works)
6. Upgrade!: A USB sound device if you want less glitchy sound & to use the original Apple //e case speaker, by running a cable from the headphone jack to it under the case's keyboard: http://www.amazon.com/gp/product/B0...=as2&tag=secure0dd-20&linkId=BM34XN6WJYELMM76
Using a hot glue gun I arranged all the items in the Apple case, connected all the USB devices, and lo and behold, it just works.
"Erm, we've met before, but it's been 30 years so I forgive you for forgetting."
You can send games and ROMs to the Pi via Cyberduck over your Wi-Fi. Yes, this Apple //e has Wi-Fi!
Software Setup
- Install the RetroPie software onto the SD card in your Mac: http://lifehacker.com/how-to-turn-your-raspberry-pi-into-a-retro-game-console-498561192
- Put the SD card in the Pi and set up the Wi-Fi: http://www.howtogeek.com/167425/how-to-setup-wi-fi-on-your-raspberry-pi-via-the-command-line
- It's good to also update RetroPie straight away using these commands, then following the appropriate menu option:
cd RetroPie-Setup (if not already in that directory)
sudo ./retropie_setup.sh - Install the Xbox Wireless Controller drivers (if applicable): https://github.com/petrockblog/RetroPie-Setup/wiki/Setting-up-the-XBox360-controller and/or download the xboxdrv driver via the RetroPie menu as per the above commands)
- You can set up the soundcard by following the instructions at http://asliceofraspberrypi.blogspot.kr/2013/02/adding-audio-input-device.html and make it the default system device by following https://learn.adafruit.com/usb-audio-cards-with-a-raspberry-pi/updating-alsa-config
- Start copying ROMs (emulator game files) over to the appropriate "roms" subfolder on the Pi, via Cyberduck, and have fun!
My total cost was about $150 including the Apple //e, but without the optional joystick adapter. After selling the Apple //e parts that were inside it, it cost approximately $0 total.
So I thought I'd share some photos of it to anyone else interested in this fun project to help anyone else wishing to do the same. Hit me up with any questions, and enjoy the trips down memory lane!
Last edited:
As an Amazon Associate, MacRumors earns a commission from qualifying purchases made through links in this post.