PART 1 of 3
This is a guide to installing Windows 10 on Classic Mac Pros without the Boot Camp Assistant.
This is one of many ways to implement such a "Bare Metal" setup but is a straightforward method.
This guide is for installing Legacy Windows, as opposed to UEFI Windows, but can also be used for installing UEFI Windows with one change in the process (which is pointed out).
UEFI Windows is now the orthodox installation setup but unlike Legacy Windows, usage, and even simply just starting the installer, comes with risks of damaging Classic Mac Pros. Users must note and mitigate these risks should they decide upon UEFI Windows. Please search the forum or create a separate thread for this if you prefer UEFI Windows.
An installed Windows 10 version can apparently be upgraded to Windows 11.
A link to a tool that apparently does this is provided at the end of the guide.
It may however be best to remain on Windows 10 until absolutely required.
If so, you may want to take a look at Windows 10 IoT Enterprise LTSC 2021.
This release of Windows 10 will receive security updates for 10 years (2031).
NOTE
This guide requires installing Legacy Windows on a separate disk to avoid the HybridMBR hack that the Boot Camp Assistant relies on. To install Legacy Windows and Mac OS on the same disk however, the HybridMBR hack must be applied instead. Follow these alternative instructions to manually apply the hack and to install Legacy Windows when done.
The idea is to start the installation on a VM, carry out some preliminary steps, then finalise directly on a Mac.
- Ensure a Pre-Boot Configuration Screen is Available
- IMPORTANT: Required to install and handle the Multi-Boot arrangement.
- If running a GPU that supports this, you can access the Pre-Boot Configuration Screen by pressing the OPTION key on restarting your Mac.
- If you do not have such in place, try using MyBootMgr to set RefindPlus up for an equivalent screen.
- IMPORTANT: Required to install and handle the Multi-Boot arrangement.
- Download and Install VirtualBox
- IMPORTANT: VirtualBox does not ordinarily work on cMP as of v7.x.
- You will therefore want VirtualBox v6.1.
- Choose the "macOS / Intel hosts" variant.
- Do not open VirtualBox from "Applications" after installing, or shut it down before continuing if you do.
- IMPORTANT: VirtualBox does not ordinarily work on cMP as of v7.x.
- Download the Windows 10 "ISO" File
- This will represent a "CD/DVD" to be inserted into the Virtual Machine to start the installation.
- USE THIS LINK for the General Availability Channel (GAC).
- This provides ISO files for standard versions of Windows 10.
- Access from Mac OS or Linux as required download options are not shown on Windows.
- USE THIS LINK for the Long-Term Servicing Channel (LTSC) if you have the access credentials needed or USE THIS LINK to get the ISO file from the third-party "Microsoft Activation Scripts (MAS)" site.
- USE THIS LINK for the General Availability Channel (GAC).
- This will represent a "CD/DVD" to be inserted into the Virtual Machine to start the installation.
Launch

After

Choose the same options as shown above, then click on
Run Terminal once done, enter

Return to

Run the following command in Terminal:
Unmount
Your physical disk is now prepared and ready to be connected to a Windows VM.
Disk Utiity and choose Show All Devices under View in the top left corner of the window. Then, select a disk (whole disk, not just a volume on a disk) attached to one of the four native SATA Bays in your MacPro and format it by clicking Erase. NB: This will be wiped clean so ensure you move any important data out first. Also, note that the native SATA Bays are required to run Legacy Windows on Classic MacPro. UEFI Windows can be run from any available port/slot.After
Erase is clicked, a dropdown dialogue box will be shown:Choose the same options as shown above, then click on
Erase to format the disk.Run Terminal once done, enter
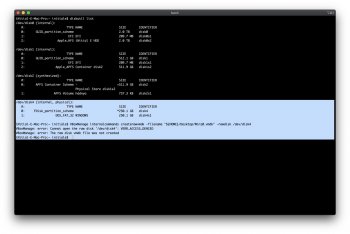
diskutil list and note the Disk ID for "WIN_DISK" (See "3" below):Return to
Disk Utiity, select the WIN_DISK volume itself, then unmount it:Run the following command in Terminal:
sudo VBoxManage internalcommands createrawvmdk -filename "${HOME}/Desktop/Win10.vmdk" -rawdisk /dev/disk??.- Make sure
/dev/disk??matches the Disk ID noted earlier. - Reconfirm the Disk ID if you have rebooted since you last checked as it can change between boots.
Win10.vmdk) that points to WIN_DISK, being created in Raw Disk Mode.Unmount
WIN_DISK from Disk Utiity again after, as it would have been mounted by the command:
Type and enter
Remember not to launch directly but to use Terminal.
PS: Cannot recollect why this is required, but recollect I found it so.
Select

Swtich to

In Expert Mode, adjust the settings as shown:

You will get a dialogue as shown where you should click

Navigate to your desktop and select the
Highlight this when returned to the dialogue box and click

Press

sudo virtualbox into Terminal to launch VirtualBox.Remember not to launch directly but to use Terminal.
PS: Cannot recollect why this is required, but recollect I found it so.
Select
New within VirtualBox:Swtich to
Expert Mode on the drop down box as the Virtual Machine needs fine tuning:In Expert Mode, adjust the settings as shown:
- WIN10
- /Users/YOUR_USER_NAME/Virtualbox VMs
- Windows 10
- Leave at default setting. Will tweak later
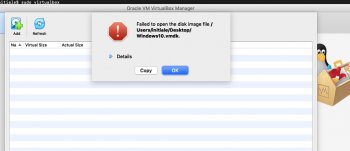
- Select "use existing file".
- Click folder icon to select the file
You will get a dialogue as shown where you should click
Add:Navigate to your desktop and select the
Win10.vmdk file created earlier.Highlight this when returned to the dialogue box and click
Choose.Press
Create to create a Windows VM linked to WIN_DISK on return to the Expert Mode dialogue.CONTINUED BELOW...
Last edited: