Well at school we do Newscasts, alot of newscasts... and we always have trouble getting the Blue Screen wall to chroma out just right. Of couse we do not use people wearing blue in a color or anything like that. However somtimes around the edges of the person in Adobe Premier there is some problems that we encounter when chromaing. It's just not crisp. Any ideas on how to fix this?
Got a tip for us?
Let us know
Become a MacRumors Supporter for $50/year with no ads, ability to filter front page stories, and private forums.
Bluescreen/ Chroma Keying Help
- Thread starter Texas04
- Start date
- Sort by reaction score
You are using an out of date browser. It may not display this or other websites correctly.
You should upgrade or use an alternative browser.
You should upgrade or use an alternative browser.
Texas04 said:Well at school we do Newscasts, alot of newscasts... and we always have trouble getting the Blue Screen wall to chroma out just right. Of couse we do not use people wearing blue in a color or anything like that. However somtimes around the edges of the person in Adobe Premier there is some problems that we encounter when chromaing. It's just not crisp. Any ideas on how to fix this?
Premiere isn't great for chroma keying unless you have a perfect set. At my school, we have a blue wall made out of fabric store fabric and with Final Cut I'm able to get it perfect every time. All I can really say is ask the school to look into Final Cut Pro.. it's a much better investment.
mikemodena said:Premiere isn't great for chroma keying unless you have a perfect set. At my school, we have a blue wall made out of fabric store fabric and with Final Cut I'm able to get it perfect every time. All I can really say is ask the school to look into Final Cut Pro.. it's a much better investment.
What I have been telling them for a while... Maybe if i prepare a test demo with Final Cut. Get our newscast anchors in the blue wall go to the Apple store and play around...
I saw your set up thats what prompted me to make this thread... our wall is very much equal in color and your lighting didnt look like it was really thought about. Its a new adventure each time we do ours.
EDIT: Would Final Cut Express be able to do the same?
is it a fabric, make sure the lighting is perfect and equal light threwout the whole thing. if its fabric make sure everthigns tight with not creases or rolls
Make sure the people stand pretty far in front of the blue wall. If they are too close the wall will reflect blue light onto them and you'll get a "halo" around them that is hard to key out.
Lethal
Lethal
It could also help to use a Progressive camera (such as the Panasonic DVX100B in Progressive mode) or to deinterlace your video before you chroma it.
Normally, when I chroma at school, I garbage matte everything around the actor first, then chroma the remaining. Makes it much eaiser. Also, mess around with both the GREEN SCREEN and the CHROMA filters, you may find one or the other works better for you.
Normally, when I chroma at school, I garbage matte everything around the actor first, then chroma the remaining. Makes it much eaiser. Also, mess around with both the GREEN SCREEN and the CHROMA filters, you may find one or the other works better for you.
Texas04 said:What I have been telling them for a while... Maybe if i prepare a test demo with Final Cut. Get our newscast anchors in the blue wall go to the Apple store and play around...
I saw your set up thats what prompted me to make this thread... our wall is very much equal in color and your lighting didnt look like it was really thought about. Its a new adventure each time we do ours.
EDIT: Would Final Cut Express be able to do the same?
Yeah I kept the set lights off for that project, but they're always on for the announcements. When I was doing my iPed project I left them off to avoid shadows from the dancing, and Final Cut Express *should* do it, but I'm not totally sure.. but pretty close. Oh, and if you ever use fabric like us, which is different size fabric put together, hot glue the creases together.
This should help somewhat
There are a couple things you can do to get a better key.
First off, use a matte. Its kinda hard to explain, but first off you need to pull a B&W key. That is, youll want your actor to be completely black, and the rest to be completely white. Then when you have that, adjust the choker on the matte to expand the matte maybe 5-10 pixels. You will then use this matte and overlay it over your original (unkeyed) footage. What this is doing is providing a window to look through, you will need to change the composite mode. You should now have your matte on top, and your clip in the bottom, and the matte should be hiding everything except your actor and a small outlined strip of green around him.
Now use your keyer. This makes it easier because you are no longer trying to key out the entire blue screen with all its inpurities, you are simply trying to key the small green outline around your actor. This works better because you dont have to select such a huge range of blue, you can simply just key the shades of blue that are closest to your actor and not worry about the rest.
Often times you get bad keyes when you are tyring to key out all of the blue in the whole frame, because there are many shades that the computer is seeing. This way, your only focusin on that small blue or green band that is around your actor (thanks to the matte) and the computer only has the key out the shades that are coming through from the matte.
I tried to explain this the best I could, hope its clear. Maybe someone else can elaborate on it more and make it sound better. I can see it in my head but im not that good at explaining things, so this was my best shot.
Also, some others posted some good techniques, like shooting progressive (which should avoid stairstepping) or deinterlacing, also I have no idea how well premiers keyer works, I know FCP has a pretty good one that I use most of the time. Hope this helps and good luck in the future.
- Ryan
sometimes when shooting with a green/blue screen, the color seems to reflect off of the subject or spill onto the image of the subject. the spill suppress filter takes this color fringing and turns it gray, which usually blends with the subject very well.
So the suggestions are
1. Use Final Cut
2. Use Filters? EDITED: UNDERSTOOD
3. Matting before chromaing
4. Dont use DV (What else can I use?)
5. Keep Subject far away from the blue screen to avoid "halo"
The Above Bolds are still questionable items, could somone please go into further detail? Again Im using Adobe Premier on a Windows Machine (Its the schools not mine)
Thanks for all the help!
Texas04 said:What Else can I shoot it in besides DV?
Yes that is the form we shoot in. Its a GL2 Canon Camera that we usually use.
There are a lot of formats out there, but the real question is whether you have any other formats available at school. If not, then you just have to work with what you have.
I'm not saying you can't do it with DV, just that it's not a good format to do greenscreen with. Because DV only samples the color of every fourth pixel, it's difficult to get a smooth edge between the foreground and background. For a technical explanation of how this works, click here.
this topic has been covered at length in this forum.
i say the same thing each time.
THE LIGHTING ON THE BACKGROUND MUST BE AT LEAST 1 F-STOP
BELOW THE LIGHTING ON THE SUBJECT IN THE FOREGROUND.
that will minimize the halo.
Someone also said to pull the subject away from the background.
that will help although most people are having space constraints as well.
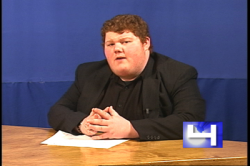
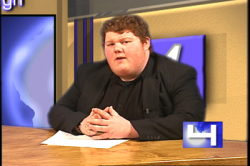
mikemodena said:Here's a before and after of our announcements.. that's not me in the shot.. that's Dave. I'm strictly behind the scenes
those shots are good. but you are not creating enough of an edge on his silohette. the background should be lit in some way.
but by the looks of it, you are fine. people dont expect so much out of small budget.
obeygiant said:those shots are good. but you are not creating enough of an edge on his silohette. the background should be lit in some way.
but by the looks of it, you are fine. people dont expect so much out of small budget.
Or, no budget
Also, I'm not in the class that actually shoots the announcements, the kids in there are buffoons. I just edit them later, and usually there is one problem or another by the time it gets to me. You should have seen the lighting today.. yuck.
mikemodena said:Or, no budget
Also, I'm not in the class that actually shoots the announcements, the kids in there are buffoons. I just edit them later, and usually there is one problem or another by the time it gets to me. You should have seen the lighting today.. yuck.
Take heart: I cringe whenever I see the stuff I shot and edited in college.
thats the best keying advice i have ever heard, but i don't think you know why.obeygiant said:this topic has been covered at length in this forum.
i say the same thing each time.
THE LIGHTING ON THE BACKGROUND MUST BE AT LEAST 1 F-STOP
BELOW THE LIGHTING ON THE SUBJECT IN THE FOREGROUND.
that will minimize the halo.
Someone also said to pull the subject away from the background.
that will help although most people are having space constraints as well.
the reson that is such good advice is to pull the luma (in addition to chroma) aspect into the situation. why? because dv shoots at 4:1:1 which means that the alpha channel has 4x as much resolution as the color channels. we can barely notice it with our eyes, but a computer can't tell, especiallly when you tell it to take out the background based on the pixelated color information.
Register on MacRumors! This sidebar will go away, and you'll see fewer ads.