Become a MacRumors Supporter for $50/year with no ads, ability to filter front page stories, and private forums.

peapody

macrumors 68040
Original poster
Oct 7, 2007
3,176
142
San Francisco, CA
I have been on the look out for a thin, professional looking case that is a folio type with a notepad I can use to take notes etc. Only two exist that I could find - a very thick moleskin folio cover for e-readers, and the booqpad mini. Having owned the larger ipad 2 version of the booqpad, I was not a fan of how lose the ipad was inside the case, and there were too many pockets, too many things going on with that case (and not a fan of the material it was made out of).

Taking direction from this site: http://www.byjohnchandler.com/2012/12/12/the-worlds-niftiest-ipad-mini-case/

I sought to make my own but with a couple tweaks.
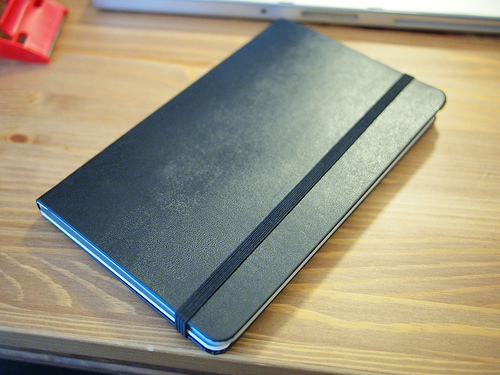
Moleskin large


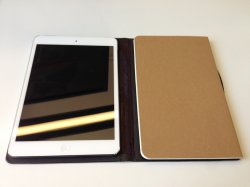
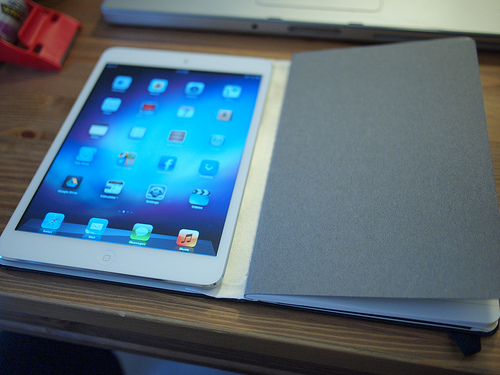
You can see that the iPad is attached via tack n peel which is a non permanent but very sticky means of attachment! I tried fitting a feather light in the book but the iPad is JUST the right size. I wrapsol'd my ipad before doing this so I have additional protection.


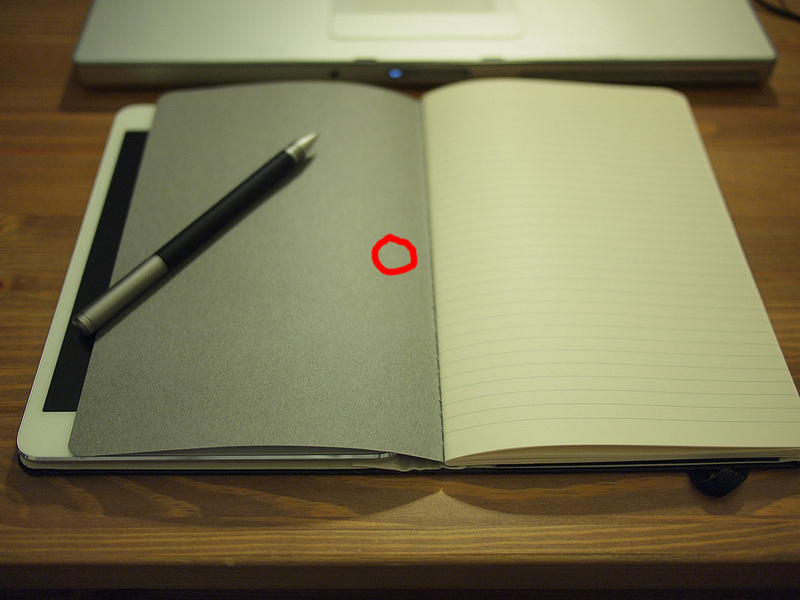
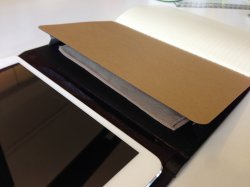
I slipped in a grey cahier notebook, which is the perfect fit for the case..and refillable at a nice price. I slipped the back cover of the cahier into the famous back pocket of the moleskin notebook. I still have the added use of the back pocket to slip in misc items.


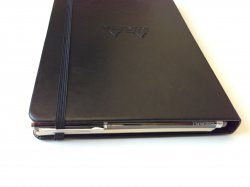
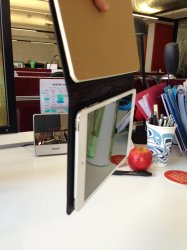
My wacom bamboo duo stylus fits perfectly on the top because I lowered the positioning of the iPad. Look at that.. perfect length and everything!


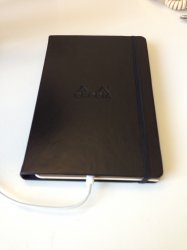
Overall I am in love with this case. It is a cheaper alternative to portenzo, dodocases etc, has added functionality, but is thin! There are options out there people. Sorry for the sucky pics. I made this before work haha. I will post a step by step if any one is interested.
 
Last edited:
Looks very good. Very clean, very simplistic, looks store-bought! Awesome match with iPad mini and Bamboo Duo sizes, too

The book opening up over the iPad is a bit awkward though, isn't it? If you took a piece of A4 sized cardboard/thick paper and folded it in two, it should allow you to create a "pocket reverser". Meaning that you would glue the folded piece to the underside of your notebook, so that the spine of the folded piece would be opposite that of the notebook. That would allow you to slide the loose end of the folded page into the pocket of the moleskine, resulting in the moleskine still being held in place, but opening the other way, not blocking the ipad.

Moleskine is black, folded page red, notebook green:

moleskine.jpg


Another tip is to find a small, flat magnetm and glue it roughly here:
magnetplacement.jpg


That would make the screen turn on/off automatically when you open/close the book.
 
The book opening up over the iPad is a bit awkward though, isn't it? If you took a piece of A4 sized cardboard/thick paper and folded it in two, it should allow you to create a "pocket reverser". Meaning that you would glue the folded piece to the underside of your notebook, so that the spine of the folded piece would be opposite that of the notebook. That would allow you to slide the loose end of the folded page into the pocket of the moleskine, resulting in the moleskine still being held in place, but opening the other way, not blocking the ipad.

Moleskine is black, folded page red, notebook green:

Image

Thats a good suggestion - yes it is a little bit awkward to have the cover of the cahier cover the ipad. However, just thinking about your schematic, having the book open the other way would be strange for me as a right hander. You would essentially be writing from the back of the cahier notebook no? To be honest, I find the cover just fine. It keeps the pages of the notebook in a confined state when I am not writing in it.

The magnet suggestion I have to look into. The sleep/wake function isn't a must have for me in the least. In fact, I just leave the ipad on, close up the moleskine altogether and let it go to sleep on its own.

Yeah, you would be writing from the bag, or upside down, depending on how you look at it. I imagine it would be weird, but depending on how you use this combination, being able to see the iPad screen at the same time might be worth the trade-off.

I agree that auto-off isn't exactly the most important feature out there, but at the same time, it's also so ridiculously easy to add that it might just be worth it :)
 
iPad Mini + Moleskine + Cahiers + blu-tack = awesome!

Hi All,

I was also inspired by this idea of transforming an old moleskine notebook into a cover for the iPad Mini. But, borne out of laziness and lack of the "right" materials to hand, I came up with a slightly different way to do this... And it worked quite well! Essentially, you should have all the materials you need in any typical office space - no trip to the arts or crafts store necessary.

This method uses a brown "cahiers" ruled journal (available in packs of 3 from Moleskine and in various nifty colours too). The journal is attached so that it can be used easily for writing without affecting the iPad. It also still utilizes the moleskine pouch, which I've used to store a screen cleaner.

I'm hoping the pictures get attached, but here's the text description.

Essentially follow the instructions as written in this thread by peapody below (and also giving credit to the original blog post where this idea originated).

But, here's the cool part:

1. Use blu-tack to attach your iPad Mini to the left side cover. I used 6 blobs and can hold my cover in the air with no worry of the ipad moving at all. But, it's up to you if you want to do it this way - I am a gadget nut, and felt comfortable enough with blu-tack that it wouldn't damage the back of my iPad. You could always put screenshield cover on the back of your iPad if you were worried about it.

2. If you offset the ipad slightly to the top or bottom, you can handily fit a stylus in as well. See the picture below.

3. Use 4 small blobs (you don't need much at all) to attach the ruled journal to the right side of the moleskine cover on top of the folding pouch.

4. I also used a thick black permanent marker to "paint" the middle section of the cover, as when I removed the paper it looked a bit crap.

Done. Yay. Supplies needed: a sharp knife to (carefully) cut out the used pages, some blu-tack, a permanent black marker (optional).

As they say, your mileage may vary, but this worked well for me.

Good luck.
 

Attachments

  • IMG_1056.jpg
    IMG_1056.jpg
    1.4 MB · Views: 753
  • IMG_1057.JPG
    IMG_1057.JPG
    1.1 MB · Views: 674
  • IMG_1058.JPG
    IMG_1058.JPG
    1.6 MB · Views: 6,237
  • IMG_1059.JPG
    IMG_1059.JPG
    1.6 MB · Views: 781
  • IMG_1062.jpg
    IMG_1062.jpg
    1.9 MB · Views: 698
Hi All,

I was also inspired by this idea of transforming an old moleskine notebook into a cover for the iPad Mini. But, borne out of laziness and lack of the "right" materials to hand, I came up with a slightly different way to do this... And it worked quite well! Essentially, you should have all the materials you need in any typical office space - no trip to the arts or crafts store necessary.

This method uses a brown "cahiers" ruled journal (available in packs of 3 from Moleskine and in various nifty colours too). The journal is attached so that it can be used easily for writing without affecting the iPad. It also still utilizes the moleskine pouch, which I've used to store a screen cleaner.

I'm hoping the pictures get attached, but here's the text description.

Essentially follow the instructions as written in this thread by peapody below (and also giving credit to the original blog post where this idea originated).

But, here's the cool part:

1. Use blu-tack to attach your iPad Mini to the left side cover. I used 6 blobs and can hold my cover in the air with no worry of the ipad moving at all. But, it's up to you if you want to do it this way - I am a gadget nut, and felt comfortable enough with blu-tack that it wouldn't damage the back of my iPad. You could always put screenshield cover on the back of your iPad if you were worried about it.

2. If you offset the ipad slightly to the top or bottom, you can handily fit a stylus in as well. See the picture below.

3. Use 4 small blobs (you don't need much at all) to attach the ruled journal to the right side of the moleskine cover on top of the folding pouch.

4. I also used a thick black permanent marker to "paint" the middle section of the cover, as when I removed the paper it looked a bit crap.

Done. Yay. Supplies needed: a sharp knife to (carefully) cut out the used pages, some blu-tack, a permanent black marker (optional).

As they say, your mileage may vary, but this worked well for me.

Good luck.


I like your general color scheme more than mine. Will have to change it up!
 
I don't have a mini (don't plan on getting one either) This is one awesome thread you guys, I love it. Both looks real good..
 
For those unaware, Peabody is a female.

On topic, good work DIYers.

If you're referring to my external post, I actually know that (thanks to the Flickr feed), but did find one "his" in my post, which I changed to "her" like the rest of it :)
 
Your post inspired me to try to find or make something similar.

I didn't want the ipad's edge to stick out (even if only slightly) and wanted a notebook that wouldn't cover up the ipad when I opened it. After some research I ended up combining three items not intended to go together, to end up with a professional looking, folio iPad Mini case that I can take with me to meetings and is easy to carry around.

It's a little bulkier, and doesn't involve all the handicraft, but I like the finished off look and suede lining, as if it's custom made for the iPad Mini. Total cost was £40 (I think in US you can get this all for $40-50)

1. Used a Moleskine Folio e-Reader Cover intended for the Kindle2, into which my ipad mini fit's in perfectly (I think there are two versions, I used the one where the kindle is supposed to be on the left side). The Mini fits nice and tightly into the elastic straps, and the speakers, on/off button and headphone jack are all (just) accessible

2. Replaced the small volant reporter notebook, that the folio came with, with a large plain soft cover moleskine reporter as I needed something more focused on taking notes in meetings than scribbling thoughts on. The only handicraft required is to remove the pocket and the elastic strap from the back cover, as this slots into the sleeve in the folio case

3. Attached a Leuchtturm pen loop to the back of the reporter notebook as there is no space for a pen in the case, since it all fits so snugly.

All in all quite pleased with the sum of the parts!


IMG-20130321-00062.jpg IMG-20130321-00064.jpg
IMG-20130321-00065.jpg IMG-20130321-00066.jpg
IMG-20130321-00068.jpg
 
Last edited:

Very cool. Wish I could have provided better pictures.


Nice. I actually have this e-reader folio cover and it does fit perfectly. The only annoyance is that it is soo thick. That and the notebook is not substantial enough for me. You made a nice upgrade.
 
Adapted Kindle E-reader for the Mini

Your post inspired me to try to find or make something similar.

I didn't want the ipad's edge to stick out (even if only slightly) and wanted a notebook that wouldn't cover up the ipad when I opened it. After some research I ended up combining three items not intended to go together, to end up with a professional looking, folio iPad Mini case that I can take with me to meetings and is easy to carry around.

It's a little bulkier, and doesn't involve all the handicraft, but I like the finished off look and suede lining, as if it's custom made for the iPad Mini. Total cost was £40 (I think in US you can get this all for $40-50)

1. Used a Moleskine Folio e-Reader Cover intended for the Kindle2, into which my ipad mini fit's in perfectly (I think there are two versions, I used the one where the kindle is supposed to be on the left side). The Mini fits nice and tightly into the elastic straps, and the speakers, on/off button and headphone jack are all (just) accessible

2. Replaced the small volant reporter notebook, that the folio came with, with a large plain soft cover moleskine reporter as I needed something more focused on taking notes in meetings than scribbling thoughts on. The only handicraft required is to remove the pocket and the elastic strap from the back cover, as this slots into the sleeve in the folio case

3. Attached a Leuchtturm pen loop to the back of the reporter notebook as there is no space for a pen in the case, since it all fits so snugly.

All in all quite pleased with the sum of the parts!


View attachment 403676 View attachment 403677
View attachment 403678 View attachment 403679
View attachment 403680

Nice fix. I am a big fan of Moleskine. Also like the idea of "recycling" them as I have a few years of old calendar diaries.

On the side where you insert the note pad, is there an open slot so that you can insert portrait oriented notebooks such as the Cahiers on the left side instead of the top?

One thing I thought of is to use the Moleskin Evernote notebooks as they have a special paper or format to scan into Evernote, thus converting what you draw or write into Evernote on the device.

There are places who have book making supplies which include the book board, printed art papers, the right kinds of glue, backing paper and cloth. Hmmmm, would make an interesting project. I made calendars one year as gifts and was impressed how they turned out and had a bit of fun putting them together. I would think of using a very thin back shell permanently attached to the folio. I am not always wanting to use the mini in a folio so this would enable removal of my Mini.

Another thought I had with using a retired Moleskine in the large hardback version would be to glue a piece of ultra-suede or thin microfiber on the cover on top of elastic bands in the corners to affix the mini to the folio much like the commercially made one and use the pocket on the right side to hold one of their thin notebooks or Evernote notebooks. This would in a sense be like the E-folio that Moleskine makes, but thinner.
 
I've been thinking of making one of these myself, for my iPad Mini. I've been looking at all kinds of tutorials and saw this excellent video on making a good Moleskine style notebook. You can just leave out the part where she puts in the actual notebook paper. The cover looks really very nice. Thought this might help someone: http://www.youtube.com/watch?v=ERhZGHQtCCk

4ki77n.jpg
 
I actually tried my hand at following that tutorial--- figured out that I am NO WHERE NEAR as good as the video poster. I think she got better and better with more practice. I ended up spending more money making the cover through the book binding methods than I would have if I just bought a cover from dodo case or some other company!
 
Ha, I understand what you mean. I'm 50 and been doing art related stuff a long time. I recognize some of the tools and methods she uses, but she makes the execution look easy. I don't think I could do it that well either, especially wrapping the faux leather so neatly around the round corners then tucking them in. But I'm sure she screwed up a lot of early projects until she got better at it. I know I have. Everyone has to start somewhere!
 
Register on MacRumors! This sidebar will go away, and you'll see fewer ads.