Expanding on recent threads about Hard Drive Encryption and Secure File Deletion it seems like a good time to present password-protected file vaults.
Apple first provided this functionality in OS X 10.3 - the good news is that file vaults are compatible in versions of OS X up to (and including) 10.11
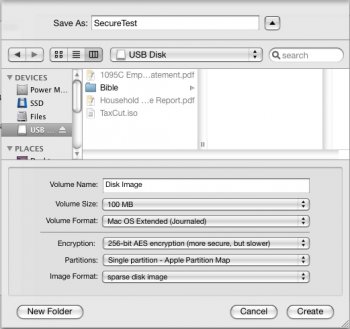
Let's create a file vault (image attached for reference)!
You will be prompted for the password each time you open a file vault.

Apple first provided this functionality in OS X 10.3 - the good news is that file vaults are compatible in versions of OS X up to (and including) 10.11
Let's create a file vault (image attached for reference)!
- Open Disk Utility.
- Click the New Image button, or choose File > New > Blank Disk Image.
- Type a name in the Save As field. This name will be used for the disk image (.sparseimage) file.
- Change the save destination if you wish.
- Select a size for the disk image file from the Size pop-up menu.
- Choose a different volume format if you don't want to use the default Mac OS X Extended (Journaled).
- Choose 128-bit AES encryption (and/or 256-bit AES in Mac OS X v10.5 or later) from the Encryption pop-up menu to encrypt the image's contents with a password. If you don't choose an encryption, your new image won't be encrypted.
- Change the image format to Sparse Disk Image. A sparse disk image will only consume the amount of storage used by its contents, however it can expand to the maximum size selected in step 5.
- Click the Create button.
- Enter and verify a good password in the dialog window that appears. This password will be saved in your keychain unless you deselect "Remember password (add to keychain)".
- Click OK.
You will be prompted for the password each time you open a file vault.