The MacBook Pro Retina 2013 uses a special build of OS X 10.9.1. This means the installer downloaded from the Mac App Store or from a friend's computer will not work. The built in Recovery HD partion has a bootable recovery disk already on it, but we need to get the computer to download the "payload" (so it doesn't require a future internet connect).
Start by mounting the built in Recovery HD using terminal and the invisible BaseSystem.dmg using terminal.
Run the Install OS X Mavericks app. Use a GUID HFS+j formatted external disk (unfortunately, it requires a disk larger than 8GB, so you might have to use a different one than the one that will eventually become your recovery USB Disk). It will verify your computer, and start the download. The download is big, so it might take a while.
Here is the tricky part, you have to make sure that it does not restart the computer. If it restarts you have to sit through the install process, and start over as it deletes the files. To make sure it doesn't auto restart you can open up a document with the old Save/Save As options and start writing in it (MS Office or Photoshop work).
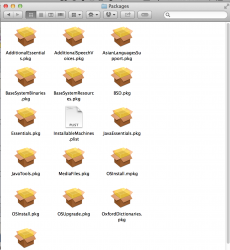
Once the download finishes, force quit (must be force quit) the Installer. Look at the external disk and find InstallESD.dmg (it may be buried in a folder). Copy InstallESD.dmg to the desktop. If you open it, you will just see a folder named Packages. This is the "payload" of the install, but it is not a bootable disk.
Make sure that you still have BaseSystem.dmg mounted. Open Disk Utility.app and restore the image to your USB Disk (the one you plan on using as the recovery disk, must be GUID HFS+j and at least 8GB). Eject the BaseSystem.dmg to prevent confusion in the next step.
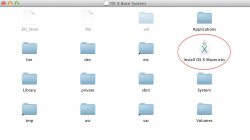
This creates the bootable disk, but it has no "payload" to deliver. Open the OS X Base System on the USB Disk and look into /System/Installation. Here you see a shortcut for Packages, but not an actual folder. Mount InstalESD.dmg and copy the Packages into OS X Base System and replace the shortcut.
You are done! Feel free to rename the USB Disk as you wish.
Start by mounting the built in Recovery HD using terminal and the invisible BaseSystem.dmg using terminal.
Code:
diskutil mount readOnly /dev/disk0s3
hdiutil attach "/Volumes/Recovery HD/com.apple.recovery.boot/BaseSystem.dmg"
Run the Install OS X Mavericks app. Use a GUID HFS+j formatted external disk (unfortunately, it requires a disk larger than 8GB, so you might have to use a different one than the one that will eventually become your recovery USB Disk). It will verify your computer, and start the download. The download is big, so it might take a while.
Here is the tricky part, you have to make sure that it does not restart the computer. If it restarts you have to sit through the install process, and start over as it deletes the files. To make sure it doesn't auto restart you can open up a document with the old Save/Save As options and start writing in it (MS Office or Photoshop work).
Once the download finishes, force quit (must be force quit) the Installer. Look at the external disk and find InstallESD.dmg (it may be buried in a folder). Copy InstallESD.dmg to the desktop. If you open it, you will just see a folder named Packages. This is the "payload" of the install, but it is not a bootable disk.
Make sure that you still have BaseSystem.dmg mounted. Open Disk Utility.app and restore the image to your USB Disk (the one you plan on using as the recovery disk, must be GUID HFS+j and at least 8GB). Eject the BaseSystem.dmg to prevent confusion in the next step.
This creates the bootable disk, but it has no "payload" to deliver. Open the OS X Base System on the USB Disk and look into /System/Installation. Here you see a shortcut for Packages, but not an actual folder. Mount InstalESD.dmg and copy the Packages into OS X Base System and replace the shortcut.
You are done! Feel free to rename the USB Disk as you wish.
Last edited: