well, 100% of people i asked here said it could not be done, but i have succeeded in installing a multitouch trackpad in a non unibody white macbook
this guide works to all MacBooks 2007 and newer
there are 2 routes to this project, i prefer the latter, because though it involves removing the top case, its much easier in my opinion.
Things you'll need:
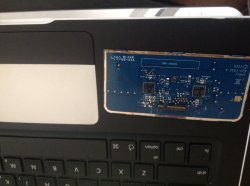
1. a trackpad assembly from a 2008 (MUST BE 2008) Non-unbody (MUST BE NON-UNIBODY) macbook pro (see image below)

2. screwdrivers (for route 2)
3. hair dryer
4. knife of some sort ( used my pocketknife)
5. time, patience, and a steady hand.
ok, route 1.
remove the battery of your macbook
you should see where the trackpad is located on the underside of the top case.
remove the plastic flap very carefully.
now carefully (CAREFULLY) remove the ribbon cables by lifting up on the clamps of the connectors, and pulling the cables out
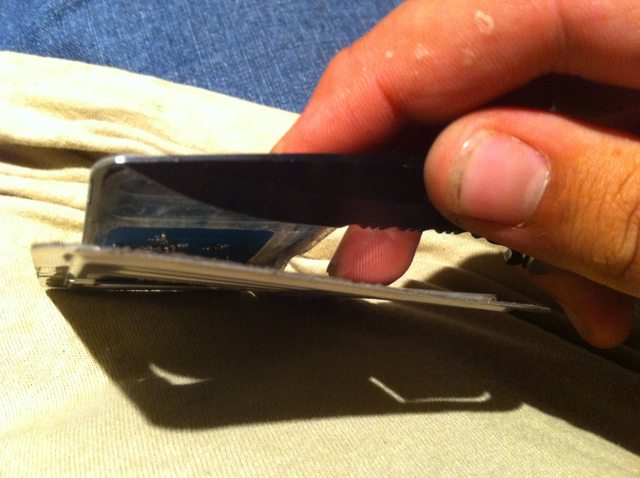
now before taking out this trackpad you should take the trackpad assembly that you are going to put in the macbook and using the hair dryer and knife gently remove JUST the trackpad part like this
so it looks like this
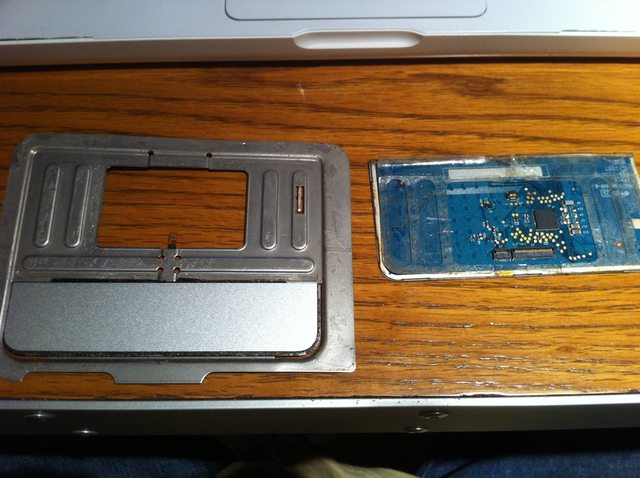
discard (or keep) the rest of the assembly, we are just using the trackpad
now that you have done it on the trackpad, its time to swap them.
do the same with the macbooks trackpad, just try pushing it out thru the hole
(DO NOT under any circumstance, remove the button, it will NEVER click properly again if you do)
then once that is out, simply place the new trackpad back into the empty slot, making sure its correctly aligned.
then reconnect the ribbon cables (VERY CAREFULLY, the gold wiring on the white ribbon cable likes to peel off, i almost had to buy a new top case but luckilly i was able to fold it back over.)
now boot up and enjoy! it should come up right from boot with being able to use gestures( this is in lion/mountain lion, im not sure about snow leopard)
Route 2
this is the route i took, i wasnt comfortable pushing the trackpad out so i removed the top case and used my knife to lift it of the adhesive.
remove the top case (google it)
then basically do what the above steps for route 1 say.
then reassemble the macbook, boot and enjoy!
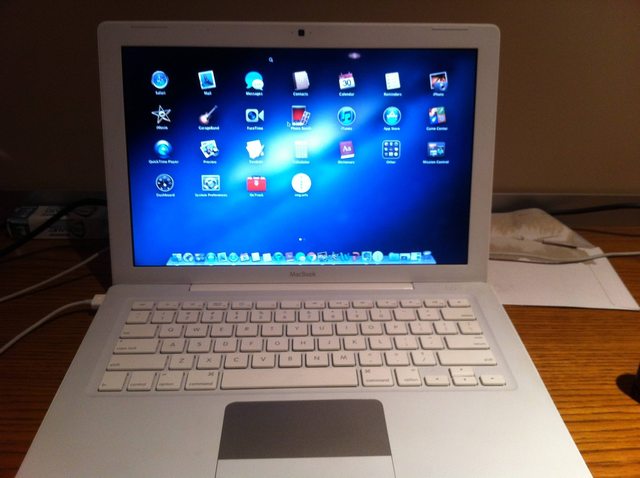
the finished product should look like this
this guide works to all MacBooks 2007 and newer
there are 2 routes to this project, i prefer the latter, because though it involves removing the top case, its much easier in my opinion.
Things you'll need:
1. a trackpad assembly from a 2008 (MUST BE 2008) Non-unbody (MUST BE NON-UNIBODY) macbook pro (see image below)
2. screwdrivers (for route 2)
3. hair dryer
4. knife of some sort ( used my pocketknife)
5. time, patience, and a steady hand.
ok, route 1.
remove the battery of your macbook
you should see where the trackpad is located on the underside of the top case.
remove the plastic flap very carefully.
now carefully (CAREFULLY) remove the ribbon cables by lifting up on the clamps of the connectors, and pulling the cables out
now before taking out this trackpad you should take the trackpad assembly that you are going to put in the macbook and using the hair dryer and knife gently remove JUST the trackpad part like this
so it looks like this
discard (or keep) the rest of the assembly, we are just using the trackpad
now that you have done it on the trackpad, its time to swap them.
do the same with the macbooks trackpad, just try pushing it out thru the hole
(DO NOT under any circumstance, remove the button, it will NEVER click properly again if you do)
then once that is out, simply place the new trackpad back into the empty slot, making sure its correctly aligned.
then reconnect the ribbon cables (VERY CAREFULLY, the gold wiring on the white ribbon cable likes to peel off, i almost had to buy a new top case but luckilly i was able to fold it back over.)
now boot up and enjoy! it should come up right from boot with being able to use gestures( this is in lion/mountain lion, im not sure about snow leopard)
Route 2
this is the route i took, i wasnt comfortable pushing the trackpad out so i removed the top case and used my knife to lift it of the adhesive.
remove the top case (google it)
then basically do what the above steps for route 1 say.
then reassemble the macbook, boot and enjoy!
the finished product should look like this