Become a MacRumors Supporter for $50/year with no ads, ability to filter front page stories, and private forums.

VibShar

macrumors newbie
Original poster
May 29, 2019
3
0
I recently upgraded my MCB Mid 2012 to 500 GB SDD in primary drive. I also used my existing 750 GB HDD in optical drive bay using a unibody caddy.

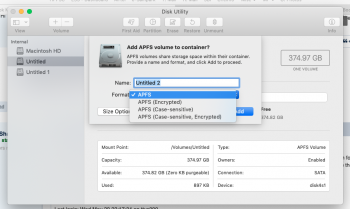
The primary drive (500 GB SDD) is working fine. My old 750 GB HDD had two partitions. Now the secondary HDD is reflecting as two container disks. I would like the two to be merged back into a single drive, Is there any way to combine the two partitions into one?

Also Is it possible to use the secondary drive as Time Machine Backup location?
 
You can use the 750GB HDD as a Time Machine backup disk. You should decide on this first because from what you have said, the HDD is now formatted as APFS and for Time Machine, you need a disk formatted as HFS+ so it will have to be erased first. For Time Machine, you can use a partition on the HDD if you don't want to devote the full disk to Time Machine.

If you instead want to merge the two containers into one, go into the Terminal app, type in the following command: "diskutil list" and post the output here. If you want to change the name of volumes you specifically named before posting, that's OK but just modify the names you specifically chose for the volumes.

You won't be able to merge the contents of two containers together using a single command. It's likely that you can just copy the contents of one container into the other and resize the container vs. copying and restoring both but we would need to see the results of the command above.
 
Last edited:
Thanks for your reply treekram.

At present, I have two partitions of 375 GB each (of secondary HDD in optical drive bay). If it is possible to use one partition for Time Machine Backup,I would like to allocate about 500 GB for Time Machine and remaining volume for data storage. Pls advise the way forward.

HFS+ formatting option is not showing at the time of erasing the volumes. Pls see attached screenshot.

The Terminal output is as below:

Last login: Wed May 29 22:17:34 on ttys000

Vibhors-MacBook-Pro:~ vibhor$ diskutil list

/dev/disk0 (internal, physical):

#: TYPE NAME SIZE IDENTIFIER

0: GUID_partition_scheme *750.2 GB disk0

1: EFI EFI 209.7 MB disk0s1

2: Apple_APFS Container disk4 375.0 GB disk0s2

3: Apple_APFS Container disk3 375.0 GB disk0s3


/dev/disk1 (internal, physical):

#: TYPE NAME SIZE IDENTIFIER

0: GUID_partition_scheme *500.1 GB disk1

1: EFI EFI 209.7 MB disk1s1

2: Apple_APFS Container disk2 499.9 GB disk1s2


/dev/disk2 (synthesized):

#: TYPE NAME SIZE IDENTIFIER

0: APFS Container Scheme - +499.9 GB disk2

Physical Store disk1s2

1: APFS Volume Macintosh HD 156.6 GB disk2s1

2: APFS Volume Preboot 20.5 MB disk2s2

3: APFS Volume Recovery 506.8 MB disk2s3

4: APFS Volume VM 2.1 GB disk2s4


/dev/disk3 (synthesized):

#: TYPE NAME SIZE IDENTIFIER

0: APFS Container Scheme - +375.0 GB disk3

Physical Store disk0s3

1: APFS Volume Untitled 1 905.2 KB disk3s1


/dev/disk4 (synthesized):

#: TYPE NAME SIZE IDENTIFIER

0: APFS Container Scheme - +375.0 GB disk4

Physical Store disk0s2

1: APFS Volume Untitled 897.0 KB disk4s1
 

Attachments

  • Screenshot 2019-05-29 at 10.21.02 PM.png
    Screenshot 2019-05-29 at 10.21.02 PM.png
    334.6 KB · Views: 98
From what I'm seeing, it doesn't appear that you have much, if anything, in the 2 containers on the HDD. If you do have something there, you can copy it to the SSD.

For HDD's, the consensus seems to be that it's better to use HFS+ vs. APFS. The reason for that is that APFS was optimized for SSD's, HFS+ was initially made for HDD's and is more suitable for HDD's. So I would suggest you use HFS+ for the disk. You can have a mixed HFS+ and APFS disk if you wish. Again, Time Machine has to be HFS+.

What you have to do is in Disk Utility, press the command and hold down key and then press the "2" key. If you press and hold the command key and then toggle between pressing "1" and "2" you can see the difference. In the mode where more things appear (Command-2), select the HDD which will be the left-most item under which the two "Untitled"s will appear.

There's a couple of ways to approach this - I'm giving the way that I think would be less confusing.

1) Again, make sure your HDD is selected - the disk icon should be at the left-most point - there will be other disk icons that are indented.

2) Press the "Erase" button at the top of the window. Enter the name you want for the first partition (this should be the Time Machine partition). Select "Mac OS Extended (Journaled)" (or encrypted if you wish) - this is the other name for HFS+. Make sure the scheme is set to "GUID Partition Map". Press the "Erase" button. If you don't see the scheme option, you haven't selected the correct item. Go back and make sure the HDD is selected.

3) After it is done, make sure the HDD is still selected and press the "Partition" button at the top of the window.

4) There should only be one pie slice (which should have the partition name you entered in step 2) above). To create a second partition, press the "+" button at the bottom of the window. A second slice should appear.

5) There should be a small round circle towards the bottom of the circle. You can click and hold this and move it to size the partition. Once you have sized the slice, select the second slice and if you want to use APFS for this partition, you can change it here or leave it as "Mac OS Extended (Journaled)". Name the partition whatever you wish.

6) Press the Apply button and it should make the requested changes.

In Time Machine you should then be able to specify the partition you just created as the backup disk.
 
  • Like
Reactions: VibShar
What you have to do is in Disk Utility, press the command and hold down key and then press the "2" key. If you press and hold the command key and then toggle between pressing "1" and "2" you can see the difference. In the mode where more things appear (Command-2), select the HDD which will be the left-most item under which the two "Untitled"s will appear.
The non-keyboard versions of those actions are:
View All Devices
View Only Volumes​

https://blog.macsales.com/45330-dis...the-mystery-of-those-empty-unformatted-drives
 
  • Like
Reactions: VibShar
The sizes of your partitions just flew past me in looking at your configuration and giving instructions.

Since your SSD size and proposed Time Machine partition size is the same, that either says you plan to delete old backups on a regular basis or you don't have much data on the SSD and 500GB will accommodate your backup growth.

Time Machine will keep incremental backups. But if you don't think you'll need that or again if you plan to delete old backups on a regular basis, you might want to consider software that can clone your SSD to the HDD. Many people (including myself) use Carbon Copy Cloner (CCC). https://bombich.com/

Another popular package is Super Duper. The advantages to these apps is that their performance is better than Time Machine and you have a bootable clone - that is, if you're SSD goes down, you can boot from the clone. With Time Machine, you'd have to do a restore to get the computer in working shape. CCC (maybe Super Duper as well) can keep incremental backups if you wish but again, if you have a lot of data, you won't be able to keep too many incremental backups.
 
  • Like
Reactions: VibShar
Many thanks for elaborate and easy to understand/perform steps. It worked. Thanks for advising on cloning options as well.
 
Register on MacRumors! This sidebar will go away, and you'll see fewer ads.