NOTE: currently, as of KitKat 4.4.4 and firmware version NK4 (Snap805) / NK5 (Exynos) and all versions before, this article only applies to Snapdragon 805 users. Exynos users in no way can improve the image quality of their shots and are, consequently, advised to use the stock Camera app. Consequently, they won't learn much from this article either.
Introduction
This article only concentrates on getting the best possible image quality while shooting in GOOD light, that is, when the phone can use as low sensitivities (ISO's) as possible, resulting in typically low noise levels. The Lightroom etc. settings I present are, consequently, typical for low-ISO shots taken in good light. Should you be interested in low-light shooting, head for THIS article instead. I don't discuss any kind of HDR, including that of the Note4 camera app, here. Please read THIS article for HDR tips and tricks.
If you've read my previous posts / articles on the camera of the Note4, you know very well the stock Camera app is not capable of very good results because it applies unnecessary noise reduction and sharpening, practically destroying the image quality. Up to now, I've recommended Snap camera HDR (“Snap” for short; PlayStore link; please see my original low-light article for more info on obtaining the latest beta) as an all-in-one app for shooting both video (including 4K) and stills. It may not have the best GUI (in this regard, the FV-5 apps (Camera/Cinema) are far superior) and lack essential features like exposure bracketing (see my HDR article linked to above) but it's the only app that can produce images making full use of the hardware capabilities. For example, it's the only app to be able to go under the shutter speed of 1/15s I know of (please see my above-linked low-light article for more info on this very subject).
If you really want to achieve the best image quality, you'll, as you'll see below, do a little bit of additional work. This is what this entire article is all about: a very detailed one on color noise reduction (CNR for short) and sharpness increasing during post processing in
- Lightroom on the desktop
- Neat Image on the desktop
- Topaz DeNoise on the desktop
- Lightroom Mobile on Android (the iOS works in exactly the same way)
- Photo Mate R2 on Android
compared this to shooting with Snap camera HDR using its built-in CNR and sharpening support.
1.1 Recommended reading before reading on
If you don't know much of the theory of photography please read THIS and THIS for more info on image noise and sharpening, respectively.
Note that the former link takes you to Part I of the article series; the second one is HERE and is a hugely recommended read because, among other things, it clearly explains the differences between luminance and color noise. It's the latter of these that I'm specifically discussing in this article, the former being not as unnatural.
The article on sharpening provides several examples of oversharpening artifacts. It's these artifacts that - along with color noise - we'll try to minimize while keeping our shots sufficiently sharp.
1.2 The goal - why do you want to read this article at all?
To produce as good images as possible. Regretfully, the stock Camera app coming with the Note4 applies far too much CNR and oversharpening even when shooting in broad daylight, at base ISO. In the comparative examples below, I show you several crops that do show this in practice.
1.3 Three ways of shooting
There are three ways of shooting. Below, I introduce them in decreasing complexity (need for additional work) and, regretfully, strictly in this order decreasing achievable image quality too.
1.3.1 Using a camera app producing as little-processed images as possible and (possibly) using desktop apps to make these images more natural-looking
First and foremost, if you don't want to lose any bit of (later) achievable image quality, you must save your images with as little processing as possible. This is exactly what is done when using Snap camera HDR with the non-default settings ("Samsung camera mode" on, sharpening set to zero and JPEG output quality set to "Best") I recommend.
However, the output won't really be eye-friendly then, even if you shoot in the most optimal conditions, that is, in as much light as possible. If you do have the time for desktop (x86) post processing, you can achieve significantly better image quality than with Android-only image processing, let it be done straight in the camera app doing the actual shooting or another Android app you use for post processing.
In the following two subsections, I show you several examples of the typical noise reduction and sharpening you can achieve with high-quality desktop tools working on as little-processed input as possible. As you'll see, the results they produce are not only significantly more eye-pleasing than the original, somewhat noisy and definitely soft (RAW-like) output of Snap camera HDR, but also orders of magnitude better than the absolutely messy output of the stock Camera app.
1.3.1.1 Noise in the near-RAW output images
The sensor of the Note4 has relatively small pixels. This, as you are already aware of, results in a low(ish) signal-to-noise ratio, meaning visible color noise even in the best conditions if absolutely no noise reduction is used. (Actually, you'd need significantly larger pixels (full frame, assuming a Bayer filter) and/or special filter (APS-C sensor size paired with Fuji's X-Trans filter array) arrangements to achieve the total lack of visible noise.)
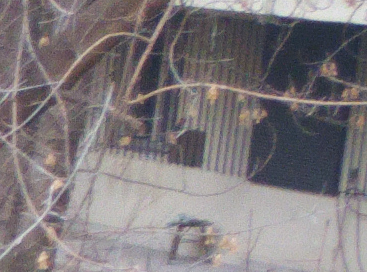
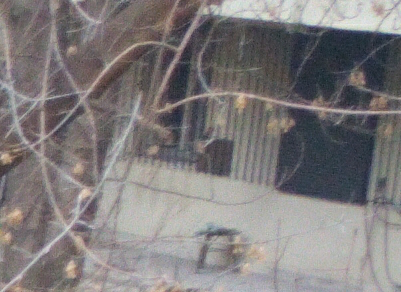
Let me show an example of this. The following crop (cropped from the original image) shows visible color image noise in the near-black window area:
![Note%204%20Snap%20-%20denoise%20off%20sharpness%200%20-%20ISO40%20-%201%3A40s%20-%20IMG_20150117_145153TH2.png]()
And yes, this shot was taken in broad daylight at base ISO.
Note that, in section 1.3.1.2.1 below (obviously, in the first, unaltered, almost-RAW crop), you can also spot some color noise in the tree trunk. However, on dark, homogenous surfaces like, in this case, a black window it's far easier to spot color noise – and to fine-tune CNR while trying to (almost) completely get rid of the noise.
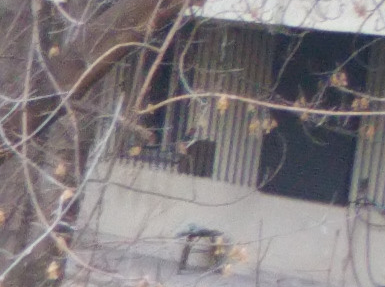
For comparison, here are the already CNR'ed (and sharpened, see next section) output crops of the three desktop tools (Lightroom, Neat Image and, finally, the Lightroom + Topaz DeNoise combo) I'll introduce in section 1.3.1.2.1 below:
Lightroom:
![05%20-%20CNR%2010%20Sharp%2040-BLACKWINDOWTH.png]()
Neat Image:
![neatimage%20white%20noise%20profile%20LNR%200%20CNR%20max%20Sharpness%20max%20(250)-BLACKWINDOWTH.png]()
Lightroom + Topaz DeNoise:
![02%20-%20Topaz%20Denoise%20Clean%20Color%2050%2C%20all%20other%20at%20default%20after%20Reset%20%2B%20LR%20Sharpen%2040-BLACK.png]()
1.3.1.2 Lack of sharpness in the near-RAW output images
The output of the sensor, generally, is pretty soft with most cameras (not only with the Note4). This is caused by the not very good lens (or one operating far from its "sweet spot"), the Bayer / X-Trans filter sensor as opposed to Foveon sensors paired with tack-sharp lens. This (relative) softness can, purely in software, somewhat fixed. This is called 'sharpening'. Unfortunately, you can't use arbitrarily high amounts of sharpening, as it'll lead to the appearance of both very ugly oversharpening halos around the contrasty edges and much more pronounced luminance noise.
Let me show you a pair of crops from the same original image and, then, compare it to both a decently-sharpened one (still without major oversharpening artifacts) and, finally, that of the stock Camera app, showing absolutely awful oversharpening halos.
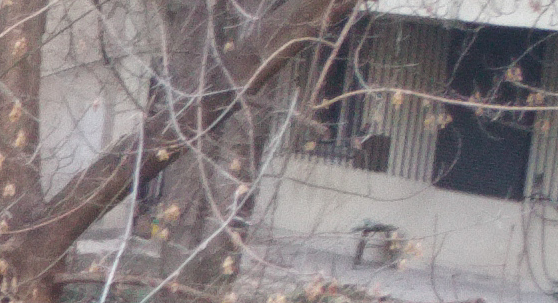
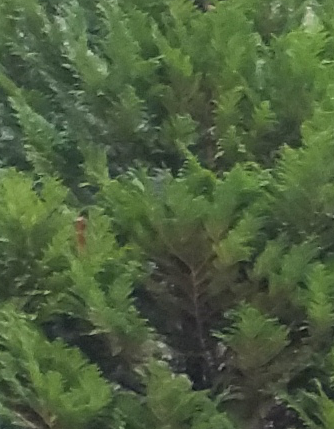
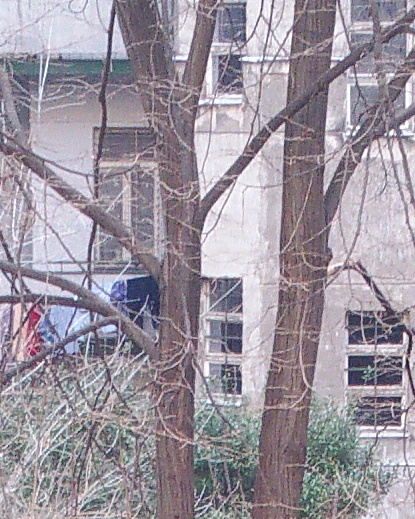
1.3.1.2.1 Trees (oversharpening halos):
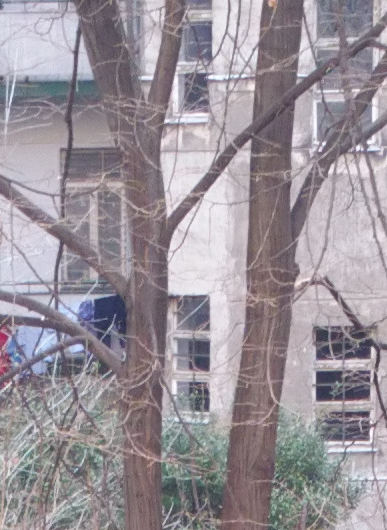
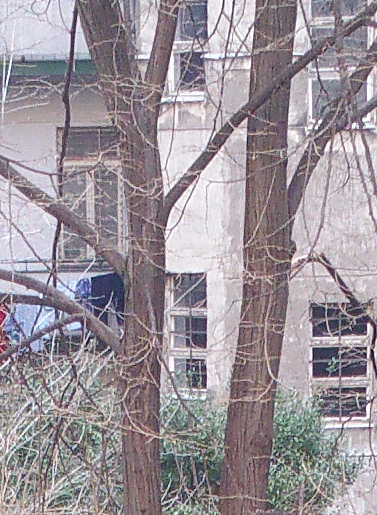
The original, non-sharpened image (shot with absolutely zero software sharpening):
![Note%204%20Snap%20-%20denoise%20off%20sharpness%200%20-%20ISO40%20-%201%3A40s%20-%20IMG_20150117_145153%20TREE.png]()
(original, full image)
After processing with one of the most widely used desktop apps for image post processing (with the parameters CNR=10, Sharpening=40, everything else being default, incl. LNR=0), Lightroom 5.7:
![05%20-%20CNR%2010%20Sharp%2040-TREETH.png]()
(original, full image)
and another one from the, for private, non-commercial use (with some not very severe restrictions), free(!!) and multiplatform (Windows, Mac and even Linux) Neat Image, with LNR 0, CNR set to maximum and Sharpness also set to maximum:
![neatimage%20white%20noise%20profile%20LNR%200%20CNR%20max%20Sharpness%20max%20(250)-TREETH.png]()
(original, full image)
Finally, the output of another excellent desktop noise handler, Topaz DeNoise (5.1.0) with Clean Color set to 50 and all other settings at default after Reset and additional Lightroom Sharpening of 40 (that is, the same as with the Lightroom-only image above):
![02%20-%20Topaz%20Denoise%20Clean%20Color%2050%2C%20all%20other%20at%20default%20after%20Reset%20%2B%20LR%20Sharpen%2040-TREE.png]()
(original, full image)
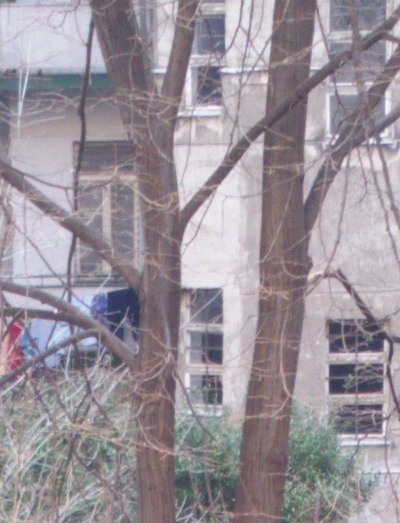
And this is how the stock Camera app renders the same:
![Stock%20Camera%20app%20-%20HDR%20-%20ISO50%20-%201%3A50s%20-%2020150117_145119-TREETH.png]()
(original, full image)
In the last image, notice the absolutely hideous "edges" around the tree trunk over the bright wall. (I'll also discuss with the visible disappearing of fine detail on the trunk of the tree.) Also, in all previous images but the very first (the one originally saved by Snap camera HDR), notice the lack of color noise (which is somewhat present in the original Snap output in the dark windows and on the dark brown tree trunk) and the significantly higher sharpness (but still without annoying oversharpening halos).
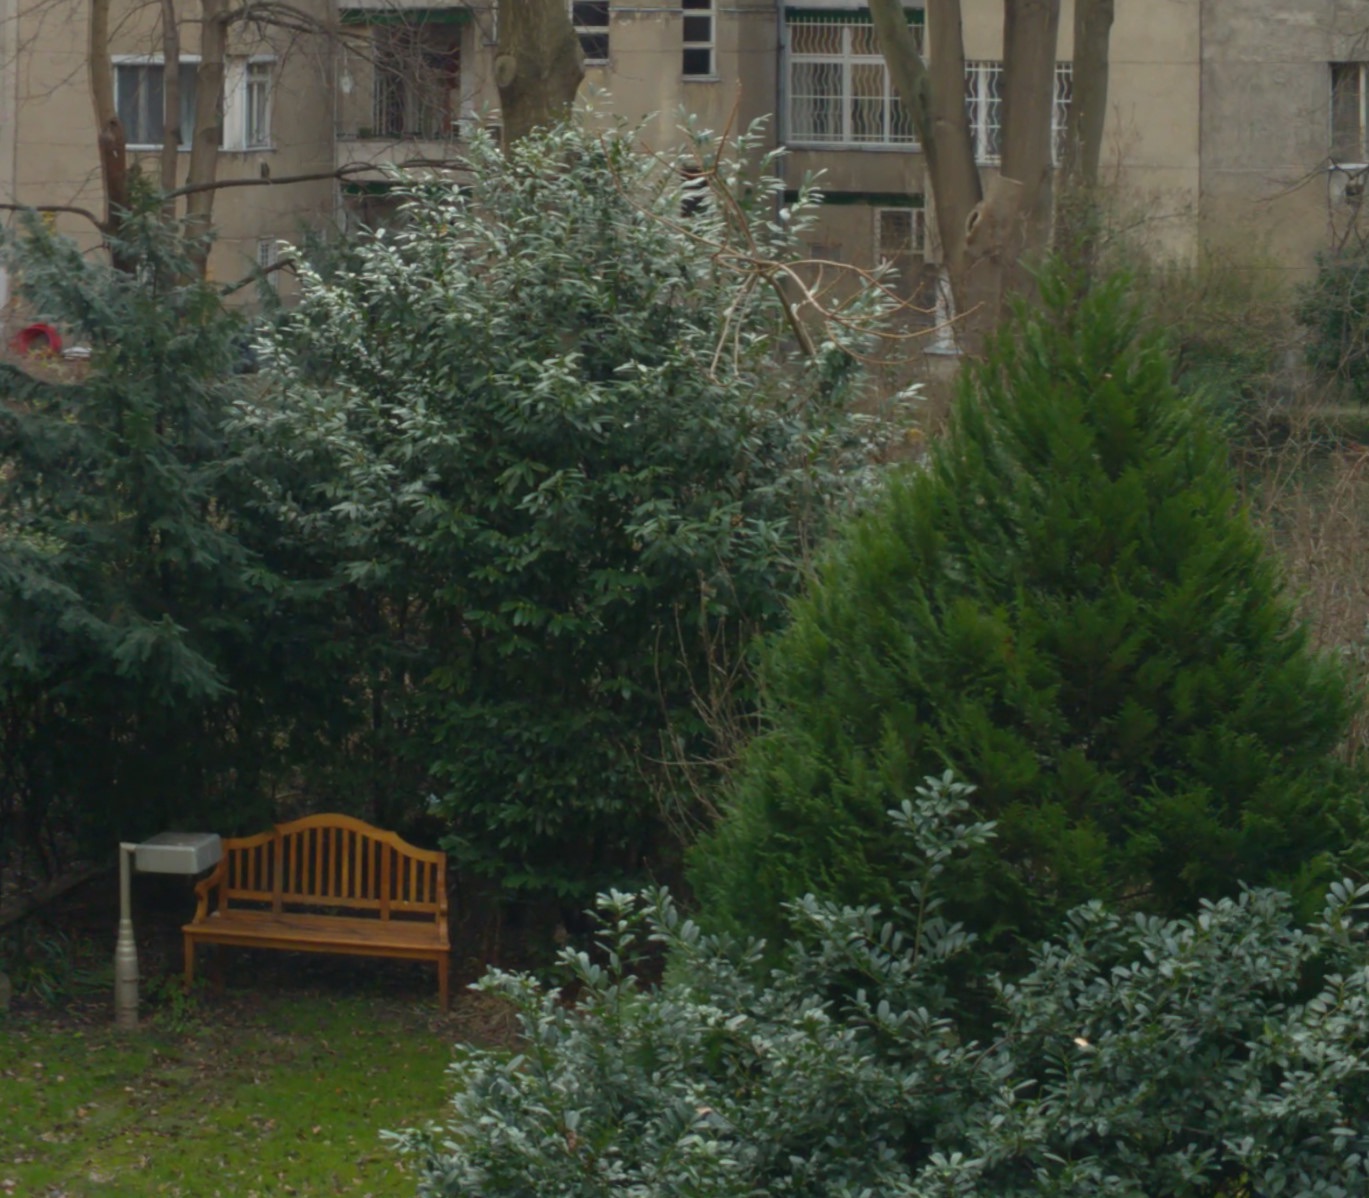
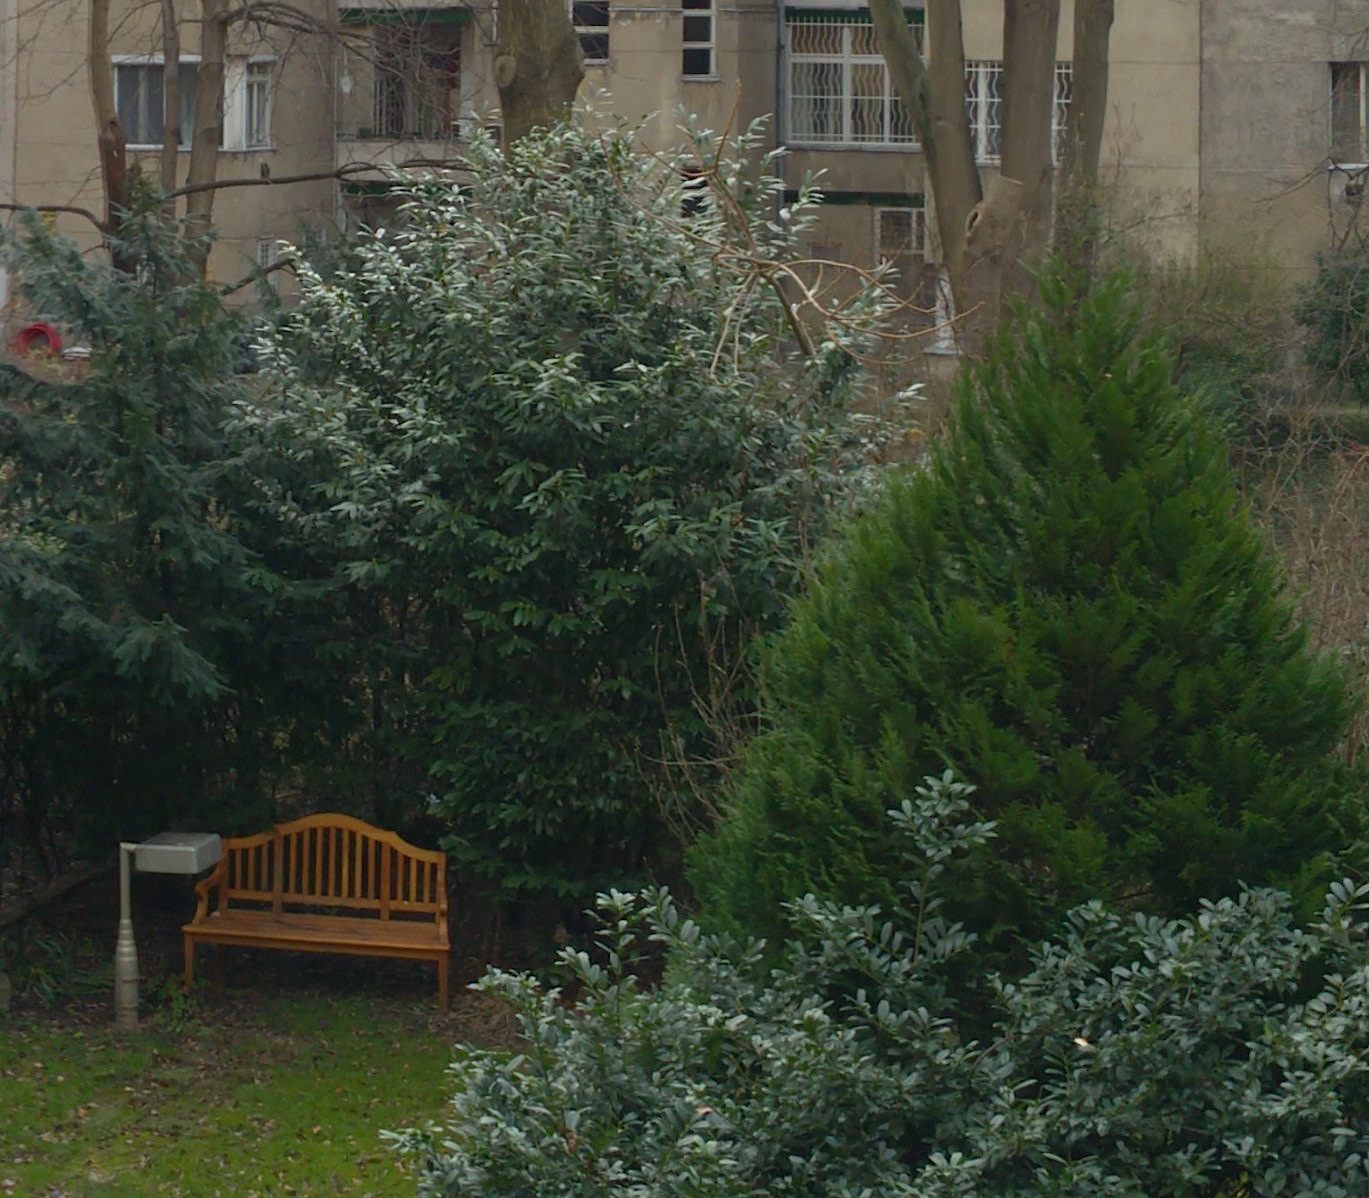
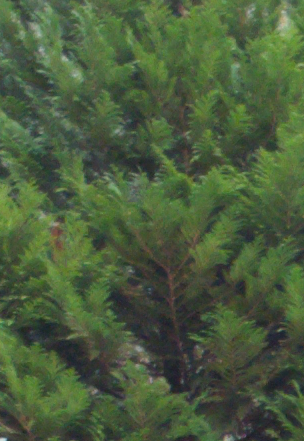
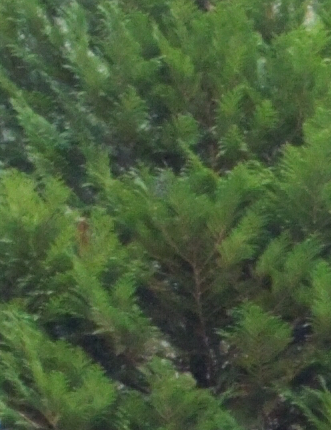
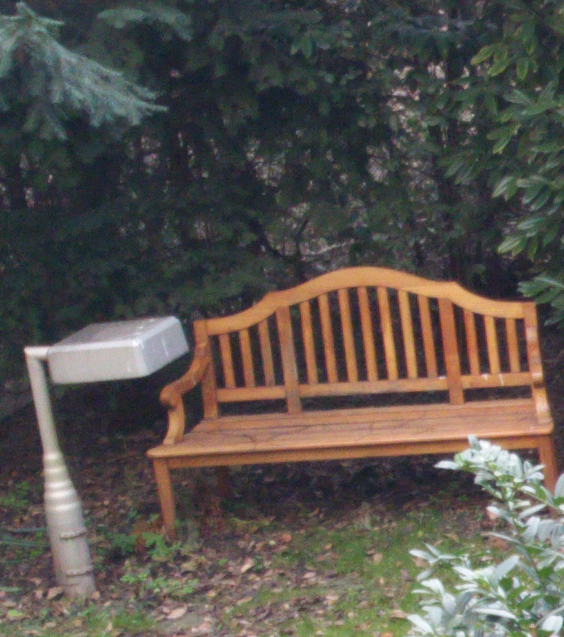
1.3.1.2.2 Bush (sharpening, smearing):
The original, non-sharpened image as saved by Snap:
![Note%204%20Snap%20-%20denoise%20off%20sharpness%200%20-%20ISO40%20-%201%3A40s%20-%20IMG_20150117_145153-BUSHTH.png]()
(Note that the original, full images are at exactly the same URL as in the previous section. Also, for the next three shots, the processing parameters are also equal to the ones I've already listed above.):
Again, notice how soft this shot is compared to the next images – that's because of the complete lack of any software post-sharpening.
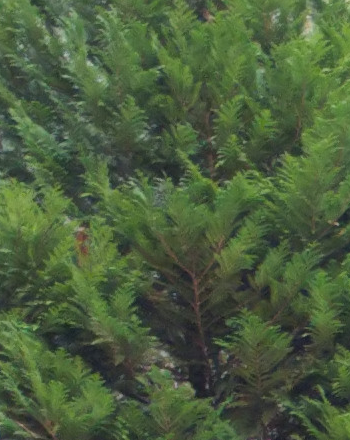
Lightroom (CNR=10, Sharpening=40):
![05%20-%20CNR%2010%20Sharp%2040-BUSHTH.png]()
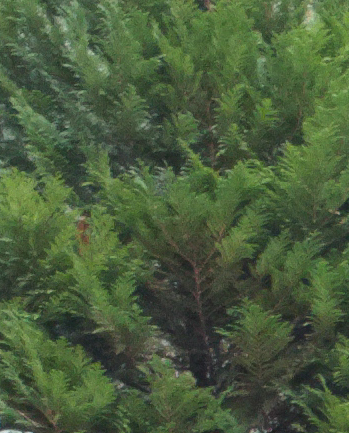
Neat Image:
![neatimage%20white%20noise%20profile%20LNR%200%20CNR%20max%20Sharpness%20max%20(250)-BUSHTH.png]()
Topaz DeNoise:
![02%20-%20Topaz%20Denoise%20Clean%20Color%2050%2C%20all%20other%20at%20default%20after%20Reset%20%2B%20LR%20Sharpen%2040-BUSH.png]()
Finally, for comparison, here's the output of the stock Camera app:
![Stock%20Camera%20app%20-%20HDR%20-%20ISO50%20-%201%3A50s%20-%2020150117_145119-BUSHTH.png]()
The last image is, as with all the other stock Camera app crops, absolutely awful. There is some major detail smearing, the color saturation is heavily reduced and the edges oversharpened. Yes, another example of why in no way recommend the stock Camera app unless you absolutely need to make use of its features.
1.3.2 Post-processing on Android & most known problems of lower-quality CNR algorithms
In the previous section, I've shown you examples of the achievable quality when, with strictly desktop (x86, true Windows / OS X and, in some cases, even Linux) tools, processing near-RAW images shot on the Note4. In this section, I elaborate on doing the post processing right on your Android phone. As you'll see, the results will be substandard compared to the desktop-based results. Nevertheless, they'll still deliver better-quality results than using the in-app CNR and sharpening features of Snap camera HDR.
1.3.2.1 Photo Mate R2
The following are the same crops as above from the well-known, quite expensive, (for Android) professional Android app “Photo Mate R2” (current, tested version: 2.6). The parameters I used (and found the most optimal): CNR=30, Luminance=High quality, Sharpening=75. (Original, full image; screenshot of the settings)
Black window:
![05%20-%20Photo_Mate_R2%20CNR30%20Lum%20HighQ%20Sharpening%2075%20-BLACKWINDOWTH.png]()
Tree:
![05%20-%20Photo_Mate_R2%20CNR30%20Lum%20HighQ%20Sharpening%2075%20TREE.png]()
Bush:
![01%20-%20Photo_Mate_R2%20CNR30%20Lum%20HighQ-BUSHTH.png]()
As you can see, while these crops are still orders of magnitude better than those of the stock Camera app and still deliver more eye-pleasing (that is, significantly sharper and definitely less noisy) images than the near-RAW output of Snap, it can't match the output of the desktop tools.
If you do compare these results to those of the three desktop tools introduced in Section 1.3.1, you'll immediately see that CNR, while not being as effective as with them (just compare the color noise in the black window shot!) has resulted in a significant drop in color saturation. Just compare the saturation of the color brown in the bush shot to those of the desktop tools.
1.3.2.1.1 Why can't you just increase Photo Mate R2's CNR to reach the level of cleanness of desktop tools?
Unfortunately, it's not only color saturation that suffers when increasing the CNR level in Photo Mate R2 – as opposed to the three desktop tools.
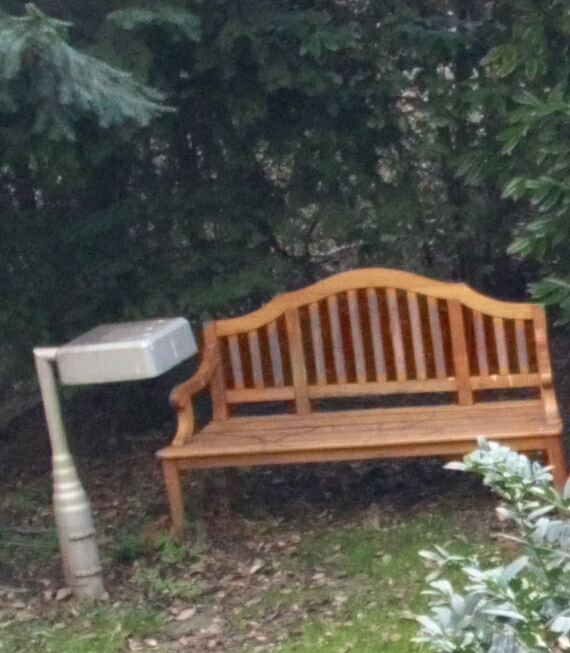
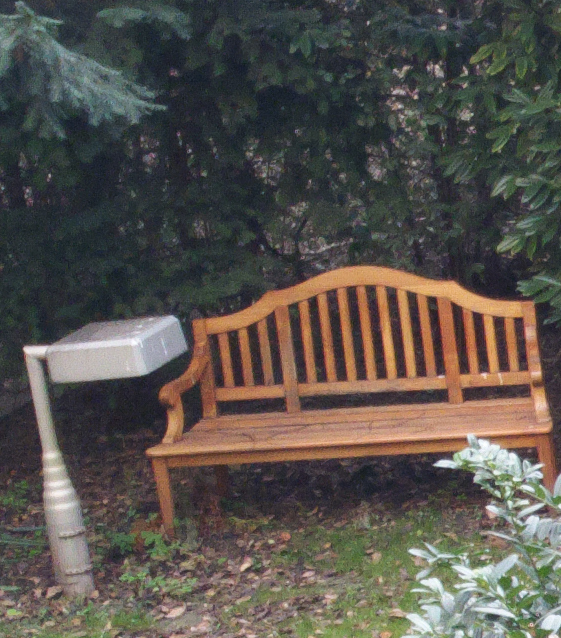
Simple(r) and/or faster CNR algorithms just smear colors. This was the major reason (and not the further decrease of color saturation) that I simply couldn't further increase the CNR level in Photo Mate R2. Let's take a look at the following crop at CRN=30 (that is, the above (section 1.3.2) one):
![05%20-%20Photo_Mate_R2%20CNR30%20Lum%20HighQ%20Sharpening%2075%20-THLAMP.png]()
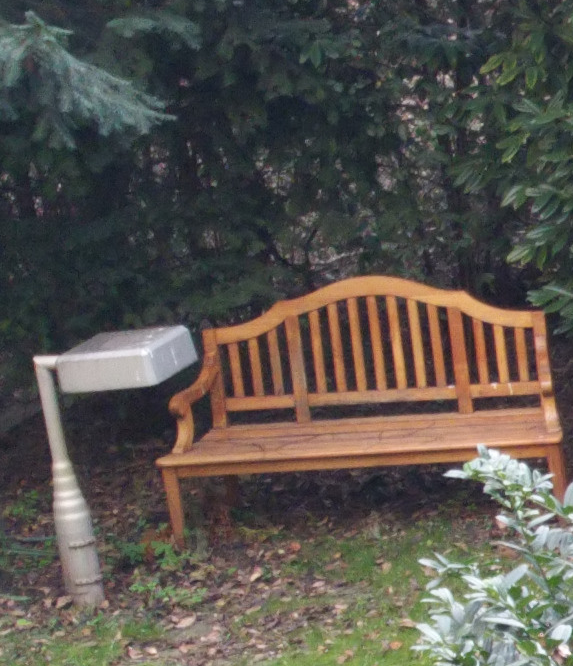
and compare it to the CNR=40 case, that is, with slightly increased CNR strength:
![04%20-%20Photo_Mate_R2%20CNR40%20Lum%20HighQ-THLAMP.png]()
Do you notice the difference? Surely you do. The bench's thin, vertical boards look completely unnatural (as if they were discoloured) in the second case, while they don't exhibit similar problems in the first one. In order to avoid this, you absolutely must stay with lower noise reduction levels.
Now, let's compare how the bench is rendered by the top desktop PP tools (incl. the three introduced in Section 1.3.1) at their significantly higher (again, they got rid of the color noise much(!) more effectively) CNR level:
Lightroom:
![05%20-%20CNR%2010%20Sharp%2040-THLAMP.png]()
Neat Image:
![neatimage%20white%20noise%20profile%20LNR%200%20CNR%20max%20Sharpness%2075-THLAMP.png]()
(Sharpening = 75)
![neatimage%20white%20noise%20profile%20LNR%200%20CNR%20max%20Sharpness%20max%20(250)-THLAMP.png]()
(Sharpening = max)
Topaz:
![02%20-%20Topaz%20Denoise%20Clean%20Color%2050%2C%20all%20other%20at%20default%20after%20Reset%20%2B%20LR%20Sharpen%2040-BENCH.png]()
1.3.2.2 Lightroom Mobile
Regretfully, the otherwise (for Adobe's Creative Cloud subscribers) free Lightroom Mobile (LRM for short) is absolutely a no-go if you want to do Android-only post-processing.
1.3.2.2.1 Need for a “true” desktop
First and foremost: LRM doesn't do any kind of mobile-side processing, unless you do share your images right from the client (then, however, you can only share a low-res, pretty much useless one). It just communicates back the processing parameters you set and you'll need to use the desktop LR to post process your images based on the parameters you set in the GUI.
For example, the three levels of Detail > Noise Reduction sets the following parameters for further (again, desktop-based) processing:
Low: Luminance: 25/ CNR: 25
Med: 50/25
High: 75/25
(The original setting, that is, the one if you don't set any NR level, is 0/25).
That is, there's absolutely no way to get desktop-level output on mobile, without involving any kind of desktop post processing. This also means that, if you directly access the, on mobile, (seemingly) edited images synchronized back to the cloud in
- either the desktop file system (in its temporary directory, via "Show in Finder/Explorer")
- or via explicitly exporting it using the "Export" button in the bottom left corner of the Library view and setting "Image format" from "JPEG" to "Original" in the "File Setting" group in the export dialog,
all you get is an unprocessed (original) image.
1.3.2.2.2 The built-in “Share” feature
And if you do share on-mobile processed images right from the client, it'll be downsized, no matter what you do. HERE is the output of the LRM-postprocessed and, then, in-app shared image. A crop of the same bench:
![lrmobile%20SHARE%20HIGH%20NR%20BENCHCROP.png]()
See the VAST difference in resolution?
1.3.2.2.3 LRM Summary
All in all, you can forget about LRM right away if you want to stay away from desktop PP. Even the (otherwise, if you can do desktop PP, not recommended)
- denoise / sharpening in Snap and
- CNR in Photo Mate R2
produces waaaay better results because they don't downsize their output, unlike "Share" in LRM.
Also note that, as has been explained above, the CNR setting LRM uses will always be 25, which is definitely an overkill for Note4 base ISO shots. This is why I recommend against using the presets of LRM – you'll, most probably, want to decrease the CNR on the desktop so you'll need to touch the sliders there, making setting NR on the mobile unnecessary. Just manually decrease CNR to (if you shoot at base ISO) around 10 in the desktop LR, it'll produce the best possible compromise. And, again, then, the output will significantly be better than with either Snap or Photo Mate R2's built-in CNR options. (The latter remark also applies to sharpening quality of Snap.)
All in all, you can't expect much from post processing on Android. Desktop tools will always produce significantly better results. Only use these (along with shooter apps already supporting in-app denoising / sharpening) if you really can't use a full computer for image post-processing.
1.3.3 Using a camera app with built-in CNR and sharpening
Assuming you want the fastest possible way of sharing your images with, for the Average Joe, more pleasing “looks” (read: no color noise, sharp), you may want to give a try to the built-in CNR and sharpening support of the camera app you use. Ideally, support for sharpening / CNR should be achievable right in the app you shoot with. This is the classic case of social shooting in, say, pubs, when you want to share your shots right away (as soon as possible) and, consequently, can't wait for editing your images in another Android app on the same phone after shooting, let alone transferring your images to an x86 computer for post processing (and, consequently, later sharing).
I have bad news for you: Snap has definitely bad sharpening and not very good CNR support. (Nevertheless, even these, when used, produce better images than the stock Camera app's complete mess.) Let's start with the latter.
1.3.3.1 CNR in Snap
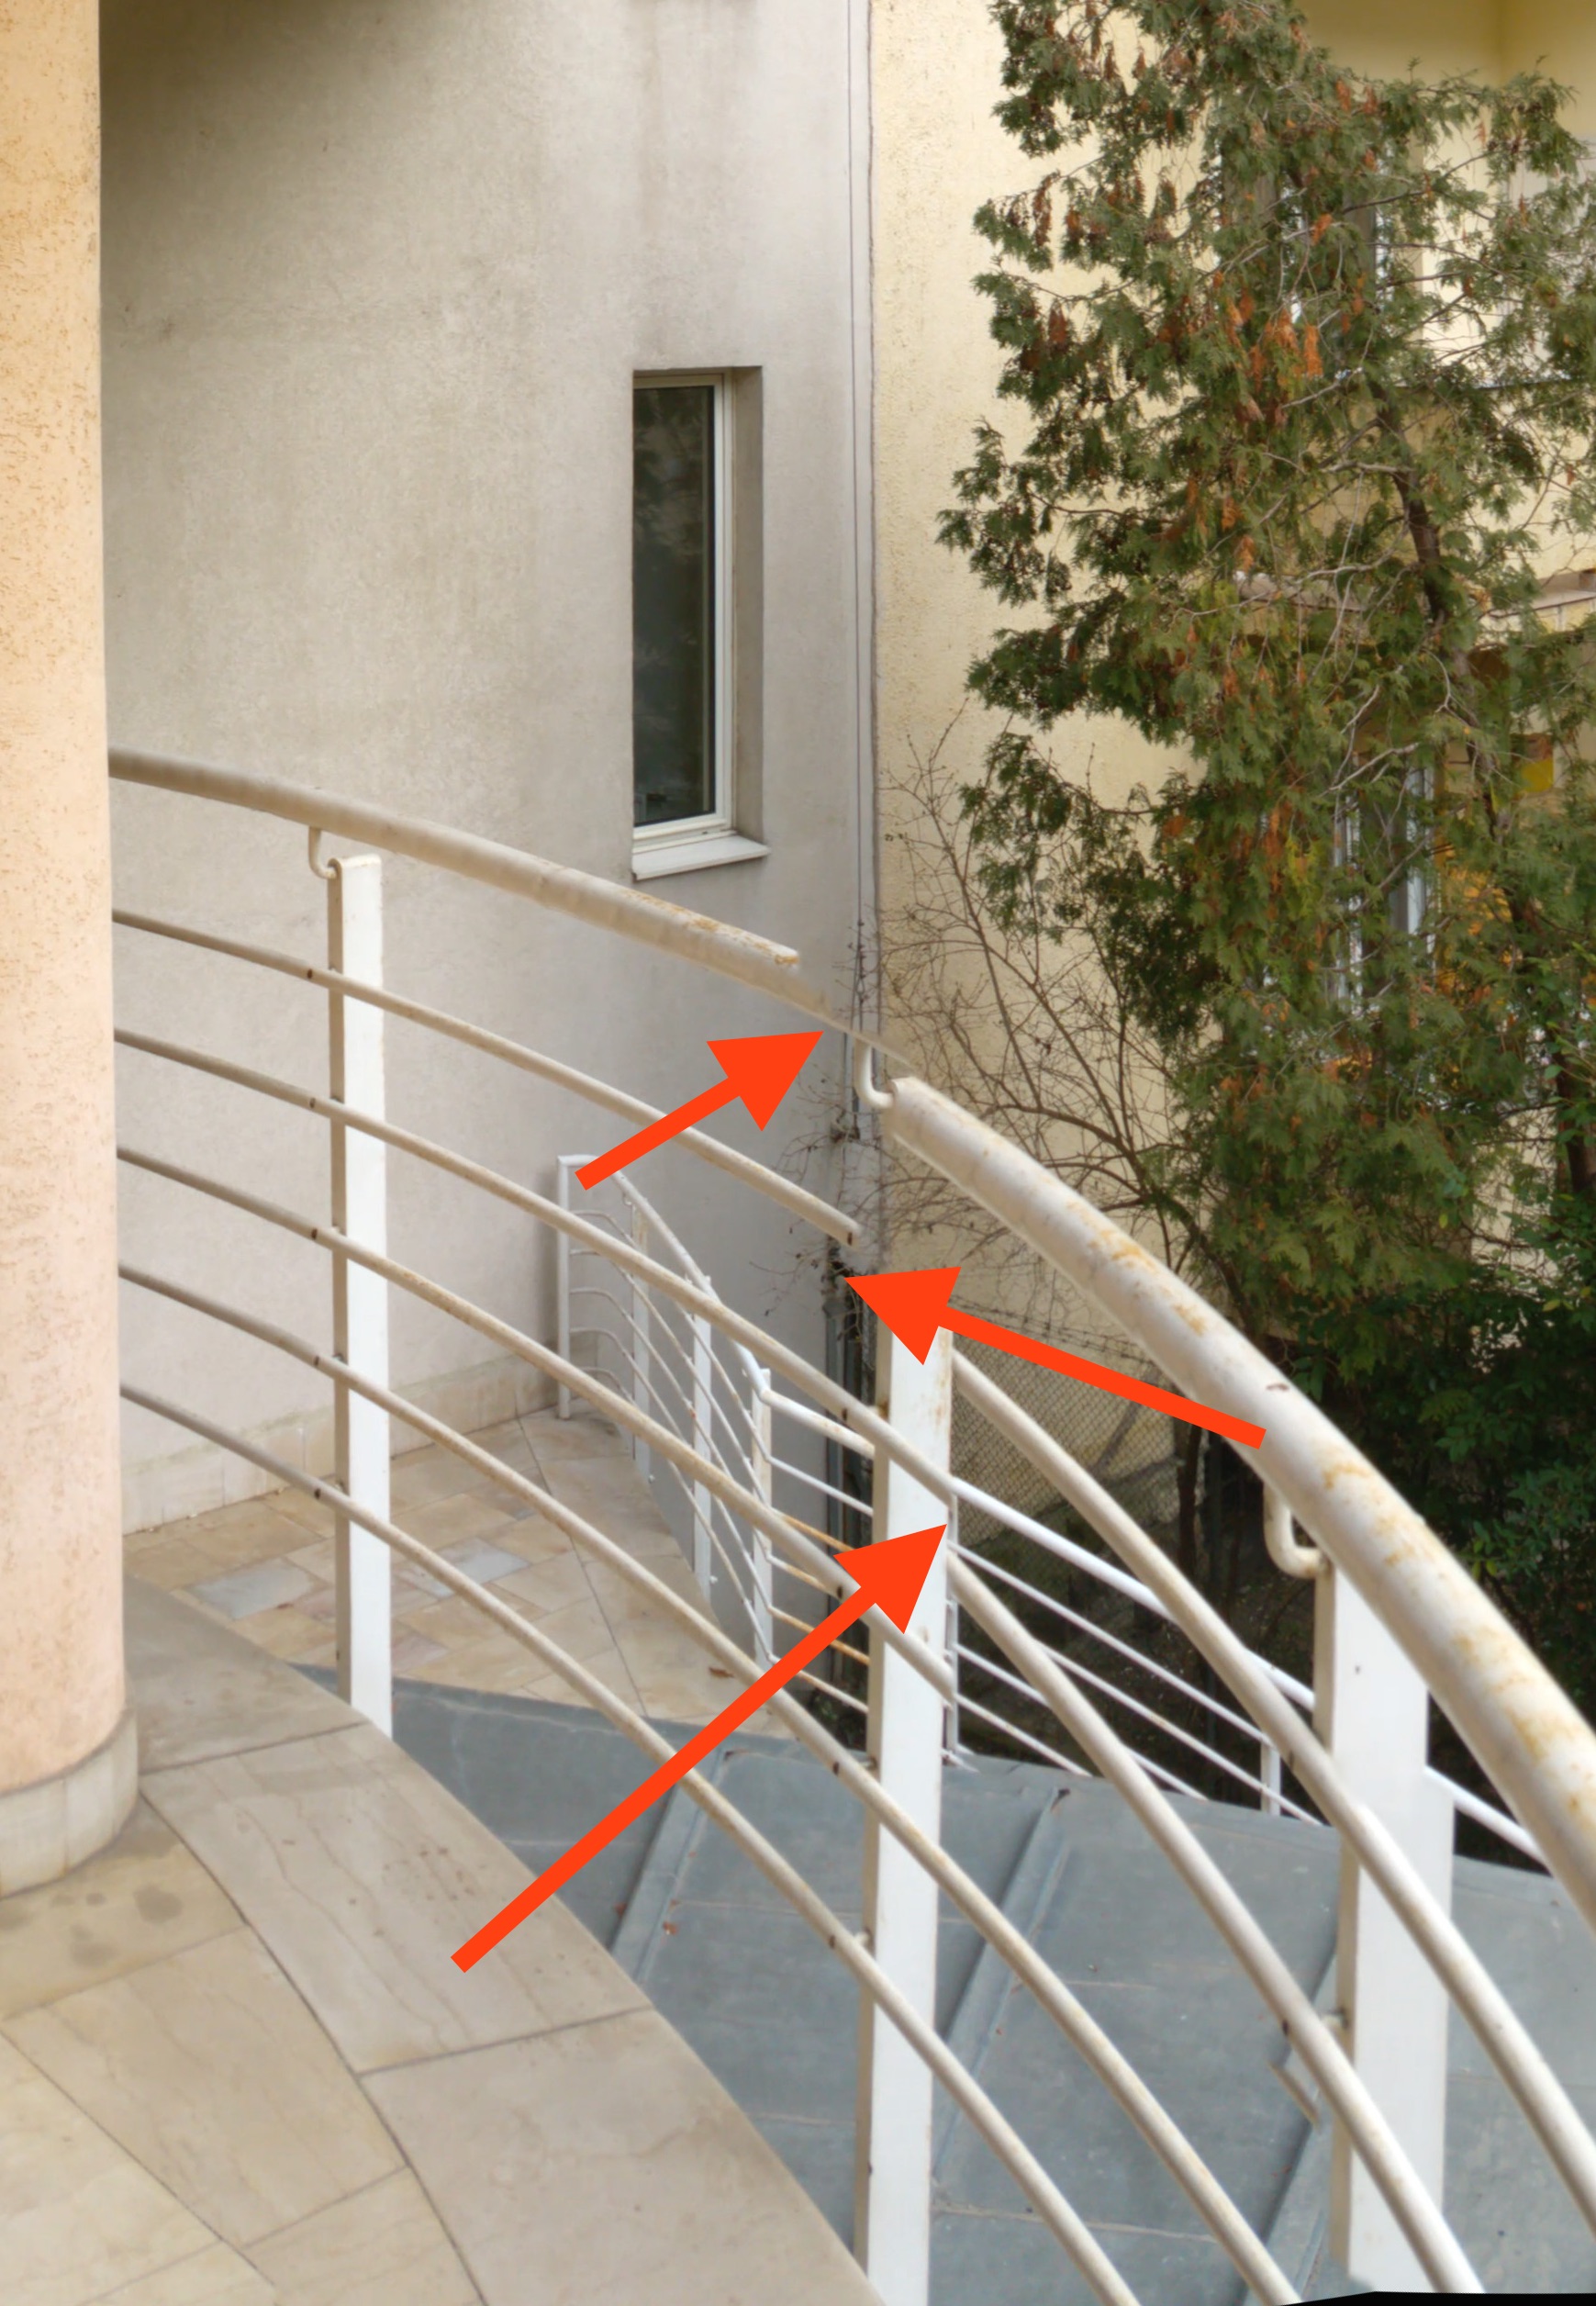
1.3.3.1.1 Enabling CNR
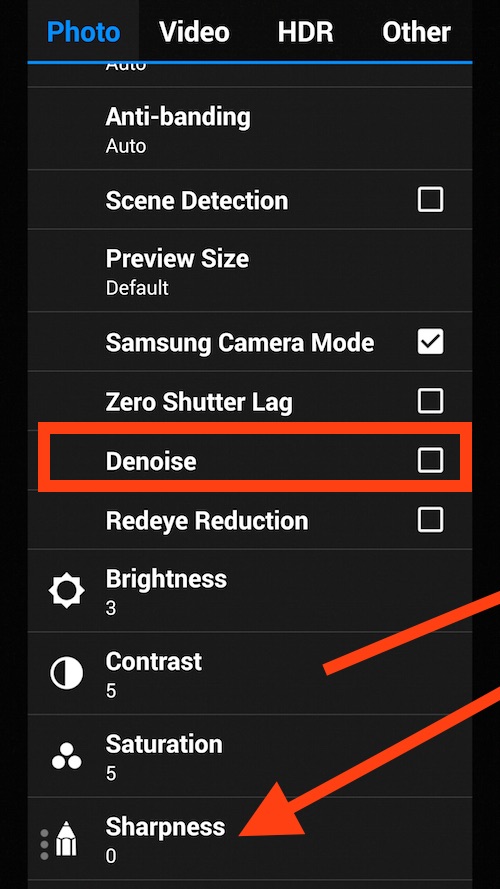
In Snap, CNR isn't enabled by default. Enabling it needs to be done via ticking in the “Photo > Denoise” checkbox annotated with a rectangle below:
![SnapDenoiseCBAndSharpness.jpg]()
Note that I also annotated the “Sharpness” menu (with an arrow), in which you can configure post-sharpening. (Generally, as you already know, you'll want to completely zero it out, unless you really need to do the sharpening right during your shooting.)
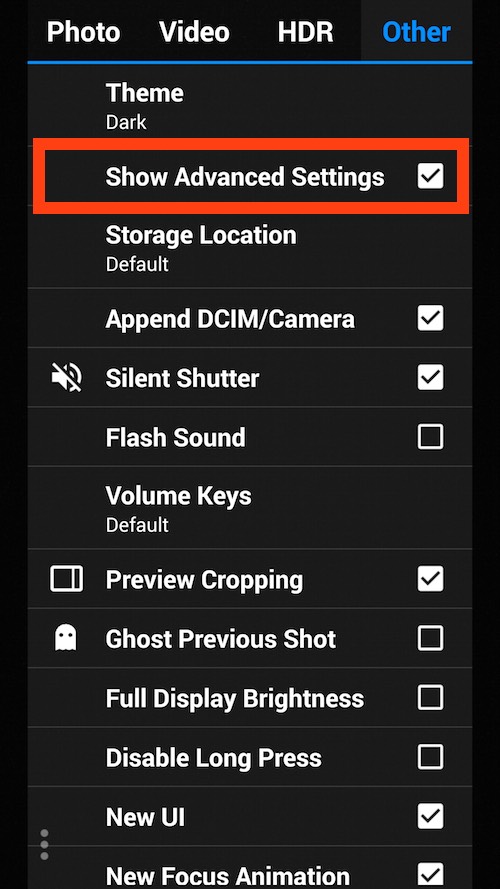
Also note that, in order for the Denoise checkbox to be displayed, you must enable “Others > Show Advanced Settings”, also annotated below:
![SnapShowAdvSetCB.jpg]()
1.3.3.1.2 And what about the quality?
As I've already hinted on, you can't expect much from Snap's CNR algorithm. The good news, however, is that isn't worse than that of the standalone Photo Mate R2. That is, if sharpening isn't important (and, again, you absolutely must do everything on Android), you can just use Snap's built-in CNR and won't end up having to load the same image to Photo Mate R2 afterwards.
1.3.3.1.2.1 Snap, “Denoise” disabled
A pair of Snap crops of the original image shot without “Denoise” enabled:
Bench:
![Note%204%20Snap%20-%20denoise%20off%20sharpness%200%20-%20ISO40%20-%201%3A40s%20-%20IMG_20150117_145153-THLAMP.png]()
Black window:
![Note%204%20Snap%20-%20denoise%20off%20sharpness%200%20-%20ISO40%20-%201%3A40s%20-%20IMG_20150117_145153TH2.png]()
1.3.3.1.2.2 Snap, “Denoise” enabled
And with “Denoise” enabled (original, full image):
Bench:
![Note%204%20Snap%20-%20denoise%20on%20sharpness%200%20-%20ISO40%20-%201%3A40s%20-%20IMG_20150117_145133-THLAMP.png]()
Black window:
![Note%204%20Snap%20-%20denoise%20on%20sharpness%200%20-%20ISO40%20-%201%3A40s%20-%20IMG_20150117_145133TH2.png]()
1.3.3.1.2.3 Photo Mate R2, CNR=30, Sharpening=0
Finally, compare the above crops to those of Photo Mate R2 with CNR=30 and without(!) any kind of sharpening in order to provide level playing field for the two apps. Original image; the settings I used.
Again, as has been explained in Section 1.3.2.1.1, you won't want to go over CNR=30 with Photo Mate R2 because of the major smearing effects. In that section, I've shown you sharpened crops. Note that the sharpened black window crop is HERE (screenshot of the settings used)
Bench:
![01%20-%20Photo_Mate_R2%20CNR30%20Lum%20HighQ-THLAMP.png]()
Black window:
![01%20-%20Photo_Mate_R2%20CNR30%20Lum%20HighQ%20BWINDOW.png]()
1.3.3.1.2.4 Summary
As you can see, unlike Photo Mate R2 with its separate color and luminance NR sliders, Snap applies a sizable amount of luminance NR as well. Consequently, the resulting image is, as you may have already noticed, significantly softer.
After all, luminance NR equals to blurring the image itself, and not “only” the colors on it. Also, luminance noise is far more natural, film-like and, consequently, acceptable. This is why I, generally, don't apply luminance NR to my low-ISO shots. Too bad Snap doesn't allow for separate noise reduction – currently, luminance NR is just too heavy-handed and results in pretty soft results. (Nevertheless, needless to say, these results are still way superior to those of the stock Camera app!)
1.3.3.1.2.5 Color saturation decrease
Note that, as with Photo Mate R2 (and unlike with the three desktop apps when properly configured), the color saturation definitely decreases in Snap's shots. Just compare the intensity (saturation) of the brown of the branches in the following shots, starting with the non-denoised Snap original:
![Note%204%20Snap%20-%20denoise%20off%20sharpness%200%20-%20ISO40%20-%201%3A40s%20-%20IMG_20150117_145153-BUSHTH.png]()
Snap, denoised:
![Note%204%20Snap%20-%20denoise%20on%20sharpness%200%20-%20ISO40%20-%201%3A40s%20-%20IMG_20150117_145133-BUSHTH.png]()
Photo Mate R2, CNR=30, no sharpening:
![01%20-%20Photo_Mate_R2%20CNR30%20Lum%20HighQ-BUSHTH.png]()
(note that you can find the output of desktop apps, along with the absolutely awful stock Camera app, in section “1.3.1.2.2 Bush”. Technically, the non-denoised Snap original can also be found in that section; however, for easy comparison without having to scroll much, I've repeated it here.)
1.3.3.2 Sharpening in Snap
As has been mentioned several times, in order to get the best possible results via post processing, you REALLY want to set Photo > Sharpening to zero (screenshot of the whereabouts of the menu item is in section “1.3.3.1.1 Enabling CNR” above). In this section, I scrutinize the sharpening quality of the app. Regretfully, it's pretty bad; no wonder I recommend getting rid of it entirely.
Now, let's take a look at the default (3) settings:
Tree:
![N4%20-%2003%20-%20denoise%20off%20sharpness%203-TREETH.png]()
Compare this screenshot to those of in section “1.3.1.2.1 Trees (halos)” above. See why I don't recommend using sharpening in Snap at all?
Naturally, the maximum sharpness level, 6, results in even worse output, with even more prominent sharpening halos:
![N4%20-%2004%20-%20denoise%20off%20sharpness%206-TREETH.png]()
Nevertheless, should you really need on-Android sharpening and want to refrain from using Photo Mate R2, you can still use a sharpness value “1”. It'll correspond to 50% (or even more) sharpening in Photo Mate R2.
2. Tips and tricks for desktop post-processing
Above, we'll seen the relative quality of the three approaches:
1. desktop (section “1.3.1 Using a camera app producing as little-processed images as possible (and possibly using desktop apps to make these images more natural-looking)”)
2. Android with an additional app (section “1.3.2 Post-processing on Android & most known problems of lower-quality CNR algorithms”)
3. not using any kind of post processing but using the built-in NR and/or sharpening of the camera app itself (section “1.3.3 Using a camera app with built-in CNR and sharpening”)
We have seen the achievable quality gradually decreased in the above order.
In this chapter, I provide you with other tips on post processing Note4 images on the desktop; that is, the best way to achieve the best image quality.
Basically, I've found the, for private (non-commercial) use, if you accept the (not very restrictive) limitations, free “Neat Image” and “Topaz DeNoise” somewhat better than Lightroom. Nevertheless, even Lightroom can produce significantly better results than anything on Android, even the expensive Photo Mate R2.
(to be continued!)
Introduction
This article only concentrates on getting the best possible image quality while shooting in GOOD light, that is, when the phone can use as low sensitivities (ISO's) as possible, resulting in typically low noise levels. The Lightroom etc. settings I present are, consequently, typical for low-ISO shots taken in good light. Should you be interested in low-light shooting, head for THIS article instead. I don't discuss any kind of HDR, including that of the Note4 camera app, here. Please read THIS article for HDR tips and tricks.
If you've read my previous posts / articles on the camera of the Note4, you know very well the stock Camera app is not capable of very good results because it applies unnecessary noise reduction and sharpening, practically destroying the image quality. Up to now, I've recommended Snap camera HDR (“Snap” for short; PlayStore link; please see my original low-light article for more info on obtaining the latest beta) as an all-in-one app for shooting both video (including 4K) and stills. It may not have the best GUI (in this regard, the FV-5 apps (Camera/Cinema) are far superior) and lack essential features like exposure bracketing (see my HDR article linked to above) but it's the only app that can produce images making full use of the hardware capabilities. For example, it's the only app to be able to go under the shutter speed of 1/15s I know of (please see my above-linked low-light article for more info on this very subject).
If you really want to achieve the best image quality, you'll, as you'll see below, do a little bit of additional work. This is what this entire article is all about: a very detailed one on color noise reduction (CNR for short) and sharpness increasing during post processing in
- Lightroom on the desktop
- Neat Image on the desktop
- Topaz DeNoise on the desktop
- Lightroom Mobile on Android (the iOS works in exactly the same way)
- Photo Mate R2 on Android
compared this to shooting with Snap camera HDR using its built-in CNR and sharpening support.
1.1 Recommended reading before reading on
If you don't know much of the theory of photography please read THIS and THIS for more info on image noise and sharpening, respectively.
Note that the former link takes you to Part I of the article series; the second one is HERE and is a hugely recommended read because, among other things, it clearly explains the differences between luminance and color noise. It's the latter of these that I'm specifically discussing in this article, the former being not as unnatural.
The article on sharpening provides several examples of oversharpening artifacts. It's these artifacts that - along with color noise - we'll try to minimize while keeping our shots sufficiently sharp.
1.2 The goal - why do you want to read this article at all?
To produce as good images as possible. Regretfully, the stock Camera app coming with the Note4 applies far too much CNR and oversharpening even when shooting in broad daylight, at base ISO. In the comparative examples below, I show you several crops that do show this in practice.
1.3 Three ways of shooting
There are three ways of shooting. Below, I introduce them in decreasing complexity (need for additional work) and, regretfully, strictly in this order decreasing achievable image quality too.
1.3.1 Using a camera app producing as little-processed images as possible and (possibly) using desktop apps to make these images more natural-looking
First and foremost, if you don't want to lose any bit of (later) achievable image quality, you must save your images with as little processing as possible. This is exactly what is done when using Snap camera HDR with the non-default settings ("Samsung camera mode" on, sharpening set to zero and JPEG output quality set to "Best") I recommend.
However, the output won't really be eye-friendly then, even if you shoot in the most optimal conditions, that is, in as much light as possible. If you do have the time for desktop (x86) post processing, you can achieve significantly better image quality than with Android-only image processing, let it be done straight in the camera app doing the actual shooting or another Android app you use for post processing.
In the following two subsections, I show you several examples of the typical noise reduction and sharpening you can achieve with high-quality desktop tools working on as little-processed input as possible. As you'll see, the results they produce are not only significantly more eye-pleasing than the original, somewhat noisy and definitely soft (RAW-like) output of Snap camera HDR, but also orders of magnitude better than the absolutely messy output of the stock Camera app.
1.3.1.1 Noise in the near-RAW output images
The sensor of the Note4 has relatively small pixels. This, as you are already aware of, results in a low(ish) signal-to-noise ratio, meaning visible color noise even in the best conditions if absolutely no noise reduction is used. (Actually, you'd need significantly larger pixels (full frame, assuming a Bayer filter) and/or special filter (APS-C sensor size paired with Fuji's X-Trans filter array) arrangements to achieve the total lack of visible noise.)
Let me show an example of this. The following crop (cropped from the original image) shows visible color image noise in the near-black window area:
And yes, this shot was taken in broad daylight at base ISO.
Note that, in section 1.3.1.2.1 below (obviously, in the first, unaltered, almost-RAW crop), you can also spot some color noise in the tree trunk. However, on dark, homogenous surfaces like, in this case, a black window it's far easier to spot color noise – and to fine-tune CNR while trying to (almost) completely get rid of the noise.
For comparison, here are the already CNR'ed (and sharpened, see next section) output crops of the three desktop tools (Lightroom, Neat Image and, finally, the Lightroom + Topaz DeNoise combo) I'll introduce in section 1.3.1.2.1 below:
Lightroom:
Neat Image:
Lightroom + Topaz DeNoise:
1.3.1.2 Lack of sharpness in the near-RAW output images
The output of the sensor, generally, is pretty soft with most cameras (not only with the Note4). This is caused by the not very good lens (or one operating far from its "sweet spot"), the Bayer / X-Trans filter sensor as opposed to Foveon sensors paired with tack-sharp lens. This (relative) softness can, purely in software, somewhat fixed. This is called 'sharpening'. Unfortunately, you can't use arbitrarily high amounts of sharpening, as it'll lead to the appearance of both very ugly oversharpening halos around the contrasty edges and much more pronounced luminance noise.
Let me show you a pair of crops from the same original image and, then, compare it to both a decently-sharpened one (still without major oversharpening artifacts) and, finally, that of the stock Camera app, showing absolutely awful oversharpening halos.
1.3.1.2.1 Trees (oversharpening halos):
The original, non-sharpened image (shot with absolutely zero software sharpening):
(original, full image)
After processing with one of the most widely used desktop apps for image post processing (with the parameters CNR=10, Sharpening=40, everything else being default, incl. LNR=0), Lightroom 5.7:

(original, full image)
and another one from the, for private, non-commercial use (with some not very severe restrictions), free(!!) and multiplatform (Windows, Mac and even Linux) Neat Image, with LNR 0, CNR set to maximum and Sharpness also set to maximum:
(original, full image)
Finally, the output of another excellent desktop noise handler, Topaz DeNoise (5.1.0) with Clean Color set to 50 and all other settings at default after Reset and additional Lightroom Sharpening of 40 (that is, the same as with the Lightroom-only image above):

(original, full image)
And this is how the stock Camera app renders the same:

(original, full image)
In the last image, notice the absolutely hideous "edges" around the tree trunk over the bright wall. (I'll also discuss with the visible disappearing of fine detail on the trunk of the tree.) Also, in all previous images but the very first (the one originally saved by Snap camera HDR), notice the lack of color noise (which is somewhat present in the original Snap output in the dark windows and on the dark brown tree trunk) and the significantly higher sharpness (but still without annoying oversharpening halos).
1.3.1.2.2 Bush (sharpening, smearing):
The original, non-sharpened image as saved by Snap:
(Note that the original, full images are at exactly the same URL as in the previous section. Also, for the next three shots, the processing parameters are also equal to the ones I've already listed above.):
Again, notice how soft this shot is compared to the next images – that's because of the complete lack of any software post-sharpening.
Lightroom (CNR=10, Sharpening=40):

Neat Image:
Topaz DeNoise:
Finally, for comparison, here's the output of the stock Camera app:
The last image is, as with all the other stock Camera app crops, absolutely awful. There is some major detail smearing, the color saturation is heavily reduced and the edges oversharpened. Yes, another example of why in no way recommend the stock Camera app unless you absolutely need to make use of its features.
1.3.2 Post-processing on Android & most known problems of lower-quality CNR algorithms
In the previous section, I've shown you examples of the achievable quality when, with strictly desktop (x86, true Windows / OS X and, in some cases, even Linux) tools, processing near-RAW images shot on the Note4. In this section, I elaborate on doing the post processing right on your Android phone. As you'll see, the results will be substandard compared to the desktop-based results. Nevertheless, they'll still deliver better-quality results than using the in-app CNR and sharpening features of Snap camera HDR.
1.3.2.1 Photo Mate R2
The following are the same crops as above from the well-known, quite expensive, (for Android) professional Android app “Photo Mate R2” (current, tested version: 2.6). The parameters I used (and found the most optimal): CNR=30, Luminance=High quality, Sharpening=75. (Original, full image; screenshot of the settings)
Black window:
Tree:

Bush:
As you can see, while these crops are still orders of magnitude better than those of the stock Camera app and still deliver more eye-pleasing (that is, significantly sharper and definitely less noisy) images than the near-RAW output of Snap, it can't match the output of the desktop tools.
If you do compare these results to those of the three desktop tools introduced in Section 1.3.1, you'll immediately see that CNR, while not being as effective as with them (just compare the color noise in the black window shot!) has resulted in a significant drop in color saturation. Just compare the saturation of the color brown in the bush shot to those of the desktop tools.
1.3.2.1.1 Why can't you just increase Photo Mate R2's CNR to reach the level of cleanness of desktop tools?
Unfortunately, it's not only color saturation that suffers when increasing the CNR level in Photo Mate R2 – as opposed to the three desktop tools.
Simple(r) and/or faster CNR algorithms just smear colors. This was the major reason (and not the further decrease of color saturation) that I simply couldn't further increase the CNR level in Photo Mate R2. Let's take a look at the following crop at CRN=30 (that is, the above (section 1.3.2) one):

and compare it to the CNR=40 case, that is, with slightly increased CNR strength:
Do you notice the difference? Surely you do. The bench's thin, vertical boards look completely unnatural (as if they were discoloured) in the second case, while they don't exhibit similar problems in the first one. In order to avoid this, you absolutely must stay with lower noise reduction levels.
Now, let's compare how the bench is rendered by the top desktop PP tools (incl. the three introduced in Section 1.3.1) at their significantly higher (again, they got rid of the color noise much(!) more effectively) CNR level:
Lightroom:
Neat Image:
(Sharpening = 75)

(Sharpening = max)
Topaz:

1.3.2.2 Lightroom Mobile
Regretfully, the otherwise (for Adobe's Creative Cloud subscribers) free Lightroom Mobile (LRM for short) is absolutely a no-go if you want to do Android-only post-processing.
1.3.2.2.1 Need for a “true” desktop
First and foremost: LRM doesn't do any kind of mobile-side processing, unless you do share your images right from the client (then, however, you can only share a low-res, pretty much useless one). It just communicates back the processing parameters you set and you'll need to use the desktop LR to post process your images based on the parameters you set in the GUI.
For example, the three levels of Detail > Noise Reduction sets the following parameters for further (again, desktop-based) processing:
Low: Luminance: 25/ CNR: 25
Med: 50/25
High: 75/25
(The original setting, that is, the one if you don't set any NR level, is 0/25).
That is, there's absolutely no way to get desktop-level output on mobile, without involving any kind of desktop post processing. This also means that, if you directly access the, on mobile, (seemingly) edited images synchronized back to the cloud in
- either the desktop file system (in its temporary directory, via "Show in Finder/Explorer")
- or via explicitly exporting it using the "Export" button in the bottom left corner of the Library view and setting "Image format" from "JPEG" to "Original" in the "File Setting" group in the export dialog,
all you get is an unprocessed (original) image.
1.3.2.2.2 The built-in “Share” feature
And if you do share on-mobile processed images right from the client, it'll be downsized, no matter what you do. HERE is the output of the LRM-postprocessed and, then, in-app shared image. A crop of the same bench:
See the VAST difference in resolution?
1.3.2.2.3 LRM Summary
All in all, you can forget about LRM right away if you want to stay away from desktop PP. Even the (otherwise, if you can do desktop PP, not recommended)
- denoise / sharpening in Snap and
- CNR in Photo Mate R2
produces waaaay better results because they don't downsize their output, unlike "Share" in LRM.
Also note that, as has been explained above, the CNR setting LRM uses will always be 25, which is definitely an overkill for Note4 base ISO shots. This is why I recommend against using the presets of LRM – you'll, most probably, want to decrease the CNR on the desktop so you'll need to touch the sliders there, making setting NR on the mobile unnecessary. Just manually decrease CNR to (if you shoot at base ISO) around 10 in the desktop LR, it'll produce the best possible compromise. And, again, then, the output will significantly be better than with either Snap or Photo Mate R2's built-in CNR options. (The latter remark also applies to sharpening quality of Snap.)
All in all, you can't expect much from post processing on Android. Desktop tools will always produce significantly better results. Only use these (along with shooter apps already supporting in-app denoising / sharpening) if you really can't use a full computer for image post-processing.
1.3.3 Using a camera app with built-in CNR and sharpening
Assuming you want the fastest possible way of sharing your images with, for the Average Joe, more pleasing “looks” (read: no color noise, sharp), you may want to give a try to the built-in CNR and sharpening support of the camera app you use. Ideally, support for sharpening / CNR should be achievable right in the app you shoot with. This is the classic case of social shooting in, say, pubs, when you want to share your shots right away (as soon as possible) and, consequently, can't wait for editing your images in another Android app on the same phone after shooting, let alone transferring your images to an x86 computer for post processing (and, consequently, later sharing).
I have bad news for you: Snap has definitely bad sharpening and not very good CNR support. (Nevertheless, even these, when used, produce better images than the stock Camera app's complete mess.) Let's start with the latter.
1.3.3.1 CNR in Snap
1.3.3.1.1 Enabling CNR
In Snap, CNR isn't enabled by default. Enabling it needs to be done via ticking in the “Photo > Denoise” checkbox annotated with a rectangle below:
Note that I also annotated the “Sharpness” menu (with an arrow), in which you can configure post-sharpening. (Generally, as you already know, you'll want to completely zero it out, unless you really need to do the sharpening right during your shooting.)
Also note that, in order for the Denoise checkbox to be displayed, you must enable “Others > Show Advanced Settings”, also annotated below:
1.3.3.1.2 And what about the quality?
As I've already hinted on, you can't expect much from Snap's CNR algorithm. The good news, however, is that isn't worse than that of the standalone Photo Mate R2. That is, if sharpening isn't important (and, again, you absolutely must do everything on Android), you can just use Snap's built-in CNR and won't end up having to load the same image to Photo Mate R2 afterwards.
1.3.3.1.2.1 Snap, “Denoise” disabled
A pair of Snap crops of the original image shot without “Denoise” enabled:
Bench:
Black window:
1.3.3.1.2.2 Snap, “Denoise” enabled
And with “Denoise” enabled (original, full image):
Bench:

Black window:

1.3.3.1.2.3 Photo Mate R2, CNR=30, Sharpening=0
Finally, compare the above crops to those of Photo Mate R2 with CNR=30 and without(!) any kind of sharpening in order to provide level playing field for the two apps. Original image; the settings I used.
Again, as has been explained in Section 1.3.2.1.1, you won't want to go over CNR=30 with Photo Mate R2 because of the major smearing effects. In that section, I've shown you sharpened crops. Note that the sharpened black window crop is HERE (screenshot of the settings used)
Bench:

Black window:

1.3.3.1.2.4 Summary
As you can see, unlike Photo Mate R2 with its separate color and luminance NR sliders, Snap applies a sizable amount of luminance NR as well. Consequently, the resulting image is, as you may have already noticed, significantly softer.
After all, luminance NR equals to blurring the image itself, and not “only” the colors on it. Also, luminance noise is far more natural, film-like and, consequently, acceptable. This is why I, generally, don't apply luminance NR to my low-ISO shots. Too bad Snap doesn't allow for separate noise reduction – currently, luminance NR is just too heavy-handed and results in pretty soft results. (Nevertheless, needless to say, these results are still way superior to those of the stock Camera app!)
1.3.3.1.2.5 Color saturation decrease
Note that, as with Photo Mate R2 (and unlike with the three desktop apps when properly configured), the color saturation definitely decreases in Snap's shots. Just compare the intensity (saturation) of the brown of the branches in the following shots, starting with the non-denoised Snap original:
Snap, denoised:
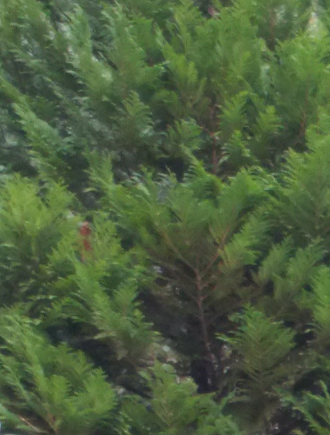
Photo Mate R2, CNR=30, no sharpening:
(note that you can find the output of desktop apps, along with the absolutely awful stock Camera app, in section “1.3.1.2.2 Bush”. Technically, the non-denoised Snap original can also be found in that section; however, for easy comparison without having to scroll much, I've repeated it here.)
1.3.3.2 Sharpening in Snap
As has been mentioned several times, in order to get the best possible results via post processing, you REALLY want to set Photo > Sharpening to zero (screenshot of the whereabouts of the menu item is in section “1.3.3.1.1 Enabling CNR” above). In this section, I scrutinize the sharpening quality of the app. Regretfully, it's pretty bad; no wonder I recommend getting rid of it entirely.
Now, let's take a look at the default (3) settings:
Tree:
Compare this screenshot to those of in section “1.3.1.2.1 Trees (halos)” above. See why I don't recommend using sharpening in Snap at all?
Naturally, the maximum sharpness level, 6, results in even worse output, with even more prominent sharpening halos:
Nevertheless, should you really need on-Android sharpening and want to refrain from using Photo Mate R2, you can still use a sharpness value “1”. It'll correspond to 50% (or even more) sharpening in Photo Mate R2.
2. Tips and tricks for desktop post-processing
Above, we'll seen the relative quality of the three approaches:
1. desktop (section “1.3.1 Using a camera app producing as little-processed images as possible (and possibly using desktop apps to make these images more natural-looking)”)
2. Android with an additional app (section “1.3.2 Post-processing on Android & most known problems of lower-quality CNR algorithms”)
3. not using any kind of post processing but using the built-in NR and/or sharpening of the camera app itself (section “1.3.3 Using a camera app with built-in CNR and sharpening”)
We have seen the achievable quality gradually decreased in the above order.
In this chapter, I provide you with other tips on post processing Note4 images on the desktop; that is, the best way to achieve the best image quality.
Basically, I've found the, for private (non-commercial) use, if you accept the (not very restrictive) limitations, free “Neat Image” and “Topaz DeNoise” somewhat better than Lightroom. Nevertheless, even Lightroom can produce significantly better results than anything on Android, even the expensive Photo Mate R2.
(to be continued!)
Last edited: