Become a MacRumors Supporter for $50/year with no ads, ability to filter front page stories, and private forums.

Astroboy907

macrumors 65816
Original poster
May 6, 2012
1,387
15
Spaceball One
I am in a second year class at school where I have pretty much free access to a machine shop- complete with laser cutters and mills.

I recently purchased a mac mini and have been looking to build a media center in combination with my airport extreme and a few wireless backup drives to create a media/NAS/RAID server. I have been watching Doctor Who as of recently, although I am only in the 4th season of the new series. Gotta catch up...

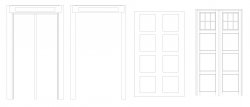
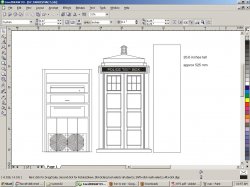
I am solely cutting this out on a laser cutter, which means everything must be designed in 2D, and then layered. It's pretty fun actually.

Here is my basic design at the moment. I will have 4 backup drives in the bottom of the enclosure, 2 of them in RAID backing up my laptop wirelessly. The other two drives will probably be media storage and a redundant media drive. I have a MiniStack hard drive, which will be placed in a "slot" above the mini and back it up. The next-to-top slot will hold my airport extreme and act as a wifi base/router. The top slot I am leaving empty for now, and the very top of the tower will hold some electronics for making the TARDIS "whooshing" engine noise. As an added bonus I am planning on making the windows and sign light up, just like the real TARDIS prop. There are also 2 fans in the bottom that will be blowing/sucking air (I haven't decided yet), to keep everything cool, and hopefully fire-free (the whole thing is going to be in 3 and 6mm plywood (1/8" or 1/4"). The total height is approximately 525mm or 20.6 inches, with a base just over 10" wide.

I'll keep this thread updated on how the build goes throughout the next few weeks, but I would like to hear any ideas/comments/concerns about the design and build!

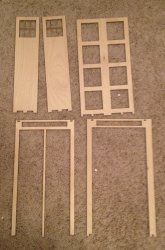
Here is a pic of the initial layout
 

Attachments

  • mac.JPG
    mac.JPG
    105 KB · Views: 616
Last edited:
How will you access the disc drive (not that that's used too often these days)? It looks like the back will be open but that seems awkward. Could you set the Mini sideways to the disc could come out the right door? Or if you faced the mini forward and pushed it right up against the front of the door, you could cut out a thin slot.
 
How will you access the disc drive (not that that's used too often these days)? It looks like the back will be open but that seems awkward. Could you set the Mini sideways to the disc could come out the right door? Or if you faced the mini forward and pushed it right up against the front of the door, you could cut out a thin slot.

The mini will be pressed up against the door, which will have a slot in it. I am also making the doors open out (not the direction they open in the show, but I don't have much extra room), just in case I need to swap things out. The back will also be mostly closed, with only openings for air flow and a plethora of cables. Now that I think about it I should probably design the back to open somehow. More hinges! :)

----------

That looks pretty cool.


Are you done yet?:p;)

Not yet, I had a basic prototype done a couple weeks ago but needed some more room so I'm starting again from scratch, but bigger.
 
Last edited:
The mini will be pressed up against the door, which will have a slot in it. I am also making the doors open out (not the direction they open in the show, but I don't have much extra room), just in case I need to swap things out. The back will also be mostly closed, with only openings for air flow and a plethora of cables. Now that I think about it I should probably design the back to open somehow. More hinges! :)

Gotcha. I was thinking the part of the image with the computer/fans visible was the back. So the fans will be pointing forward also? Or is the mini just backwards in the image?
 
Gotcha. I was thinking the part of the image with the computer/fans visible was the back. So the fans will be pointing forward also? Or is the mini just backwards in the image?

Fans are actually at the back, mini is facing forward. It's supposed to look like the fans are in the back but it doesn't come across at all in a 2D model. So yeah, fans are in the back panel :)
 
Very cool ...
I'm sure once it's done there are some guys here and everywhere want one, too.

:D

Actually, providing mine doesn't spontaneously burst into flames, I'm open to the idea of making them for others :) Either way, the plans will be open sourced, providing I can get permission from the guy on the Doctor Who forums for using his TARDIS template.

----------

Cool idea !!.. Does it mean you have unlimited storage inside the Tardis ?

:D

Well.... let's just go with it holds more on the inside than you might assume by looking at it ;) Cloud storage might be cool though, existing in a different place than the TARDIS is.
 
Ok, update #1. More of my plans and such :D

First off, lets put in some credit. This whole thing really started off when I was searching on Thingiverse for stuff to cut out on the laser cutter. This model came up, which I thought was ridiculously awesome. But it got me thinking.... what if I built it larger? How cool would THAT be! So credit to MarkP on thingiverse.

Second credit- I am working everything I'm building on this round off of the TARDIS plans and dimensions posted in this thread by the wonderful DoctorWho8. These plans are meticulously detailed and are accurate based off of the props seen on the show, even to scale, as seen in this photo:
index.php

Please also note that I am building a 2005 series TARDIS (David Tennant), and not the newer (2013) TARDIS (Matt Smith). Though after this I might do it as a side project just to show it off. Eventually I might even have an entire set of TARDISEs (TARDISi?), but I will have to finish series 5 and forth first and then watch all the classics. :D

Ok, down to the juicy stuff! So, this round is more about what I have done so far and what my plans are for this. One of the interesting things I have to do with the model is design it entirely in two dimensions, as I am not machining it. This can make everything pretty crazy. For example, take this shot of the TARDIS (I hope you can see it fine) tardis-doctor-who.jpg. If you can see it fine- look at how the TARDIS is structured. There are the corner posts, and then an additional "trim" layer underneath that. Then you have the door structure. And beneath that you have the door backing, with the grid that holds the windows in place. This means that I need to create four separate, distinct layers that when assembled, create this effect. DESIGN QUESTION! You can see in the photo that the corner post has a little "shield" around the edges. I have been ignoring it to this point because my sides are 3mm thick and I don't have thin enough material for that. I could potentially raster (etch into the wood), that part to have the corner post effect- what do you think about this?
Ok, back to layers. Prior to posting this I had created an 18 inch model but I found out that with power cables it wouldn't look as clean as I'd hoped. Because of that I actually have an example of the four layer model for one side. Tell me what you think!

I'll try to keep this updated regularly, hopefully weekly if not biweekly :)


******************
This looks very cool. Let me know if you ever fancy selling these things.

It's definitely a possibility. Actually depending on your needs I can probably customize it a bit as well! Not a guarantee but hey, if you're interested :D
 

Attachments

  • design.jpg
    design.jpg
    25.7 KB · Views: 151
  • tardis.jpg
    tardis.jpg
    1.3 MB · Views: 352
  • tardis1.jpg
    tardis1.jpg
    1.3 MB · Views: 177
Going to try to update on wednesday if possible. Getting a protoype of the sides and base structure done, with the corner cap block. I'm getting a bit annoyed with the structure I chose because
1. I'm crazy and would like to not use glue if possible
and 2. Everything has to be really almost perfect....
Which means I'm spending wayyy too much time designing stuff that will fit together nicely without glue than I probably should be. Oh well, it's an engineering challenge! But my golly, this thing is HUGE. My school has a really big laser cutter, 36x24", (which costs $50,000+ :eek:), and 2 sets of sides pretty much takes up the whole bed :O

Other things- working on getting the fan structure in and attempting to figure out how to make the doors work how I want on the front and back without opening spontaneously. I'll keep you updated!
 
I just realized it has been over a month since I posted this... oops! This is why I am not a journalist.

Ok, over the month I have worked out a lot of the issues in the drawing. I've made the hinges a bit different due to the expense and unavailability of miniature concealed hinges. The hinges (plain old butterfly hinges) will be partially embedded into the doorframe, and will allow the door to rotate out freely without sacrificing too much of the look. I have yet to order these hinges.
View attachment 450932

I went out and bought a used Mediasonic RAID enclosure, which to be honest, will barely fit (it arrives tomorrow so I will confirm then). And recently, I just figured out that a Wii console is 8.5" by 1.75", the exact size of one of my shelves. This means I still have to reorganize the shelve layout. Not terribly hard, but I don't want to cut CD slots into the windows. Since the doors hinge I think I might just leave the front alone and a use will just have to open the frame to insert/remove a disc. I also decided that as this will be a media center, and I don't have any way to rip blu-ray discs yet I will put a BD reader into it. I will try to place it like this enclosure, but I still want to have lighting on the sign, which would be an absolute pain with wiring to that. So maybe a no-go on the sign but I'm sure I can integrate it elsewhere.
tardis_pc_1.jpg


But I've basically spent the last month getting all the corners right, designing the base part, starting into the top enclosure, and making sure everything will work (hopefully) and is sized right (a pain) for a computer. It's honestly taking way longer than I expected but I want to make sure it's done right without wasting a lot of material (3 20x30" .125" ply sheets, 1 20x30" .25 ply sheets right now).

Oh yeah, another new thing. Each shelf now has a fan, I will be using 60mm and 40mm fans. Hopefully these will push enough air through the enclosure to keep everything running smooth.

I have started cutting it out on the laser cutter, the first couple walls are up and looking good, I'll update this week as I get more of it completed and get all my equipment!

Let me know if there's stuff I should change or you think it would be better. I welcome your opinion!
 
Update! It's been a long two months in and out of this, but I've decided to post a quick update.

Since I know you're all dying to see it, here ya go

photo 5-1 by photogeek121, on Flickr
Everything still looks a bit unaligned in these photos, don't worry, it all fits together, I just really don't want to glue all the pieces together until it's painted.

photo 1-4 by photogeek121, on Flickr
Size relation to a can of soda- this thing is just about pushing 2 feet!


photo 4-2 by photogeek121, on Flickr
Odd little design tidbit here... the door "catch" thingy (what would you call that?), that overlaps the doors is on the *wrong* side. Technically, the TARDIS doors open inwards, so it's on the correct side from a prop point of view, but when the doors open out it seems on the wrong side. The doorhandle/lock side should have it. I just figured I might as well keep it looking like the prop :p

These pics were taken a couple of weeks ago shortly after gluing the hinges in. I could not find concealed hinges small enough for this that would allow the range of motion I wanted, so I went with the next best thing, and embedded the hinges in the door. I got my measurements off by a little (or the South Korean hinge seller on eBay), so a little sanding had to be done to get them to fit all the way and have an axis of rotation that would allow the door to swing out without getting stuck. Still, they turned out really nice and are holding just fine with wood glue. Still a bit sticky though (the hinges, not the glue). Pretty slick if you ask me.


photo 3-2 by photogeek121, on Flickr
Box of parts waiting to be glued....


photo 2-4 by photogeek121, on Flickr
The top where the fan control/lighting electronics are going to go.


photo 2-3 by photogeek121, on Flickr
Testing for fit with a lot of the computer equipment that will go in. Bottom shelf: RAID controller and external HDD, up from that is a Wii (can't go wrong there! :D), to the Mac Mini, to another external hard drive (eventually will be replaced by an external blu-ray drive and will join the external drive on the bottom shelf), and at the top is an Airport Extreme. Pretty nice setup, if I do say so myself!


photo 3-1 by photogeek121, on Flickr
Photo without the side insert.


photo 1-3 by photogeek121, on Flickr
Doors closed, doesn't look like much in there!


Recently I bought some 8oz samples of Behr Sapphire Lace paint (regarded on TARDIS builders forum to be pretty accurate for the color). Unfortunately we had some freezing temps the week the paint was shipped, so it arrived separated and clumped beyond revival... for $6 shipped I can't complain, but I was hoping for better. I decided not to go to Ace hardware though and spend another $20 on paint, because it turns out a family member (painter) has some blue paint that looks pretty close to the TARDIS. Time to start painting! I plan to follow this up with a dark teal/black wash and add some weathering effect to it.

photo 2-1 by photogeek121, on Flickr

photo 1-1 by photogeek121, on Flickr

I spent a lot of last week getting window inserts cut to the right sizes in acrylic. These inserts are jut the right thickness to look like they are inset by a frame, totally lucked out there because that's all the white acrylic we have on hand at the shop at school. Best part about the acrylic is that it is translucent, if you shine a bright light onto the acrylic it lights up the whole thing. It can't be a TARDIS without lights and sounds now, can it?

photo 2-2 by photogeek121, on Flickr


photo 1-2 by photogeek121, on Flickr

So, yeah. Lots of work to do, but it's starting to come together! I think putting the signs on (not sure what to do here to get them to light up....), adding the rest of the top parts (and light), sanding the base, and painting will get it really close to being done!
 
Looking great! I wish I was good at stuff like this. Keep up the good work, I'm sure the end result will be more than worth the effort!
 
1st day of painting! A bit disappointed here, turns out when I did the test piece that I put the paint on way too thin, so everything is a bit darker (and lots more blue!) than I would like. :D
In comparison to David Tennant's TARDIS
tardis_2-wallpaper-1400x1050.jpg

Here's mine

photo-3 by photogeek121, on Flickr

The brush strokes are kind of wonky as well. Not sure what my options are at this point- I can try lightening the original paint I have and covering up with a bit lighter, or going to Ace/Wal-mart after all and color-matching a paint sample (8oz should be enough, I hope), and covering it up. If anything, the current paint will act as a good background and I can sand down to it to add some distress, but I might have to coat the whole thing a few times before it covers it all up...
 
Register on MacRumors! This sidebar will go away, and you'll see fewer ads.