Straight out of help in Printer Setup Utility
1 Open System Preferences and click Print & Fax.
2 Click Printing, and then click the Set Up Printers button.
If the printer already appears in the Printer List, select the In Menu checkbox to add it to your list of available printers. You'll see it in the Printer pop-up menu the next time you print.
3 Choose Printers > Add Printer.
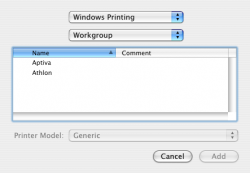
4 Choose Windows Printing from the top pop-up menu, choose a network workgroup from the pop-up menu that appears directly below it, select a workgroup from the list, and click Choose.
Any Windows printers in the network you've chosen appear in the Printer List.
5 Select the printer in the Printer List.
6 To use printer-specific features, choose the item appropriate for your printer from the Printer Model pop-up menu, then select your printer in the Model Name list.
IMPORTANT: Be sure to choose the correct printer model for the printer you're using. For more information, see the documentation that came with the printer. If you have an HP PCL compatible printer that is not listed in the Printer Model pop-up menu, choose the printer model that most closely matches your printer. For a list of compatible printer models you can choose if your printer isn't listed, go to
http://gimp-print.sourceforge.net/p_Supported_Printers.php3.
7 Click Choose.
The printer appears in the Printer List as the default printer (in bold type). It also appears in the Printer pop-up menu when you print a document.