Become a MacRumors Supporter for $50/year with no ads, ability to filter front page stories, and private forums.

Aesthetica

macrumors member
Original poster
Jun 18, 2014
78
28
Hi all, hope you're all getting through these mad times we're in!

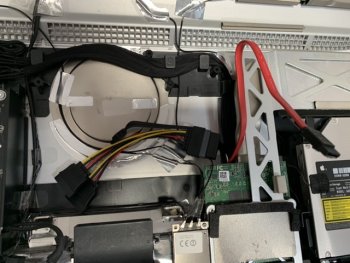
I've got a Mid 2011 iMac 27" which is going to waste on account of its horribly slow mechanical hard drive. I'm going to upgrade it to a Sandisk SSD Plus 240GB that I have laying around but am concerned about how this will impact fan speeds and have heard conflicting info

I've heard either


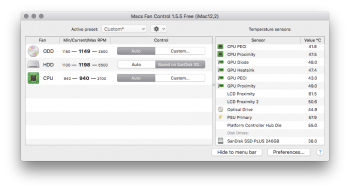
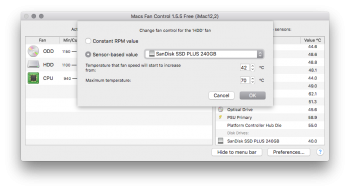
- SSDs have their own temp sensors that they send through SATA, so you just need to install MacsFanControl which can read this and adjust fans accordingly
- you need to use a special and expensive temperature sensor (seemingly only made my OWC) because MacsFanControl doesn't read temps / control fans properly
- 2011 iMacs send temp readings through Sata anyway and some SSDs are compatible with this by default


Has anyone some solid evidence as to which of these is true before I start the procedure?

Thanks! :)
 
  • Like
Reactions: huogas
The OEM HDD has a temperature sensor internal to the drive.

SSDs do not have a temperature sensor, AFAIK. It kind of makes sense considering they do not really get hot like HDDs.

If you replace You can get the external sensor, use SW to control the fans, or I have seen people close the circuit of the temp sensor wires, which will read as low temp, and normal fan speed.


hmm okay thanks :) , when you use software to control the fans, does it just ignore the SSD reading (or lack thereof) and control the speed based on CPU, GPU etc, or does it just run at a certain speed all the time?
 
hmm okay thanks :) , when you use software to control the fans, does it just ignore the SSD reading (or lack thereof) and control the speed based on CPU, GPU etc, or does it just run at a certain speed all the time?
Either, or none if the above options.

I have used a few different fan control software, although, not in the same way that you plan to, such as a missing temp sensor.

You can have fans set at a base speed, a set speed, link a fan's speed to any particular temp sensor. Or some combination of all three.

I would suggest getting the sensor adapter and not worry about it. I think I got it for $34.

But, if you want to try some other options, it isn't like it would be hard to try something else, then get the sensor later if it doesn't work for you.
 
Don't waste your money on that OWC (or similar) temp sensor!
Just do what many have successfully done, myself included. Simply shorted out the HD connector with a home-made jumper wire as shown HERE.
I'd been planning to sell my mid 2010 27" iMac and purchase the new 2019 model, as the performance had significantly dropped off despite doing an OS clean install.
So I installed a Samsung 860EVO SSD in place of the original HD. Whilst doing this it was obvious that the fans would benefit from removal and thorough cleaning. Glad I did this because when removed there was a great deal of clogged dust particles remaining in the housings which required a good cleaning too.
With everything re-installed I was truly amazed at the renewed performance of the iMac running OS Sierra.
Added more RAM memory for a total of 12Gb, and also enabled trim support on the Samsung SSD, and installed SSD Fan Control, although with an SSD everything runs so cool that SSD Fan control is probably an overkill.
A great way to give these excellent iMacs a new lease of life! This one's a keeper for at least another 3 years, by which time I will probably have upgraded to High Sierra or even Catalina with the DosDude patch.
 
  • Like
Reactions: tanventure and wpdv
I have a mid-2010 27" iMac that I had a 1TB SSD installed last year. The company I had install the SSD didn't mention anything about making changes to the temp sensor, though I guess they could have. Best thing I ever did! It runs much cooler. I have 16GB of RAM installed as well. Did that myself. Easy.

Last week I upgraded from Yosemite (10.10.5) to High Sierra (10.13.6). Went very smoothly. I also have a MacBook Air... if I start up my MacBook Air 2017 (10.15.3) and my iMac mid-2010 (10.13.6)... the iMac is the first one to show the login screen! Very fast now. I am very happy with my setup. Because of this minimal investment, I also feel I'll get another few years out of this great machine.
 
Don't waste your money on that OWC (or similar) temp sensor!
Just do what many have successfully done, myself included. Simply shorted out the HD connector with a home-made jumper wire as shown HERE.

You're absolutely right its a waste of money - but that guide won't work for a 2011 model as the temp sensor is build into the SATA cable. You can just short 2 wires on that cable and it'll do the same job though.

However, I didn't even bother doing that.


For those like me who were coming across a bunch of different guides about what and what isn't needed: I can tell you that I'm now running an SSD in a refreshed Mid 2011 iMac with just:

- the SSD itself (Sandisk SSD Plus)
- a Torx T10 Screwdriver
- some Velcro to mount the drive
- Macs Fan Control


I didn't buy the OWC cable or do any hardware modification other than swapping the disk.

Macs Fan Control sees the temp sensor on the SSD and uses that to adjust the HDD fan speed! (you have to set this, see pic)

I'm delighted, wasn't too comfortable going inside an iMac despite having been in countless PCs and laptops before but it was completely painless, now to upgrade everything else inside this thing!
 

Attachments

  • Screen Shot 2020-03-20 at 10.18.56.png
    Screen Shot 2020-03-20 at 10.18.56.png
    94.8 KB · Views: 1,993
  • Screen Shot 2020-03-20 at 10.29.05.png
    Screen Shot 2020-03-20 at 10.29.05.png
    91.1 KB · Views: 1,996
In the 2009/2010 you can either short the two lines from the connector cable or buy a cheap used iMac ODD/ambient thermo sensor and glue it directly on the disk with Tesa or 3M. The former case effectively fix the fan at low speed, the latter will leave the original temperature depending fan speed function in place.

With the 2011 this is different: The most easy way is to buy a SATA Y splitter an put it on the existing power connector.
(Now you can buy a second SATA data cable and connect it to the unused SATA 1 port on the logic board.)

You have the same situation as described above with the 2009/10, the fan is locked to low speed. You can install now two 2.5“ drives on a normal 3.5 to 2.5 frame.

If you do not trust the lock to low fan speed use Mac Fan Control additionally or instead. All SSD deliver thermal data through SMART.

Yes, some SSD work without any additional cable and without loss of fan control. Cannot really confirm which ones in the broad market...
 
  • Like
Reactions: howardc64
I did a similar HD -> SSD replacement on a decade old iMac but did not 'fix' the heat sensor and the fans ran too fast and loud.
The annoyance was fixed using "TG Pro" to control the fans, and the iMac is still protected from getting too hot (if configured to do so).
TG Pro (link) is an excellent utility was well worth my small investment.
 
  • Like
Reactions: Ausdauersportler
using a software won't stop the noisy fan from power on to session screen.
Here is the solution ! This make your HDD or SSD like an original one, and enjoy the silence :)
You need to make a connexion between pin 11 and pin 12
Some pictures
Sata-Apple-2010-2011.jpg
Soudure-Sonde-Sata-Apple-2010-2011-2.jpg

Soudure-Sonde-Sata-Apple-2010-2011-1.jpg
 
using a software won't stop the noisy fan from power on to session screen.
Here is the solution ! This make your HDD or SSD like an original one, and enjoy the silence :)
You need to make a connexion between pin 11 and pin 12
Some pictures
View attachment 902470
Hi!

You are talking about the mid 2011 systems?

I guess this is exactly what happens when using a SATA Y splitter cable. It shorts PINs 11 and 12. But this is NOT the same as the original solution. If you deactivate temperature control and lock the fan to the minimum RPM of 1100 there is - deactivation - no temperature control at all. Or have you ever observed a rising fan speed of the HD fan?

To get a control at the very end in case of real high ambient temperatures you should install Mac Fan Control additionally. SSD can become hot if you write huge amounts of data onto it. Having a fan in place to bring down the temperature make expected live span of such a device longer...

But really good to know this little solder hack. I will give it a try on one of my old HDDs later :) Cheaper than a 4 Euro splitter cable...

Thanks for sharing!
 
yes just take a look at my signature :) iMac 27 mid 2011
sure no temp control, but you can watch the t° using macsfan for exemple
I have done it on my ssd :) and the previously HDD
sorry for my bad english :)
Hello from France
Take care
 
Normally I use this setup:

Grab a normal SATA data cable (red) and connect it to the port 0 on the back side and a splitter to get a second power source.

Reverse the old data cable to have the flat side out and the 90 degree plug on the unused data port 1.

Connect the splitter cable and take a 3.5 to 2.5 inch conversion frame. Now you can connect easily two 2.5 disks without bending plugs and without a roaring disk fan in the morning :)

Greetings back to beautiful France 🇫🇷 - stay healthy!
 

Attachments

  • F7DFF270-EA7A-4CEA-BBE2-606A7CED00F1.jpeg
    F7DFF270-EA7A-4CEA-BBE2-606A7CED00F1.jpeg
    114.2 KB · Views: 1,606
My tip doesn't work for iMac 2009 (my earlier iMac), TG Pro fixes noise as soon as you power on the machine?
 
I am not sure when the software is loaded or becomes active-- I do not see it in my "Login Items" (Agents) list. Nor do I notice an obvious file belonging to it in the /System "Launch Agents" or "Launch Daemons." For me this is a moot point, and I do not have access to that machine now to do a test for you. I have found the developer to be very respsoive to my questions so if you send an email to the developer at support@tunabelly.com you should get your answer.
 
Normally I use this setup:

Grab a normal SATA data cable (red) and connect it to the port 0 on the back side and a splitter to get a second power source.

Reverse the old data cable to have the flat side out and the 90 degree plug on the unused data port 1.

Connect the splitter cable and take a 3.5 to 2.5 inch conversion frame. Now you can connect easily two 2.5 disks without bending plugs and without a roaring disk fan in the morning :)

Greetings back to beautiful France 🇫🇷 - stay healthy!

Hey Ausdauersportler

I’ve got some questions regarding your setup. I want to upgrade the old hdd of my Imac 27” from 2011 to a ssd. Now I’m concerned about the fans running at full speed after the exchange but I have seen that one can bypass this issue by using a SATA Y-Splitter cable. My question is how and where exactly do I need to plug in the Y-Splitter if I just want to use one ssd and do I need an other sata data cable or can I just use the cable that Apple originally used to connect the old hdd?
thank you
 
There is only one way you can connect the splitter and you need no second data cable. You even need not to reroute any cable. Just disconnect the old disk, install a frame and the new SSD, use the splitter in between the old power cable and the new SSD.
Use Mac Fan Control to watch the heat inside and to control the HDD fan. Heat can kill every electronic device.
 
Danke für die Hilfe!
There is only one way you can connect the splitter and you need no second data cable. You even need not to reroute any cable. Just disconnect the old disk, install a frame and the new SSD, use the splitter in between the old power cable and the new SSD.
Use Mac Fan Control to watch the heat inside and to control the HDD fan. Heat can kill every electronic device.
 
in iMac 2011 just plug that goes into the HDD power connector that shorts pins 2 and 7


in iMac 2009 just use 1k ohm resistor as thermal sensor
 

Attachments

  • 3159E1F6-B176-4789-95D8-B7BB461C9C06.jpeg
    3159E1F6-B176-4789-95D8-B7BB461C9C06.jpeg
    36.4 KB · Views: 1,990
  • Like
Reactions: RioRio
I just want to add that in a 2010 21.5 iMac, theres a separate temp sensor cable that connects to the motherboard from the original hdd. You just need to cut off the connector that plugs into the hdd and just connect the wires together. The fans will go at minimum speed all the time instead of max speed(but you can reconfigure using an app if needed).
 
  • Like
Reactions: Ausdauersportler
After replacing the drive of my Mid-2010, I conclude that software control is the way to go.

Many newer drives don't even have that small connector for connecting the temperature sensor to the motherboard. Even if a drive does have that small connector it doesn't mean it gives temperature output. Nowadays it is only for jumpers. Back in those days Apple was known to have ordered custom firmware and/or hardware so the original drives might be different even if they appeared to be the same. So, I decided not to worry about connecting that temperature cable to the replacement drive. It doesn't appear to be the way to go anymore after so many years.

I am not sure if the temperature is denoted by some resistance value (or e.g. PWM?), but just in case, I put in a 16K resistor. (It might not have been a linear curve, but I've heard 51k ohm=1500rpm and 100k ohm=max.) As a data point, Macs Fan Control reads 59 degrees Celsius and rpm is at its lowest, 1100, if left at "Auto" to be controlled by the system. Apparently, Apple didn't think additional cooling was required at 59 degrees C! The guys who simply shorted out the wires were not wrong. It would not have made a difference anyway. Apple wanted quiet over longevity.

I would like to ask everyone to post your resistor value and your temperature reading. It is called 'platform controller hub die' in Macs Fan Control if I understand correctly. When we have enough data points we can plot a graph. For me, 16k=59C.

Maxing out the fan didn't lower temperatures that much. The inside was just a huge swirl of hot air. Increasing circulation only moves that hot air from one place inside the housing to another. Dust accumulated over 10 years might have played a role. You have to lower your standards as to what is good enough. Right now my replacement drive is under load, and at 46 C, with the fan running at 2700rpm, controlled by Macs Fan Control. I could lower to 42 C with the fan at 5500rpm but I was never able to get the drive under 40 C under load.

When I restored the Mac with Time Machine, I had no opportunity to run Macs Fan Control of course, and during the restore the drive reached 50 C, an alarming temperature at which Apple thought still wouldn't need to turn up the fan. Don't overly trust Apple. They make good decisions most of the time, but they are not always right.

The next generation, my Late-2013, had none of this thermal nightmare. A revolution was underway starting with Sandy Bridge to make everything power efficient, and that generation of iMac was not that much different from a laptop in an all-in-one form factor. (Yes, it was capable of a much higher TDP envelope, but the power saving technology was all the same.) My 2.5" drive inside never got into the 40's, although the SSD portion of the fusion drive did get over 80 at one point. (My understanding was that SSDs can run as hot as a CPU.)
 
Register on MacRumors! This sidebar will go away, and you'll see fewer ads.