As promised, full details today on how I went from "its dead, Jim" to an operational air-cooled Power Mac G5 Quad.
To start with, the "magic smoke" incident I reported earlier in this thread clearly smoked one or both of the CPU cards on the Quad in question, a fact I confirmed when I swapped the CPU cards between the LCS-cooled Quad and the Quad I planned to air cool. After that swap, the LCS-cooled Quad no longer booted, and when I finally succeeded with the air cooling, the onscreen color artifacts that had showed up pretty consistently on the LCS-cooled Quad followed the CPU cards and moved with them from the LCS Quad to the "Air Quad".
SO... one or both of those CPU cards has been damaged. To work around this "smoke issue", I set both of the cards aside and proceeded with installing the CPU cards from the LCS Quad into the Air Quad.
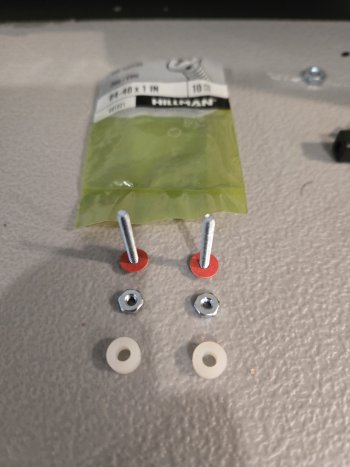
For the Air Quad, the key issue all along has been the front mounting hardware for the FROZN units. The back mounting hardware presents no issues - just put a small bolt through each of the two holes in the CPU card nearest the heat pipes and use them to screw down the front bracket. Easy.
Well, nearly easy anyway. When you do this, you will quickly realize that there are some rather tall (for a chip) surface mount components near the holes you need to use, and thus a tall plastic washer is needed to ensure that when the nut is added, the front bracket rests above the nearby components. I used hard white plastic (non-conductive!) washers that I had in stock, probably a quarter of an inch tall.
The photo below shows the back mounting hardware now in place. The white plastic washers are underneath the bracket, and so are not visible.
So, that is the back mounting hardware in place and secured.
The front mounting hardware has been the key issue to overcome all along. Unless this is as tightly connected as the back mounting hardware, the FROZN heat sink doesn’t mate tightly enough to the CPU face and effective cooling simply doesn’t happen.
At first glance, this doesn’t look particularly challenging. There are four more holes near the front of each CPU card (two sets of two holes, one on each side of the card), and the inner set of holes fits the positioning requirements for the front mounting brackets almost perfectly. Looks like a slam dunk, but … Apple put those holes there for a reason! Four threaded pegs exist on the motherboard the slide up into these holes when the CPU cards are put into place and (a) ensure the correct physical alignment of the cards relative to the motherboard and (b) tighten down the front of the card, securing it in place - that is why each peg is threaded. These pegs are clearly visible in the photo above.
SO... Apple is already using the set of CPU card holes that the front mounting hardware needs. What to do????
Faced with the same problem,
@Doq opted to tear down the Quad completely, remove the motherboard and then, with access to the motherboard’s underside, remove the four offending pegs entirely. He then added a nut/bolt arrangement similar to what was done for the back mounting hardware and thus, after reassembling the Quad, could now secure the front mounting hardware to the CPU card.
The only issue with all of this, other than the enormous amount of work required to completely tear down a Quad, is that once done, there was no way to secure the front of each CPU card – the now removed pegs had provided that function prior to their removal. Since the CPU cards are screwed down in the back,
@Doq decided that this was good enough and did not attempt any further efforts to secure the front of the card. As it happens, his “air quad” worked out quite well, and so this turned out to have been a very effective decision.
For my part, after reading the Apple service manual for the Quad, it became clear (to me at least) that extracting the motherboard from the case was something akin to brain surgery, and I quickly decide to try almost ANYTHING to avoid having to do that.
I have a huge collection of nuts, bolts, screws, clamps etc., but I could not find ANYTHING that would screw onto the threads present in each of the pegs… nothing! They must be a very unusual size – classic Apple engineering: why use an industry standard size when you can throw everyone off by creating something proprietary!
🙄
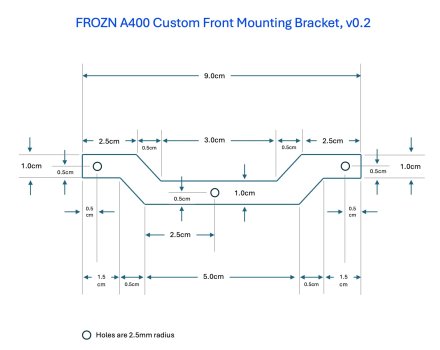
As readers of this thread will know, I attempted a variety of twist-tie based solutions to secure the front mounting hardware, but none of them were able to hold the hardware in place well enough to create a good thermal seal for the heat sinks that screw down onto it. So I decided to create a custom front mounting bracket with the help of a friend who has a metal working shop in his garage.
Then, an “aha!” moment. The mounting hardware included with the FROZN units is very complete and includes four knurled top nuts. I will refer to these as “knurls” for the rest of this post. These knurls turned out to be the lifeboats I needed. They will screw tightly onto the top of the motherboard pegs, but they will only screw down a tiny amount from the top before stopping and they cannot be tightened further. I tried them as a solution early on and dismissed them at that time – they fit the top of the peg just fine but provided no way to securely screw down the mounting hardware that had to sit below.
The ”aha”? What if I built up the bottom of each peg, after it had come through the hole on the CPU card, with enough rubber washers such that the front mounting bracket was raised up into near contact with the top of the peg, close enough that the knurl would provide adequate tightening for it? That was “aha” number one.
I tried it, and let me tell you, it is a delicate dance – too many washers and you raise the mounting bracket up so high that the heat sink will not contact the CPU face, but too few washers and the mounting bracket ends up too low, and the mounting hardware on the FROZN unit cannot reach down far enough to grab onto the threaded screw post in the center of the bracket.
There was another complication too. The holes in the edges of the mounting brackets are too small to fit over and through the CPU/motherboard pegs. Hence the bracket would not go all the way down the peg to reach the washers. A complication? Yes. A big one? No. I got out my trusty electric drill, selected a drill bit that was intended for metal and was of the right diameter (I just eyeballed that one) and enlarged the hole at each end of the bracket. When done, the hole was large enough that the bracket would go all the way down the peg to the washers. The result looked like this:
With trial and error, I found that three 1/16” rubber washers
almost did it. With three such washers at the base of peg (on top of the CPU card hole), The mounting bracket almost reached up to the knurl, but there was a just a little bit of “wiggle” in it. With the knurls fully tightened down, here is what the result looked like:
“Aha” number two? This wiggle room didn’t matter – in fact it was
exactly what was needed.
With three washers used, the front mounting bracket was just marginally too low to allow the front FROZN mounting hardware to reach down and grab the threaded bracket screw it tightens into. But leveraging that little bit of wiggle, I could tilt the FROZN unit forward slightly, lowering the front mounting hardware just enough to enable it to grab the front bracket screw and tighten down onto it, and then tilt the FROZN the other way, causing the now attached front mounting hardware to pull the front mounting bracket up to the small extent of its wiggle room. This provided just enough “wiggle room” in the other direction to enable the FROZN’s back mounting hardware to reach its bracket screw and tighten down.
Mission accomplished! The FROZN unit was being held firmly in place against the CPU/shim setup on the CPU card AND the card itself was being more or less held in place by the pegs and the knurl. In retrospect, if I had tried four washers each, it might have been even a little bit more effective, but it worked well with three, and since it works, I am not messing with it!
I repeated the above with the second FROZN and then attached the FROZN fans. As documented earlier in this thread, I rely on a combination of the mounting clips provided with the FROZN units, twist ties and duct tape to secure the fans. The fan closest to the top is properly secured on the side nearest the PCI Divider plate with a mounting clip. The far side of the fan case is secured to its paired FROZN with duct tape. The fan closest to the bottom of the Quad is secured on top entirely with duct tape, while its bottom is twist tied to the nearest edge of the top fan. The result looks like this:

If you follow the wires in the above photo really carefully, you may just see that the FROZN’s fans are powered from a MOLEX that I split out from the DVD/CD area of the case and then pulled through a gap near the bottom of the PCI Divider plate. This is the only MOLEX I am aware of in the machine. Of course, the FROZN units do not directly consume MOLEX; they have traditional fan plugs. However, I had a MOLEX to fan plug conversion cable and that bridged the gap.
If I had chosen not to go with MOLEX, I could have (per
@Doq,) cut into the Quad’s pump control cable (it is now extraneous after all - there is no pump anymore!) and extracted the +5v, +12v and Ground needed from there.
So, that is it! That is the story of how I got from “its dead, Jim” to a fully air cooled Quad! Lots of niggly little details, but the key issue to solve was attaching the front mounting hardware, and the knurls provided by FROZN turned out to be the answer.
I am still pinching myself; all four CPU cores in the 30s … I have never seen such a thing, nor did I even hope for such an excellent result. I think I am breathing pretty rarified air as well – as far as I know, not very many people have successfully pulled this off. I am not sure how many other people in the world have attempted a true air-cooled Quad conversion (the original four 2.5 GHz CPUs being air cooled, not the conversions that end up turning a Quad into a dual 2.3 GHz air cooled machine) but counting
@Doq myself, I am only aware of about three. There must be more however, somewhere.
In the end, air cooling a Quad is SO much simpler than overhauling a failing LCS
and less expensive to boot. It takes a little persistence and ingenuity, but I strongly recommend it. Never again will you have to contend with coolant leaks, dried coolant crystals, roaring fans and so on. The LCS may have been a good cooling decision in 2005, but we can do better two decades later in 2025. The results speak for themselves:
As I did with the LCS Overhaul work, I am busy writing a complete document laying out exactly how to accomplish an air-cooled Quad. When done, I will post it here, and load it onto my retro-computing.com web site as well.