An I/O error happened which caused /Volumes/Install_Lion to be ejected? Is there something wrong with your disk? Otherwise, I would modify the script to output more progress or status information.
Here is a list I collected for all macOS installer links from Lion to Ventura on the App Store (former iTunes Store). Most of the Installers can be installed with mas-cli. Some of them will require previous download from the App Store with that store account. For macOS'sLion to Ventura Apple provides only stub installers, so use Mist for full installers from Lion to Sequoia (without Mavericks), @bogdanwscript for for macOS 11.5.2 to 13.2 or Mr. Macintosh site.
All the official installers from Lion to Ventura (except Mavericks) come in the form of Install Mac OS.dmg containing InstallMacOSX.pkg installer, which by design is supposed to unarchive the installer app into the Applications folder. Here is the catch though, you can only do this on the same or earlier version of macOS. The good thing is that you can always create Lion or Mountain Lion installers in your Applications folder fairly easy and create a virtual machine in Parallels. From there you can download and install in the Applications folder any of the macOS full Installers from Lion to Sierra:
Although these installers work fine for creating a Parallels virtual machine you still might have an issue with a "broken installer" message on a real machine. For instance upgrading Snow Leopard to Mountain Lion might not be possible unless you do the following:
Code:
open -W /Applications/Install\ OS\ X\ Mountain\ Lion.app/Contents/SharedSupport/InstallESD.dmg
where XXX is the name of the disk you're installing to.
You CANNOT use the above procedure for later than Mountain Lion DMG's. You can create the USB, but It will just miserably fail during installation process with the following message: View attachment 2152350
You can use @Dayoscript for creation of USB installers from Lion to Monterey (excluding Mavericks) (and here with Mavericks) dowloaded from Apple or as applications in the Applications folder with the help of Balena Etcher. This script creates a bootable disk image in the current directory from the given macOS or OS X installer app and supports Lion through Sonoma (and beyond, probably). This script Creates a bootable ISO of OS X / macOS, from the installation app file from Mavericks to Sonoma. You can install it with Homebrew or just download the osxiso.command file and make it executable (chmod +x osxiso.command).
After ISO creation you can restore the ISO to an USB using Balena Etcher. You can also use dd just note it is extremely slow. Find the USB device with diskutil list, unmount the USB:
If not using this script all the other installers after Mountain Lion contain the createinstallmedia program for bootable USB creation but you MUST install them in the Applications folder by double clicking or following the below procedure for Mavericks. Bare in mind that the old installers have expired certificates and you might need to change the date from recovery.
The only black sheep here is Mavericks. Apple for some unknown reason decided to skip Mavericks from the list of the available installers. So now if you want to officially install Mavericks there is only one solution. You must have "purchased" it at some point in the past to be able to redownload Mavericks from the App Store on MavericksmacOS or earlier, or using mas-cli from newer macOS's. It gets even deeper. Say you have created a regular USB installer and boot from it. It will require files update and it will force you to log in to your account verifying your "purchase" from within Recovery. Let's assume you qualify for redownload and get your copy from the App Store. So, can you reinstall it or create a working bootable USB? Not without some extra work.
You can restore this DMG to an HFS+ partition. This is a never booted image of Mavericks.
For a Mavericks USB installer creation follow this :
Format an 8GB USB drive with HFS+ GUID Partition scheme and label it Untitled.
Execute these commands:
I have been knocking myself out over four days trying to overcome the instalment verification problem.
Thank you so much for posting this encyclopeadic coverage with all your researched solutions.
I thank you and I salute you!
I confess I am somewhat overwhelmed by the various options you have presented and now, two years after your post, I am hitting new difficulties.
An OSX install file downloaded with Mist on a 2019 iMac, when transferred by USB to a 2007 iMac running Lion, results in a window stating "You can’t open the application Install OSX Mountain Lion 10.8.5_12F45 because it is not supported on this type of Mac". Also with mas-2.2.2.pkg will not work on OSX10.7.5.
I am able to download 10.8.5 pkg. installers from Apple which load 10.8.5 into Applications but they hit the Certificate/Verification hurdle. I have changed my computer date to read 1/10/2012.
Can you please guide me by giving your opinion of the simplest, most reliable 10.8.5 installation method in my situation.
I am running Lion on a 2007 iMac and want to upgrade to Mountain Lion to run legacy software. I am happy to install over lion or make a bootable USB drive.
I have tried both avenues with .dmg and I have tried with .iso/ESD and always installation fails at the verification /expired certificate barrier.
My impression is that Command Line is the most reliable approach.
I am not Command Line literate so need to know exact placement of files and suitable code.
An OSX install file downloaded with Mist on a 2019 iMac, when transferred by USB to a 2007 iMac running Lion, results in a window stating "You can’t open the application Install OSX Mountain Lion 10.8.5_12F45 because it is not supported on this type of Mac". Also with mas-2.2.2.pkg will not work on OSX10.7.5.
The issue is installing, not booting. There is a verification block as I described, which prevents the installation process. As startego testifies - evidenced in the link View attachment2152350 below:
"You can create the USB, but It will just miserably fail during installation process with the following message: View attachment 2152350
That is also my experience. Finding a solution is very elusive. If you have previously bought or downloaded the legacy OSX twenty years ago, the verification process is probably still executed by Apple Store and your Mac. If that is not the case, these days it is a loosing battle to install a legacy OSX afresh. I can get the installers .dmg or .pkg, just cannot make them install.
I tried published command line scripts which worked in the past. Whether copied or typed, I receive ’no such file or directory’ message.
I am currently trying to create bootable USB installer for Yosamite with Disk Drill on 2019 iMac running Ventura. That fails when Disk Drill completes erasure of target USB with an unspecified error and cannot proceed. I shall see what Disk Drill support can offer in the way of assistance.
I reckon the answer is in getting the command line script just right. I do not have the knowledge or experience to use the gems offered by startego. Supplementary script knowledge and syntax is required which I do not possess.
I would welcome advice from those who have the knowledge.
An OSX install file downloaded with Mist on a 2019 iMac, when transferred by USB to a 2007 iMac running Lion, results in a window stating "You can’t open the application Install OSX Mountain Lion 10.8.5_12F45 because it is not supported on this type of Mac".
The issue is installing, not booting. There is a verification block as I described, which prevents the installation process. As startego testifies - evidenced in the link View attachment2152350 below:
"You can create the USB, but It will just miserably fail during installation process with the following message: View attachment 2152350
That is also my experience. Finding a solution is very elusive. If you have previously bought or downloaded the legacy OSX twenty years ago, the verification process is probably still executed by Apple Store and your Mac. If that is not the case, these days it is a loosing battle to install a legacy OSX afresh. I can get the installers .dmg or .pkg, just cannot make them install.
I tried published command line scripts which worked in the past. Whether copied or typed, I receive ’no such file or directory’ message.
I am currently trying to create bootable USB installer for Yosamite with Disk Drill on 2019 iMac running Ventura. That fails when Disk Drill completes erasure of target USB with an unspecified error and cannot proceed. I shall see what Disk Drill support can offer in the way of assistance.
I reckon the answer is in getting the command line script just right. I do not have the knowledge or experience to use the gems offered by startego. Supplementary script knowledge and syntax is required which I do not possess.
I would welcome advice from those who have the knowledge.
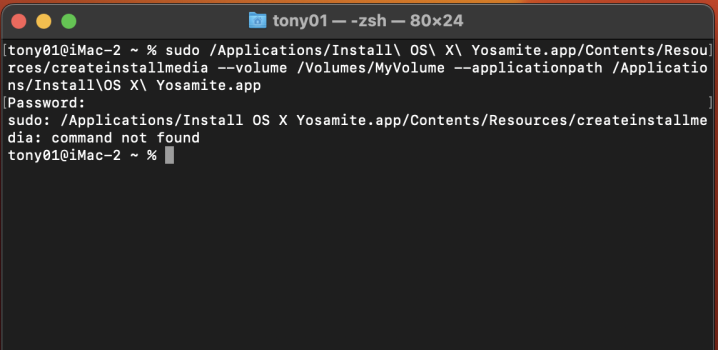
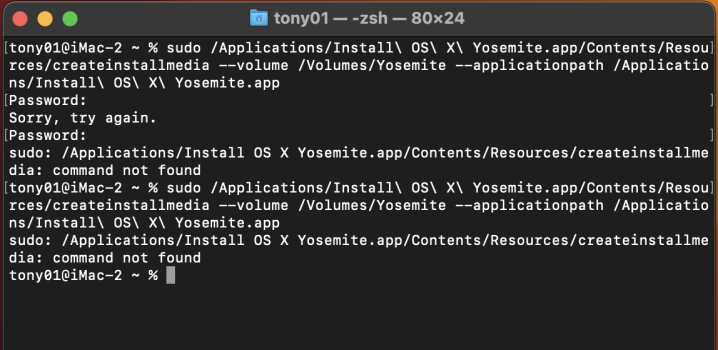
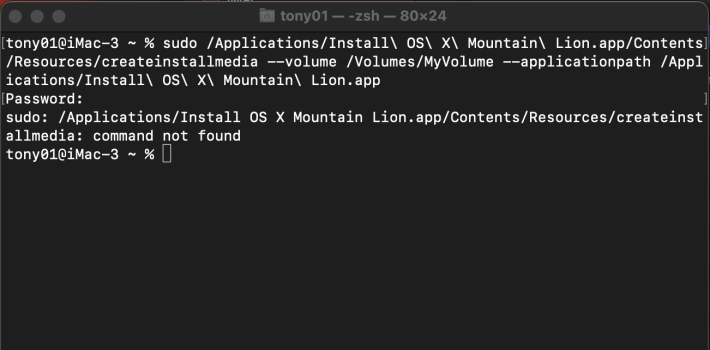
The error message says command not found.
The command path that you entered is /Applications/Install OS X Yosamite.app/Contents/Resources/createinstallmedia
Which means /Applications/Install OS X Yosamite.app/Contents/Resources/createinstallmedia does not exist.
Where did you put the Install OS X Yosamite.app application?
Maybe the name should be Install OS X Yosemite.app ?
Unless I have made an error, Apple scripts for Terminal are not working for me on Ventura as screenshots show.
I have also tried the technique of dragging OSX installer ESD into disk utility which does work, except I hit the Verification block when Mountain Lion tries to install.
I have also tried with OSX install via USB feature in disk drill. This works fast but Yosamite is the earliest OSX Disk Drill recognises. Presumably because there is no boot installer included in the files.
Re-reading previous references,above, I was impressed by the Dayo script on GitHub but I do not have the fundamental knowledge to build actions from the snippets.
Have abandoned use of 2019 iMac and am installing Snow Leopard on 2007 iMac v-e-r-y s-l-o-w-l-y
and will install Lion and Mountain Lion over each subsequent OSX.
Using the old iMac should solve the Verification/Certificates issue and I can then create install USB’s on old system, thus bypassing the obstacles of later evolution. Should be complete by Christmas!
Let's try a few commands that use wild-cards, and see what the results are.
Please post the output of each command shown. If an error occurs at any point, then none of the subsequent cmds will work, because each one goes progressively farther into "/Applications" looking for things.
Code:
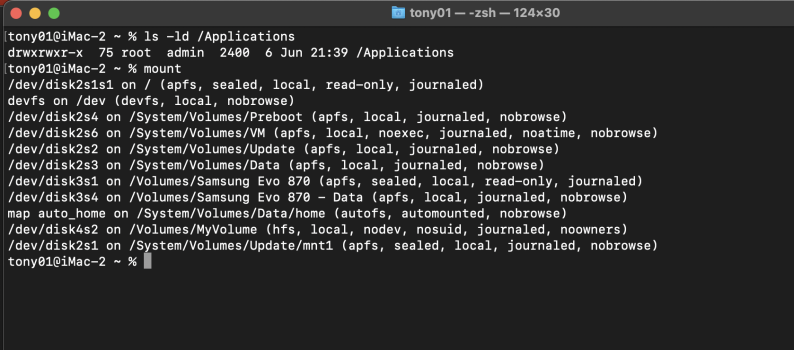
ls -ld /Applications
If there is an Applications folder mounted at the file-system root, then this will show the permissions and ownership of that folder. If there isn't such a folder, then an error message will appear instead.
The following cmd will list what's mounted. It would be useful to see this if the above cmd fails. If it works, then there's no reason to see the mounted output.
Code:
mount
If the 1st cmd worked, try this:
Code:
ls -ld /Applications/Install*.app
If there is an "Install"-any-words-here".app" application in the above /Applications folder, it will show its permissions and ownership. If not, an error appears.
If that worked, try this:
Code:
ls -ld /Applications/Install*.app/Contents/Resources
This goes into the above application and looks for a Contents sub-directory, with a Resources sub-dir within that. These sub-dirs are standard parts in an app.
If that worked, try this:
Code:
ls -ld /Applications/Install*.app/Contents/Resources/cr*
If there's anything whose name starts with "cr" in the above Resources sub-dir, it will be listed. If there isn't, an error will appear.
Let's try a few commands that use wild-cards, and see what the results are.
Please post the output of each command shown. If an error occurs at any point, then none of the subsequent cmds will work, because each one goes progressively farther into "/Applications" looking for things.
Code:
ls -ld /Applications
If there is an Applications folder mounted at the file-system root, then this will show the permissions and ownership of that folder. If there isn't such a folder, then an error message will appear instead.
The following cmd will list what's mounted. It would be useful to see this if the above cmd fails. If it works, then there's no reason to see the mounted output.
Code:
mount
If the 1st cmd worked, try this:
Code:
ls -ld /Applications/Install*.app
If there is an "Install"-any-words-here".app" application in the above /Applications folder, it will show its permissions and ownership. If not, an error appears.
If that worked, try this:
Code:
ls -ld /Applications/Install*.app/Contents/Resources
This goes into the above application and looks for a Contents sub-directory, with a Resources sub-dir within that. These sub-dirs are standard parts in an app.
If that worked, try this:
Code:
ls -ld /Applications/Install*.app/Contents/Resources/cr*
If there's anything whose name starts with "cr" in the above Resources sub-dir, it will be listed. If there isn't, an error will appear.
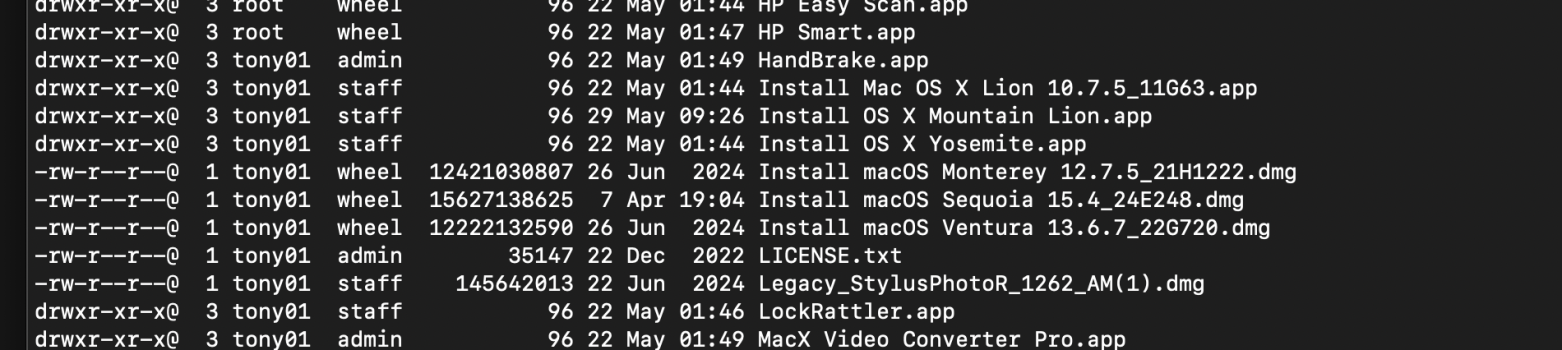
Results: ls -ld listed Applications which shows Mountain Lion.app and Applications Good
Directory listed first time then second attempt received error:
tony01@iMac-2 ~ % ls -ld /Applications
drwxrwxr-x 75 root admin 2400 6 Jun 16:23 /Applications
tony01@iMac-2 ~ %
ls -ld /Applications/mount
tony01@iMac-2 ~ % ls -ld Applications/mount
ls: Applications/mount: No such file or directory
tony01@iMac-2 ~ %
ls -ld /Applications/Install\ OS\ X\ Mountain\ Lion.app Failed
zsh: permission denied: /Applications/Install OS X Mountain Lion.app
tony01@iMac-2 ~ %
ls -ld /Applications/Install\ OS\ X\ Mountain\ Lion.app/Contents/Resources/cr Failed:
ls -ld/Applications/Install\ OS\ X\ Mountain\ Lion.app/Contents/Resources/cr
ls: invalid option -- /
usage: ls [-@ABCFGHILOPRSTUWabcdefghiklmnopqrstuvwxy1%,] [--color=when] [-D format] [file ...]
tony01@iMac-2 ~ %
Hi chown33,
Thank you for giving time to guide me through elementary steps.
My observations are:
1. Is Expression of OSX Mountain Lion correct? (macOS or OS\ X\ )?
2. Which -- / is wrong?
3. I have also accepted Joevt recommendations to match file in Applications with Terminal script but my syntax may yet be wrong. In Applications, I deleted installer OSX Mountain Lion number suffix and replaced it with.app (12F45 deleted; replaced with .app; EG Mountain Lion.app) (USB destination named MyVolume formatted Mac OS Extended (Journaled)
4. An earlier article on ‘createinstallmedia’ code showed ‘-’ instead of ‘--’ (for --volume) Different shell?
This was entered incorrectly. First, the 'mount' command is completely separate from the 'ls' command, and should have been entered on a line by itself. Second, you'd only need the 'mount' command if the 'ls' command failed, as I noted above. Third, in the command you actually entered, you neglected the leading "/", which may not seem significant but is.
This appears to have been entered incorrectly. It appears that you've typed in the expanded name of the installer app. You should have typed in the "*" character exactly as it was shown. The goal was to get the cmd-line shell to expand what it sees, and tell you that in its output.
Please type in this exact command:
Code:
ls -ld /Applications/Install*
This is simpler than the one I gave above, because I want to see anything whose name starts with "Install", not just the ones that also end with ".app".
If that command produces an error, then run this separate command, and post the output.
This was entered incorrectly. You neglected to put a space between "-ld" and "/Applications". As a result, 'ls' interpreted the entire "/Applications..." string as a series of options, and complained that "/" is an invalid option.
The main problem I see right now is that we don't know the exact name of the "Install" app. Another problem is small mistakes in what you type in, which leads to large consequences because punctuation and spacing are significant to the shell and commands.
It may help you to compose error-free command-lines by typing them into a TextEdit window, where you can more easily add missing characters or edit mistakes. It should be a Plain Text window, not a Rich Text or styled text window. When the command-line is verified, you can copy and paste it into a Terminal window. You may have to press the "Return" key, if your selected text didn't include the newline in the TextEdit window.
If you do editing in TextEdit, make sure to turn off "Smart quotes", because they're wrong for command-lines.
3. I have also accepted Joevt recommendations to match file in Applications with Terminal script but my syntax may yet be wrong. In Applications, I deleted installer OSX Mountain Lion number suffix and replaced it with.app (12F45 deleted; replaced with .app; EG Mountain Lion.app) (USB destination named MyVolume formatted Mac OS Extended (Journaled)
This output tells us there is a "/Applications" directory (folder), and it should be accessible to you.
This was entered incorrectly. First, the 'mount' command is completely separate from the 'ls' command, and should have been entered on a line by itself. Second, you'd only need the 'mount' command if the 'ls' command failed, as I noted above. Third, in the command you actually entered, you neglected the leading "/", which may not seem significant but is.
This appears to have been entered incorrectly. It appears that you've typed in the expanded name of the installer app. You should have typed in the "*" character exactly as it was shown. The goal was to get the cmd-line shell to expand what it sees, and tell you that in its output.
Please type in this exact command:
Code:
ls -ld /Applications/Install*
This is simpler than the one I gave above, because I want to see anything whose name starts with "Install", not just the ones that also end with ".app".
If that command produces an error, then run this separate command, and post the output.
Code:
ls -l /Applications
This was entered incorrectly. You neglected to put a space between "-ld" and "/Applications". As a result, 'ls' interpreted the entire "/Applications..." string as a series of options, and complained that "/" is an invalid option.
The main problem I see right now is that we don't know the exact name of the "Install" app. Another problem is small mistakes in what you type in, which leads to large consequences because punctuation and spacing are significant to the shell and commands.
It may help you to compose error-free command-lines by typing them into a TextEdit window, where you can more easily add missing characters or edit mistakes. It should be a Plain Text window, not a Rich Text or styled text window. When the command-line is verified, you can copy and paste it into a Terminal window. You may have to press the "Return" key, if your selected text didn't include the newline in the TextEdit window.
If you do editing in TextEdit, make sure to turn off "Smart quotes", because they're wrong for command-lines.
Thank you for your patience chown/joevt.
I have done better this time:
Install app as you can see is: OS X Mountain Lion.app
I have BBEdit downloaded but have only used it to do word changes to professionally supplied .xml files on website. Command line tools are loaded. However I do not know how to use them.
Clearly I can research and learn. This is more work but I am happy to engage in whatever you believe are the necessary minimal requirements to get a working command line instruction
How is a text editor used in relation to command line instructions? The text output is a file. Can that be drag and dropped into Terminal? I see no import facility in the Terminal Menu.
Thank you Joevt,
I must be more carefull. I shall do some research and try to get a grip on the relationship between Terminal and Text Editing conventions.
How is a text editor used in relation to command line instructions? The text output is a file. Can that be drag and dropped into Terminal? I see no import facility in the Terminal Menu.
You type text in a window. You edit text in a window. You don't need to save it to a file. The important thing is the plain text being edited in a window.
You can select a piece of text, then press ⌘C to copy it to the clipboard. Then go to a Terminal window and press ⌘V to paste it in. You can do this with fragments of text, or complete lines.
You can also drag-and-drop selected text from a TextEdit window onto a Terminal window, and it will behave as if you'd typed the dropped text.
You can try all this using the commands shown earlier.
That’s a great help in getting me to focus more carefully on what I am doing. Very much appreciated.
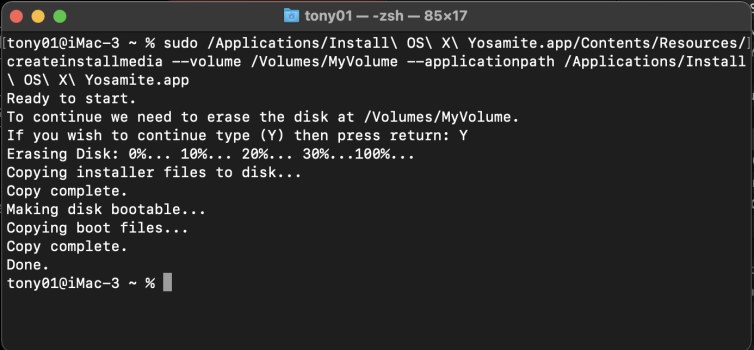
So getting back to the primary problem of ‘createinstallmedia’ script not working in Terminal, I tried again using command line on the 2019 iMac and script worked for Yosemite once I spelled it correctly, thank you joevt; but failed with Mountain Lion.
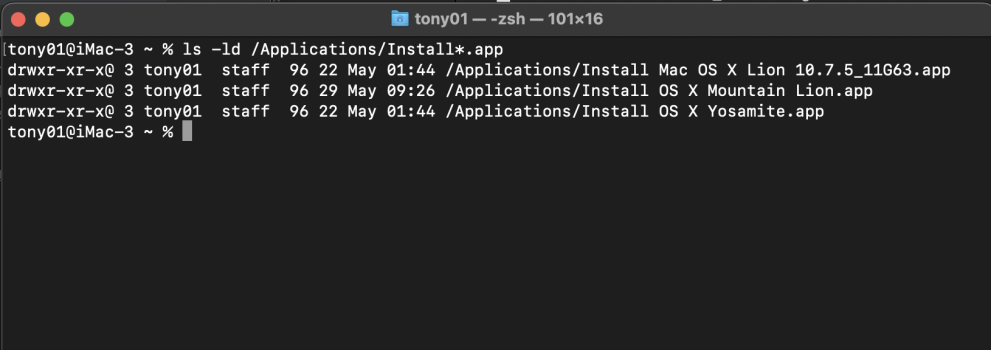
ls -ld /Applications/Install*.app results shown below:
1. Is My script expression for ‘Mountain Lion .app’ correct, is there an error, or does the script require modification as per Apple guidelines below;
2. Apple instructions, second point, say in case of ‘Command not found’-
If you get a message that the command was not found, make sure that you’re using the correct command and the installer is in your Applications folder and named Install [Version Name]. And if creating the bootable installer on a Mac that is using macOS Sierra 10.12.6 or earlier, append --applicationpath to the command, followed by the appropriate installer path, similar to what is shown at the end of the command for El Capitan.
Append --applicationpath is ambiguous;
• I believe script I used is correct as it matches Yosemite which worked; I am on Ventura, a post Sierra OSX.
• If I use the ‘createinstallmedia’ command on OSX Yosemite using the 2007 iMac; where would I insert the second --applicationpath script as referred to by Apple?
Tried:
open -W /Applications/Install\ OS\ X\ Mountain\ Lion.app/Contents/SharedSupport/InstallESD.dmg
Succeeded in creating an ESD package which ran Mountain Lion without a Certificate issue!
Installation ran smoothly. Yeah! Thank you startergo.
While not bootable USB in the APFS/OSX installer sense, I can load ESD installer onto USB drive and use it to install on macOS Extended (journaled) disks in the same way we used to install from DVD’s
A Big Thank You for to chown33, joevt and startergo for keeping me focused.