Become a MacRumors Supporter for $50/year with no ads, ability to filter front page stories, and private forums.

mollyc

macrumors G3
Original poster
Aug 18, 2016
8,063
50,660
I've seen various comments over the past few months about a before/after thread. Well here it is. ? Anyone is welcome to share their own before/afters, and try to explain what you did. It doesn't have to include every layer or LR tweak, but just a general rundown as to your thought process.

Mine is several parts, before, during, and after. I needed a spider image for my photo of the day. As some of you know, I am part of a monthly diptych loop, where we each send a photo to someone else, and the second person shoots an image to be paired, inspired by the original photo. The image sent to me was of a stack of books on a stool, very minimal, but the title that was readable on one of the book spines was "Spiders of the World." So I set out to find a spider.

I did find several in my back yard, but they were all very small. I originally had my Lensbaby Velvet 85 on my camera, and while it is a macro lens, it is only a 1:2 representation. The spider was just too small in the frame to be a meaningful subject, so I quickly switched over to my actual 105mm macro lens, as seen below.

FB_October_13_2021_001-2.jpg


At this point the spider is much better subject to background ratio, and I liked the light coming from behind it, but I felt that the web wasn't prominent enough, and that working in post the colors would go wonky if I upped contrast too much. So I went back inside and got my water bottle and then sprayed the web. Much better!

FB_October_13_2021_001-3.jpg


Then some light editing in LR. I have my own import preset where I set contrast, change the sliders in the Highlights, Shadows, Blacks, & Whites that somewhat replicates my camera back. I also tweak texture and clarity and often add a vignette with a radial filter. On this one I also added a bit of a faux sunbeam/warm glow upper left because there was a hint of it in the SOOC and I thought that a solid green background was too boring.

FB_October_13_2021_001-4.jpg


Then I take almost all my images into Photoshop and finish them off with a lightshaping overlay and also a custom curves layer for some color toning.

FB_October_13_2021_001.jpg


I would have loved if I'd thought to take the spray bottle out before spider hunting becasue I like the shape of the web in the original one but in the end I am pleased with my final result. This is where it helps to have a vision of what you want before you even set out to shoot. ?

I would love to see others of you share also!

ETA: This can also be a behind the scenes or planning the image kind of share also, not necessarily strictly post processing. ? My images are sort of a hybrid.
 
Last edited:

Steven-iphone

macrumors 68000
Apr 25, 2020
1,953
16,490
United States
Starting with a base image

In Lightroom, I like to keep it simple. With this color image The Upright Guide Tool was used to correct the geometry of the image taken.

For B/W I will test a few LR presets. In this case, The B/W Punch preset did it for me.

Adjust the White and Black points. Work the Shadows. And vary Contrast.

Simple works best.
88908db273698a39e34a8849fb2fe25d.jpg
a29ee9c2a38cea6804e1a170f64c0a1c.jpg
 

Ledgem

macrumors 68020
Jan 18, 2008
2,042
936
Hawaii, USA
I have an old example. It's one I used when trying to show people the power of shooting in RAW over JPEG.

Here's the original shot (I believe this is the JPEG processed by the camera):
P5294844.jpeg


Taken around sunset, but I think I had not adjusted the camera settings particularly well and messed up on the metering setting as well. This led to capturing some of the sunset colors sufficiently, but the foreground appeared a bit dark. Your eyes aren't drawn to the foreground immediately; it's clearly the focus because it's the only area that is sharply in focus, but you're likely starting to look at the bridge in the background first.

Here's the edit from RAW:
P5294844 (1).jpeg


Adjustments included straightening; using a polarizing brush on the sky and water to shift the hues; and I forgot which brush it was but basically brushwork on the foreground to lift the exposure and brighten it. In hindsight I should have darkened the background a small bit to make the foreground pop even more, but I comparing the two, the eye is drawn to the foreground much more easily with the edit.

Just for a bit more musing, this was done using Aperture, I believe on a non-retina screen (and viewing it on a retina screen now, I can see that the photo did begin to fall apart, and I can also see a small error here and there with the brushwork). I am generally against those sky-replacement-type edits, but what I did here isn't terribly far off (even if the data was in the original photo).

Long story short, though, if I had only shot in JPEG then my making shifts like this would have been impossible. I could have done better in taking the photo so that more drastic edits would not have been necessary, but RAW gives you that flexibility... and this was with a camera from over a decade ago, and software from the same time. Files have only become more malleable since then, and programs more advanced. But I dig back to this example because I don't really have the time or inclination to make edits like these anymore; some global edits and curve adjustments, but that's about the extent of it now.
 

Apple fanboy

macrumors Ivy Bridge
Feb 21, 2012
56,960
55,956
Behind the Lens, UK
I've seen various comments over the past few months about a before/after thread. Well here it is. ? Anyone is welcome to share their own before/afters, and try to explain what you did. It doesn't have to include every layer or LR tweak, but just a general rundown as to your thought process.

Mine is several parts, before, during, and after. I needed a spider image for my photo of the day. As some of you know, I am part of a monthly diptych loop, where we each send a photo to someone else, and the second person shoots an image to be paired, inspired by the original photo. The image sent to me was of a stack of books on a stool, very minimal, but the title that was readable on one of the book spines was "Spiders of the World." So I set out to find a spider.

I did find several in my back yard, but they were all very small. I originally had my Lensbaby Velvet 85 on my camera, and while it is a macro lens, it is only a 1:2 representation. The spider was just too small in the frame to be a meaningful subject, so I quickly switched over to my actual 105mm macro lens, as seen below.

View attachment 1864095


At this point the spider is much better subject to background ratio, and I liked the light coming from behind it, but I felt that the web wasn't prominent enough, and that working in post the colors would go wonky if I upped contrast too much. So I went back inside and got my water bottle and then sprayed the web. Much better!

View attachment 1864097

Then some light editing in LR. I have my own import preset where I set contrast, change the sliders in the Highlights, Shadows, Blacks, & Whites that somewhat replicates my camera back. I also tweak texture and clarity and often add a vignette with a radial filter. On this one I also added a bit of a faux sunbeam/warm glow upper left because there was a hint of it in the SOOC and I thought that a solid green background was too boring.

View attachment 1864098

Then I take almost all my images into Photoshop and finish them off with a lightshaping overlay and also a custom curves layer for some color toning.

View attachment 1864099

I would have loved if I'd thought to take the spray bottle out before spider hunting becasue I like the shape of the web in the original one but in the end I am pleased with my final result. This is where it helps to have a vision of what you want before you even set out to shoot. ?

I would love to see others of you share also!

ETA: This can also be a behind the scenes or planning the image kind of share also, not necessarily strictly post processing. ? My images are sort of a hybrid.
Great idea for a thread and informative post.
 

tizeye

macrumors 68040
Jul 17, 2013
3,239
35,899
Orlando, FL
Actually, there were two additional shots for the "Before" category. The one shown gives the even foreground lighting if the other two had issues. The other two were umbrella left and umbrella right with the opposite umbrella removed to give the 'clean, well lit' wall on each side and using adjustment layers painting the desired portion of the layers for a "clean" background. Only thing I had to clone out and reconstruct was my camera and tripod reflecting in the mirror, and that box under the credenza I didn't see when setting up the photo. Avoided having to clone myself out with self timer...run away!

Remember, the lighting sources and camera were against the back wall - left, right and center of that rear cabinet, not in the front as the mirror makes them appear.

I actually use the technique quite often and not necessarily in real estate. On one group shot, everyone in the photo was great except on person eyes shut with a face. Since was taken on a tripod, used a second photo and painted his head in. (If was too far off, could also have copied the head to a layer and used warp transition re-positioning.
Mirrored Wall - BEFORE - 2500px.jpg
Mirrored Wall AFTER-2500px.jpg
 
Last edited:

OldMacs4Me

macrumors 68020
May 4, 2018
2,317
29,878
Wild Rose And Wind Belt
Those of you who follow the POtD thread know I have been getting acquainted with my new Lumix ZS200 camera. Probably better cameras available for the buck but this one is pocket sized with a 15x zoom range and has the 1" sensor. A huge step up from the small sensor cameras I have been working with for the past 18 years. My better half loves the 360mm equivalent at the long end. Having a 24mm wide angle is icing on the cake for me. Perspective control is of course always a fun side show when shooting wide angle. This camera has a nice level feature, but it is not always possible to completely remove tilt in camera.
This was my starting point:
21P_070_Original.jpg


Pulled the top corners out here:
21P_070_Skewed.jpg


After cropping, levels, bumping the saturation a bit and then just a touch of sharpening.
21P_070A.jpg


And just for fun a slightly stretched version.
21P_070_Final.jpg
 
Last edited:

Steven-iphone

macrumors 68000
Apr 25, 2020
1,953
16,490
United States
Those of you who follow the POtD thread know I have been getting acquainted with my new Lumix ZS200 camera. Probably better cameras available for the buck but this one is pocket sized with a 15x zoom range and has the 1" sensor. A huge step up from the small sensor cameras I have been working with for the past 18 years. My better half loves the 360mm equivalent at the long end. Having a 24mm wide angle is icing on the cake for me. Perspective control is of course always a fun side show when shooting wide angle. This camera has a nice level feature, but it is not always possible to completely remove tilt.
This was my starting point:
View attachment 1881959

Pulled the top corners out here: View attachment 1881962
After cropping, levels, bumping the saturation a bit and then just a touch of sharpening.
View attachment 1881966
And just for fun a slightly stretched version.
View attachment 1881980
Nice work
 
  • Like
Reactions: OldMacs4Me

Mark0

macrumors 6502a
Sep 11, 2014
516
3,399
SW Scotland
Here's a recent effort of mine. In this order:

Camera JPG output (X-T3 saves these along with the RAW, but applies some presets for a look I quite like)
RAW file (0 editing)
Finished, edited file after some LR and PS.

You will note the camera JPG is in a different aspect ratio, I forgot to set it back at the time and it got baked into the JPG as I was too busy concentrating on the light!

Camera JPG output
Camera JPG Output.JPG


RAW (as is with no edits)
RAW.jpg


Finished Photo, edited from the RAW in LR & PS
Glentrool Pine Forest small copy.jpg
 

mackmgg

macrumors 68000
Nov 2, 2007
1,670
582
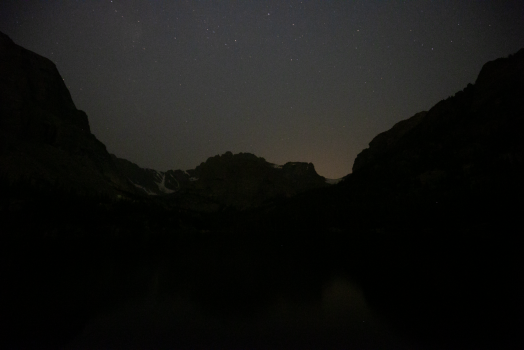
Going back and redoing some processing intensive edits to try out the new laptop. Still have not been able to get the fans to be audible, and barely even got the computer warm to the touch briefly. Even that took auto aligning a stack of 37 compressed TIF files! Here's the before/after of that one.

Before:
Screen Shot 2021-11-05 at 10.53.05 PM.png

This is a single exposure un-edited. 20" at f/4 ISO 25,600.

After:
Screen Shot 2021-11-05 at 10.54.53 PM.png

This is a stack of 37 photos, still f/4 ISO 25,600 but now equal to a 740" (~12.5 min) exposure! Unfortunately this was from the summer and the smoke had rolled in. The Milky Way was way brighter when I was at the trailhead but by the time I had hiked in a few miles it was too smoky to get the shot I wanted. Oh well, I'll have to try again!
 

Attachments

  • Screen Shot 2021-11-05 at 10.52.29 PM.png
    Screen Shot 2021-11-05 at 10.52.29 PM.png
    3.1 MB · Views: 84

Darmok N Jalad

macrumors 603
Sep 26, 2017
5,422
48,258
Tanagra (not really)
Here's one that hopefully showcases how spoiled we really are when it comes to IBIS and dynamic range, even on what is considered a relatively old sensor by today's standards. The sun was low, leaving the near bank and stream mostly in the shadows, while the far bank was in direct sunlight. Stopped down to F10, 1/5s, handheld, base ISO 200. I had doubled up on ND filters, which can be slightly visible at the corners. 8mm (16mm FF EQ) is really wide for double filters, so at least it didn't show too badly. After an initial DxO PureRAW pass and a slight cropping to cut the filter corners, then comes the push for DR, just using photos. In post, brilliance +0.26, highlights -.53, shadows +1.00, brightness -0.10, contrast +0.14. Very minor vignette, a bit of definition, and there it is. I do very little landscape work, but I was pleased with the results on a tough setup.
Before:
P1002585.jpg

After:
P1002585.jpeg
 

Darmok N Jalad

macrumors 603
Sep 26, 2017
5,422
48,258
Tanagra (not really)
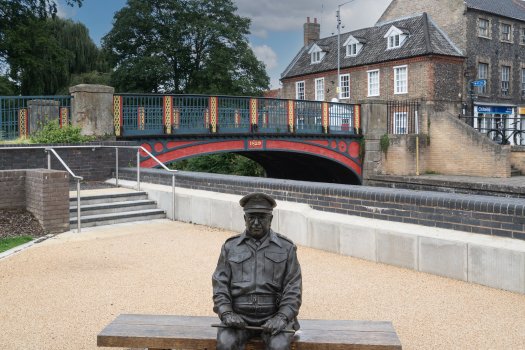
The lady on the bridge NEVER would move. The focus subject is the "Dad's Army" statue with the town where many scenes were filmed in the background...not her! Fixed the sky while at it as I removed her.

View attachment 1923890

View attachment 1923893
Next time, walk behind that stubborn onlooker and start swatting imaginary bees. Nothing gets people moving faster than stinging bugs. ;)
 
  • Like
Reactions: mollyc

Apple fanboy

macrumors Ivy Bridge
Feb 21, 2012
56,960
55,956
Behind the Lens, UK
Next time, walk behind that stubborn onlooker and start swatting imaginary bees. Nothing gets people moving faster than stinging bugs. ;)
Nah. Just go up to them and ask if you can take their picture.
If they say no, they’ll leave when you point the camera in their direction.
If they say yea say great as your are doing a series on ugly people and your the perfect subject!
Either way they will leave ?
 
  • Like
Reactions: Grey Beard

erayser

macrumors 65816
Apr 9, 2011
1,267
1,230
San Diego
I love this idea... creative mind, creative thread. Thanks for making this.

Some of you seen this before... I mainly work in photoshop. What some do in Lightroom, I'll do it in photoshop with the Camera Raw Filter. After finish the initial edit in Camera Raw Filter, if I want to adjust sections of the pic, I'll use curves, color adjustments, liquify (don't ask.. LOL), and masking layers. Last I'll do clean up and take out unwanted objects, stains, etc... This pic was taken right after the stay at home orders were lifted... so they had temporary barriers around the ship at the time. Told my client that I could take out for her... at a discounted editing cost. Not her fault there was a barrier around the backdrop she wanted for her outfit.

starbefore.jpg

starafter.jpg


I'll have to look through my old work on more before and afters... hahaha... Can't wait to enjoy and learn from others in this thread.
 

OldMacs4Me

macrumors 68020
May 4, 2018
2,317
29,878
Wild Rose And Wind Belt
Last Tuesday I posted a shot of my dad's Brunton Pocket Transit in the POTD thread. I really liked the late afternoon heavy overcast lighting but that can sure throw off the white balance and saturation.
Here's the original JPEG shot resized down from 18MP.
21P_142BruntonO.jpg


Just using Preview I made the adjustments as shown plus just a smidge on the Sepia slider. Then cropped and resized at which point I applied the sharpening slider as shown at the bottom of he panel.
Screen Shot 2021-12-08 at 11.02.26 AM.png


That got me to here.
21P_142BruntonM.jpg


At that point I found a couple of flaws in the decking rather distracting and switched over to Graphic Converter to clone them out. I also wanted to darken the face area so while in GC, I used the circular selection tool. Super easy to get it to exactly select the face. I then applied further levels correction to just the selected area. This is the final shot.
21P_142BruntonM1.jpg
 
Last edited:
Register on MacRumors! This sidebar will go away, and you'll see fewer ads.