startergo
macrumors 603
Windows keys on a Mac keyboard
A Mac keyboard has many keys that function the same as keys on a Windows keyboard but have different names.
Thank you - I did exactly what @Fishrrman suggested above. Pressed the equiv keys for Mac windows + alt + R and boot into the exact same recovery mode screen as in the photo above.Windows keys on a Mac keyboard
A Mac keyboard has many keys that function the same as keys on a Windows keyboard but have different names.support.apple.com
I doubt your machine has an internet recovery as I know for sure that cMP5,1, which is a 2010 machine does not have it.I boot into the exact same screen in the previously attached photo
 github.com
Thanks. Is it possible to use Mist on a Silicon M1 to create a Mavericks boot disk for the iMac 20" / A1224?I doubt your machine has an internet recovery as I know for sure that cMP5,1, which is a 2010 machine does not have it.
To force internet recovery use ⌘ ⌥ R (check the corresponding PC keyboard keys). And if you did not download in the past Mavericks from the App Store you won't be able to reinstall Mavericks there. You can install later macOS by creating a bootable USB and if you specifically need Mavericks there like I said before, partition that drive for Mavericks restore.
This application can download all macOS's in the past (except Mavericks) and create a USB installer. Only Mavericks will ask you to login.

GitHub - ninxsoft/Mist: A Mac utility that automatically downloads macOS Firmwares / Installers.
A Mac utility that automatically downloads macOS Firmwares / Installers. - ninxsoft/Mist

Just downloaded Mist. I don't see Mavericks on the list to download on the Installers tab. I will try downloading El Capitain as this iMac is compatible with this version and make a boot disc...this is the step I've been stuck with in the past
This application can download all macOS's in the past (except Mavericks)
You can use Mist to download an El Capitan installation app, but Mist can't create USB installers or ISOs for anything older than Big Sur when run on Apple Silicon hardware. To create a bootable installer you would run the createinstallmedia program included in the El Capitan installation app. createinstallmedia almost certainly has an invalid signature (expired) so you may need to remove the signature with codesign. I had to do this on Sonoma in order to create a Mojave install USB.Just downloaded Mist. I don't see Mavericks on the list to download on the Installers tab. I will try downloading El Capitain as this iMac is compatible with this version and make a boot disc...this is the step I've been stuck with in the past
Thank you - i thought I cannot run createinstallmedia on an M1 - ? I do not have an old mac that I could useYou can use Mist to download an El Capitan installation app, but Mist can't create USB installers or ISOs for anything older than Big Sur when run on Apple Silicon hardware. To create a bootable installer you would run the createinstallmedia program included in the El Capitan installation app. createinstallmedia almost certainly has an invalid signature (expired) so you may need to remove the signature with codesign. I had to do this on Sonoma in order to create a Mojave install USB.
createinstallmedia is an Intel executable and those can be run on M1 systems after Rosetta has been installed. The OS should offer to install Rosetta the first time you try to run an Intel executable. As I mentioned before, Mojave's version of createinstallmedia refused to run on Sonoma until I stripped the signature.Thank you - i thought I cannot run createinstallmedia on an M1 - ? I do not have an old mac that I could use
date 100821002014 which will change the date to October 8, 2014. After changing the date, you can exit the terminal, use disk utility to erase the target disk, then install the OS.Thank you for this - I am downloading the Mavericks ISO right now and will install Etcher to create the bootable stick - will report backcreateinstallmedia is an Intel executable and those can be run on M1 systems after Rosetta has been installed. The OS should offer to install Rosetta the first time you try to run an Intel executable. As I mentioned before, Mojave's version of createinstallmedia refused to run on Sonoma until I stripped the signature.
The previous post by @gilby101 jogged my memory to suggest an easier way to get you on Mavericks if that's what you want. Download the Mavericks ISO from archive.org (be patient, it could take a while). Then download Etcher and install it on your M1. Use Etcher to write the ISO contents to a USB stick. You may need to give Etcher full disk access privileges before it can write to the USB stick. Now boot from the USB stick on your old iMac to install Mavericks.
Thanks - I do not need any data on the iMac, just want to start fresh. I have already deleted the partition via disk utilOP wrote:
"I did exactly what @Fishrrman suggested above. Pressed the equiv keys for Mac windows + alt + R and boot into the exact same recovery mode screen as in the photo above.
What options do I have?"
Hmmm... that screen is what you're SUPPOSED TO SEE when you boot to internet recovery.
In your original post, you said you wanted to do "a fresh install", right?
We need to clarify that:
Do you want a "completely fresh" start (this means "erase everything and start over", restoring from a backup if you have one) ??
Or does it mean you want only a fresh OS installed (leaving the rest of the data intact) ??
What I would suggest is an erase and install.
Here's how to do it:
1. Boot to internet recovery, as you did before.
2. From the utilities screen, open disk utility.
3. VERY IMPORTANT -- you must check to see if there's a "view" menu in disk utility (older versions don't have it). If there IS a view menu, go to it and choose "show all devices". If there isn't a view menu, don't worry about it and go to next step.
4. Next, look at "the list on the left". The TOPMOST item in the list should represent the physical drive inside the iMac.
5. Click on the line for the drive, and click erase.
6. Although I don't recall seeing what YEAR your Mac was made, I'm guessing it's an older one, so erase the drive to "Mac OS extended, journaling enabled, GUID partition format".
7. When the erase is done, quit disk utility and open the OS installer.
8. Again, without knowing exactly WHICH iMac you have, can only guess at which OS the installer will offer. My advice is to accept whatever version of the OS you are offered. Remember the old saying, "any port in a storm".
9. Begin "clicking through" the install. The Mac will restart several times, and the screen may go dark for a minute or more with no other indication of activity. Just be patient.
10. When done, you should see the initial setup screen (choose your language). IF YOU HAVE A BACKUP, connect it now. Then "click through".
11. Again, if you connected a backup, setup assistant will ask if you wish to migrate from another drive. So "point the way" to the backup and give SA time to digest things. I suggest you just "migrate it all" and let SA do its job.
12. If you DON'T have a backup, then it's time to create a new account, etc.
Good luck.
To install Mavericks as suggested in my previous post, you'll need to change the date before the install will complete. This is because the installer's certificate has long ago expired. To change the date, use the Utilities menu in the top bar to open a terminal. In the terminal, typedate 100821002014which will change the date to October 8, 2014. After changing the date, you can exit the terminal, use disk utility to erase the target disk, then install the OS.
That machine has no internet recovery. This screen comes later when you select reinstall operating system. The login prompt to your iCloud account is only required for Mavericks if not using the full installer, just because it is not freely available, but you must have downloaded it from the Apple Store in the past.Hmmm... that screen is what you're SUPPOSED TO SEE when you boot to internet recovery.
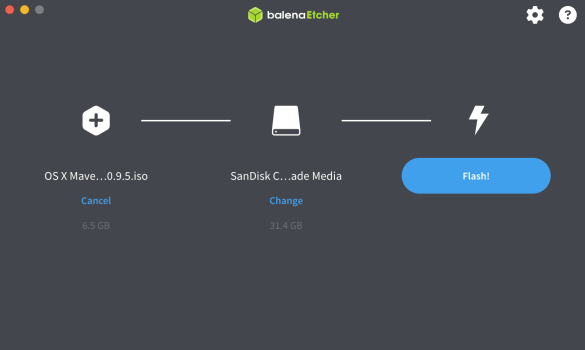
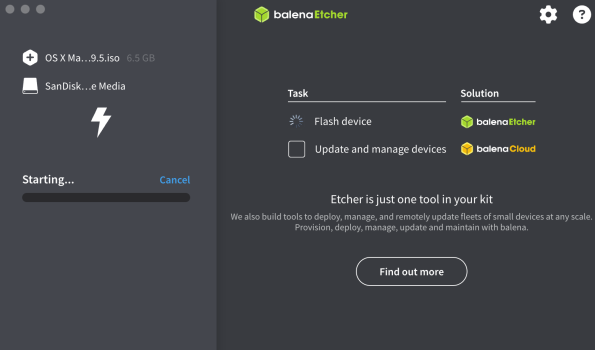
You can use this Mavericks.appEtcher tries to flash the drive but just says "starting...."
 gist.github.com
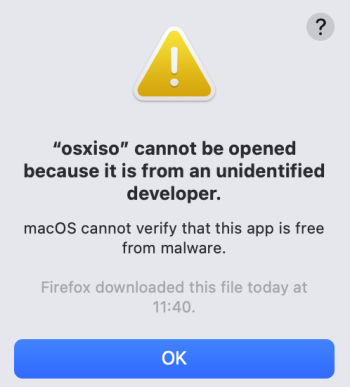
date -u 0101010116Thank you for the links - How do I run this script for Install_USB_Maker.sh? I double click on Install_USB_Maker.sh and it just opens in TextEdit? I tried to open osx-iso and I get the error in the attachedThat machine has no internet recovery. This screen comes later when you select reinstall operating system. The login prompt to your iCloud account is only required for Mavericks if not using the full installer, just because it is not freely available, but you must have downloaded it from the Apple Store in the past.
You can use this Mavericks.app
and create a bootable USB using this:
OS X Mavericks 10.9.5 : Apple : Free Download, Borrow, and Streaming : Internet Archive
OS X Mavericks downloaded from Apple on June 3, 2015.archive.org
If you need to change the date from terminal in recovery use this. (You might not need it as the USB installer bypasses this if I remember correctly):Creates Bootable USB for Mac OS Lion to Monterey
Creates Bootable USB for Mac OS Lion to Monterey. GitHub Gist: instantly share code, notes, and snippets.
Edit: That script will not create directly USB for Mavericks as it does not come as a DMG instead of .app (like the rest of the legacy installers), but ISO which you can burn with Etcher.Code:date -u 0101010116
This script can also create an ISO burnable by etcher without needing to worry about certificates:

GitHub - startergo/osx-iso: Create a bootable ISO of OS X / macOS, from the installation app file
Create a bootable ISO of OS X / macOS, from the installation app file - startergo/osx-iso
How do I run this script for Install_USB_Maker.sh
chmod +x /Users/mbp151/Downloads/6dd3893c805c4aeed7eae0a226055b3f-2e0b090a82057f7f450ed55e55623b08cfd0b8e5/Install_USB_Maker.sh
mbp151@MBP151s-MacBook-Pro ~ % cd /Users/mbp151/Downloads/6dd3893c805c4aeed7eae0a226055b3f-2e0b090a82057f7f450ed55e55623b08cfd0b8e5
mbp151@MBP151s-MacBook-Pro 6dd3893c805c4aeed7eae0a226055b3f-2e0b090a82057f7f450ed55e55623b08cfd0b8e5 % ./Install_USB_Maker.sh


ERROR!!
Connect a correctly sized USB stick labelled as 'Install_USB_Maker' and rerun this script.Same procedure for theI tried to open osx-iso and I get the error in the attached
OSXISO or use:brew tap startergo/tap
brew install osx-isoUpdate the USB creator. I have just fixed a typo:OK i will try later this evening...this is outside my tech knowledge - not even sure what homebrew is but will search and install it.
  ################################
 ##  Create Mac OS Install USB ##
################################


## STAGE 1 of 4: Confirm Install Target ##
------------------------------------------
STEP 01 of 02: Get Mac OS Target
1) Monterey        4) Mojave           7) El Capitan     10) Mountain Lion
2) Big Sur        5) High Sierra     8) Yosemite     11) Lion
3) Catalina        6) Sierra           9) Mavericks     12) Exit
Enter Corresponding Number for Mac OS Version or Exit: 9

STEP 02 of 02: Returned 'Mavericks'

Completed Stage 1


## STAGE 2 of 4: Confirm Prerequisites ##
-----------------------------------------
STEP 01 of 01: Validate Misc ...
"disk2" ejected.
"disk4" ejected.
"disk6" ejected.
"disk8" ejected.
"disk10" ejected.
"disk13" ejected.

Completed Stage 2


## STAGE 3 of 4: Find Installer ##
----------------------------------
STEP 01 of 01: Checking for Installer App ...
Found Installer App for Mavericks

Completed Stage 3


## STAGE 4 of 4: Create ISO Image ##
------------------------------------
Using Installer App:- '/Applications/Install OS X Mavericks.app'
STEP 01 of 13: Create a Blank 16GB Single Partition Apple Partition Map ISO Image
created: /tmp/VersionOSX/Mavericks.sparseimage

STEP 02 of 13: Mount Installer Image
/dev/disk2              Apple_partition_scheme
/dev/disk2s1            Apple_partition_map
/dev/disk2s2            Apple_HFS                          /Volumes/install_app

STEP 03 of 13: Mount Sparse Bundle for Package Addition
/dev/disk3              Apple_partition_scheme
/dev/disk3s1            Apple_partition_map
/dev/disk3s2            Apple_HFS                          /Volumes/install_build

STEP 04 of 13: Restore Base System into 'Mavericks' ISO Image
    Validating target...done
    Validating source...done
    Retrieving scan information...done
    Validating sizes...done
    Restoring  ....10....20....30....40....50....60....70....80....90....100
    Restored target device is /dev/disk3s2.
    Remounting target volume...done
Restore completed successfully.

STEP 05 of 13: Remove Package Link and Replace with Actual Files
NB: This can take a while to complete
/Volumes/OS X Base System/System/Installation/Packages
/Volumes/install_app/Packages -> /Volumes/OS X Base System/System/Installation/Packages
/Volumes/install_app/Packages/AdditionalEssentials.pkg -> /Volumes/OS X Base System/System/Installation/Packages/AdditionalEssentials.pkg
/Volumes/install_app/Packages/AdditionalSpeechVoices.pkg -> /Volumes/OS X Base System/System/Installation/Packages/AdditionalSpeechVoices.pkg
/Volumes/install_app/Packages/AsianLanguagesSupport.pkg -> /Volumes/OS X Base System/System/Installation/Packages/AsianLanguagesSupport.pkg
/Volumes/install_app/Packages/BaseSystemBinaries.pkg -> /Volumes/OS X Base System/System/Installation/Packages/BaseSystemBinaries.pkg
/Volumes/install_app/Packages/BaseSystemResources.pkg -> /Volumes/OS X Base System/System/Installation/Packages/BaseSystemResources.pkg
/Volumes/install_app/Packages/BSD.pkg -> /Volumes/OS X Base System/System/Installation/Packages/BSD.pkg
/Volumes/install_app/Packages/Essentials.pkg -> /Volumes/OS X Base System/System/Installation/Packages/Essentials.pkg
/Volumes/install_app/Packages/InstallableMachines.plist -> /Volumes/OS X Base System/System/Installation/Packages/InstallableMachines.plist
/Volumes/install_app/Packages/JavaEssentials.pkg -> /Volumes/OS X Base System/System/Installation/Packages/JavaEssentials.pkg
/Volumes/install_app/Packages/JavaTools.pkg -> /Volumes/OS X Base System/System/Installation/Packages/JavaTools.pkg
/Volumes/install_app/Packages/MediaFiles.pkg -> /Volumes/OS X Base System/System/Installation/Packages/MediaFiles.pkg
/Volumes/install_app/Packages/OSInstall.mpkg -> /Volumes/OS X Base System/System/Installation/Packages/OSInstall.mpkg
/Volumes/install_app/Packages/OSInstall.pkg -> /Volumes/OS X Base System/System/Installation/Packages/OSInstall.pkg
/Volumes/install_app/Packages/OSUpgrade.pkg -> /Volumes/OS X Base System/System/Installation/Packages/OSUpgrade.pkg
/Volumes/install_app/Packages/OxfordDictionaries.pkg -> /Volumes/OS X Base System/System/Installation/Packages/OxfordDictionaries.pkg
/Volumes/install_app/Packages/X11redirect.pkg -> /Volumes/OS X Base System/System/Installation/Packages/X11redirect.pkg

STEP 06 of 13: Copy 'Mavericks Installer' Dependencies
NB: Type password and press "Enter" if prompted
    Nothing will display when typing password
/Volumes/install_app/BaseSystem.chunklist -> /Volumes/OS X Base System/BaseSystem.chunklist
/Volumes/install_app/BaseSystem.dmg -> /Volumes/OS X Base System/BaseSystem.dmg

STEP 07 of 13: Unmount Installer Image
"disk2" ejected.

STEP 08 of 13: Unmount Sparse Bundle
"disk3" ejected.

STEP 09 of 13: Resize 'Mavericks' Sparse Bundle to Remove Free Space
Resized 'Mavericks' Sparse Bundle

STEP 10 of 13: Convert 'Mavericks' Sparse Bundle to ISO/CD Master
NB: This can take a while to complete
Reading Driver Descriptor Map (DDM : 0)…
Reading Apple (Apple_partition_map : 1)…
Reading disk image (Apple_HFS : 2)…
...............................................................................
Elapsed Time: 14.045s
Speed: 447.6MB/s
Savings: 0.0%
created: /tmp/VersionOSX/Mavericks.cdr
/tmp/VersionOSX/Mavericks.sparseimage

STEP 11 of 13: Convert ISO/CD Master to Regular Image
/tmp/VersionOSX/Mavericks.cdr -> /tmp/VersionOSX/Install_Mavericks.iso

STEP 12 of 13: Rename 'Install_USB_Maker' ...
Volume on disk12s2 renamed to Mavericks Installer

STEP 13 of 13: Finishing
/tmp/VersionOSX/Install_Mavericks.iso -> /Users/mbp151/Desktop/Install_Mavericks.iso


Complete


NB: Use a tool such as BalenaEtcher to create bootable USB
    From: '/Users/mbp151/Desktop/Install_Mavericks.iso'


All Done!


################################
 ##  Create Mac OS Install USB ##
################################/Applications folder.Make sure that your USB drive is erased to Mac OS Extended (Journaled) with a GUID Partition Map. If the drive is formatted as APFS Etcher will hang (this is undoubtedly an Etcher bug).@Grumpus I downloaded the Mavericks ISO and used Etcher to flash. I selected the source "OS X Mavericks 10.9.5.iso" and then selected my usb drive as the target. Etcher tries to flash the drive but just says "starting...." the OS X Mavericks 10.9.5.iso file is the only file highlighted to select
Homebrew is a package manager. You can install the package from here:not even sure what homebrew is
github.com