
One of the major new software-based camera features in the iPhone 16 models is support for a wider range of Photographic Styles, complete with more granular controls to make for a setup where you can create a customized look for all of your images.
Photographic Styles isn't a feature that's quite as easy to use as something as simple as a filter, so we thought we'd delve into how it works and how to get the most from it.
Available Photographic Styles
Photographic Styles aren't new, but with prior iPhone models, there were only four options: Rich Contrast, Vibrant, Warm, and Cool. On the iPhone 16, there are several more pre-set styles to choose from.
- Cool Rose
- Neutral
- Rose Gold
- Gold
- Amber
- Standard (No edits)
- Vibrant
- Natural
- Luminous
- Dramatic
- Quiet
- Cozy
- Ethereal
- Muted Black and White
- Stark Black and White
How Photographic Styles Work
According to Apple, on the iPhone 16 models, Photographic Styles adjust specific colors in select parts of your photos to adjust the overall look.
The first five Photographic Styles are tuned for skin undertones, including Cool Rose, Neutral, Amber, Rose Gold, and Gold. Cool Rose accentuates cool pinkish undertones, while neutral neutralizes warm undertones. Amber, Rose Gold, and Gold accentuate those specific tones. These can be fairly subtle, depending on the settings you choose.
Other Styles are closer to what you get with a filter, adding more dramatic effects that impact the mood of the image.
Setting Up and Customizing Your Style
When you've taken at least four photos with the iPhone 16 camera, you can go to Settings > Camera > Photographic Styles to set the base tone that you want to use for all of your images.
You can pick from the skin tone-focused options, which include Cool Rose, Neutral, Amber, Rose Gold, and Gold. You'll see the different effects across four images, and you can adjust the intensity to begin with.
After you've selected a favorite undertone, you can further refine the look by dragging a finger over the touchpad, which changes the brightness and saturation. The slider changes the overall intensity.
Once you've set your Photographic Style, it's automatically applied to all of your images and it is the default value for your photos.
If you want to turn it off, you can go to Settings > Camera > Photographic Styles > Reset to Standard.
Real-Time Previews
In the Camera app when you go take a photo, if you tap on the touchpad icon, you can select a different undertone or mood style. Swiping changes the Photographic Style, and the controls below can be used to customize the look.
The option to use customized Photographic Styles in real-time lets you preview what an image will look like with different effects before you even take it.
You can access Photographic Styles from the Camera Control button too. Press Camera Control once to open the Camera app, then light press to bring up the Camera Control menu. Swipe until you get to Styles or Tone, then light press again to select it. From there, you can make adjustments by swiping. To get back to the menu to select another option, use a light double press.
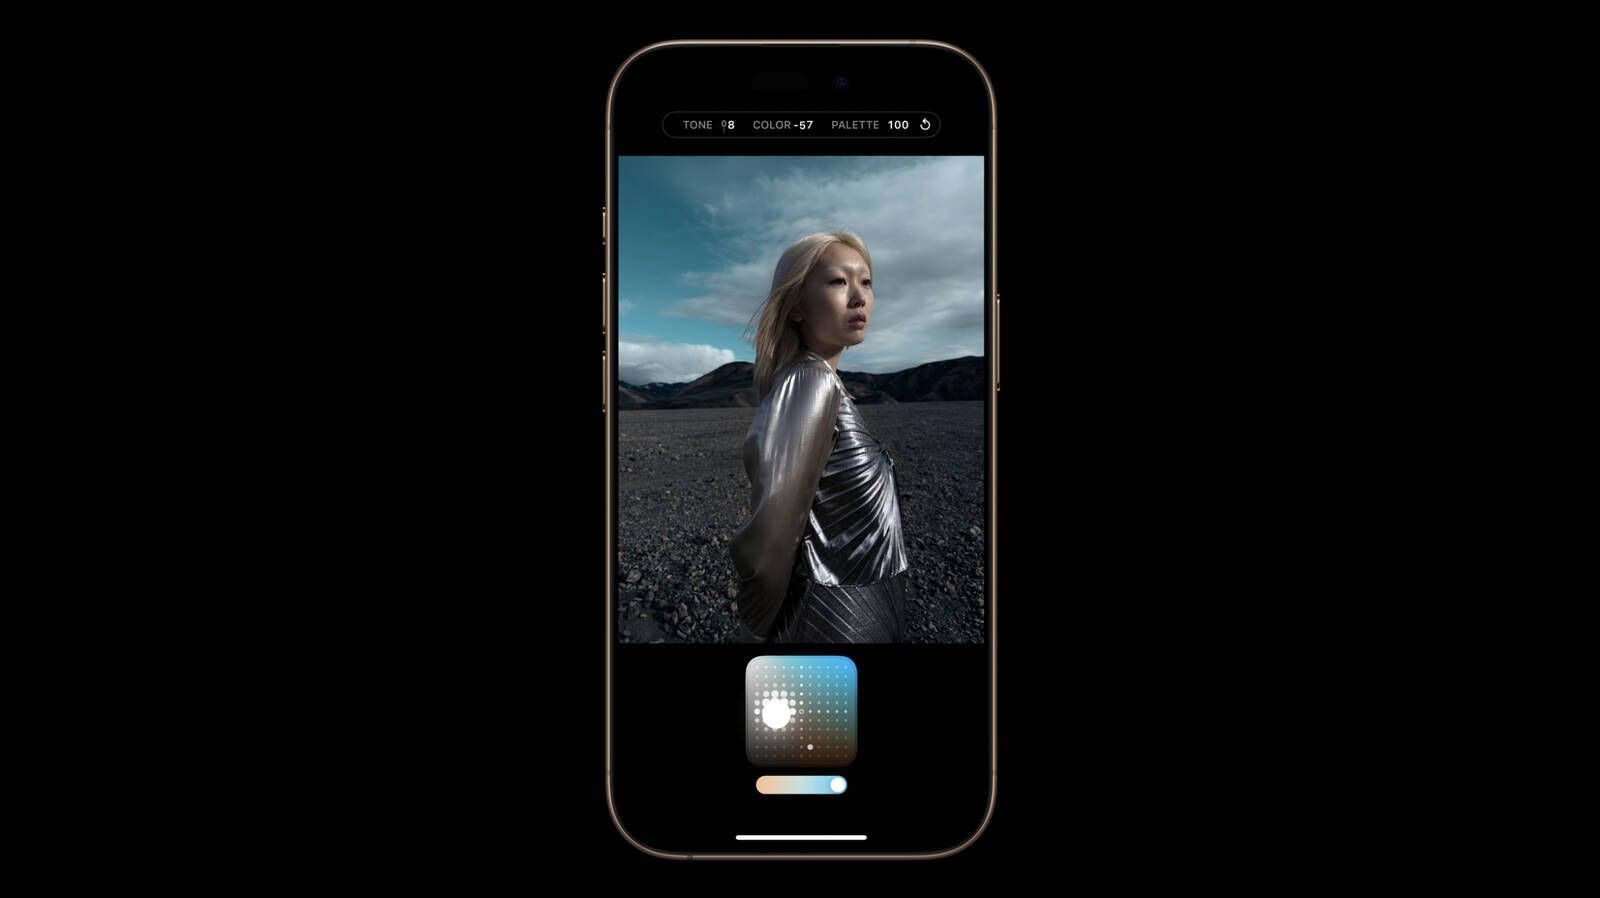
Editing After a Shot
You can add or adjust a Photographic Style after an image has been captured, so it's not something that you need to do in the moment. This is the first time that Apple has allowed Photographic Styles to be edited after the fact - earlier versions of this feature only allowed the Style to be applied when taking an image.
To edit a Photographic Style, go to the Photos app, tap on the three bars to enter the editing interface, and then tap on Styles. You can select any of the styles and then adjust it using the touchpad.
The touchpad's X axis adjusts color, while the Y axis adjusts tone. The slider adjusts overall intensity or Palette. A Tone setting of 0, a Color setting of 0, and a Palette setting of 0 result in a "Standard" photo that has no Photographic Style applied, so that's a good starting point to better understand exactly what each style is changing.
Adjusting the Color to the left desaturates, while dragging it to the right deepens color. Dragging Tone up makes the image brighter, while dragging it down makes it darker.
You can change the Photographic Style setting at any point, and it is a non-destructive edit so it's not permanent. If you want to get back to a normal, unedited photo, choose the Standard setting.
Photographic Styles are entirely distinct from the Photos app Adjust section where you can tweak exposure, brilliance, highlights and shadows, contrast, brightness, saturation, vibrance, warmth, tint, and more.
HEIF Only
If you have your iPhone set to take JPG images instead of HEIF, you won't be able to use Photographic Styles. You need to have HEIF turned on. In the Camera section of the Settings app, HEIF can be enabled by going to Formats and choosing "High Efficiency" instead of "Most Compatible."
Preserve Settings
By default, the Photographic Style that you set up using the Settings app will be used automatically. If you select a different Photographic Style when you're taking a photo, it will use that only until you close the Camera app.
If you want the Photographic Style you selected in the Camera app to be the new default, you need to go to Settings > Camera > Preserve Settings and toggle on Photographic Style. With this turned on, your iPhone will preserve your last used Photographic Style rather than reset to your default.
Photographic Styles and Older iPhones
Older iPhones do not support the new touchpad and adjustment settings for Photographic Styles, but if you take an image on an iPhone 16 and then edit it on an older phone, you can see the touchpad to make further adjustments.
Article Link: Customizing Your iPhone 16 Images With Photographic Styles


