A1297 key caps
I wanted to replace a few worn out keycaps on MPB 17" unibody (A1297). Keyboard works fine.
Options for parts to replace:
a. top case with keyboard for $200-300
b. keyboard + backlight - requires major disassembly and the 50 odd tiny screws
c. keyboard without backlight - as (b) but requires removal of backlight mechanism glued to keyboard
d. key caps @5 each
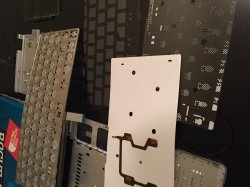
So I elected to get (c) as a source of a full set of key tops. Only will work if the mechanism is identical.
Following the suggestions in this thread, got started removing key tops and have adjusted the method. Look closely under the left corner of the key cap to check it is the same as the pics earlier. One key top supplier suggests there are two different key designs for A1297.
![]()
![]()
Removal of square keys:
Insert a flat pry tool at about 45deg from vertical from the left side under the centre left of the key, under the bar connecting the hinge pins, twist and key will pop off one side because bending the bar shortens the distance between the pins. A small screwdriver will work but I use a sharpened bamboo skewer as non-scratchy. The right side of the scissor hinge needs to be gently unhooked - wide hook holding the hinge bar. Push the key flat, push an unhooked hinge pin to lift the scissor, a slight twist and it should unhook.
Reassembly of square keys is sort of reverse of above:
(Might be easier with sliding scissor hinge pins unclipped from the key top which was necessary to do the long keys.)
Lift scissor holding down top hinge pin (furthest away from you). Push key into place flat and twist to hook on the hinge bar and then the top hinge pin. Push the bottom hinge pin towards the other gently to locate it under the metal loop.
It is a lot easier to do all this on the uninstalled spare part donor keyboard - where you can see what is happening. It's all tighter with the keyboard in situ in the top case.
A lot of fiddling around and have managed to successfully transplant a full set of key caps (removed and refit 2 sets having reassembled the new keyboard.
Square alphanum keys are all the same.
Half size keys are same hinge arrangement, except half width. Up arrow is rotated 180 deg and is *not* the same as down arrow.
The modifier keys and long keys have the scissor mechanism rotated 90deg from the rest. The non-square keys are much trickier. Only damage I managed was a chunk off the old option key skirt trying to use the bamboo skewer spudger. Would not have managed to finish without my Menda probe to unhook the hinge pins. (Menda probes and spudgers are great and not expensive.)
http://mendatools.descoindustries.com/MendaToolsCatalog/ProbesandSpudgers/35123/#.VLeM_CjMp30
The wires under the long keys will slide out of their captive loops when the keys are unhinged.
Main trick for reassembly (at least for the non-square keys, since I managed to do the square ones and half sized before figuring this trick as a matter of need) - the sliding end of the scissor mechanism can be easily unclipped from the key top is the scissor if flat. Hinge pins can be put in place with the key top flipped up for visibility. Wires hinged from the key top must be sited before hooking up the hinge pins. Wires hinged from the key bottom will slip in to their holes when lined up as the keys are pushed towards flat. When the keys are flat, they can be clicked in to the sliding scissor end.
![]()
![]()
![]()
![]()
![]()
I wanted to replace a few worn out keycaps on MPB 17" unibody (A1297). Keyboard works fine.
Options for parts to replace:
a. top case with keyboard for $200-300
b. keyboard + backlight - requires major disassembly and the 50 odd tiny screws
c. keyboard without backlight - as (b) but requires removal of backlight mechanism glued to keyboard
d. key caps @5 each
So I elected to get (c) as a source of a full set of key tops. Only will work if the mechanism is identical.
Following the suggestions in this thread, got started removing key tops and have adjusted the method. Look closely under the left corner of the key cap to check it is the same as the pics earlier. One key top supplier suggests there are two different key designs for A1297.


Removal of square keys:
Insert a flat pry tool at about 45deg from vertical from the left side under the centre left of the key, under the bar connecting the hinge pins, twist and key will pop off one side because bending the bar shortens the distance between the pins. A small screwdriver will work but I use a sharpened bamboo skewer as non-scratchy. The right side of the scissor hinge needs to be gently unhooked - wide hook holding the hinge bar. Push the key flat, push an unhooked hinge pin to lift the scissor, a slight twist and it should unhook.
Reassembly of square keys is sort of reverse of above:
(Might be easier with sliding scissor hinge pins unclipped from the key top which was necessary to do the long keys.)
Lift scissor holding down top hinge pin (furthest away from you). Push key into place flat and twist to hook on the hinge bar and then the top hinge pin. Push the bottom hinge pin towards the other gently to locate it under the metal loop.
It is a lot easier to do all this on the uninstalled spare part donor keyboard - where you can see what is happening. It's all tighter with the keyboard in situ in the top case.
A lot of fiddling around and have managed to successfully transplant a full set of key caps (removed and refit 2 sets having reassembled the new keyboard.
Square alphanum keys are all the same.
Half size keys are same hinge arrangement, except half width. Up arrow is rotated 180 deg and is *not* the same as down arrow.
The modifier keys and long keys have the scissor mechanism rotated 90deg from the rest. The non-square keys are much trickier. Only damage I managed was a chunk off the old option key skirt trying to use the bamboo skewer spudger. Would not have managed to finish without my Menda probe to unhook the hinge pins. (Menda probes and spudgers are great and not expensive.)
http://mendatools.descoindustries.com/MendaToolsCatalog/ProbesandSpudgers/35123/#.VLeM_CjMp30
The wires under the long keys will slide out of their captive loops when the keys are unhinged.
Main trick for reassembly (at least for the non-square keys, since I managed to do the square ones and half sized before figuring this trick as a matter of need) - the sliding end of the scissor mechanism can be easily unclipped from the key top is the scissor if flat. Hinge pins can be put in place with the key top flipped up for visibility. Wires hinged from the key top must be sited before hooking up the hinge pins. Wires hinged from the key bottom will slip in to their holes when lined up as the keys are pushed towards flat. When the keys are flat, they can be clicked in to the sliding scissor end.


Last edited: