Become a MacRumors Supporter for $50/year with no ads, ability to filter front page stories, and private forums.

wirelessness

macrumors 6502
Original poster
Jun 20, 2010
431
62
I have been thinking about this project since the 2010 iMac with 3 internal SATA ports was announced. The OWC eSATA port option seemed like it would work just fine for the price but I didn't want to drill a hole in my new iMac. So when doing the SSD installation I noticed there was enough room to slip a typical eSATA cable with female port along the top of the logic board and out the bottom of the Memory Door with a little 'customization'. The result is the loss of the useless Optical Multi-Drive and the addition of an eSATA port that is easily reversed to very near to stock with little effort.

What you need:
- a 2010 iMac 27 (or a 2009 iMac if you sacrifice the optical drive for 1 SATA 1 eSATA)
- eSATA port cable/female eSATA port to Internal SATA
12-816-069-S01

- 1 Small sheet of very thin Aluminum
- Metal cutting shears or something to cut the aluminum to match the Memory Door
- Fine Metal File
- Cordless Power Drill w/ several size bits
- Philips 0, Torx 8, Torx 6,
- Suction cups, I use those shower handles that hold on via suction
- Can of compressed Air
- Masking tape preferably thin
- Anti Static strap

What This Guide Does:

- This is not a how to open your iMac and or how to add and an SSD drive. I assume you have read/watched the many guides for getting in and out of the iMac and are probably installing at least 1 SSD.

- This guide will attempt to demonstrate the steps taken to add the eSATA port to the Memory Door by, in my case cannibalizing the SATA port from the useless Optical Multi-Drive

STEP 1, Create replacement Memory Door
- Create the replacement Memory Door. I want this mod to be as reversible as possible and don't intend to drill/cut the stock memory door.

- This step is pretty easy. I bought the thinnest aluminum sheeting I could find at the hardware/home depot.

- Just outline the stock cover onto the sheeting w/a Sharpie. Then cut with the metal shears. It will come out pretty straight and can be cleaned up later. ** this part is only a prototype. Later I plan to oder an extra OEM Memory Door and mod that **

- Once the piece is cut to as close as possible you can use a metal file to clean it up until it fits perfectly. A vise is good if you have one to straighten and hold the piece while filling.

- This step is optional, I drilled multiple wholes in not so symmetric pattern to assist with venting.

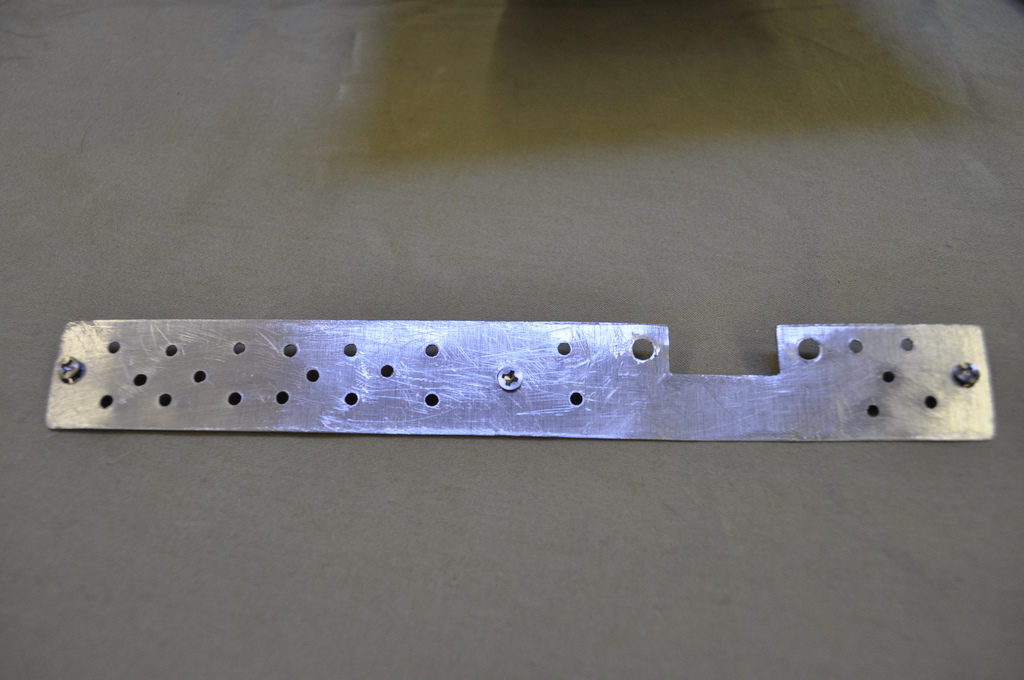
- You can see where your eSATA Port connector will go by holding it up to the bottom of the Memory Door. You only need a cut out big enough to expose the female end of the plug. Basically the port needs to be very close to the front of the memory door. Cut it with the shears and trim/straighten w/ file. Once you have the hole in place mark the screw hole cut outs for the eSATA Port and the Memory Door attachment screws and drill them out.

The end result should look something like this (remember this is a prototype):
5032441876_f080d4ccdf_b.jpg


Step 2, plug the internal end of the eSATA Port Bracket:

- OK, like I said this is not a how to take apart the iMac guide. There are many out there written much better than I could do.

- The Logic Board will need to be removed completely to access this port. I have read others were able to add a SATA cable to the 3rd SATA port by just loosening the Logic Board. When I add two SSD drives earlier I found it difficult to attach the cable without fully removing the logic board. It's not that hard just be methodical. This time around I labeled EVERYTHING with tape on the board and on the wire/screw that was removed. The tape also helps keep the wires back out of the way. Once you get to the ODD port remove the existing cable and slide it out of the way...it's the larger of the 3 SATA ports in that group. Attach the internal SATA connector end of the eSATA Port Bracket. I should look something like this (notice my labeling system ;) :

5032435716_6c752e26c5_b.jpg


Step 3, Connect eSATA Port bracket to the Modified Memory Door:

- Remove the memory from which ever side you decide to add the port
- Slide the eSATA Port bracket along the top of the logic board under the bottom portion of the aluminum case.
- You will see the Port come to rest right above where the memory would be. There is enough room for the cable port to slip out without touching the memory but two small plastic pieces that don't seem too important are holding it back from slipping all the way out the memory door.

5031819059_e00d9eac5f_b.jpg


- Those little plastic bars need to go! I used sharp angled cutters to snip the top of each longer bar as close as possible to the end. It should look like this:
5032439468_1349a8c6ae_b.jpg

- As you can see the Port/Bracket easily slip out of the memory door and do not impinge on the memory once installed.

Step 4, Attach the eSATA Port Bracket to the Modified Memory Door

The Modified Memory Door easily attaches to the eSATA Port Bracket just like it would an external drive port on a typical PC Motherboard. Don't tighten it all the way at first in order to allow the 3 Door hold down screws to get started as well. Before attaching the door reinstall your memory. The door should fit nicely with the Port snug in place not touching the memory or anything since there is a metal plate protecting the memory. Go ahead and tighten the 3 hold down screws for the door.
5032453822_f7ab19fde8_b.jpg


- Once the screws are all tightened down it should look like this:
5032469208_8525470707_b.jpg

You now have an eSATA port!!!

From inside the case you can see the cable fits nicely down to the memory door not impinging on any other bits.
5032466960_838c7ee374_b.jpg


Go ahead and close everything back up. The eSATA port should look like this:
5032471220_6aac8d2ffd_b.jpg


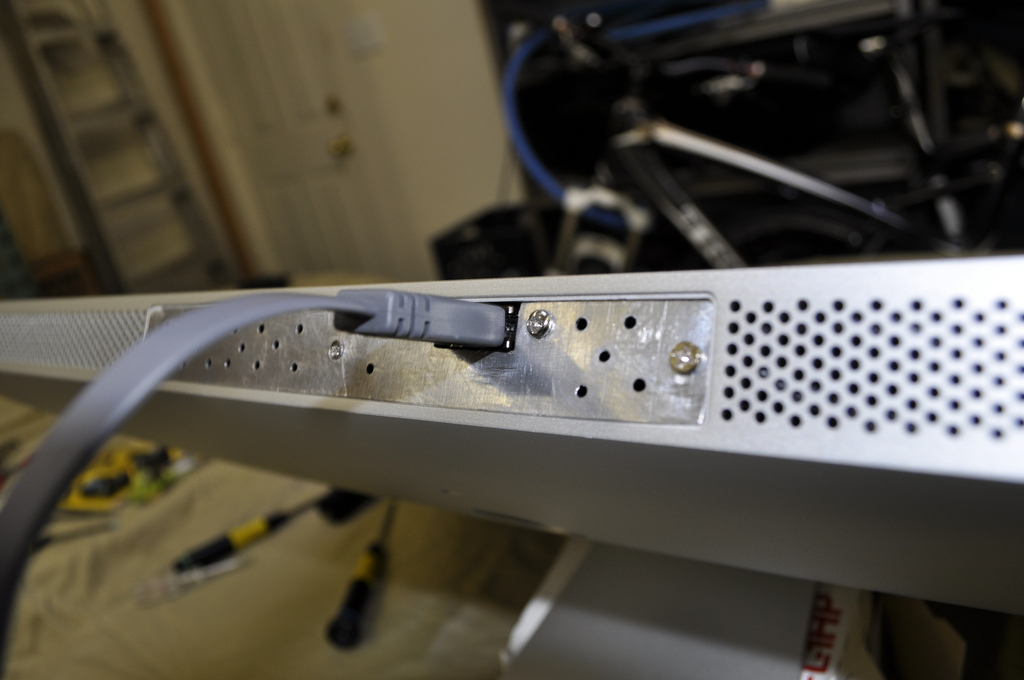
And like this when on the desk:
5031860673_2e5bf9cfa8_b.jpg


It's not too obtrusive and it gets the job done. I am on the look out for a 90* eSATA cable that might make it look a little better.


5031958403_cbf710c6f2_b.jpg

This is what you end up with if you like SSD Drives. 3 Corsair Force 120's. One RAID0 set for my primary OS and VM's and the other eSATA drive for booting directly to Windows. I connect my Data Storage drive(s) via Firewire 800 which is plenty fast for HDD's.

So, of course this mod will not be for everyone. Other than snipping those little plastic pieces this mod is 100% reversible if needed. Depending on the work being done I doubt an Apple Tech would notice those pieces being gone. If they did, how could that possibly be the cause of any technical issue?

I will post back latter when I get the OEM Memory Door modified and installed. That will look much better. Although, you don't see the Memory Door ever.
 

Hellhammer

Moderator emeritus
Dec 10, 2008
22,164
582
Finland
Great guide! BTW, if you do this, do you lose two memory slots? Or can you fit two modules along with the eSATA port? Otherwise it's good but you didn't mention about that
 

wirelessness

macrumors 6502
Original poster
Jun 20, 2010
431
62
Great guide! BTW, if you do this, do you lose two memory slots? Or can you fit two modules along with the eSATA port? Otherwise it's good but you didn't mention about that

Thanks Hellhammer! I thought I mentioned it in the guide but no you do not lose the two memory slots. You just need to remove the memory when making the modification to the plastic parts and fitting the eSATA Port Bracket. Once that is done the memory goes back in without any problems. There is a thin piece of metal in the space directly between the memory modules and the open space where the port rests. The port never touches the memory because of this.
 

Hellhammer

Moderator emeritus
Dec 10, 2008
22,164
582
Finland
Thanks Hellhammer! I thought I mentioned it in the guide but no you do not lose the two memory slots. You just need to remove the memory when making the modification to the plastic parts and fitting the eSATA Port Bracket. Once that is done the memory goes back in without any problems. There is a thin piece of metal in the space directly between the memory modules and the open space where the port rests. The port never touches the memory because of this.

Ahh, that's a good thing then! At least I didn't see it in the guide so just wanted to make sure. I know some people wouldn't like to lose two memory slots.

Next we need a video tutorial :p (Just kidding)
 

symbology

macrumors regular
Aug 4, 2010
190
0
I was thinking of that.

I also considered just getting the cable through that area and cutting a slot in the memory cover. Just leaving the cable hanging in the back.

I also considered just buying an extra memory door. http://applecomponents.com/items/922-9149_door-memory-access/0000004375?pn=2&cmp=0172&per_page=30

Your memory door / cover looks fine, but it could use more "drilling" as you have cut the airflow significantly. Especially to the memory modules.

In the end, eSata is not that important for me (at this time).
 

wirelessness

macrumors 6502
Original poster
Jun 20, 2010
431
62
I was thinking of that.

I also considered just getting the cable through that area and cutting a slot in the memory cover. Just leaving the cable hanging in the back.

I also considered just buying an extra memory door. http://applecomponents.com/items/922-9149_door-memory-access/0000004375?pn=2&cmp=0172&per_page=30

In the end, eSata is not that important for me (at this time).

Yeah, I considered just hanging the cable out as well. You would still have to trim the plastic pieces out of the way for the internal SATA connector end to fit. You would not have to trim as much plastic but it won't fit in there as it is so I figured why not make enough room to have a PORT rather than a cable hanging out. The post above references that replacement memory door from applecomponents.com. The plate I made is just a prototype and I will most likely get the OEM memory door and modify it to fit the eSATA Port.

This way it's pretty much reversible. I doubt a tech would even notice those plastic bits being removed unless you had a specific issue with the memory slots.
 

product26

Cancelled
May 30, 2005
777
9
Is there any possibility of knowing the size of the plastic part that you had to cut? Perhaps a spare one can be picked up as a replacement?
 

wirelessness

macrumors 6502
Original poster
Jun 20, 2010
431
62
The plastic piece appears to be part of the entire memory module bay. I am sure it is a separate part that if found would require complete disassembly to replace.
 

max.fox

macrumors newbie
Nov 1, 2010
1
0
which SATA cable to use?

Thanks Wirelessness. Nice hack!

My new iMac 27 should show up next week, so will get to work.

Which "eSATA port cable/female eSATA port to Internal SATA" cable do you recommend? Is it possible that some cables may not fit?

I found cable at OWC, http://eshop.macsales.com/ and called up tech support just to be sure. Much to my surprise, they were adamant that their cable WILL NOT WORK! Sounds a bit strange to me... :rolleyes:

How long should the cable be? Where did you buy it?

Thanks,
Max
 

wirelessness

macrumors 6502
Original poster
Jun 20, 2010
431
62
pretty much any cable will work if you ask me. Many have suggested a left angle 90* cable. I ended up using a standard cable because there is enough room for a straight cable to go in without contacting the back of the case. The cable does not need to be very long but found it difficult to find a cable short enough and ended up using an 12" cable which works fine but is longer than needed. The standard cable attached to an eSATA port module are 12" which is also plenty long.
 

cmosq

macrumors newbie
Aug 10, 2009
11
0
5031819059_e00d9eac5f_b.jpg


- Those little plastic bars need to go! I used sharp angled cutters to snip the top of each longer bar as close as possible to the end. It should look like this:
5032439468_1349a8c6ae_b.jpg

- As you can see the Port/Bracket easily slip out of the memory door and do not impinge on the memory once installed.

I found this: http://metku.net/index.html?path=mods/baby-sata/index_eng
A guy was successful in soldering SATA cables back together.

If the SATA cable is cut, will it fit in the plastic openings in such a way that you would not have to cut any part of the iMac? A combination of this and buying a memory cover to mod would truly make this 100% reversible...
 

wirelessness

macrumors 6502
Original poster
Jun 20, 2010
431
62
I found this: http://metku.net/index.html?path=mods/baby-sata/index_eng
A guy was successful in soldering SATA cables back together.

If the SATA cable is cut, will it fit in the plastic openings in such a way that you would not have to cut any part of the iMac? A combination of this and buying a memory cover to mod would truly make this 100% reversible...

This is very true and something that I looked around for an out of box solution but could not find. I can't solder worth a damn and I don't know if I would trust a splice job for anything critical. Would be nice to not have to cut that piece though.
 

cmosq

macrumors newbie
Aug 10, 2009
11
0
It fits!

This is very true and something that I looked around for an out of box solution but could not find. I can't solder worth a damn and I don't know if I would trust a splice job for anything critical. Would be nice to not have to cut that piece though.

Take a look at: https://forums.macrumors.com/threads/1024201/

Looks like the cable fits!

http://att.macrumors.com/attachment.php?attachmentid=254202&d=1286010603

Only problem I see is that you wouldn't have any room to mount the connector flush with the memory slot cover. You would have to route the sata cable towards the back and tape the connector to the back of the case. Also I wonder if the close proximity to the memory module would cause a problem.
 

wirelessness

macrumors 6502
Original poster
Jun 20, 2010
431
62
Yeah, I saw that thread and don't see any reason why that would not work. In that particular install the cable being used does not appear to be and actual eSATA port type connector. The problem with that is most external enclosures are only compatible with an actual eSATA male connector. The eSATA port style cable that I used would probably fit as well. Good luck.
 

powerslave65

macrumors 6502
Mar 21, 2011
377
170
Sherman Oaks CA
I did exactly what you did and could not be happier...
Super fast super reliable.
I am trying to come up with a nicer looking memory door maybe in black plastic....we shall see. This method is the best for a resale later down the line.
It was really easy...:cool:
 

ScubaBadger

macrumors newbie
Jul 9, 2011
4
0
Thought I'd let you know my experiences with esata and a late 2009 iMac 27".

I now have two esata ports working and a normal optical drive functioning properly. The transformation in my work flow has been very beneficial.

I have sacrificed my wi-fi card which is now in a desk drawer, but I have cabled up with ethernet to my router to maintain internet connection. I did not come out through the memory slot ports as that meant cutting the plastic bodywork there and being close to the memory cards. Instead I drilled through the metal casing just to the right of the memory pockets when looking at the front of the machine. A cheap PC adapter card with two sata ports was purchased from eBay for less than 2 dollars, the ports removed from the plate mount they'd normally be installed upon and they were individually fitted to the two holes made in the air vent at the bottom of the iMac case.
The two flat sata cables factory fixed to these were taken straight up to the sata port card - no need for any other device to be loosened, or removed.

Incidentally, taking the front screen off the iMac was a breeze - and I didn't use any tools - just my finger nails.

I now have two external sata devices hooked up through these ports and it's all very neat and tidy.

The internal twin sata port card that replaced the wi-fi card did not work at first with the drivers provided which were drivers for separate ports. They sprang to life when I downloaded and installed the RAID configuration drivers - even though a RAID was never applied.

No cable splicing, no soldering and it works a treat.
Attached is the hardware window for my mac, it identifies the esata ports as a Parallel SCSI device - which is then broken down into two esata ports (showing attachment to a 1TB drive and a 2TB drive individually).

Yes, I made holes in my case that are irreversible, but yes I love my iMac even more for the way it now performs and frankly it looks prety cool with two esata cables dangling from the bottom.

I can edit videos files in prem pro direct from a GRAID while transferring other files to a separate desktop HD dock.
Here is the hardware window;
esataportsconfig.png
 

Attachments

  • esata ports config.png
    esata ports config.png
    216.9 KB · Views: 513
Last edited:

R.OG

Suspended
Aug 19, 2010
172
0
Thought I'd let you know my experiences with esata and a late 2009 iMac 27".

I now have two esata ports working and a normal optical drive functioning properly. The transformation in my work flow has been very beneficial.

I have sacrificed my wi-fi card which is now in a desk drawer, but I have cabled up with ethernet to my router to maintain internet connection. I did not come out through the memory slot ports as that meant cutting the plastic bodywork there and being close to the memory cards. Instead I drilled through the metal casing just to the right of the memory pockets when looking at the front of the machine. A cheap PC adapter card with two sata ports was purchased from eBay for less than 2 dollars, the ports removed from the plate mount they'd normally be installed upon and they were individually fitted to the two holes made in the air vent at the bottom of the iMac case.
The two flat sata cables factory fixed to these were taken straight up to the sata port card - no need for any other device to be loosened, or removed.

Incidentally, taking the front screen off the iMac was a breeze - and I didn't use any tools - just my finger nails.

I now have two external sata devices hooked up through these ports and it's all very neat and tidy.

The internal twin sata port card that replaced the wi-fi card did not work at first with the drivers provided which were drivers for separate ports. They sprang to life when I downloaded and installed the RAID configuration drivers - even though a RAID was never applied.

No cable splicing, no soldering and it works a treat.
Attached is the hardware window for my mac, it identifies the esata ports as a Parallel SCSI device - which is then broken down into two esata ports (showing attachment to a 1TB drive and a 2TB drive individually).

Yes, I made holes in my case that are irreversible, but yes I love my iMac even more for the way it now performs and frankly it looks prety cool with two esata cables dangling from the bottom.

I can edit videos files in prem pro direct from a GRAID while transferring other files to a separate desktop HD dock.
Here is the hardware window;
Image

What card did you use? I have a Commell MPX-3132 but it is not recognized by my 2011 imac.
 

ScubaBadger

macrumors newbie
Jul 9, 2011
4
0
What card did you use? I have a Commell MPX-3132 but it is not recognized by my 2011 imac.

I believe it was a Commell too...

Here is the actual at eBay, Auction item number: 220721563113

The drivers shipped with it did not get seen by my iMac either.
I went to the Commell web site and downloaded the drivers that set this up as a RAID config - installed the drivers but did not set up a RAID and it still works.
 

R.OG

Suspended
Aug 19, 2010
172
0
I believe it was a Commell too...

Here is the actual at eBay, Auction item number: 220721563113

The drivers shipped with it did not get seen by my iMac either.
I went to the Commell web site and downloaded the drivers that set this up as a RAID config - installed the drivers but did not set up a RAID and it still works.

Thanks, i think im gonna try that card. Can you give me a link to the drivers you installed
 

ScubaBadger

macrumors newbie
Jul 9, 2011
4
0
Thanks, i think im gonna try that card. Can you give me a link to the drivers you installed

I used the drivers from silicon image: It is the SATARaid5 storage driver Sil3132r5_1.7.5.0_Sil_Pkg.

That said I can' find them of their pages any more...? I have looked and can only fin windows stuff - how strange..

Let me know if you want me to put that into an email to you (2MB).
I cant promise its going to work for you but it does for me - don't forget my card has two ports on it - not one..
 

Thewisevaloo

macrumors newbie
May 7, 2009
5
0
eSata

Hey fellas,

So, I just added eSata to my 2010 27" iMac using the extra SSD SATA port on the MLB. Everything is great, works like a charm, fine and dandy. I'm really happy with the way it turned out. My question though, is about using an eSata hub with this setup. Do you guys thing is would work? I know the protocol is supposed to be the same from eSata and SATA, but I also know that Macs will know when it's eSata from an express card or a PCI card. For me, the drives are just showing up as internal drive, which makes sense. I just don't know if an eSata hub would work because I think I read that eSata hubs only work with certain controllers and I don't want to drop $50-$100 without knowing for sure.

Let me know your thoughts?

Thanks.
 

chevalier433

macrumors 6502a
Mar 30, 2011
510
13
I have an iMac mid-2010 with two extra SSD and the original HDD.If i replace the original HDD with eSATA anyone knows what i will do with temperature sensor?
 

chevalier433

macrumors 6502a
Mar 30, 2011
510
13
I want to replace my internal 1TB with esata anyone knows what i will do with the temperature sensor can i put it in the extra SSD i have in third sata port?
 

icpmac

macrumors newbie
Oct 28, 2014
21
17
Thought I'd let you know my experiences with esata and a late 2009 iMac 27".

I now have two esata ports working and a normal optical drive functioning properly. The transformation in my work flow has been very beneficial.

I have sacrificed my wi-fi card which is now in a desk drawer, but I have cabled up with ethernet to my router to maintain internet connection. I did not come out through the memory slot ports as that meant cutting the plastic bodywork there and being close to the memory cards. Instead I drilled through the metal casing just to the right of the memory pockets when looking at the front of the machine. A cheap PC adapter card with two sata ports was purchased from eBay for less than 2 dollars, the ports removed from the plate mount they'd normally be installed upon and they were individually fitted to the two holes made in the air vent at the bottom of the iMac case.
The two flat sata cables factory fixed to these were taken straight up to the sata port card - no need for any other device to be loosened, or removed.

Incidentally, taking the front screen off the iMac was a breeze - and I didn't use any tools - just my finger nails.

I now have two external sata devices hooked up through these ports and it's all very neat and tidy.

The internal twin sata port card that replaced the wi-fi card did not work at first with the drivers provided which were drivers for separate ports. They sprang to life when I downloaded and installed the RAID configuration drivers - even though a RAID was never applied.

No cable splicing, no soldering and it works a treat.
Attached is the hardware window for my mac, it identifies the esata ports as a Parallel SCSI device - which is then broken down into two esata ports (showing attachment to a 1TB drive and a 2TB drive individually).

Yes, I made holes in my case that are irreversible, but yes I love my iMac even more for the way it now performs and frankly it looks prety cool with two esata cables dangling from the bottom.

I can edit videos files in prem pro direct from a GRAID while transferring other files to a separate desktop HD dock.
Here is the hardware window;
Image

Hi, sorry to bring back an old thread. I have a late 2009 imac (Quad) and I wanted to change the wifi card for something else like an esata card or usb 3 card, and I was wondering if yours it's the same or it's a core 2 duo. Because the Quad apparently (https://forums.macrumors.com/posts/11729796/) doesn't have a real mini-pcie slot and it'll not work (it's attached to the logic board with an special cable), but the core 2 duo work because it's a real mini-pcie slot.
 
Register on MacRumors! This sidebar will go away, and you'll see fewer ads.