Got a tip for us?
Let us know
Become a MacRumors Supporter for $50/year with no ads, ability to filter front page stories, and private forums.
DIY 5k Monitor - success :-)
- Thread starter fiatlux
- WikiPost WikiPost
- Start date
- Sort by reaction score
You are using an out of date browser. It may not display this or other websites correctly.
You should upgrade or use an alternative browser.
You should upgrade or use an alternative browser.
- Status
- The first post of this thread is a WikiPost and can be edited by anyone with the appropiate permissions. Your edits will be public.
To follow up, I did check cable seating (both display and backlight) as well as checked and cleaned contacts. My analog brain is saying the image is compressing on the right so look for a horizontal width adjustment. But there is none I can find, either physical or on menu. Has anyone here run into this?
@Rip57 57
Does swapping the two DP cables over make any difference?
There looks like two possible problems:
The vertical stripe may be due to screen damage to the rear ribbon cable at the top of the screen where the fault is.
But your fault is different than a ribbon cable damaged by a sharp object when the screen was removed from the iMac.
Cutting into the ribbon cable just gives a black vertical line.
Does pressing on the screen at the top at the back where the line is make any visible difference?
The darkened right side of the screen may be a screen fault to the right side.
Or it might be a fault with the 40 pin eDP cable from the R9A18 to the right side of the screen.
Carefully check there is no damage to the eDP cable, or to the socket at each end.
Or it might be a fault in the R9A18. Faulty boards are unusual but not unknown...
If switching the cables over between the two R9A19 DP-in sockets makes a difference, then one DP cable is faulty.
Is there a Thunderbolt to Dual DP splitter?
Or are the two DP cables fed direct from the MBA?
You could try running the screen at 4K (or 1080p HiDPI) by just using a single DP cable from the MBA, and switching the R9A18 to single input mode.
Check if the same fault still shows ?
Last edited:
Hi Paul, swapping DP cables makes no visible difference, nor does going single DP in. Indeed, I get the white vertical stripe even with no input cables plugged in and regardless of the input I select on the menu.
I marked the borders of the white stripe with tape and tried changing aspect ratios in the menu as well as input selection, but it stays same size and position. Not exactly sure what that's telling me.
Trying the press test now. Ugh. Left side of white line brightens and darkens when I press. Following that up I see its coming from an area near an LED and... I think I nicked the ribbon cable with the pizza cutter when I was removing the screen. See little black triangle right in the middle of this pic.

Damn. It was such a pretty screen before I did that.
On a positive note, the left side of the screen still looks lovely in 5K.
Any chance the screen ribbon cable is replaceable? Or is there a source for a reasonably priced screen? I suspect I'll just have to bite the bullet and find another used iMac locally.
I marked the borders of the white stripe with tape and tried changing aspect ratios in the menu as well as input selection, but it stays same size and position. Not exactly sure what that's telling me.
Trying the press test now. Ugh. Left side of white line brightens and darkens when I press. Following that up I see its coming from an area near an LED and... I think I nicked the ribbon cable with the pizza cutter when I was removing the screen. See little black triangle right in the middle of this pic.
Damn. It was such a pretty screen before I did that.
On a positive note, the left side of the screen still looks lovely in 5K.
Any chance the screen ribbon cable is replaceable? Or is there a source for a reasonably priced screen? I suspect I'll just have to bite the bullet and find another used iMac locally.
I wonder if anybody has had this. I got the r1811 borad (HDMI 2.1) version( firmware is v04). It is randomly turning on and off. The remote has stopped working as have the buttons on the control strip. It is pugged into Macstudio so no excess power draw issue. Tried with an Ipad and the same. I unplugged all the output cables and it still seems to have a mind of it's own with the control strip light turning on and off and sometimes the fan., as it it is trying to boot and failing.
Sadly I failed with my build, damaging the data connector on the LCD panel - I believe that's where the damage is anyway. The panel powers on from JRY-W9CUHD-AA1 I purchased.
I no longer have the stomach to throw more money at this project.
To that end, if there's anyone in the UK interested, I've got the mac up on eBay - full description there.
I've got it on auction, with an optional buy now for £260, however, I highly doubt it's going to fetch that much - very niche market for faulty imacs!
Moderators, I'm sure you'll let me know if posting this is a no-no:
Apple iMac 27 Inch - 5K Desktop A1419 2017 - i5 3.5GHz 40GB Ram - faulty | eBay UK
StoneTaskin JRY-W9CUHD-AA1 For iMac 5K A1419 LG Display LM270QQ1/QQ2 Driver Board DP HDMI2.0 60HZ 10bites 5120X2880 DIY Monitor. imac A1418 A1419 A2115 2 Way Treble Bass Speaker Crossover Audio Tweeter Woofer Crossover Speakers Filter Frequency Divider.
www.ebay.co.uk
Last edited:
@shan25 "It is randomly turning on and off."
The R1811 board will switch on then off after a few seconds if it is is not connected to a screen panel.
What is the board showing on the screen?
Is the Control Strip shorting anywhere, especially the soldered wires on the back, or is it not mounted and on something insulated?
If the back is touching ground anywhere, that also can power the board down...
Hello guys, i'm reading this thread since a while and i'm impressed with the job done by some of you, congrats !
I own a 2019 iMac 27" 5k. I just want to use it as a standalone screen for my macbook pro m1 pro and my Windows laptop.
I have a caldigit ts4 hub.
I also have an apple studio display.
I want the less cables possible to plug all this little family.
What do you recommand me to buy ?
I was thinking of this one, is it ok ? Is it delivered with the psu ?
Thanks all and have a good day !
StoneTaskin JRY-W9RQUHD-SA1 Pour iMac 5K A1419 LG Display LM270QQ1/QQ2 Conversion Conseil DP USB-C HDMI2.1 60HZ 10 bits 5120X2880
161,69€ | StoneTaskin JRY-W9RQUHD-SA1 Pour iMac 5K A1419 LG Display LM270QQ1/QQ2 Conversion Conseil DP USB-C HDMI2.1 60HZ 10 bits 5120X2880
161,69€ | StoneTaskin JRY-W9RQUHD-SA1 Pour iMac 5K A1419 LG Display LM270QQ1/QQ2 Conversion Conseil DP USB-C HDMI2.1 60HZ 10 bits 5120X2880
a.aliexpress.com
Hi Paul, thanks for your reply. It is doing this with the computer connected. The behaviour is random. Sometime the menu screen comes on automatically but mostly the board and monitor just switch off randomly and I have to disconnect and reconnect the power supply to restart it. Have tried all sorts of combinations with different cables and computers. The strip, board and the wires are not touching anything. Tried with the board outside and on piece of cardboard. I think with so many options tried I can only conclude the board is faulty. It was a direct purchase from StoneTaksin. Have emailed a video over and he is awaiting reply from engineers, and I am awaiting a response.@shan25 "It is randomly turning on and off."
The R1811 board will switch on then off after a few seconds if it is is not connected to a screen panel.
What is the board showing on the screen?
Is the Control Strip shorting anywhere, especially the soldered wires on the back, or is it not mounted and on something insulated?
If the back is touching ground anywhere, that also can power the board down...

@TheCluelessOne "I’m trying to strip my power inlet's molex cable... but I’m not sure which is live and which is neutral."

https://forums.macrumors.com/threads/diy-5k-monitor-success.2253100/post-33890228
https://forums.macrumors.com/threads/diy-5k-monitor-success.2253100/post-33890228
Last edited:
I'm in a similar situation. Paul's link (above) is most helpful in determining which is Live and Neutral on the power lead coming into the iMac, but my PSU has no +&- markings on its AC terminal block. I'm assuming this is because it doesn't matter which of the terminals is used to fasten the Live or Neutral wires.Hey all, I’m trying to strip my power inlets molex cable and plug it into my
PSU, but I’m not sure which is live and which is neutral. Can anyone help?View attachment 2578986
Last edited:
@Slopes "my PSU has no +&- markings on its AC terminal block"
In that case either way should be OK.
Does the PSU have an Earth/Ground connection, or external metalwork?
If so make sure that it well connected to the iMac aluminium case, and that in incoming earth wire is still connected to the stand-off connection near the mains input socket.
In that case either way should be OK.
Does the PSU have an Earth/Ground connection, or external metalwork?
If so make sure that it well connected to the iMac aluminium case, and that in incoming earth wire is still connected to the stand-off connection near the mains input socket.
Legend thanks!@TheCluelessOne "I’m trying to strip my power inlet's molex cable... but I’m not sure which is live and which is neutral."
View attachment 2578991
https://forums.macrumors.com/threads/diy-5k-monitor-success.2253100/post-33890228
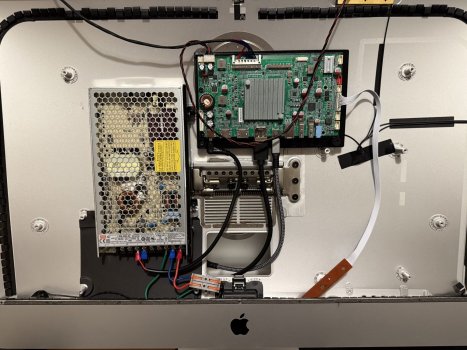
I've managed to successfully install a PSU and properly mount the board using pnwkayers 3d part. I printed my own 3d part for the PSU and cut it down to size, as I need a second screen (and need to do this all over again) I might actually make a more refined mount for the 200w PSU. If anyones interested I can share it.
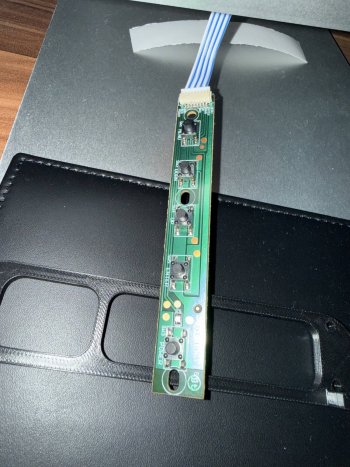
I've decided I'm gonna make the plunge and solder the keypads power button to the iMac's power button. I don't have a multiple metere and I no longer want to destroy the ribbon cable. Can someone tell me (from the pic) which points I need to solder to?
Attachments
@TheCluelessOne
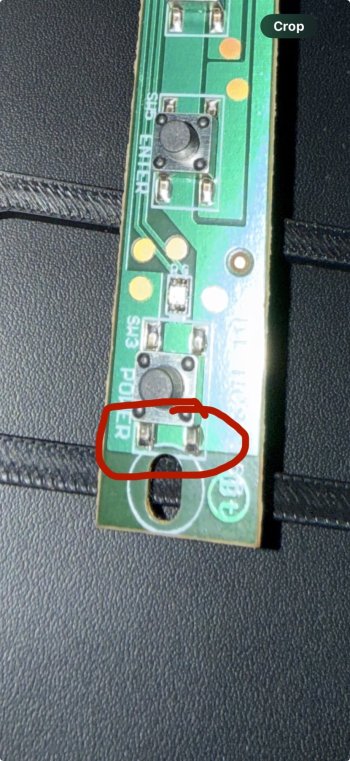
From your CU pic, solder the switch wires to the two connections on the switch nearest to the bottom - the two right above the ’R’ in the word ‘POWER ’, when holding the Control Strip horizontally.
From your CU pic, solder the switch wires to the two connections on the switch nearest to the bottom - the two right above the ’R’ in the word ‘POWER ’, when holding the Control Strip horizontally.
Just to be absolutely clear, we’re talking these two?@TheCluelessOne
From your CU pic, solder the switch wires to the two connections on the switch nearest to the bottom - the two right above the ’R’ in the word ‘POWER ’, when holding the Control Strip horizontally.
Attachments
@TheCluelessOne
Yes. Use as little solder as possible, and try not to burn any of the green areas, as all that is painted copper ground strip, and you mustn’t short the other connection (the bottom one nearest the R) to ground - or the board won’t switch on…
You can see the tiny black separation strip between the two, just above the lower solder pad.
Last edited:
Have you got any links to any completed solder jobs on this board to help me with your last note regarding avoiding black separation strips?@TheCluelessOne
Yes. Use as little solder as possible, and try not to burn any of the green areas, as all that is painted copper ground strip, and you mustn’t short the other connection (the bottom one nearest the R) to ground - or the board won’t switch on…
You can see the tiny black separation strip between the two, just above the lower solder pad.
Hi, I have a Retina 5K, 27-inch, Late 2014 iMac (purchased November 2014) that I'd like to convert to a monitor.
Will my screen definitely be the LM270QQ1 SDA1 model? I currently still use this Mac so I can't easily check on the screen itself.
I replaced the original Fusion Drive with an SSD a few years ago so have some experience with disassembly and I can do basic soldering.
What's the latest and greatest driver board to get?
I'd really like it to be passively cooled to avoid all fan noise. Is there a board compatible with my screen that has built in speaker drivers also?
If there was a way to use the original cable holes and fit the PSU inside that would be even better.
@TheCluelessOne "Have you got any links to any completed solder jobs"
Here is one of the R1811 Control Strip.
You can see that the new connecting wire has been 'tinned', so the end has solder all over it, but no big blob...
The strip's solder joint is then heated briefly until the solder melts (no added solder, just melt the existing joint).
Then the end of your new wire is dipped in the molten solder, and as soon as there is a joint, the soldering iron is quickly removed, to allow the joint to cool.
Once cool, check it's good connection.

The alternative is to find the correct wires in the ribbon cable, and remove a small part of the insulation, and make a connection (without cutting the wires);


Here is one of the R1811 Control Strip.
You can see that the new connecting wire has been 'tinned', so the end has solder all over it, but no big blob...
The strip's solder joint is then heated briefly until the solder melts (no added solder, just melt the existing joint).
Then the end of your new wire is dipped in the molten solder, and as soon as there is a joint, the soldering iron is quickly removed, to allow the joint to cool.
Once cool, check it's good connection.
The alternative is to find the correct wires in the ribbon cable, and remove a small part of the insulation, and make a connection (without cutting the wires);
Last edited:
@H3241234 Unfortunately, the late 2014 iMac may have LM270QQ1 SDA1, or SDA3 panels.
I don't really know if this makes any difference, so you would have to tell your board vendor the situation.
The latest board is the JRY-W9RQUHD-SA1 with a USB-C input (plus DP and HDMI), and JRY-W9RQUHD-FA1 with just DP and HDMI.
The SA1/FA1 boards do have an audio amplifier that will drive the iMac's speakers, but it is very low powered, so it not as good as your iMac's sound before conversion.
To get better audio you need a R1811 or a R9A18 board. The R1811 is more expensive, and the R9A18 board is older, and only works at 8 bits with a single cable - but the 2014 5K iMac's screen panel is only capable of 8 bits.
10 bits came with the 2015 (and later) iMac 5K panels.
The PSU can be fitted internally, but using existing ports, like @Aiwi did, is a complicated process.
Last edited:
@Bald_bunny Yes, the JRY-W9RQUHD-SA1 is a good board to convert a 2019 iMac, or the more expensive R1811 if you want better sound from the internal iMac speakers.
Some vendors will sell a PSU with the board, but not all do. It needs a 24V 5A PSU (or more for laptop charging).
StoneTaskin do, in the Package B or C.
Some vendors will sell a PSU with the board, but not all do. It needs a 24V 5A PSU (or more for laptop charging).
StoneTaskin do, in the Package B or C.
The German guy on YouTube threaded the wires under the two legs of the button an then twisted each wire into a tight loop. He then applied solder to the twisted loops which presumably flowed onto the legs too. That's the way I'm planning to do it.Have you got any links to any completed solder jobs on this board to help me with your last note regarding avoiding black separation strips?
@TheCluelessOne @Slopes "threaded the wires under the two legs of the button..."
The problem is the JRY control strip is surface mount, so there is probably no gap under the legs, or on the back.
The solder has to go on top of the existing pad.
There is only one point that must not be bridged with solder...

The problem is the JRY control strip is surface mount, so there is probably no gap under the legs, or on the back.
The solder has to go on top of the existing pad.
There is only one point that must not be bridged with solder...
Last edited:
Quinn Nelson from Snazzy Labs made a video about creating a DIY 5K display and mentioned this thread several times
I like his approach. Especially the 3D printed parts.
I like his approach. Especially the 3D printed parts.
Register on MacRumors! This sidebar will go away, and you'll see fewer ads.