Got a tip for us?
Let us know
Become a MacRumors Supporter for $50/year with no ads, ability to filter front page stories, and private forums.
Hands-On With Apple's New $699 Blackmagic eGPU
- Thread starter MacRumors
- Start date
- Sort by reaction score
You are using an out of date browser. It may not display this or other websites correctly.
You should upgrade or use an alternative browser.
You should upgrade or use an alternative browser.
skinned66
macrumors 65816
To be fair since it's not Apple branded it might actually get commensurate future price reductions. We'll just have to wait and see if the masters allow it.this 600 dollar price tag will only make sense until the next gen of graphic cards comes out. so for now its priced accordingly, but in 6 months time it won't.
SteveW928
macrumors 68000
Has anyone opened one up yet and proven that it's not upgradeable?
Just because Apple or another company SAYS it's not upgradeable doesn't mean it actually isn't. They may just not want people upgrading them.
https://egpu.io/forums/thunderbolt-...-egpu-radeon-pro-580-thunderbolt-3-enclosure/
To be fair since it's not Apple branded it might actually get commensurate future price reductions. We'll just have to wait and see if the masters allow it.
Good point. The $699 is kind of MSRP, I suppose. But, I doubt that will change until they open up sales beyond the Apple Store (assuming they do).

Marconelly
macrumors 6502
Its main advantage is that it's *very* quiet. Also, I expect to be able to sell it when I decide to buy a new one, so that's some kind of upgrade path I suppose.I make the comment because I can’t for the life of me figure out why you or anyone else would buy this—which isn’t upgradable and isn’t a “cheaper”’option—over any of the various other excellent options, with the only explanation I can think of being that it has an Apple on it.
Lots of interesting info there. I can echo some of the worries expressed about bootcamp. The eGPU does work, and it works without any script files or special drivers under bootcamp, but its name is incorrectly reported even in Radeon settings app - (it shows it as 560 with 8GB of GDDR5), and I'm still not sure if I can get the internal GPU to power MBP's screen and external to power secondary screen.
*edit* for my problem with internal monitor, I think I will need to try this:
https://egpu.io/forums/mac-setup/ho...-when-booting-into-windows-boot-camp/paged/1/
Seems easy enough, just one file on a USB drive, and then I boot from it.
Last edited:
mrex
macrumors 68040
I make the comment because I can’t for the life of me figure out why you or anyone else would buy this—which isn’t upgradable and isn’t a “cheaper”’option—over any of the various other excellent options, with the only explanation I can think of being that it has an Apple on it.
Because it is quiet. Easy to use. No need to think which card, driver, when to use and with what... and, i have to mention it can be placed on my desk behind my macbook (the desing and the size) - i dont want a desktop computer size egpu on my desk.
unupgradable isnt issue for me. if it works as im expecting (hoping), ill keep it for few years until something better is out - something which is ultraquiet and truely plug-and-play. i dont need bootcamp, i have a windows computer too so the egpu needs to work only with macos. and im sure it does it job much better than intel 550 inside my macbook (2016).
building own from parts isnt a problem for me, i have built many pc s since 90’s finding the best parts for the money. but nowadays i enjoy that i can just plug them in and start using them. and again, the silence is the key feature here. i dont even like to listen music when working...
loby
macrumors 68020
That’s the worst idea ever, displays can last for upwards of a decade, GPUs? Completely obsolete in 5 years MAX. A low end GTX 1050 from 2016 has almost the power of a flagship GTX 680 from 2012. For 1/3 the power draw and 1/4 the price.
I guess you are correct. Did not think about that factor.
sjinsjca
macrumors 68020
I feel like this isn't the best purchase considering you can't replace the card
In the Windows desktop world, an equivalent card is around $300. So it's not as though upgrading those comes free. And those won't work with a laptop.
PickUrPoison
macrumors G3
Right, and not the card nor any other external chassis will drive the LG 27” 5K monitor. There’s a reason Blackmagic designed this with the features they did.In the Windows desktop world, an equivalent card is around $300. So it's not as though upgrading those comes free. And those won't work with a laptop.
If I were a video pro who used Blackmagic’s software, here’s what I’d think about their eGPU:
- Manufacturered by the company that makes my software, and sold by the company that makes my hardware and OS
- I can attach my LG 5K Thunderbolt 3 monitor to it
- 85W charging capability for my MBP
- It’s very quiet
- plug and play
- 6 Tflops
- Bonus: 4 USB3 and an HDMI port
- Single vendor for the card and enclosure for any warranty issues that may arise
Here’s what I wouldn’t think: I’d rather buy a card from one vendor, an enclosure from another and put it together myself so I can save a couple hundred bucks (an hour or two of my billing rate) only to be left with an unsupported configuration that neither my applications software nor my OS/hardware vendor will stand behind if I have any troubles—oh and btw after all that, I can’t plug my monitor into it.
Last edited:
SteveW928
macrumors 68000
Here’s what I wouldn’t think: I’d rather buy a card from one vendor, an enclosure from another and put it together myself so I can save a couple hundred bucks (an hour or two of my billing rate) only to be left with an unsupported configuration that neither my applications software nor my OS/hardware vendor will stand behind if I have any troubles—oh and btw after all that, I can’t plug my monitor into it.
Exactly... and the only reason I might think that, is if I were CUDA based or could justify the performance gain, while enduring the extra noise in my office. In other words, if the performance gains were enough, I might go the route of the case, other GPU, etc.
But, it wouldn't be to save $150-200. THAT is pretty much a non-pro concern. Those are prosumers, hobbyists, and gamers speaking.
Marconelly
macrumors 6502
I will update my instructions to reflect the new findings. I deleted the older instructions.
So - I got it running under windows! Once I overcame problems that happened due to my forgetting that bootcamp installation Windows ISO shouldn't be stored on an external drive (which caused my windows installation to fail) and then APFS flakiness (which caused me to have to reformat the whole drive and restore mac backup, as it wouldn't initiate another bootcamp install after the first one failed, and the drive partition structure got slightly damaged in the process it seems)
So config and steps were:
- MBP 2017 15" with Radeon Pro 560 embedded GPU, 2560x1440 monitor, connected using HDMI to blackmagic. eGPU connected to the left side of the MBP (I tried both ports, works the same on both). MBP has "Large Memory" under windows device manager.
- Fresh bootcamp install of April 2018 Windows (put this windows ISO on your mac boot drive!)
- Blackmagic eGPU disconnected from the Mac during the entire Windows installation process.
- When Windows is installing, make sure to select a default "Home" edition windows, I had some trouble first time around when I selected the "Home single language" edition.
- Update Windows to whatever updates there are, and reboot.
- Update WiFi drivers from Apple Software update, but don't update to a new Graphics driver that it will also offer. This is because you'll want to get newer ATI drivers from https://www.bootcampdrivers.com/ I got some issues plugging in external USB drives with Apple's bootcamp ATI drivers installed with eGPU active, but no issues at all with 18.3.4 drivers downloaded from bootcampdrivers.com
- So, download 18.3.4 drivers by clicking on "Other Download Version" green button on bootcampdrivers.com, and then on the Mega site that opens, navigate to Windows 10 folder, and download W10-x64-Radeon-Software-Adrenalin-18.3.4-Bootcamp-XG-Edition.zip
- I decided not to download the latest 18.5.2 driver because in the release notes it claims that it has problems sometimes with Radeon Pro 580, and to use 18.3.4 instead if you have this GPU.
- Follow the process described in the video on bootcampdrivers site to boot Windows into safe mode, use DDU to uninstall the existing driver, and install the one you just downloaded.
- After that's done, confirm that there are no yellow exclamation marks in Device Manager in windows.
- While you're there, disable the Facetime camera - I've heard this helps free up resources, so I did it. But I don't think in my case it really changed things one way or the other.
- Now do any other setting you'd like in windows, and when you're done, Create a Restore Point. This is very important, as you will be using this restore point to re-enable your internal monitor whenever you want to use the MBP bootcamp without the eGPU.
- Once the restore point is done, shut down the computer, plug in the eGPU, and boot into Windows. It will begin installing the drivers for the eGPU. Just wait.
- Typically you just need to wait, but if nothing happens after a minute or so, go to Device Manger, right click on the eGPU that will appear there (it will be in the display adaptors, called something like "VGA adaptor" right click on it, and click Update Driver.
- Once the driver has downloaded (again, it's typically enough to just wait), you'll start hearing sounds of windows adding new devices, the desktop will appear for 10 seconds or so on the external monitor attached to eGPU, and then both screens will go black.
- Don't fear, this is just because you need another reboot for things to finish installing. Wait until windows stops making sounds of things being installed, and then press Win+R, blind-type "shutdown /r" and press return, then just wait about a minute and the windows will restart. You can also press and hold the power button for about 5 seconds, to force the shutdown, and then press it again to start the computer, just again, make sure the things have finished installing (no windows beeps and bloops for a while) before you do so.
- If everything is OK, once it starts booting, windows should show a flag logo on the MBP's internal screen, but soon after, the internal screen will go black, and external screen will boot into your desktop a few seconds later. You will also be notified by AMD software that the external GPU is running.
- From that point on, I had literally zero trouble with this setup. Windows running with this eGPU seems rock solid, can run any game I tried, switch resolutions. I carried the whole setup over to the TV in the living room to try it there - it displayed the picture on the TV without a hitch. It never froze or crashed, and during the whole process, even when running the most intensive games, eGPU seemed like it never breaks a sweat. Fan never went above the 'pleasant whirr' level of noise.
- When you want to go back to running bootcamp on the internal screen, you have to go to the Troubleshoot setting in windows, and boot into Restore checkpoint mode. Restoring takes a minute or so, and then the windows boots on internal display. Just make sure you unplug the eGPU before it starts booting after the restore checkpoint is done.
- Then when I need eGPU again, shut down the computer, plug eGPU, boot, wait for both screens to go black, type shutdown /r, and it boots with eGPU active. Basically, just a repeat of the last phase of the process above, which all takes about 2-3 minutes. Not the most elegant process, but if you intend to use the windows mostly with just eGPU, you won't have to do this often, at least. Most importantly, things really seem stable and predictable during all this. I repeated this back & forth 5-6 times now just to make sure it's safe and stable, and it never misbehaved.
- One more important note: If you try to go back to internal display by restoring from the restore checkpoint - only to find that the checkpoint has somehow disappeared, don't fret. You can still go back to internal display by booting the windows into a safe mode, and then running the DDU. It will uninstall whatever drivers are there, and bootcamp will then boot with internal display. Then, with eGPU detached, you can just install the ATI drivers, to get the maximum performance from the 560. This happened to me just recently, and I have no idea why the checkpoint disappeared. Maybe it's a good idea to delete the old restore point and create a new one every time you restore from a checkpoint - to ensure that it will be there next time you need it.
As for games, I tried Alan Wake, and it was running buttery smooth in monitor's native 2560x1440 resolution with all settings on high, and antialiasing set to 2x (only setting that I dialled down from 4x to 2x from the default High settings).
Then I tried Quantum Break, which also ran at, or very close to 60FPS in 1920x1080 resolution, using a mixture of High and Medium settings. I also tried it in ultrawide 2560x1080 resolution, to get a native pixel mapping on my monitor, using those same settings, the game's performance didn't seem to degrade visibly at all. When I tried it in full 2560x1440, I did notice some performance degradation, and would have to dial some settings down more to reach the smooth performance. Overall, it was quite a sight having a game that looks that good run at 60FPS on a setup like this, and yet not even have that much fan noise (MBP consistently creates more fan noise than eGPU btw, even though it also never goes anywhere near that crazy overdrive like it does when you run these games solely on it). It all felt, pardon the pun, like black magic : P
So, even though I didn't have to do any of the weird hacks that people on eGPU forum typically suggest, the process is not entirely straightforward. I really think that the main issue here is that ATI right now has no Windows drivers that truly recognize this eGPU. The driver that the windows installs when it detects it is something from 2016, that can't even display the real name of the GPU. That driver from 2016 naturally doesn't recognize the embedded 560 GPU, so when you run this driver that makes the eGPU work, your internal screen goes blank, and then when you go back to the restore point which uses the ATI's bootcamp driver, then the embedded 560 works, but that driver doesn't recognize the eGPU. At least that's what I think is happening, and hopefully ATI can remedy this situation soon. Or maybe it's not the drivers at all, but the fact that somehow during this driver installation, 560 gets disabled, which frees up resources for the eGPU.
I also need to list the things I tried (mostly guides from eGPU.io) that didn't work, to prevent people with the same setup as mine from pulling hair - keep in mind, if you have a different setup, it is worth trying things described there, it very well might work for you. and it has for many people, especially the apple_set_os.efi boot trick. But nothing worked for me, and I ended up re-installing windows about 10 times until I settled on the process described above. Here's what I tried;
- apple_set_os.efi boot from the USB drive. Didn't seem to do anything useful, or anything at all really.
- running integrated.bat to enable iGPU, and free up resources taken by 560. This has royally messed up the windows, I got some nasty screen flicker on the next reboot, and had to reinstall the windows. I tried also booting from the apple_set_os.efi usb boot after running integrated.bat, same thing happened, with the flickery screen.
- I tried disabling the left side TB3 ports on the MBP, shutting down, then plugging the eGPU to the right side. This changed nothing - I could still only see external monitor, running through eGPU, and nothing on the internal screen. However, it also messed up Windows, and I could no longer re-enable left side TB3 ports for some reason, and had to reinstall windows again.
- I did not try the DSDT override, or the script suggested here: https://egpu.io/forums/builds/2017-...gtx-1080-ti32gbps-tb3-akitio-node-windows-10/
But I kind of doubt it would work anyway, as at no point I'm even seeing the Error 12, that these methods are attempting to solve. While the eGPU is active, I only see the error 34 yellow exclamation on the 560 GPU, saying that the windows has disabled the device as it has stopped working correctly.
Last edited:
It’s more like 200-250. And after a year or 2 you only pay another 200-250 to upgrade to gtx 1160/rx680 or whatever with or normal eGPU enclosures. This thing? You pay another 750 and you don’t get to choose the card.In the Windows desktop world, an equivalent card is around $300. So it's not as though upgrading those comes free. And those won't work with a laptop.
mrex
macrumors 68040
I got mine today, and haven't run any benchmarks yet, but the unit has been running on the background like an hour or so (flash application on safari). And oh boy, this unit is silent.
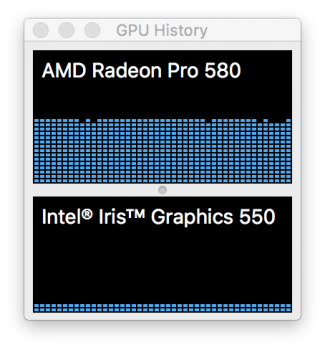
I though I could hear some kind of the tiny noise from the fan, but no. I simply hear nothing at all. I literally have to put my head over the unit to hear a little sound from the fan. Putting my hand over the unit I can feel warm air flowing from it. Also my MacBook Pro 13" (2016) isn't so hot as it used to be without an egpu - unfortunately safari/flash is loading the cpu too. So I probably can keep MacBook on my lap without cooking my balls when I get a longer tb3 cable. I attached a screenshot from gpu history diagrams showing that the egpu is under the load and igpu not. My first impression is that this works actually better than I though - and I was a little sceptical.
View attachment 772272
Edit. Run a quick test (OpenCL) with GeekBench 4 and MacBook Pro 13" TB (2016).
- igpu (intel iris 550): 31663
- egpu (radeon pro 580): 108005
Edit 2. God, how short this tb3 cable is! C'mon BlackMagic, you could have baked it with 80cm cable at least preferably with a longer cable. My advice, get a longer active tb3 cable with your egpu when you purchase it. I find it quite hard to place both, my mbp and the egpu on my desk next to the external display with this tiny cable.
Attachments
Last edited:
I mean you’re running web apps and Geekbench of course it’s silent...because it isn’t under load at all...I got mine today, and haven't run any benchmarks yet, but the unit has been running on the background like an hour or so (flash application on safari). And oh boy, this unit is silent.
I though I could hear some kind of the tiny noise from the fan, but no. I simply hear nothing at all. I literally have to put my head over the unit to hear a little sound from the fan. Putting my hand over the unit I can feel warm air flowing from it. Also my MacBook Pro 13" (2016) isn't so hot as it used to be without an egpu - unfortunately safari/flash is loading the cpu too. So I probably can keep MacBook on my lap without cooking my balls when I get a longer tb3 cable. I attached a screenshot from gpu history diagrams showing that the egpu is under the load and igpu not. My first impression is that this works actually better than I though - and I was a little sceptical.
View attachment 772272
Edit. Run a quick test (OpenCL) with GeekBench 4 and MacBook Pro 13" TB (2016).
- igpu (intel iris 550): 31663
- egpu (radeon pro 580): 108005
Edit 2. God, how short this tb3 cable is! C'mon BlackMagic, you could have baked it with 80cm cable at least preferably with a longer cable. My advice, get a longer active tb3 cable with your egpu when you purchase it. I find it quite hard to place both, my mbp and the egpu on my desk next to the external display with this tiny cable.
Marconelly
macrumors 6502
It's only been a bit more loud than the default, after running Quantum Break for an hour or so. This unit is a real deal when it comes to silent operation.I mean you’re running web apps and Geekbench of course it’s silent...because it isn’t under load at all...
Eightarmedpet
macrumors regular
Yes, thats less than a Razer Core. Whats so hard to understand people?$400 for that?
dannynjoni
macrumors regular
I will update my instructions to reflect the new findings. I deleted the older instructions.
So - I got it running under windows!
Thank you for all the work you put in to help others. I think you should post this on the other eGPU sites because I went through all of the same things as you did and none of it worked! My wife was beginning to think I'd lost it because I wouldn't let it go lol.
My MacBook Pro setup & graphics card are identical in specs as yours, I'm just using the Akito Node and your method has gotten me up and running in Windows 10!
Woot!
mireki1975
macrumors member
short question... does anyone own a GoPro Fusion and can say anything about rendering times in Fusion Studio with eGPU? would be great
Marconelly
macrumors 6502
Glad it helped. One more important note, which I will add into the large post above as well: If you try to go back to internal display by restoring from the restore checkpoint - only to find that the checkpoint has somehow disappeared, don't fret. You can still go back to internal display by booting the windows into a safe mode, and then running the DDU. It will uninstall whatever drivers are there, and bootcamp will then boot with internal display. Then, with eGPU detached, you can just install the ATI drivers, to get the maximum performance from the 560. This happened to me just recently, and I have no idea why the checkpoint disappeared. Maybe it's a good idea to delete the old restore point and create a new one every time you restore from a checkpoint - to ensure that it will be there next time you need it.Thank you for all the work you put in to help others. I think you should post this on the other eGPU sites because I went through all of the same things as you did and none of it worked! My wife was beginning to think I'd lost it because I wouldn't let it go lol.
My MacBook Pro setup & graphics card are identical in specs as yours, I'm just using the Akito Node and your method has gotten me up and running in Windows 10!
Woot!
Marconelly
macrumors 6502
I have also just realized that a user GuideOfGalaxy on eGPU.io forums has successfully managed to run this eGPU while also having windows on the internal monitor - on a 2016 15" MBP. Here's what he said:
https://egpu.io/forums/thunderbolt-...deon-pro-580-thunderbolt-3-enclosure/paged/4/
I cannot verify if these advices will work for me, as I don't have access to eGPU right now. However, I do see that he's done something I never tried doing - which is install Intel HD drivers. I believe this can only be done on a 15" MBP when you boot it into Windows using the apple_set_os.efi boot trick. Otherwise, Windows won't let you install Intel GPU drivers, as it won't recognize that your computer even has iGPU. I have to note however, that I don't think booting using this apple efi trick has made the iGPU visible to windows on my 2017 MBP when I tried it. If someone wants to try this on 2017 MBP, you can download required intel drivers for the Intel HD 630 GPU here: https://downloadcenter.intel.com/product/98909/Intel-HD-Graphics-630
Also, with 2017 MBP, you most likely won't have to plug the eGPU to the right side, and you won't have to disable the left side TB3 ports, because 2017 model has the "large memory". You'll have to disable the PCIe controller for the Radeon Pro 560 GPU however (and maybe the facetime camera).
Overall, I think that for playing games in bootcamp on external monitor, this solution might not be necessary, as you might just put the extra strain on MBP hardware due to iGPU running (so more fan noise), but it might make it possible to run the eGPU on the internal screen in bootcamp using the AMD X-Connect software, which is an enticing prospect.
https://egpu.io/forums/thunderbolt-...deon-pro-580-thunderbolt-3-enclosure/paged/4/
key things to remember is to:
- install the Intel HD graphics drivers for the 530 THEN use the iGPU switch intergrated.bat
- YOU HAVE TO plug the egpu on the RIGHT SIDE FOR AMD because it won't work on the left side no idea why but anyway.
- you have to disable the left side thunderbolt ports, you have to also disable the web cams.
Lastly it only seems to work via HDMI output it refuses to output to the 5k thunderbolt display.
I have the internal display runing off the intel graphics 530 and I have the 4k display over hdmi running, and then I had to daisy change to my thunderbolt HDDs.
ALSO you have to ALWAYS boot using the USB apple efi usb thing.
I also forgot to add that you have to disable the PCIe controller for the Radeon pro 455 as well so you only run off of intergrated graphics and not dedicated, this is after you run the intergrated.bat and roboot.
I cannot verify if these advices will work for me, as I don't have access to eGPU right now. However, I do see that he's done something I never tried doing - which is install Intel HD drivers. I believe this can only be done on a 15" MBP when you boot it into Windows using the apple_set_os.efi boot trick. Otherwise, Windows won't let you install Intel GPU drivers, as it won't recognize that your computer even has iGPU. I have to note however, that I don't think booting using this apple efi trick has made the iGPU visible to windows on my 2017 MBP when I tried it. If someone wants to try this on 2017 MBP, you can download required intel drivers for the Intel HD 630 GPU here: https://downloadcenter.intel.com/product/98909/Intel-HD-Graphics-630
Also, with 2017 MBP, you most likely won't have to plug the eGPU to the right side, and you won't have to disable the left side TB3 ports, because 2017 model has the "large memory". You'll have to disable the PCIe controller for the Radeon Pro 560 GPU however (and maybe the facetime camera).
Overall, I think that for playing games in bootcamp on external monitor, this solution might not be necessary, as you might just put the extra strain on MBP hardware due to iGPU running (so more fan noise), but it might make it possible to run the eGPU on the internal screen in bootcamp using the AMD X-Connect software, which is an enticing prospect.
Last edited:
cwazytech
macrumors 6502
I can't say I'm very familiar with the concept of an eGPU, but based on my readings it sounds like it helps with video encode speeds. I dabble a bit here and there. Currently, I'm running a 2018 13 inch MacBook Pro and I use Handbrake a lot for video encodes. Can anyone confirm if the eGPU would be a benefit for Handbrake users?