Become a MacRumors Supporter for $50/year with no ads, ability to filter front page stories, and private forums.

mollyc

macrumors G3
Original poster
Aug 18, 2016
8,098
51,180
Who does exposure blending or HDR? Do you have any suggested settings? I took a five exposure bracket this morning of the sunrise through a window. I want the inside part to have some detail in it, although a bit darker and I want the outside part to look like sunrise. But every setting I try either makes it look "too" balanced or overly HDR. I'm just trying to play with it to look natural.

I have tried in LR, in PS (both the HDR option as well as the auto blend layers), and in Photomatix Pro. Photomatix came the closest, but still looked a little too HDRy for me, so I deleted it. I'm wondering if it's something in the ghosting settings that is throwing me.
 
Last edited:
I usually take a bracket of 3 shots - 0, -1 and +1, then use Nik HDR Efex Pro to merge the photos. I don't find any problems with ghosting.
This is the original Google Nik which became free a few years ago, but it's 64 bit and fine for me.

I know I had a reputation for over the top HDR, but nowadays I just take the most bland default output and work on that in Elements afterwards to tidy up, crop, straighten etc.

Cheers :)

Hugh
 
  • Like
Reactions: mollyc
I usually take a bracket of 3 shots - 0, -1 and +1, then use Nik HDR Efex Pro to merge the photos. I don't find any problems with ghosting.
This is the original Google Nik which became free a few years ago, but it's 64 bit and fine for me.

I know I had a reputation for over the top HDR, but nowadays I just take the most bland default output and work on that in Elements afterwards to tidy up, crop, straighten etc.

Cheers :)

Hugh
thanks...i'm dialing into some settings with some presets I downloaded for Photomatix, but it still comes off looking a bit cartoony. I might have to spend some time in PS trying to hand blend it to get the look I want. Or maybe my photo is just bad. ?
 
  • Like
Reactions: Hughmac
I do find Photmatix can get cartoony but for me, mostly because there's a lot to the tool that I haven't practiced enough. I don't do HDR a lot but will work with it occasionally. I tend to do -2,0,+2 because when you need HDR, it's usually in really, really high DR scenarios, in particular shots like you're trying to do which is an instance of "real estate photography" where you've got outside and inside. Most cameras these days can actually do a reasonable job pulling shadow details with manageable noise in situations where you'd do -1,0,1 for example or cases where you've exposed for the highlights in a single image. Crushing tones into middle (which is what HDR does - the great "bell curve") can to me lead to unintended consequences, one of which is the cartoony image. Don't get me started on Trey Ratcliff! Is there one of the images you've taken, perhaps the darker one or even the 0EV one, that you can pull shadows and push/pull highlights to a pleasing level with manageable noise?

(Much later) EDIT:

Short answer: I personally stick with out-of-the-box default settings as best I can so I can "get fiddly" in a tool I know well (e.g. Capture One or Photoshop).

As far as actually answering your question , with something like Photomatix, I just do "out of the box" settings and don't mess around with things much. If I'm not on a tripod and/or there's movement within the frame, I'll make the movement / ghosting settings appropriate to the situation. My goal though is to not deviate too much from the default. Basically I want as well constructed file as I can get that will let me pull/push shadows and highlights and to be able to work with contrast on my own terms.

Capture One recently released a feature update to do HDR merge and Pano stitching from within the application. It's a decent first release, though very much an emphasis on "first release". The interesting thing is that the output of each of those capabilities is a "raw" file (dng) with somewhat greater capabilities to edit than a straight tiff. I put "raw" in quotes because in order to do the merge or stitch, it needs to go through a demosaicing process so it's not truly raw. But it does retain some capabilities to deal with white balance, contrast, etc but admittedly I don't quite understand the process very well.

Testing the HDR merge capability, I chose a scene in my office that went from about a 1 second exposure to 1/2000 of a second in some of the brighter areas with ISO 64, f/4 on a 50mm lens. I chose 0EV as 1/30s and did 5 shots from -4EV to 4EV on a tripod. My goal was to simply have a file I could work with. With Capture One, there aren't a lot of settings I can work with with the first release (it has auto align, auto adjust, both of which were on). With Photmatix, just "out-of-the-box" defaults. I got a file I could work with from both approaches, though the PMX file crushed the reds a bit so that when you pull shadows it tends to get very cartoony. The C1 result kept a much more evenly distributed histogram but tended towards overexposed in the highlights. Images are C1, then PMX, then the 0EV-baseline.


2022-01-01_HDR0012_HDR 5.jpg


Capture One merge. It tended to keep a lot of the highlights, tending towards over-exposure but still workable. I was able to pull back the whites/highlights to essentially get the same "look" outside the window.

2022-01-01_HDR0008_PMX_HDR_RHH.jpg


Photomatix (straight out of the app, all defaults). The reds in the painting are a bit overdone, but unlike Capture One kept more of the detail in the highlights out the window. I had to pull those highlights back in the C1 image but I could do so with no real problems. PMX just chose a white balance of 5k straight which was off from the "as shot" of around 5.5k which C1 did keep better track of.

2022-01-01_HDR0008.jpg


0EV (1/30s)
 

Attachments

  • 2022-01-01_HDR0008.jpg
    2022-01-01_HDR0008.jpg
    219.2 KB · Views: 90
Last edited:
  • Love
Reactions: mollyc
You can load the images into PS as layers, select all, auto align, convert to a smart object then do a calculation - Mean I think and it will blend them for you. Or use auto blend - that’s an option too but I dont always like that result

Or, use a soft brush and go layer by layer with opacity of about 20% and draw on the mask to bring through the details from the areas you want from each frame.
 
  • Like
Reactions: mollyc
With the current more sophisticated cameras the dynamic range improved a lot..hence the bracketing with +/- (2) stops is more attractive over only +/- (1) stop.
I used to process HDR with Photomatics Pro, but didn’t always liked the end result…Now the recent Capture One 22 release has a promising HDR feature creating a .dng RAW file that can be edited very well..I am still experimenting with C1P 22 but so far I like what I see..
It seems that (3) bracketed shots is enough and a tripod is very desirable..
 
  • Like
Reactions: mollyc
So I think part of my problem is that the software doesn't really know what I want. I don't think I realized this at first. Ken is probably on to something that I should just do it manually. I've done interior real estate photos before where I have hand blended and had excellent results. It's just a lot of tedious masking I didn't want to do yesterday.

But I think the main issue is that I don't want the exterior/through the window part HDR. I want that part darkish (so one of the lower exposures) to show the colors of the sky. All the software options are pulling out midtones/highlights from that area to balance it, which is kind of the point of the software. I only want to balance the inside of my house (walls) to the overall outside scene. I think I might try the HDR software and then manually layer back in a lower exposure for the window only.

And I say I'm doing HDR, and technically I am, but I don't want it to look HDR. I want it to look natural, just with more range than I would get in one image. I feel like because it was a low light image to start with, I needed more exposures because even though I want a low light feel to it, I do want more light on the walls than one image would get, and pulling those wall shadows was just way too much noise. My walls were black in the best window image, which was not what I wanted.

I've also decided that the composition of the entire photo wasn't really what I wanted, but I am going to try to do a hybrid layering to see if I can at least get the light to show what I originally intended. Will be back later. ?
 
Who does exposure blending or HDR? Do you have any suggested settings? I took a five exposure bracket this morning of the sunrise through a window. I want the inside part to have some detail in it, although a bit darker and I want the outside part to look like sunrise. But every setting I try either makes it look "too" balanced or overly HDR. I'm just trying to play with it to look natural.

I have tried in LR, in PS (both the HDR option as well as the auto blend layers), and in Photomatix Pro. Photomatix came the closest, but still looked a little too HDRy for me, so I deleted it. I'm wondering if it's something in the ghosting settings that is throwing me.
Photomatrix is definitely too HDRish to me too. I always use LRC, select all the photos and then just choose merge to HDR and the only thing I have checked is auto alignment, leaving all the other auto settings disabled. This gives a nice flat photo (just like what comes out of the camera) with tons more data for you to work with in post.
 
  • Like
Reactions: USAntigoon
I've actually used Photomatix in the past with great results, but they were on landscape images, not an indoor/outdoor balancing.

To be honest, all the options I tried initially: Lightroom HDR, PS HDR Pro, PS auto-align/auto-blend, and Photomatix all had nearly the same result. But it's taken me awhile to figure out why I didn't like the results. The window view just has too many details showing through. I actually think if I cropped it down to just the window the results might be okay, but I don't like how it blends with my interior. I have a very specific look in my head. I think it's going to take at least some manual blending.
 
Web_January_05_2022_001.jpg


Okay, I think I finally got it. I ended up just blending only two exposures in the LR HDR option. LR consistently found the windows as my "subject" for automasking, whereas PS did not see the windows as a whole as the subject. It's always weird to me how the algorithms between those two programs are wildly different. But in LR after I blended them, I could auto mask the windows and then drop the exposure back down where I wanted it through the adjustment panel. I just really loved the warm light spill on that right wall, but also wanted to see just a bit of detail of the door frame so that the whole thing wasn't a black blob.


This is what I was getting when I was merging all five exposures, and as I mentioned above, pretty much all the variations I tried gave similar results. In hindsight, this probably is a fairly good blend of everything but I didn't want to bright up details on the neighboring houses. I wanted those still in shadow so that just the sky showed through. But of course the software didn't know I didn't want that much detail....


Web_January_05_2022_001-2.jpg
 
So I think part of my problem is that the software doesn't really know what I want. I don't think I realized this at first. Ken is probably on to something that I should just do it manually. I've done interior real estate photos before where I have hand blended and had excellent results. It's just a lot of tedious masking I didn't want to do yesterday.

But I think the main issue is that I don't want the exterior/through the window part HDR. I want that part darkish (so one of the lower exposures) to show the colors of the sky. All the software options are pulling out midtones/highlights from that area to balance it, which is kind of the point of the software. I only want to balance the inside of my house (walls) to the overall outside scene. I think I might try the HDR software and then manually layer back in a lower exposure for the window only.

And I say I'm doing HDR, and technically I am, but I don't want it to look HDR. I want it to look natural, just with more range than I would get in one image. I feel like because it was a low light image to start with, I needed more exposures because even though I want a low light feel to it, I do want more light on the walls than one image would get, and pulling those wall shadows was just way too much noise. My walls were black in the best window image, which was not what I wanted.

I've also decided that the composition of the entire photo wasn't really what I wanted, but I am going to try to do a hybrid layering to see if I can at least get the light to show what I originally intended. Will be back later. ?

Have you tried using apply image on masks for quick masking?
 
If the original shot has lots of dynamic range with enough data in the highlights and the shadows, then you can get the desired results by using masks and play with adjustments and HDR ranges like highlights and shadows. (Make copies of your original and review the data with increasing the exposure and next pumping up the shadows, this test will bring forward the data you will not see in the original shot)

As I mentioned before , the recent full size sensor cameras have a nice dynamic range hence bracketing is not always required..Even if you do, take a (2) stop bracketing with (3) shots on tripod and only change the shutter speed, in fact use manual settings. You don't want to change any DOF with aperture settings..the latter might create algorithm conflicts with the DOF changes..

Again, you try to obtain a final result that is close to what your eyes/brain perceived.. (pushing this further is indeed your option and exaggerated results can and will be obtained with HDR merging)

Just mu humble opinion..
 
  • Love
Reactions: ericgtr12
If the original shot has lots of dynamic range with enough data in the highlights and the shadows, then you can get the desired results by using masks and play with adjustments and HDR ranges like highlights and shadows. (Make copies of your original and review the data with increasing the exposure and next pumping up the shadows, this test will bring forward the data you will not see in the original shot)

As I mentioned before , the recent full size sensor cameras have a nice dynamic range hence bracketing is not always required..Even if you do, take a (2) stop bracketing with (3) shots on tripod and only change the shutter speed, in fact use manual settings. You don't want to change any DOF with aperture settings..the latter might create algorithm conflicts with the DOF changes..

Again, you try to obtain a final result that is close to what your eyes/brain perceived.. (pushing this further is indeed your option and exaggerated results can and will be obtained with HDR merging)

Just mu humble opinion..
Exactly my thoughts too. The dynamic range we're getting out of the newer cameras these days is pretty broad, I focus more on my composition and exposure at the time of the shot knowing what to expect in post. Frankly, the shadow detail I get out of my Sony AR7 III never ceases to amaze me, see the attached example and this was a single shot. I hardly ever use bracketing anymore personally.

Greenshot 2022-01-06 09.51.05.png
 
  • Like
Reactions: USAntigoon
@USAntigoon, @ericgtr12, your points are valid, but not always applicable. For one thing, not everyone has a newer model camera. For another, sometimes one might want more than a 2-3 stop swing in exposure throughout an image.

In my case, I ended up with a four stop difference for the interior portion of my image. I shot this image on a Nikon Z6, which has one of the best dynamic ranges in a camera, and also a relatively smaller sensor (24mp) which is well noted for good noise handling. If I increased the exposure of my "window" reference image 4 stops to get to the wall color of my "wall" reference image, I introduced a TON of noise. Sure, I could probably run it through a noise reduction program of choice, but why would I do that? The image exposed properly for the wall has zero noise.

Web_January_05_2022_001-3.jpg


Screen Shot 2022-01-06 at 2.03.20 PM.jpg


I mean, you aren't wrong in saying there is a lot of dynamic range to be pulled from my window image, but there's no reason not to just layer images if you have the ability to shoot and layer multiples ones for the best final result.

That said, I recently took some sunset landscape images with my Z6ii and I couldn't find the bracket setting since that button was removed from the Z series. It was freezing with no cell service, so I couldn't even do a quick google to find the setting, and since I was losing light I just made the best exposures I could on the fly. In the end, I was able to pull enough detail out of the shadows for a balanced overall exposure, but they were fairly noisy still in the shadows. So yes, sometimes one image is doable, or the only option. But here I had time to shoot bracketed (because after my freezing sunset debacle I figured out what menu command it is), so that's what I chose. Also, my shadow area is probably half my image, not some shadows sprinkled throughout that I'm trying to tweak.

Eric, in your sample, although you did bring back a lot of detail to the foreground grass, I would still consider it to be shadows; you weren't trying to raise it to midtones. You also have a lot of contrasty details in there that hide noise. My walls are solid, and noise came out as both grain and color noise. Plus, it was in the out of focus area of the image where noise lives even more greatly. I'd like to see what just that grass area looks like at 100% if you raise exposure four stops.
 
Last edited:
  • Like
Reactions: ericgtr12
@USAntigoon, @ericgtr12, your points are valid, but not always applicable. For one thing, not everyone has a newer model camera. For another, sometimes one might want more than a 2-3 stop swing in exposure throughout an image.

In my case, I ended up with a four stop difference for the interior portion of my image. I shot this image on a Nikon Z6, which has one of the best dynamic ranges in a camera, and also a relatively smaller sensor (24mp) which is well noted for good noise handling. If I increased the exposure of my "window" reference image 4 stops to get to the wall color of my "wall" reference image, I introduced a TON of noise. Sure, I could probably run it through a noise reduction program of choice, but why would I do that? The image exposed properly for the wall has zero noise.

View attachment 1939835

View attachment 1939834

I mean, you aren't wrong in saying there is a lot of dynamic range to be pulled from my window image, but there's no reason not to just layer images if you have the ability to shoot and layer multiples ones for the best final result.

That said, I recently took some sunset landscape images with my Z6ii and I couldn't find the bracket setting since that button was removed from the Z series. It was freezing with no cell service, so I couldn't even do a quick google to find the setting, and since I was losing light I just made the best exposures I could on the fly. In the end, I was able to pull enough detail out of the shadows for a balanced overall exposure, but they were fairly noisy still in the shadows. So yes, sometimes one image is doable, or the only option. But here I had time to shoot bracketed (because after my freezing sunset debacle I figured out what menu command it is), so that's what I chose. Also, my shadow area is probably half my image, not some shadows sprinkled throughout that I'm trying to tweak.

Eric, in your sample, although you did bring back a lot of detail to the foreground grass, I would still consider it to be shadows; you weren't trying to raise it to midtones. You also have a lot of contrasty details in there that hide noise. My walls are solid, and noise came out as both grain and color noise. Plus, it was in the out of focus area of the image where noise lives even more greatly. I'd like to see what just that grass area looks like at 100% if you raise exposure four stops.
I am not in disagreement at all..The choice of bracketing is indeed driven by the subject's condition and the camera's dynamic range.
In case of doubt you can always bracket as much as you want and "play" with it in post.. It's all doable and that is the beauty of photography as there is for sure more than one workflow..
Personally I am not that much of a HDR fan..I am now studying (try and error) the Brenizer System and stitching ..Enjoy
 
@USAntigoon, @ericgtr12, your points are valid, but not always applicable. For one thing, not everyone has a newer model camera. For another, sometimes one might want more than a 2-3 stop swing in exposure throughout an image.

In my case, I ended up with a four stop difference for the interior portion of my image. I shot this image on a Nikon Z6, which has one of the best dynamic ranges in a camera, and also a relatively smaller sensor (24mp) which is well noted for good noise handling. If I increased the exposure of my "window" reference image 4 stops to get to the wall color of my "wall" reference image, I introduced a TON of noise. Sure, I could probably run it through a noise reduction program of choice, but why would I do that? The image exposed properly for the wall has zero noise.

View attachment 1939835

View attachment 1939834

I mean, you aren't wrong in saying there is a lot of dynamic range to be pulled from my window image, but there's no reason not to just layer images if you have the ability to shoot and layer multiples ones for the best final result.

That said, I recently took some sunset landscape images with my Z6ii and I couldn't find the bracket setting since that button was removed from the Z series. It was freezing with no cell service, so I couldn't even do a quick google to find the setting, and since I was losing light I just made the best exposures I could on the fly. In the end, I was able to pull enough detail out of the shadows for a balanced overall exposure, but they were fairly noisy still in the shadows. So yes, sometimes one image is doable, or the only option. But here I had time to shoot bracketed (because after my freezing sunset debacle I figured out what menu command it is), so that's what I chose. Also, my shadow area is probably half my image, not some shadows sprinkled throughout that I'm trying to tweak.

Eric, in your sample, although you did bring back a lot of detail to the foreground grass, I would still consider it to be shadows; you weren't trying to raise it to midtones. You also have a lot of contrasty details in there that hide noise. My walls are solid, and noise came out as both grain and color noise. Plus, it was in the out of focus area of the image where noise lives even more greatly. I'd like to see what just that grass area looks like at 100% if you raise exposure four stops.
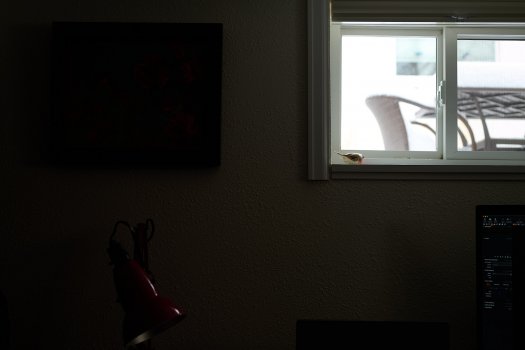
Fair points, I know that even my Canon 6D MKII could never bring out the same shadow detail as the Sony. I will also concede that if we bumped the highlights/exposure in this shot that we would likely see some noise, particularly in the color spectrum.

However, when shooting I'm doing so knowing the limitations of both the camera and the software, this shot is a good example of that for me. I don't need any more detail than what is shown and at 42MP I can still blow this up nice and big in a print if I choose. Had I been shooting for proper levels in the grass it would've blown the sky so I always look for the underexposed to bring it out.
 
With Real Estate photo I prefer multi off-camera lighting but keep HDR in my back pocket when lighting setup is not possible. It is the color balance issue with HDR that you nicely described...where I prefer "clown vomit." Recently, HDR was my only choice as I took interior photos of daughter's airBnB as I didn't haul my lighting to Europe. Only software I used was Lightroom with Photo Merge HDR, then that file appears I exported the resulting HDR.dgn file to Photoshop for further adjustment, returning back to Lightroom as a .tiff and later exported from LR as a jpg. WHEW!!

With me, the issue was window pulls that would be blown out with single exposure.

I don't usually process on my MBP but did these. While I see the end result an intermediate files in Finder, have some sort of issue with Lightroom as the entire Switzerland2021 folder doesn't show in Lightroom and wants me to re-import it with all files noted as available to import. Really don't know what happened there...but I can't review how I worked by re-opening it.

Don't think I had to do it with the HDR but a trick I learned with Panoramics (I use PtGui - not PS or LR for merging) is before exporting as jpg, I select the sequence in LR and with auto-sync make broad changes, such as color balance, contrast, etc, to the entire sequence. You may want to try the with the 3 HDR exposures - select the three but work on the "0" with auto-sync making similar adjustments on +1 and -1. In this case, it appears you like the window exposures, use LR's mask (I think you can in auto-sync) to block changes to them while adjusting the interior walls. Might be worth a try.

In my case, I do recall that I didn't even have a tripod so had to make anti-shake adjustments in the merge.
Chalet -2000px-4.jpg
Chalet -2000px-1.jpg
Chalet -2000px-9.jpg
Chalet -2000px-8.jpg
 
no, I don't ever use that command. I should look that one up. ?

Oh, definitely look at using apply image on a mask. It makes dodging and burning super quick and also when trying to mask out complex shapes it is a great accelerator.
 
Register on MacRumors! This sidebar will go away, and you'll see fewer ads.