Become a MacRumors Supporter for $50/year with no ads, ability to filter front page stories, and private forums.

Keebler

macrumors 68030
Original poster
Jun 20, 2005
2,965
249
Canada
Hi folks,

I'm hoping someone could help me here.

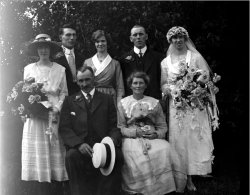
I have a fantastic photograph from a client's Grandparents wedding - from 1918! How cool is that!? It's in remarkable condition and I've edited the blemishes etc.. and now i'm working on blending in the left side as it's burned white at the edge.

I've used some levels layers (multiple and screens), but I can't seem to get rid of that white flaring :(

I'm followed page 92 of Katrina Eismann's book b/c I ran out of options, but I can't seem to fix this one.

I realize the right side of the photo is dark and I was going to play with that, but any suggestions for that left side?

Using Photoshop CS5.

Of course, this is the last photo I need to fix for her project.

Thanks,
Keebler
 
[flying blind]

Could you post the photo so we can see what you're talking about?

[/flying blind]

omg. i can't believe i forgot to attach the screenshot i took.

my bad :)
 

Attachments

  • levels issue.jpg
    levels issue.jpg
    441.5 KB · Views: 127
I am too new at CS5 to be of much help, but I wonder if this would be of any help to you (?):

a. Take a good quality RAW photo of the picture, and open this RAW image in Camera Raw as a Smart Object. See if you can adjust the area that is too light (left of the photo).

b. Now, double-click on the image shown in the Layers panel, which in turn will open a layer of the image in Camera Raw. Now adjust the dark side of the image, and then click on "Done." The result is two layers blended into one.
-------------
 
Last edited:
I am too new at CS5 to be of much help, but I wonder if this would be of any help to you (?):

a. Take a good quality RAW photo of the picture, and open this RAW image in Camera Raw as a Smart Object. See if you can adjust the area that is too light (left of the photo).

b. Now, double-click on the image shown in the Layers panel, which in turn will open a layer of the image in Camera Raw. Now adjust the dark side of the image, and then click on "Done." The result is two layers blended into one.
-------------

Thanks AlaskaMoose. I should have mentioned this is a negative. I would definitely try your method if it was a photo.
 
Levels!

vwegrthnt5.jpg


30 second fix

duplicate layer, layer mask, invert mask, brush in afflicted area on right side, adjustment layer of levels

new layer, clone brush / black paint brush over the white fringe edge that is left

BAM
 
vwegrthnt5.jpg


30 second fix

duplicate layer, layer mask, invert mask, brush in afflicted area on right side, adjustment layer of levels

new layer, clone brush / black paint brush over the white fringe edge that is left

BAM

awesome! thanks.

I knew there had to be a way and I was at my wit's end b/c I couldn't make it work.

I do appreciate it and I'll make sure to credit you in helping me when I explain to the client. As much as I wanted to do it myself, I just had to ask b/c this photo deserves to be fixed properly :)

Glad to help!
 
Register on MacRumors! This sidebar will go away, and you'll see fewer ads.