Become a MacRumors Supporter for $50/year with no ads, ability to filter front page stories, and private forums.

KimJonNumberUn

macrumors regular
Original poster
Dec 18, 2013
168
0
So i upgraded to a canon 70D DSLR, still getting use to it. I wouldnt say im a noob with photography as I know a few things about playing with aperture, depth of field and the basics....

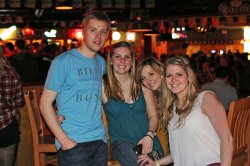
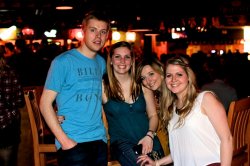
Anyways I shot this photo of a group of people and the other photos were of similar to this.

The equipment was a Canon 70D with a Canon 1.4 35mm L lens.

The settings were:

ISO - 1600
35mm
O EV
f/2.8
shutter: 1/60.
flash (the built in flash)

the setting was, bar/club kind of scene with dim lighting is best i could describe it.

was there anything i could have done with what I had to make it better in terms of settings or what would you guys have set the camera to if you were in my position?

I won't lie I set the camera on auto. I'm getting more inclined to go manual but I would hate to ruin a photo of good friends so I'm still more confident in the cameras settings then my own but hopefully in time I will get more use to manual, hence why I am asking here right now.

Also my last request was. does anyone here have alot of post processing skills to make this pic better? I just want atleast one to look nice in the album :)

Full sized picture on flikr:

https://www.flickr.com/photos/24140175@N02/13477153053/
 

thekev

macrumors 604
Aug 5, 2010
7,005
3,343
thanks for doing it! but the pic looks kinda grainy?

He applied either a sharpening algorithm with wide radius or a combination of them. What you're seeing is noise that is simply more evident in that version. I prefer the original. It looks much more natural.
 

themumu

macrumors 6502a
Feb 13, 2011
727
644
Sunnyvale
How could have I improved this picture? Could someone maybe post process it n...

I think for photos like this, the built in flash is the weakest link. It's not too bad, but if you want dramatically better results in conditions like that, you need to look at better control of light, not just post production.
 

KimJonNumberUn

macrumors regular
Original poster
Dec 18, 2013
168
0
I think for photos like this, the built in flash is the weakest link. It's not too bad, but if you want dramatically better results in conditions like that, you need to look at better control of light, not just post production.

so the settings are okay, but a external flash would make a difference? I thought about getting one but for taking pics of people seems a bit intimidating / excessive for casual
 

ElectronGuru

macrumors 68000
Sep 5, 2013
1,656
489
Oregon, USA
The easiest way to make a picture look better is with a wider aperture. You've got fast glass, crank that down to something under 2.0. The easiest way to make a picture look worse is to use a flash. If there's simply no option, find a way to make the light diffused and indirect. But go a far with the lens first as possible.
 

AirborneAngel

macrumors 6502
Sep 8, 2007
258
0
Los Angeles, CA
Settings are ok - but they could be better! With your current setup you can do several things without purchasing a speedlight (external flash.)

The main problem with this image is that it is underexposed by about one/one and a half stops.

1. Increase your ISO - on the 70D you can safely increase your ISO (sensor's sensitivity to light) beyond 1600 without introducing too much noise into the image, next time try out ISO 2000, 2500 or even 3200 - this will increase the exposure of your photograph.

2. Open up your aperture - shooting at 2.8 on a 1.4 lens restricts potential light that could hit your camera's sensor. Try opening up the lens (widening the aperture) to f/2, f/1.8 or even all the way open at f/1.4.

3. Shutter speed is good - anything lower than say 1/60 or 1/80 you are extremely likely to increase camera shake/blur in the image. Generally you do not want to shoot below this shutter speed handheld, unless you are using a flash or tripod.

4. Use your camera's light meter! That little bar that moves in your viewfinder when you point it at things is a very powerful tool for letting you know, roughly, how the photograph will turn out. If the little ticker is too far in the "-" direction your image will be underexposed, too far in the "+" direction and it will be overexposed. Somewhere around the middle marker (preferably on the "+" side, and you should be right on the money.)

5. Only use your camera's built-in flash if absolutely necessary (as it may have been in this situation). I have completed hundreds of photo shoots in the past few years, and not once did I use my camera's built-in flash! If you can get the image properly exposed without using on-camera flash, do it.

6. Shoot Manual mode - this gives you much greater control when shooting in low light environments. As I'm sure you know, there are 3 key things on your camera that control exposure:

a. Shutter Speed: how fast your shutter exposes the sensor to light
b. Aperture: the amount of light allowed by your lens
c. ISO: your camera sensor's sensitivity to light

Once you figure out how these work in relation to one another, shooting in manual becomes a breeze. For example, when I go to a shoot (I'm a sports photographer/editor) I will shoot at a relatively constant aperture (F/2.8 or 3.2) but tweak my ISO and shutter speed so I can freeze action based on the amount of ambient light. (Generally I don't dip below 1/1000 or 1/800 of a second to freeze action) so the only thing I'm really messing with is my ISO.

An alternative to manual mode is either aperture priority or shutter priority mode on your camera (AV and TV, respectively). In aperture priority mode you set the aperture on your camera and it does the rest to achieve what it deems to be "perfect" exposure. In shutter priority mode you set your shutter speed and the camera sets your shutter speed to achieve proper exposure. Using these modes you should understand your camera's metering modes/exposure compensation, but that's a story for another day.

7. Shoot RAW instead of JPG. Shooting your files in camera RAW gives you much more control in the post-production process. Even if all you're doing is increasing exposure and decreasing noise. I wouldn't suggest shooting in RAW if you are unfamiliar with editing however, focus first on mastering your camera's manual functionality.

Hope that helps - let me know if you have any other questions. Always willing to help a beginning photographer out! The learning curve can be a little bit steep in regards to shooting manual mode on a DSLR, but once you do you will find you have significantly more control over how your images come out.

I edited your image by increasing it's exposure/sharpening and have attached it to this post. Sorry for the information overload!

Edited image: http://imgur.com/J4vYkWD

Source: Professional photo editor / sports photographer
 
Last edited:

Parkin Pig

macrumors 6502a
Oct 23, 2009
670
141
Yorkshire-by-Gum
Also my last request was. does anyone here have alot of post processing skills to make this pic better? I just want atleast one to look nice in the album :)


I had a go - the original is about 7MB after PP, so here's a 1800x1200 version...

I tried not to over-brighten it, to retain some warmth and more detail in the white top of the girl on the right.
 

Attachments

  • 13477153053_7a50bc3240_d.jpg
    13477153053_7a50bc3240_d.jpg
    888.9 KB · Views: 228

tcphoto

macrumors 6502a
Feb 23, 2005
758
2
Madison, GA
I would drag the shutter and get more ambient light. You will get a little blurred edge around the subjects but it's a nice effect when done well.
 

KimJonNumberUn

macrumors regular
Original poster
Dec 18, 2013
168
0
I would drag the shutter and get more ambient light. You will get a little blurred edge around the subjects but it's a nice effect when done well.

wouldnt a longer shutter make the pic blurry? especailyl since im hand holding this
 

BJMRamage

macrumors 68030
Oct 2, 2007
2,713
1,233
Airborne Angel has good tips and a nice output.

What Post Processing software are you using?

I used to use Photoshop back in the day...then moved to iPhoto and now onto Aperture. I like using Aperture (very similar to Lightroom) as I can organize and quickly run through photos and apply the same settings to many shots with similar lighting. and the non-destructive nature of it helps too. you can come back at a later time and adjust some more or go back to the original versions easily.

Here's a few shots that I edited with Aperture...I was using RAW for these:
https://www.flickr.com/photos/36990401@N06/sets/72157643062534885/

I started using RAW last summer and only shot RAW for a vacation a month later. I try to not use Auto (sometimes with kids Auto or even Program mode is easiest when somebody else is shooting). Anyway, I like to switch off Auto and either use Aperture or Shutter modes (sometimes going into Manual) and I will use the Exposure compensation or even the Flash compensation (I think i have those right) to adjust the blast of the flash and the way the camera shoots.
 

pmxperience

macrumors regular
Aug 12, 2011
241
456
United States
AirborneAngel explained it perfectly.

Here's my go at it. Spent a few minutes in Lightroom 5.
Raised exposure, open shadows, brought down highlights on overexposed areas, a little more tweaking and...

FtUXsor.jpg
 

KimJonNumberUn

macrumors regular
Original poster
Dec 18, 2013
168
0
Here's my go. I wanted to keep the "bar" feel.

AirborneAngel explained it perfectly.

Here's my go at it. Spent a few minutes in Lightroom 5.
Raised exposure, open shadows, brought down highlights on overexposed areas, a little more tweaking and...

Thanks guys! You made the picture 10x better! :)

hopefully i can figure out post processing after I get the hang of using the canon eventually ! :D

I'll def take AirborneAngles advice in the future!
 

KimJonNumberUn

macrumors regular
Original poster
Dec 18, 2013
168
0
Settings are ok - but they could be better! With your current setup you can do several things without purchasing a speedlight (external flash.)

The main problem with this image is that it is underexposed by about one/one and a half stops.

1. Increase your ISO - on the 70D you can safely increase your ISO (sensor's sensitivity to light) beyond 1600 without introducing too much noise into the image, next time try out ISO 2000, 2500 or even 3200 - this will increase the exposure of your photograph.

2. Open up your aperture - shooting at 2.8 on a 1.4 lens restricts potential light that could hit your camera's sensor. Try opening up the lens (widening the aperture) to f/2, f/1.8 or even all the way open at f/1.4.

3. Shutter speed is good - anything lower than say 1/60 or 1/80 you are extremely likely to increase camera shake/blur in the image. Generally you do not want to shoot below this shutter speed handheld, unless you are using a flash or tripod.

4. Use your camera's light meter! That little bar that moves in your viewfinder when you point it at things is a very powerful tool for letting you know, roughly, how the photograph will turn out. If the little ticker is too far in the "-" direction your image will be underexposed, too far in the "+" direction and it will be overexposed. Somewhere around the middle marker (preferably on the "+" side, and you should be right on the money.)

5. Only use your camera's built-in flash if absolutely necessary (as it may have been in this situation). I have completed hundreds of photo shoots in the past few years, and not once did I use my camera's built-in flash! If you can get the image properly exposed without using on-camera flash, do it.

6. Shoot Manual mode - this gives you much greater control when shooting in low light environments. As I'm sure you know, there are 3 key things on your camera that control exposure:

a. Shutter Speed: how fast your shutter exposes the sensor to light
b. Aperture: the amount of light allowed by your lens
c. ISO: your camera sensor's sensitivity to light

Once you figure out how these work in relation to one another, shooting in manual becomes a breeze. For example, when I go to a shoot (I'm a sports photographer/editor) I will shoot at a relatively constant aperture (F/2.8 or 3.2) but tweak my ISO and shutter speed so I can freeze action based on the amount of ambient light. (Generally I don't dip below 1/1000 or 1/800 of a second to freeze action) so the only thing I'm really messing with is my ISO.

An alternative to manual mode is either aperture priority or shutter priority mode on your camera (AV and TV, respectively). In aperture priority mode you set the aperture on your camera and it does the rest to achieve what it deems to be "perfect" exposure. In shutter priority mode you set your shutter speed and the camera sets your shutter speed to achieve proper exposure. Using these modes you should understand your camera's metering modes/exposure compensation, but that's a story for another day.

7. Shoot RAW instead of JPG. Shooting your files in camera RAW gives you much more control in the post-production process. Even if all you're doing is increasing exposure and decreasing noise. I wouldn't suggest shooting in RAW if you are unfamiliar with editing however, focus first on mastering your camera's manual functionality.

Hope that helps - let me know if you have any other questions. Always willing to help a beginning photographer out! The learning curve can be a little bit steep in regards to shooting manual mode on a DSLR, but once you do you will find you have significantly more control over how your images come out.

I edited your image by increasing it's exposure/sharpening and have attached it to this post. Sorry for the information overload!

Edited image: http://imgur.com/J4vYkWD

Source: Professional photo editor / sports photographer

Thanks for the great advice! I have one question regarding aperature. You said in low light situations for a shot like this I ciould krank the aperature all the way to 1.4. I found when the aperature is low like that in group shots,, say of 3 or 4 people, if one person is slightly back more then the others, they tend to be a bit out of focus. I suppose in those situations though i was closer and not as far back as I was in the picture i posted in this thread. Is that a correct assessment? this is totally based on my own experience.
 

admwright

macrumors regular
Sep 11, 2008
243
53
Scotland
Thanks for the great advice! I have one question regarding aperature. You said in low light situations for a shot like this I ciould krank the aperature all the way to 1.4. I found when the aperature is low like that in group shots,, say of 3 or 4 people, if one person is slightly back more then the others, they tend to be a bit out of focus. I suppose in those situations though i was closer and not as far back as I was in the picture i posted in this thread. Is that a correct assessment? this is totally based on my own experience.

Correct, the closer you are to the subject the smaller the depth of field. At 1.4 it can get pretty narrow and so with a group it can be tricky to get everyone in focus.
 

Meister

Suspended
Oct 10, 2013
5,456
4,310
Airborne Angel summed it up well.
From my experience the built in flash has only two purposes:
- triggering another flash
- shooting portraits, at night, in a cave

Always try to get the shot without the on camera flash.
It takes all the natural lighting away.
Crank up the iso, go to f1.4, try to expose a bit longer, fix underexposure in post. (shoot raw)
I'd do anything to avoid flash unless its in a studio / controlled lighting situation and you know what you are doing.
 

KimJonNumberUn

macrumors regular
Original poster
Dec 18, 2013
168
0
Airborne Angel summed it up well.
From my experience the built in flash has only two purposes:
- triggering another flash
- shooting portraits, at night, in a cave

Always try to get the shot without the on camera flash.
It takes all the natural lighting away.
Crank up the iso, go to f1.4, try to expose a bit longer, fix underexposure in post. (shoot raw)
I'd do anything to avoid flash unless its in a studio / controlled lighting situation and you know what you are doing.

whats ur opinion on an external flash?
 

Meister

Suspended
Oct 10, 2013
5,456
4,310
whats ur opinion on an external flash?
It depends on what you are trying to achieve.
If you know what you want and how to use it an external flash can be great.
In all other cases I would try to use the existing lightsources to capture the atmosphere of the moment.
 

pdxflint

macrumors 68020
Aug 25, 2006
2,407
14
Oregon coast
Figured I'd give it a try. My monitor is probably a bit out of whack colorwise, so it still looks a bit reddish, but I tried to bring up the "light" a bit on your friends without making it seem too blown out with the flash effect. I also removed a bit of reflective shine on the girl's cheek on the right. I used Lightroom 3.
 

Attachments

  • reprocess sample.jpg
    reprocess sample.jpg
    793.3 KB · Views: 103

pdxflint

macrumors 68020
Aug 25, 2006
2,407
14
Oregon coast
Actually, this is the one I meant to attach. It's basically the same as the one above, but I did a little light editing around the shiny spots on the noses and chins just to smooth things out ever so slightly. Nothing fancy, just used the healing brush in Lightroom.
 

Attachments

  • reprocess sample-2.jpg
    reprocess sample-2.jpg
    794.4 KB · Views: 115

KimJonNumberUn

macrumors regular
Original poster
Dec 18, 2013
168
0
Actually, this is the one I meant to attach. It's basically the same as the one above, but I did a little light editing around the shiny spots on the noses and chins just to smooth things out ever so slightly. Nothing fancy, just used the healing brush in Lightroom.

Thanks all, much appreciated! :)
 

kallisti

macrumors 68000
Apr 22, 2003
1,751
6,670
I can't see the original image from the link in your first post.

Great advice in the above responses.

The problem with using the on-camera flash is that it effectively creates two different exposures for the scene--a foreground exposure from the flash and a background exposure from the ambient light. This tends to make the background too dark and the whole photo unnatural looking (like a snapshot).

Ideally as stated above I would avoid using flash at all in these situations. However, you should try playing around with using negative exposure compensation on your flash output. Easy to do on Nikons (and I assume Canons). Dropping the flash exposure by a half stop up to a full stop might still provide a little fill flash, but allow the foreground and background to be closer in exposure.

Of course this still changes the quality/temperature of the light between foreground and background (foreground looking whiter and background looking yellower/redder). But for posed subjects like this you might be okay with the results.
 
Last edited:
Register on MacRumors! This sidebar will go away, and you'll see fewer ads.