Become a MacRumors Supporter for $50/year with no ads, ability to filter front page stories, and private forums.

Joe Bannon

macrumors regular
Original poster
Jan 7, 2008
151
0
Dallas, Texas
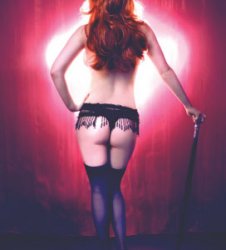
I hired a guy to edit this photo I took. I'm doing some other photo editing and wanted to know how he white washed this photo. I guess that's the term used, correct me if I'm wrong.

fonttest5.jpg


Here is the before...

ZHposter-nowhite.jpg
 
I'm guessing you're talking about the flare effect behind of the woman? It's difficult to guess how much was created in PS and how much is part of the original photo.

To recreate this using the woman and the curtains you'd need to cut her out and paint a white glow in the layers in-between, using layers blending modes to soften and make it look realistic.


No, that was the easy part. I did that with the camera and putting a strobe in front of her and the curtain.

I'm talking about whitening the photo itself.
 
just create a new layer of pure white, then turn the opacity down to like 4 - 5% :)
 
either create a layer filled with white and adjust the opacity.

Or in levels (image> adjustments> levels) move the left marker on the output levels slider to about 10.
 
Adjust the curves so the darkest blacks turn to gray. With the curve window open you can click on the picture to tell which value is where on the curve so you can adjust specific values without messing up other values.

I made the effect more extreme by just moving the bottom point diagonally up, you can also play with it more by adding more points and bending the curve so its more contrasty in the red or whatever.
 

Attachments

  • jhufgjf.jpg
    jhufgjf.jpg
    14.9 KB · Views: 624
Adjust the curves so the darkest blacks turn to gray. With the curve window open you can click on the picture to tell which value is where on the curve so you can adjust specific values without messing up other values.

I made the effect more extreme by just moving the bottom point diagonally up, you can also play with it more by adding more points and bending the curve so its more contrasty in the red or whatever.

Is there a tutorial on this?
 
Is there a tutorial on this?

I dont know, you just go to image>adjustments>curves and move the bottom left point up along the diagonal line. His version has a lot of blue so he probably picked the blue channel from the drop down menu and messed with that the most. You can give it a colored tone by doing the channels individually, or give it an even gray tone by doing RGB.
 
Register on MacRumors! This sidebar will go away, and you'll see fewer ads.