Become a MacRumors Supporter for $50/year with no ads, ability to filter front page stories, and private forums.

anotherscotsman

macrumors 68020
Original poster
Aug 2, 2014
2,369
16,735
UK
@kenoh posted the great idea for a new thread where the photographer provides a detailed explanation of how they produced a particular photograph of interest.

I was honoured to be asked to kick-off the process with a recent long exposure monochrome posting. Sorry there's no advanced video production here - not much advanced anything to be honest but I hope it shows what can be achieved with relatively little effort.

The software and hardware I used are nothing special in that the same effects can be achieved using a variety of software on any image.

IMG_5456 3.jpg


Step 1: I like to have in mind what I would like to ultimately achieve before pressing the shutter button. Doesn't always work out the way I'd hoped but I'm flexible enough to try to salvage something from whatever comes out of the camera. In general, I try to get reasonably close to the 'target' in-camera.

Given the sort of image I was after, I chose a day where the tide was predicted to be very high (looked it up on tide charts on the internet) - it was easy for this to coincide with grey, drab weather - not uncommon for here but ideal for what I was looking for.

Step 2: With wellies on, set up the camera (Canon 6D) on the tripod equipped with my favourite Canon 16-35mm f4L. Fitted the Formatt-Hitech 100mm filter holder on the front ready to take both a circular polariser and a neutral density filter. First question: what density to choose? The choice of density really depends on ambient lighting and the degree of motion blur you want to capture. I was looking for as much blur (i.e. no features in the water) as possible which pointed to a very long exposure. The highest ND filter I have is 16-stop but combined with the CPL, this takes the total density to around 17-stops. Plenty.

I find the 'correct' exposure, focus and framing by setting the camera up without the filter attached. Then using simple arithmetic (and using fingers) I calculate the required exposure by doubling the exposure time from the filter-free period once for each additional stop - 1/200 -> 1/100 -> 1/50 -> 1/25.....

Put the camera in BULB mode, set the aperture to f8 to give good sharpness and decent depth of field for the static objects in the frame. Set the image capture to RAW to get as much flexibility in post as possible.

Then attach filter and a remote timer or manual release (to get beyond the 30-sec inbuilt exposure limit in Canon cameras) and hey presto - time to set the exposure started. The 17-stops was too much for iso100, so I increased iso to 400 to bring the exposure down to a manageable 5 minutes.

The image straight out of camera appears (in Capture One or your favourite RAW processor):
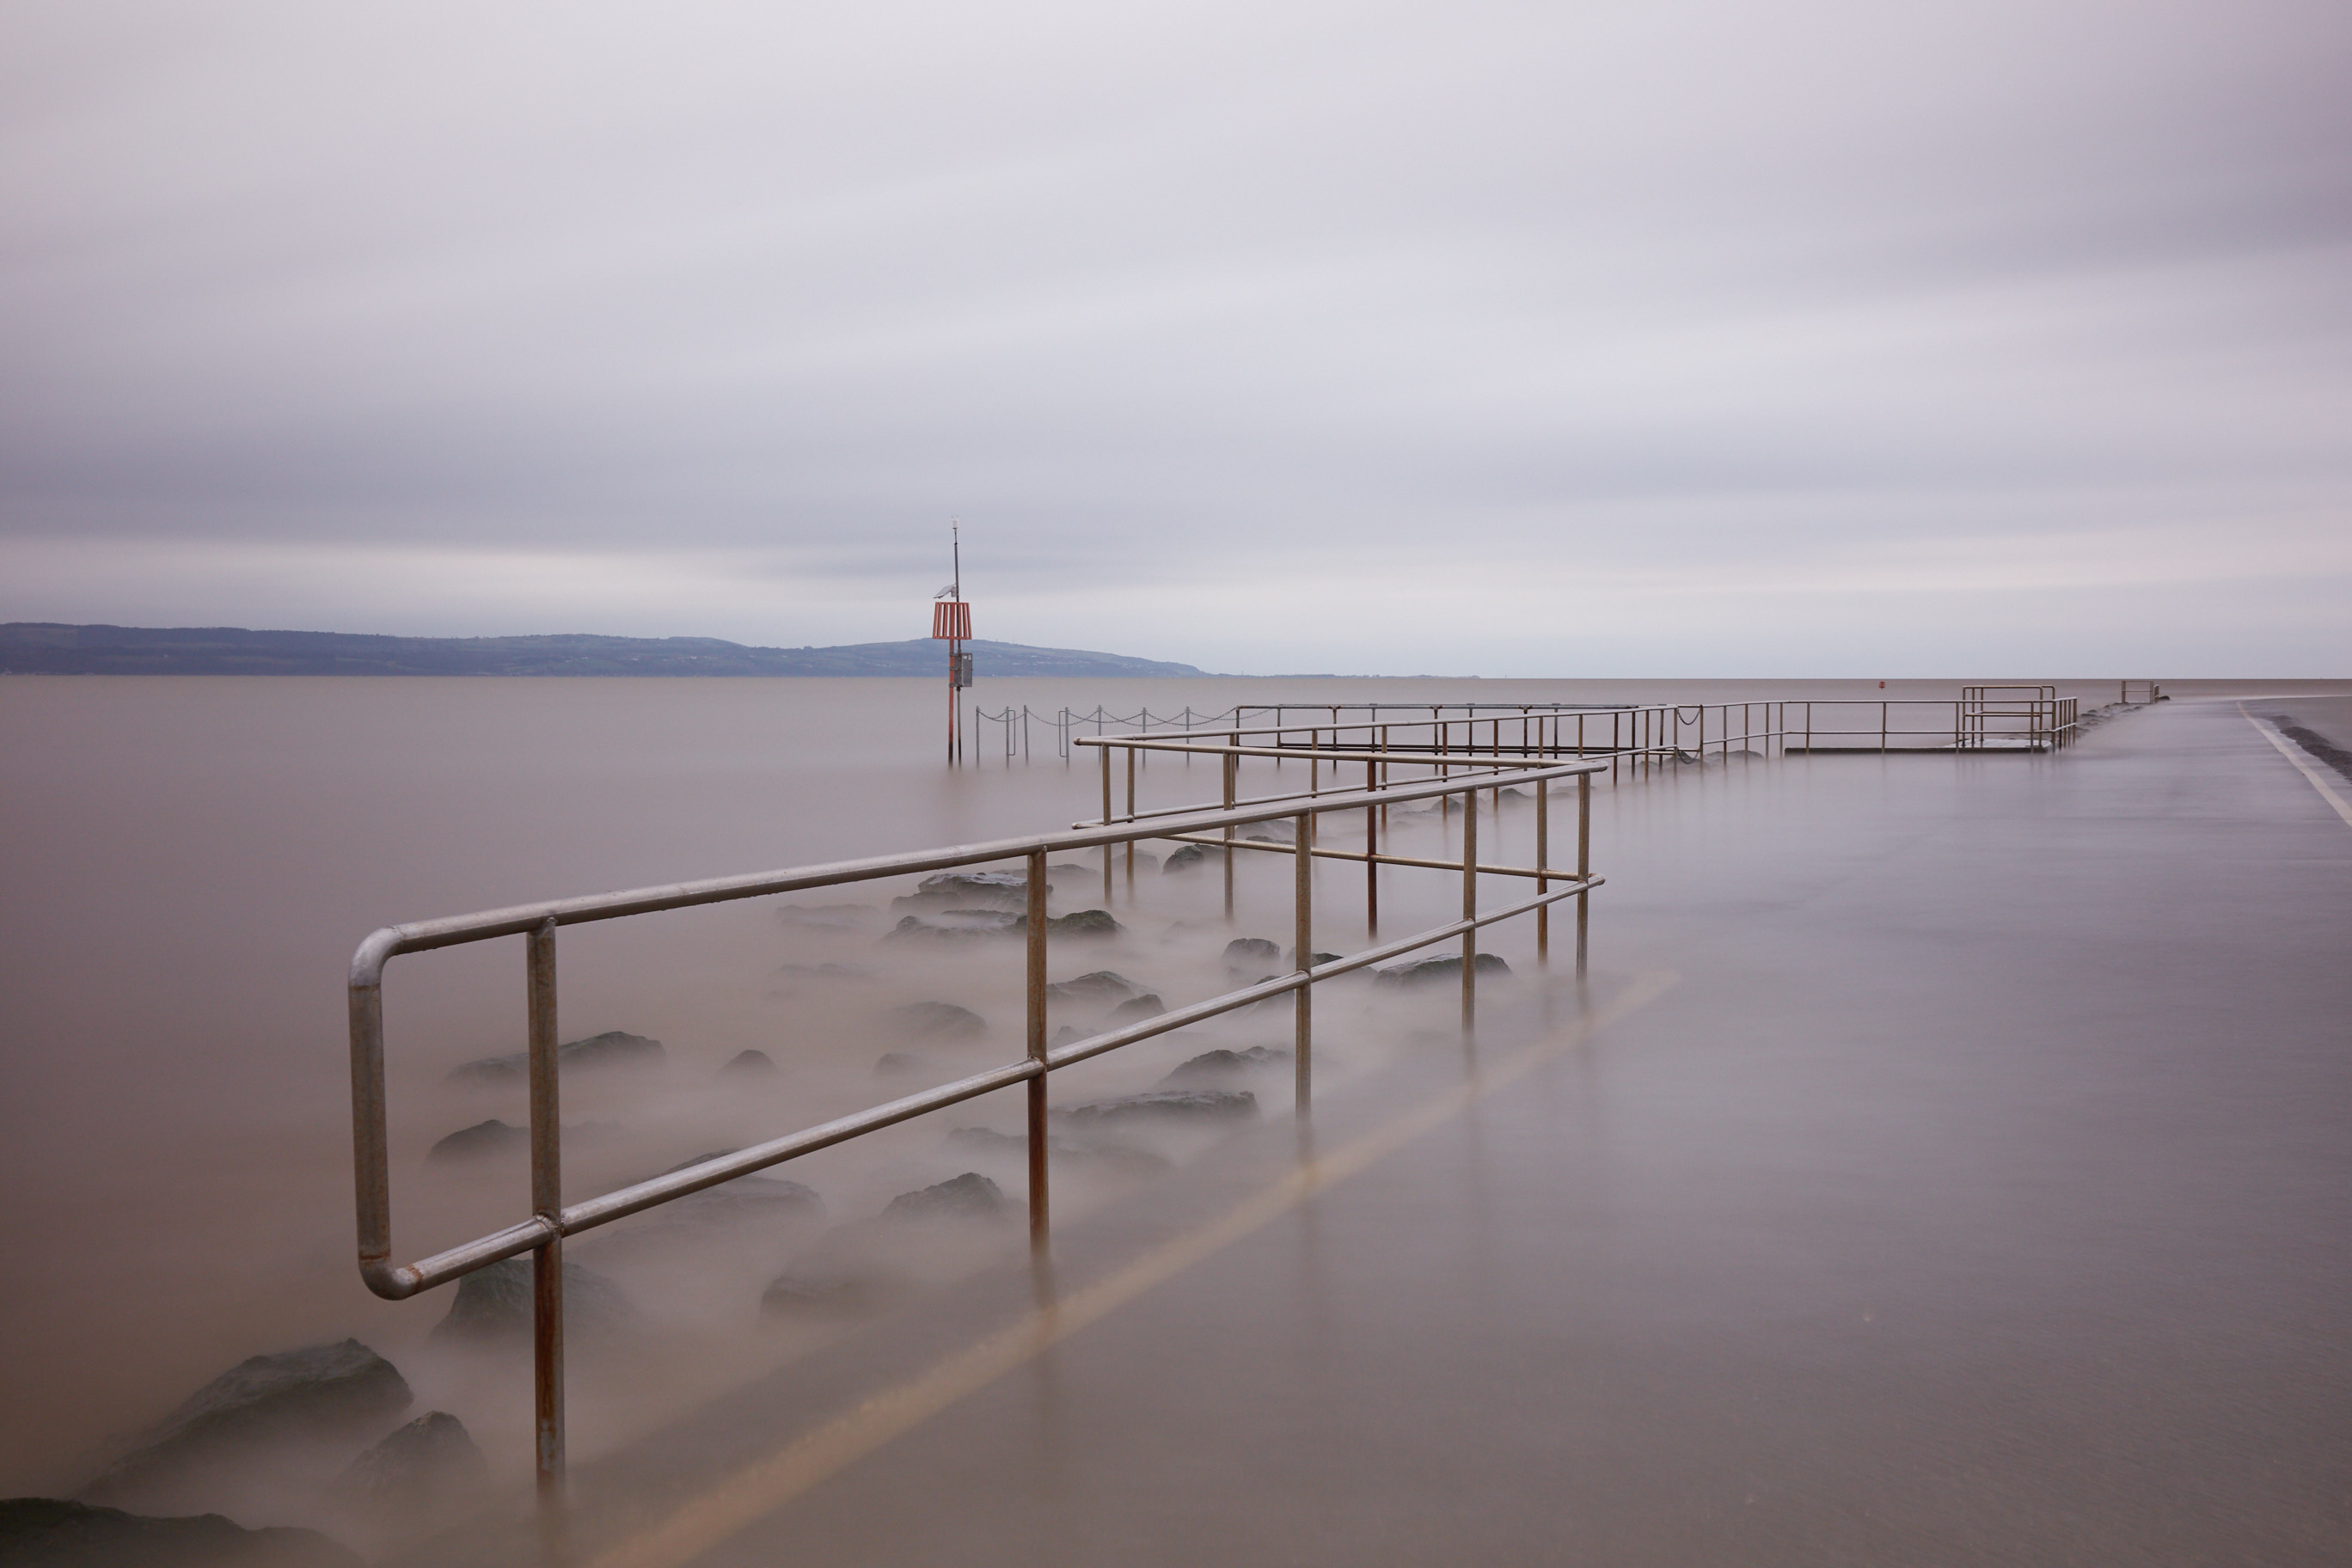
IMG_5456.jpg


Step 2: Post Processing.

I have nothing against people who spend hours in post or who take a lot of effort to produce composite images but my personal preference is to try to stay reasonably true to what I see taking into account the effect I want to achieve. Laziness, lack of patience and lack of skill in post also tends to push me in that direction.

A crop to 5x7 format to improve composition and a very slight horizon straightening yielded:
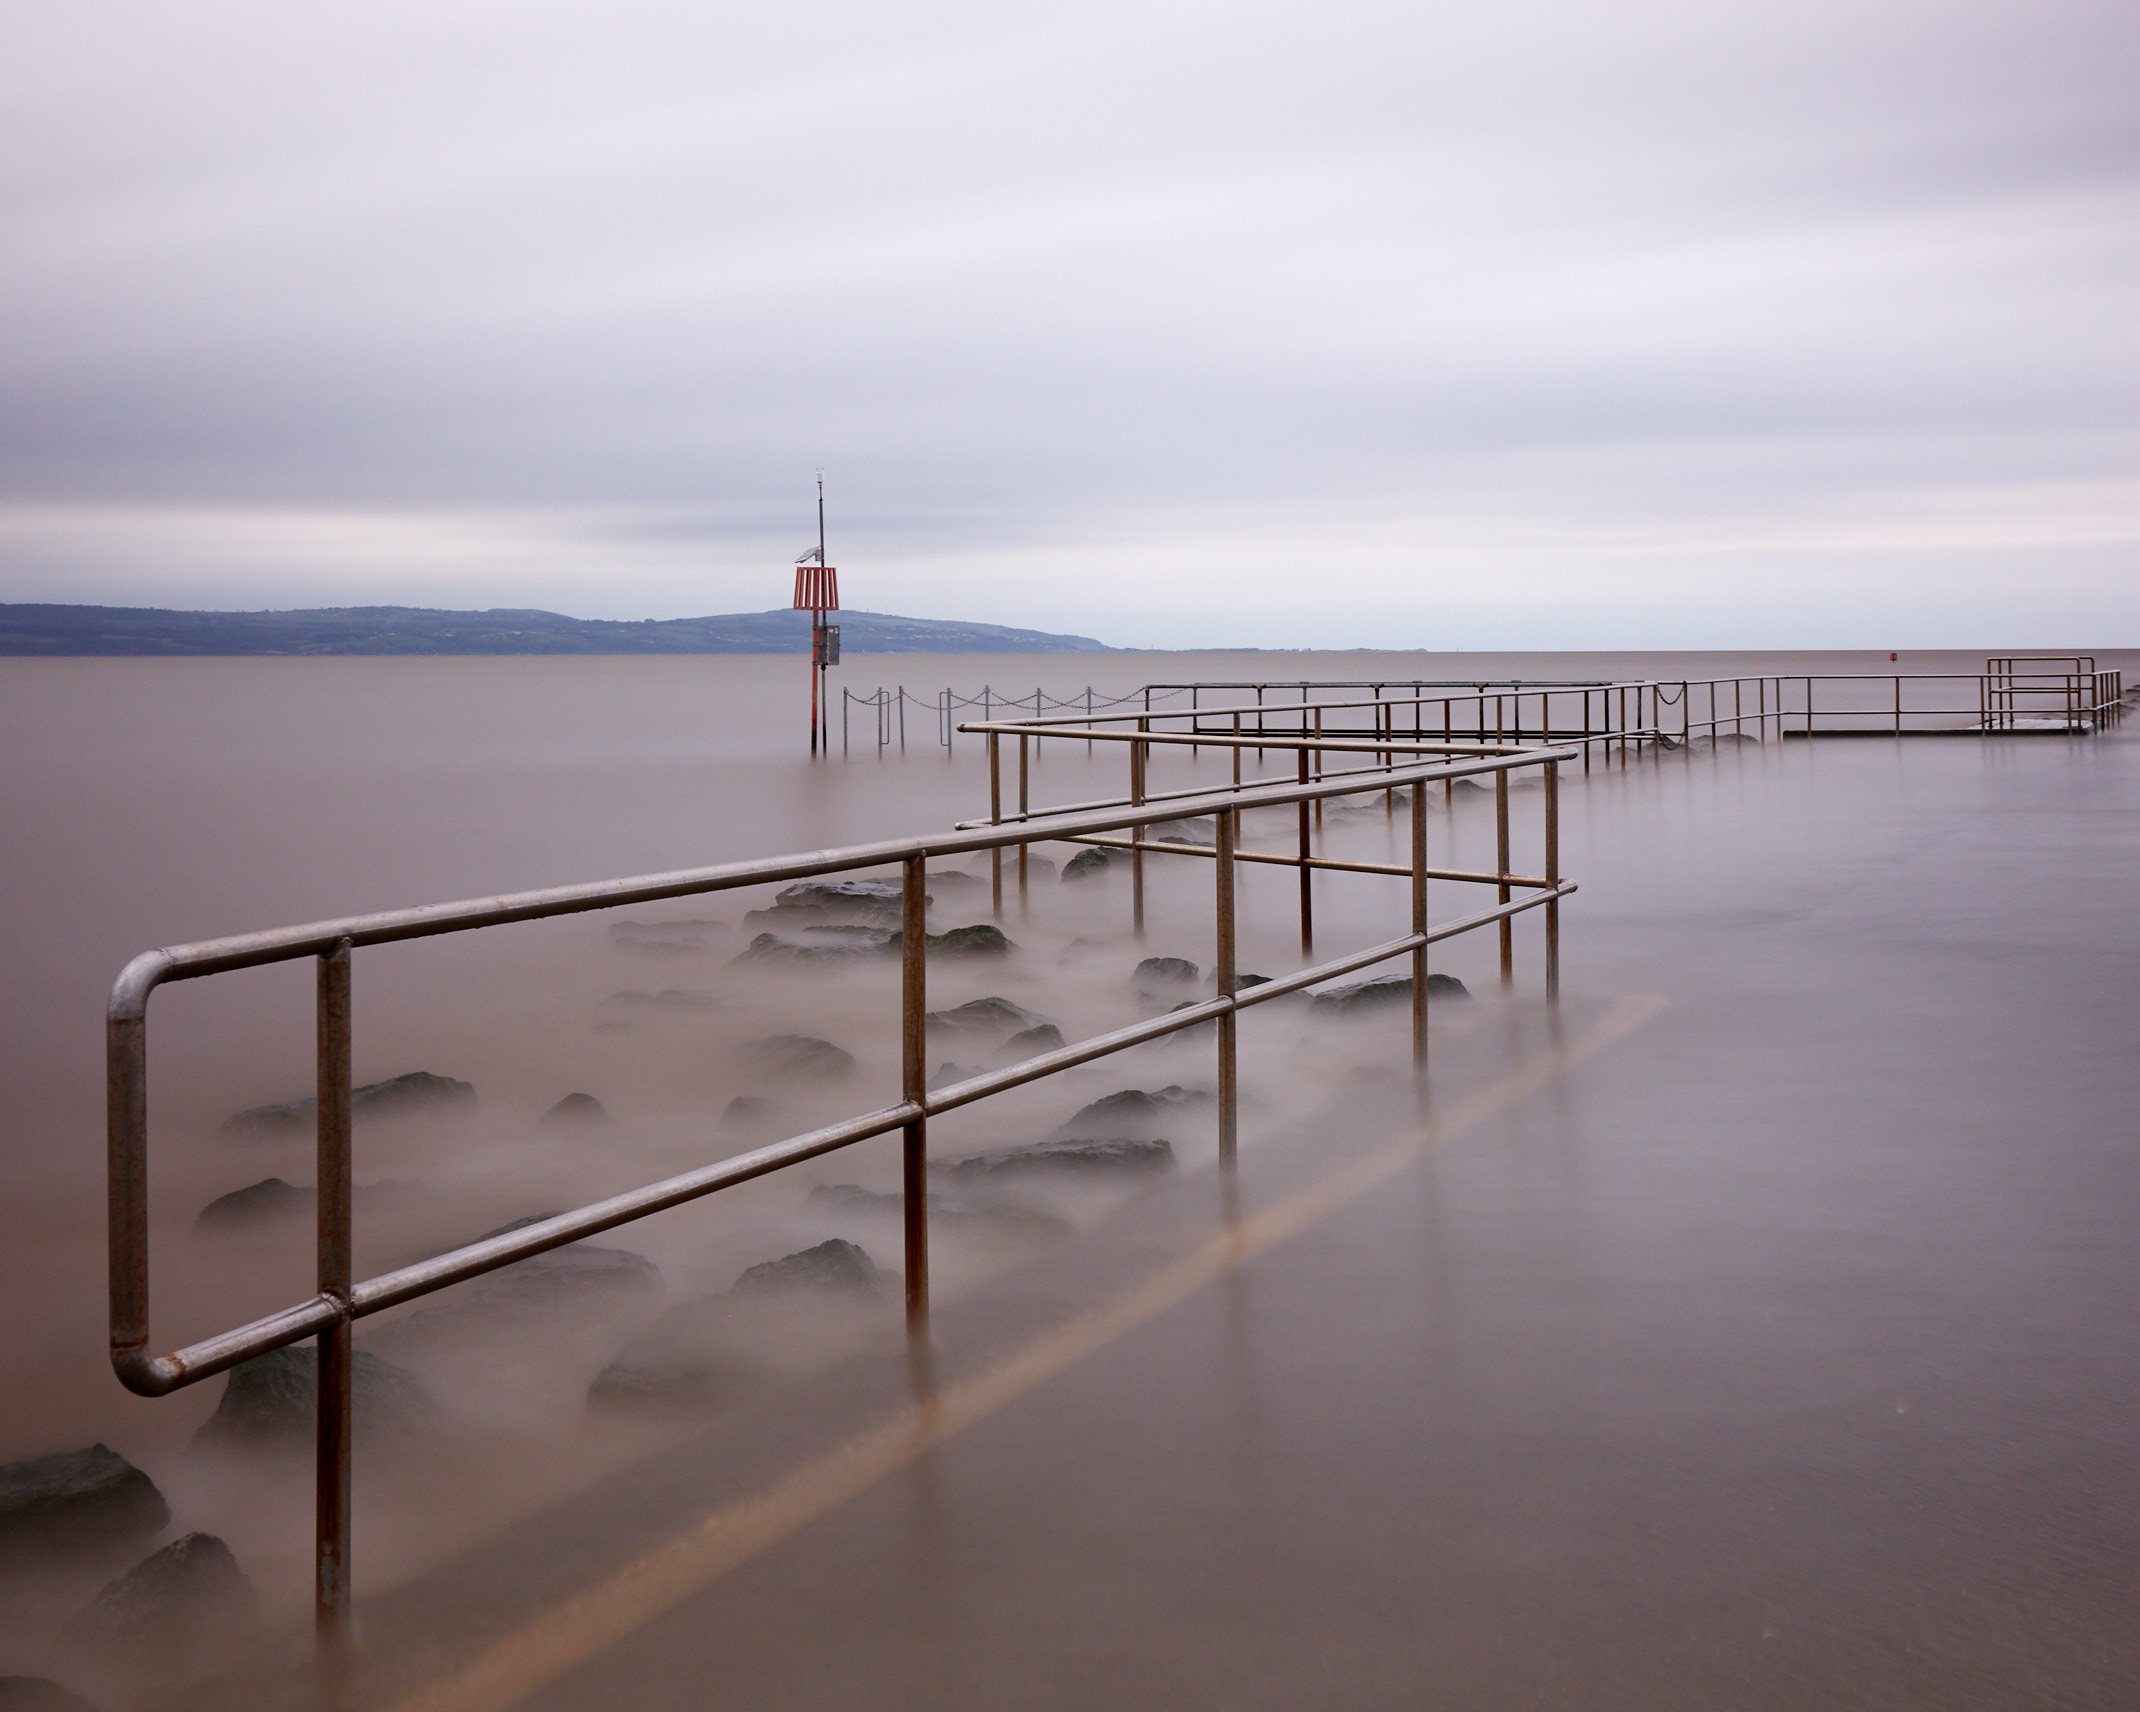
IMG_5456 5.jpg


More pleasing composition to my eye at least but the 'minimalist' goal was spoiled a bit by that distracting yellow line. Time to get out the healing brush tool (or equivalent). Again with my gentle-touch approach to post, I didn't take it out completely:

IMG_5456 4.jpg


That's better. Not much colour cast from the filter(s) but the weather made the image almost monochromatic so begged for a black and white conversion.

Depending on the software you use, there are several ways of conducting colour-to-mono conversions. I tend to use the "enable black and white" option in Capture One. This gives the ability to adjust the individual colour channels in the image to provide the effect of having coloured filters in the days of B&W film (e.g. red filter darkens blue sky etc). In this image, I left the channels alone to yield:

IMG_5456 1.jpg


STEP 3 : Making an Impact

Not a bad minimalist image but a bit meah...not minimalist enough to be 'artistic' and not dramatic enough to be a good landscape shot (in my opinion at least). What can we do to give it a bit of a boost?

Despite the almost monotonous sky, it does have some long-exposure structure so might as well make use of it. Select the sky portion of the image using whatever tools you like (selection mask in Capture One) and boost the contrast in the sky using a CURVES adjustment (darken the dark-to-mid tones of the sky) and add some negative vignette:
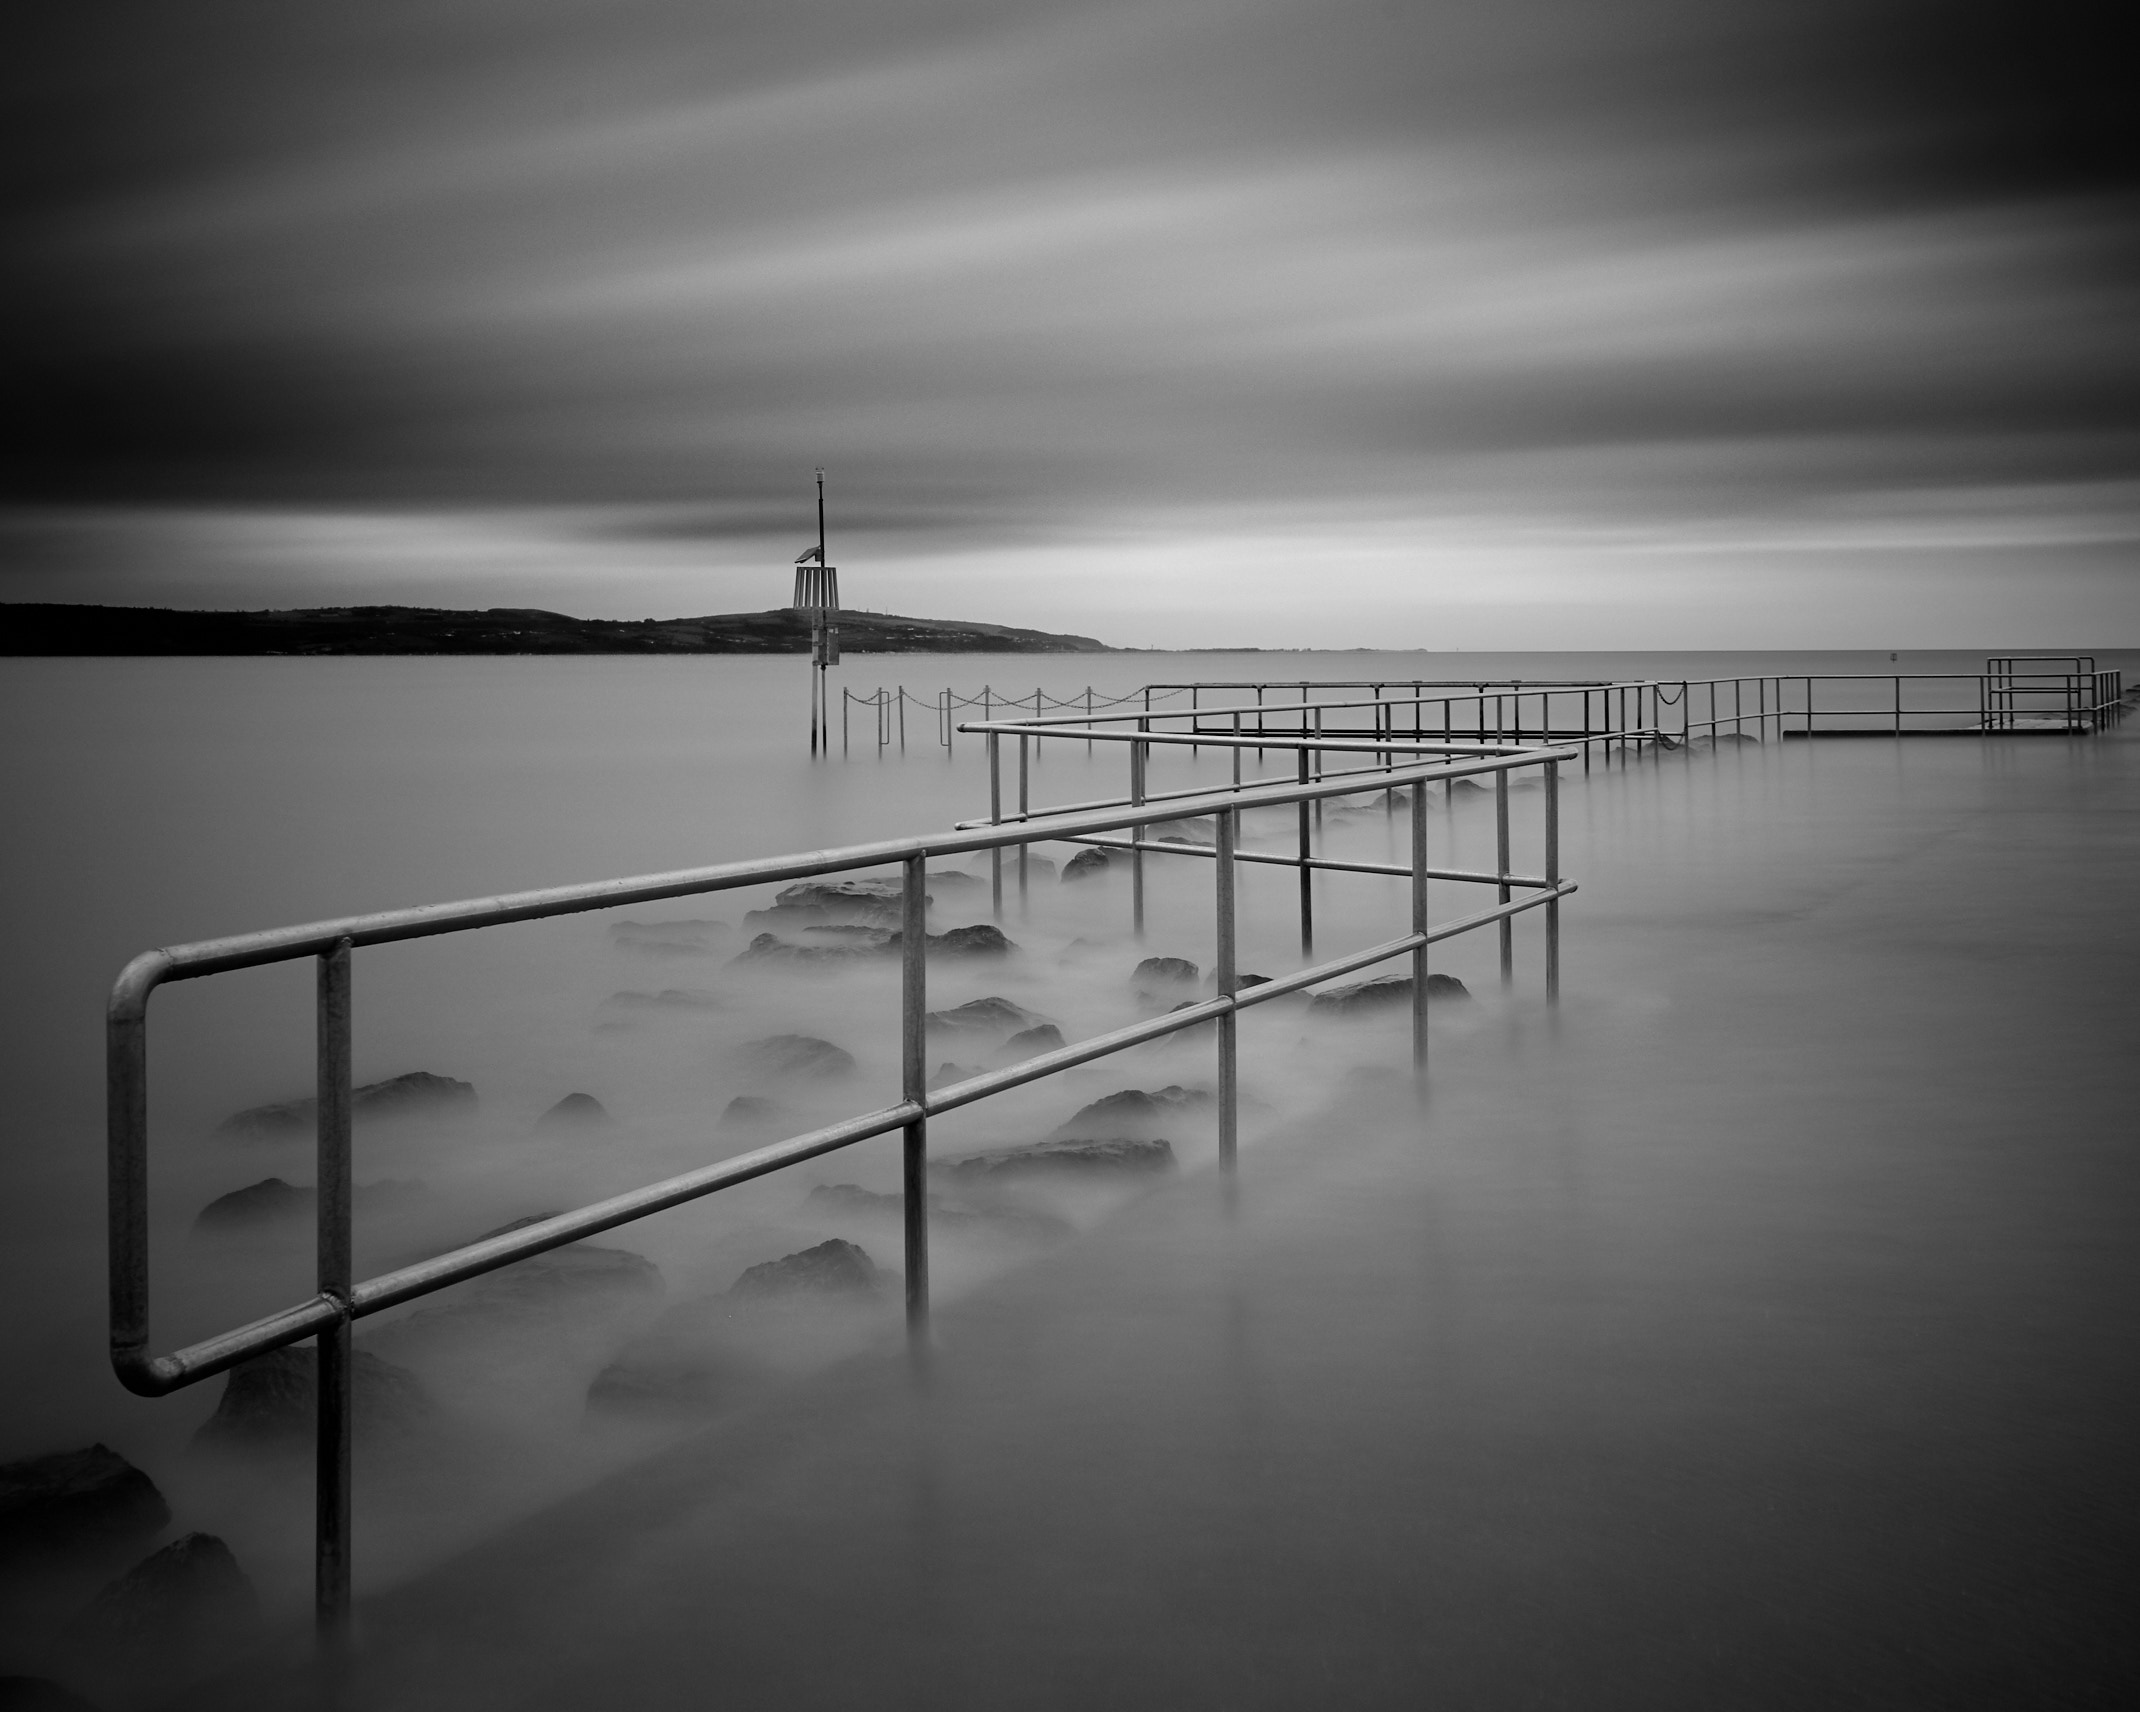
IMG_5456 2.jpg


That's better. But the water now looks a bit flat. There was some low-angle light in the original image reflecting off the water surface so try to enhance that by selecting the water and applying a CURVE adjustment to the water where we lighten the mid-to-highlight tones:
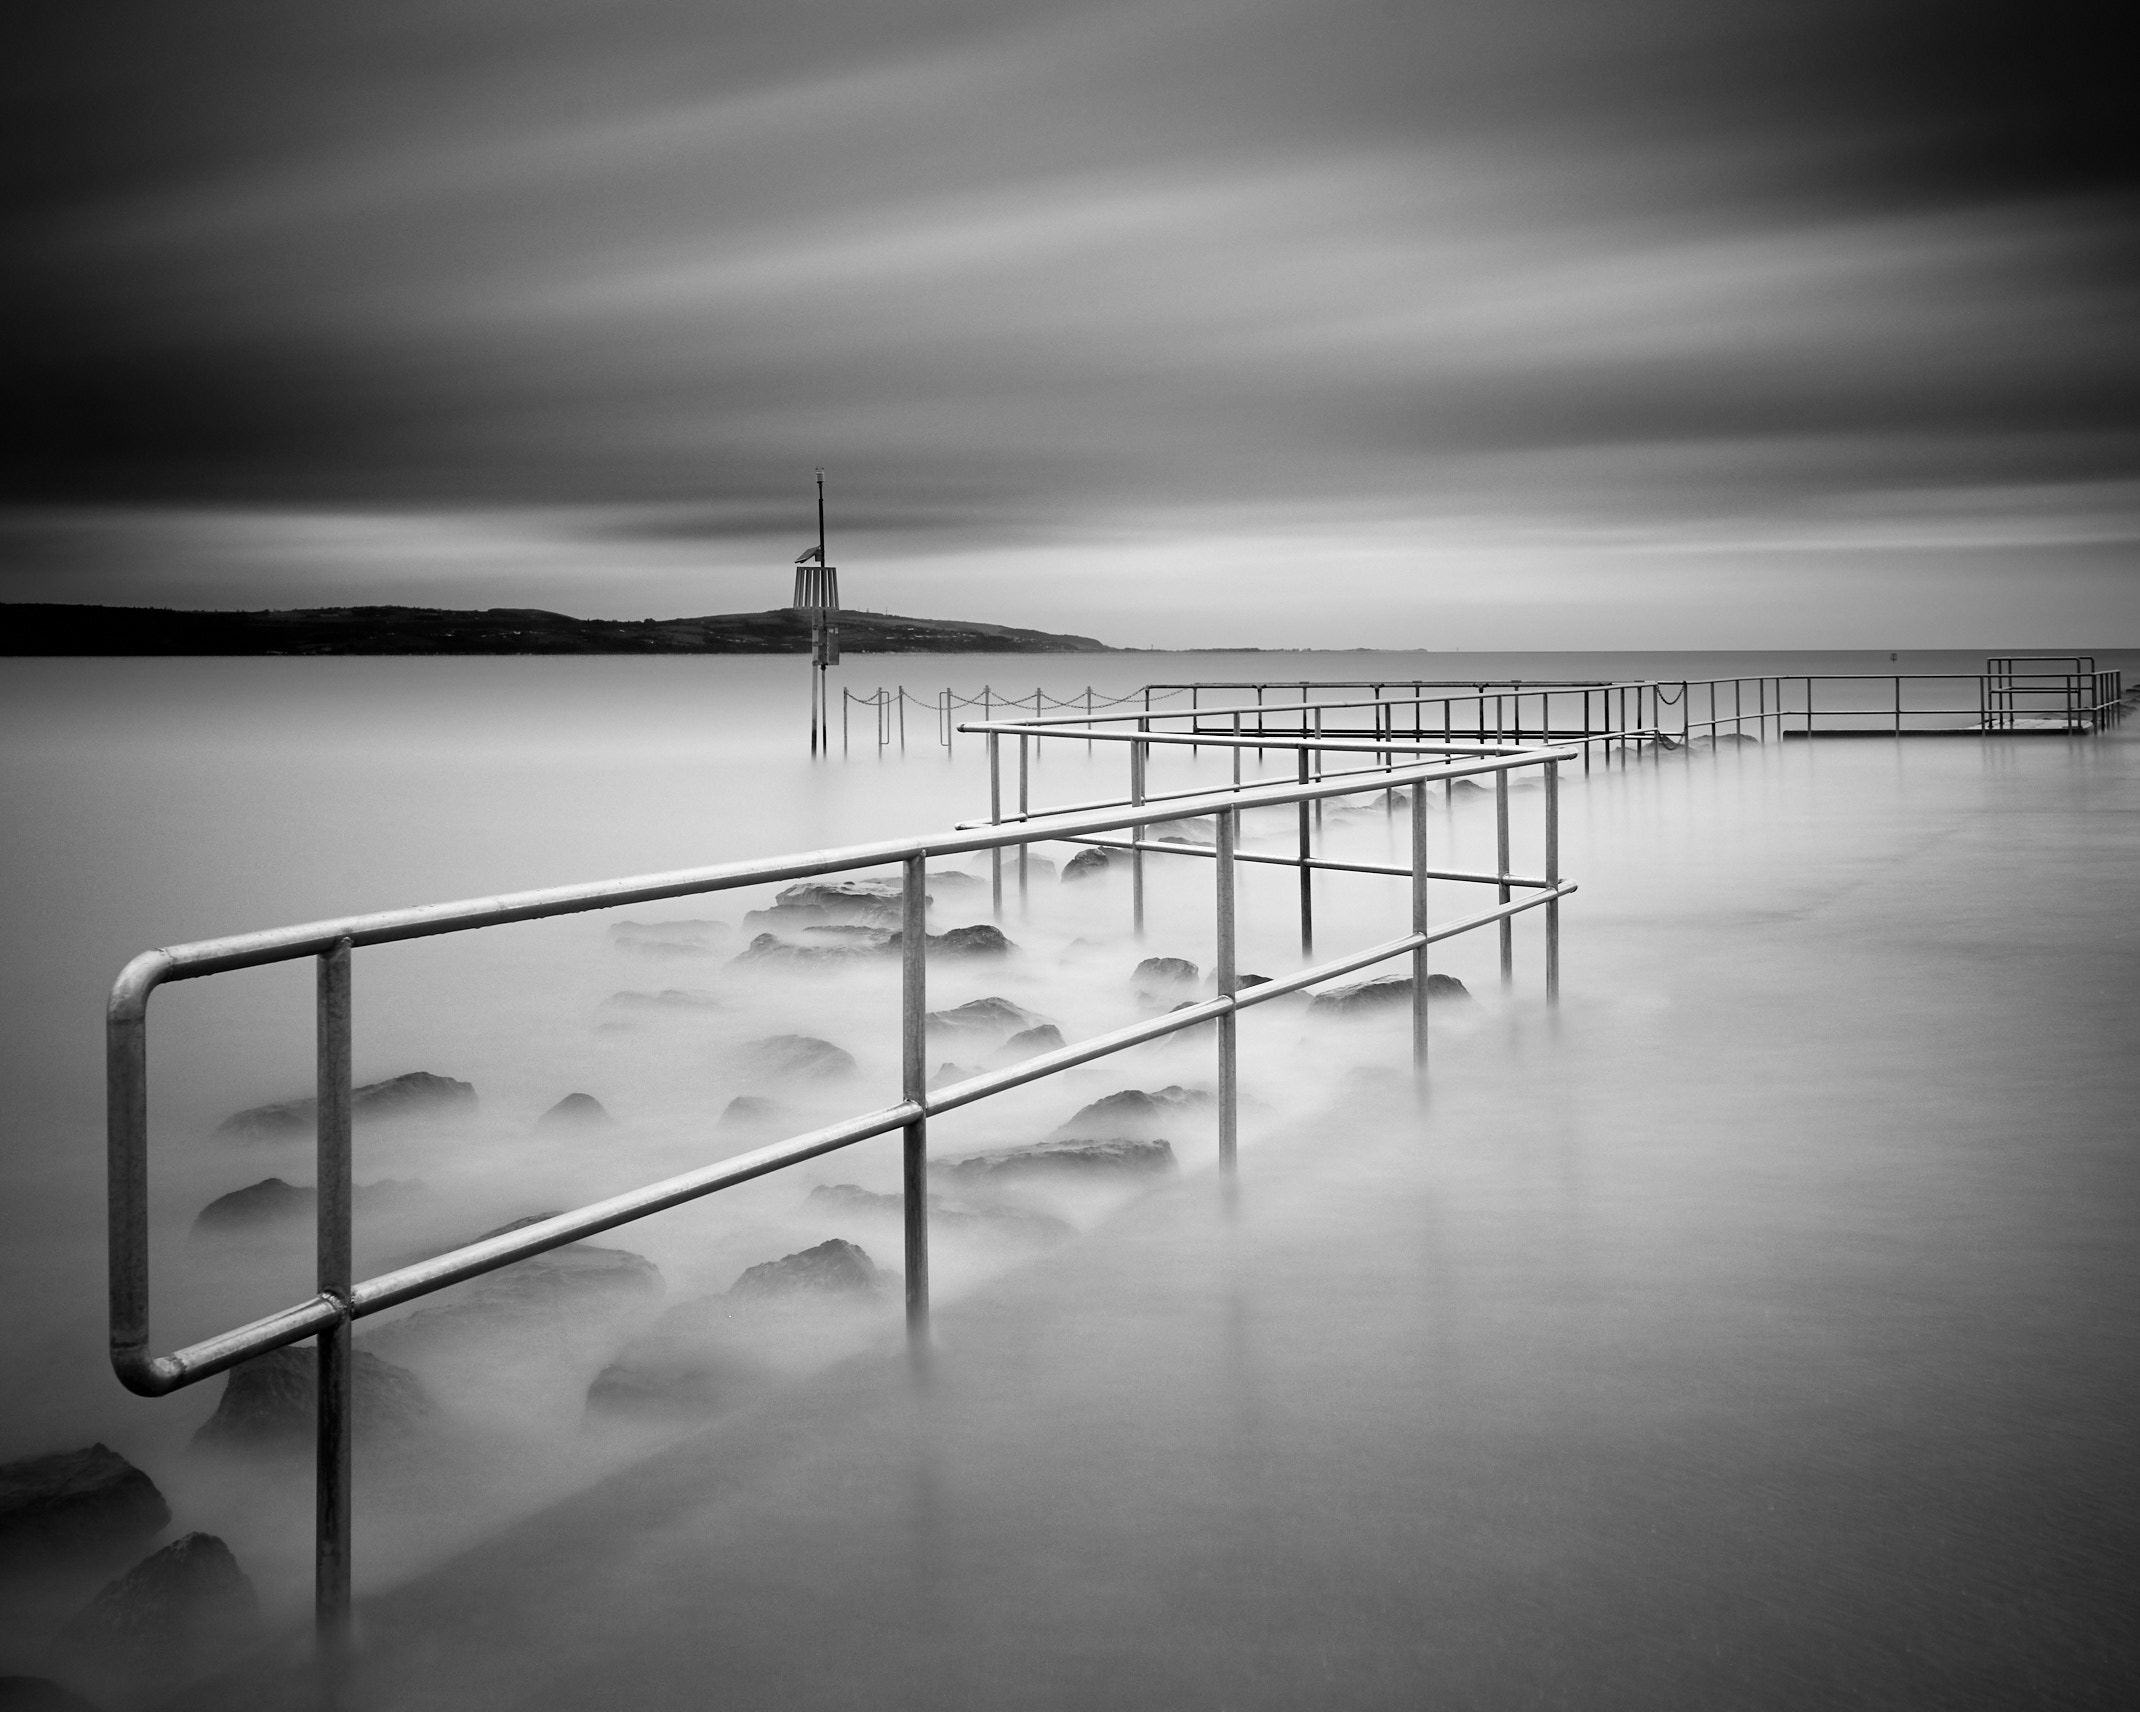
IMG_5456 3.jpg


And there is the finished image.


As you can hopefully see, there wasn't a lot of post processing involved. In fact the total post processing took literally 10- to 15- minutes, most of which was simply playing with the degree of adjustment at each step until it looked about right to me.

Ultimately the image is more complex than the 'minimalist' image I had in mind at the start of the process but at the end of the day, I'm happy with this particular photo. Some of the other images I took that day conformed more to the 'minimalist' theme I was after (principally as a result of using slight over-exposure to lose even more sky/water detail) but for me the important thing was to produce some satisfying images from a short (1 hour) trip to this location on a wet Sunday afternoon when no-one in their right mind was out and about.


Hope you found this useful or even informative, I've enjoyed doing it.
 
@kenoh posted the great idea for a new thread where the photographer provides a detailed explanation of how they produced a particular photograph of interest.

I was honoured to be asked to kick-off the process with a recent long exposure monochrome posting. Sorry there's no advanced video production here - not much advanced anything to be honest but I hope it shows what can be achieved with relatively little effort.

The software and hardware I used are nothing special in that the same effects can be achieved using a variety of software on any image.

View attachment 758308

Step 1: I like to have in mind what I would like to ultimately achieve before pressing the shutter button. Doesn't always work out the way I'd hoped but I'm flexible enough to try to salvage something from whatever comes out of the camera. In general, I try to get reasonably close to the 'target' in-camera.

Given the sort of image I was after, I chose a day where the tide was predicted to be very high (looked it up on tide charts on the internet) - it was easy for this to coincide with grey, drab weather - not uncommon for here but ideal for what I was looking for.

Step 2: With wellies on, set up the camera (Canon 6D) on the tripod equipped with my favourite Canon 16-35mm f4L. Fitted the Formatt-Hitech 100mm filter holder on the front ready to take both a circular polariser and a neutral density filter. First question: what density to choose? The choice of density really depends on ambient lighting and the degree of motion blur you want to capture. I was looking for as much blur (i.e. no features in the water) as possible which pointed to a very long exposure. The highest ND filter I have is 16-stop but combined with the CPL, this takes the total density to around 17-stops. Plenty.

I find the 'correct' exposure, focus and framing by setting the camera up without the filter attached. Then using simple arithmetic (and using fingers) I calculate the required exposure by doubling the exposure time from the filter-free period once for each additional stop - 1/200 -> 1/100 -> 1/50 -> 1/25.....

Put the camera in BULB mode, set the aperture to f8 to give good sharpness and decent depth of field for the static objects in the frame. Set the image capture to RAW to get as much flexibility in post as possible.

Then attach filter and a remote timer or manual release (to get beyond the 30-sec inbuilt exposure limit in Canon cameras) and hey presto - time to set the exposure started. The 17-stops was too much for iso100, so I increased iso to 400 to bring the exposure down to a manageable 5 minutes.

The image straight out of camera appears (in Capture One or your favourite RAW processor):

View attachment 758309


Step 2: Post Processing.

I have nothing against people who spend hours in post or who take a lot of effort to produce composite images but my personal preference is to try to stay reasonably true to what I see taking into account the effect I want to achieve. Laziness, lack of patience and lack of skill in post also tends to push me in that direction.

A crop to 5x7 format to improve composition and a very slight horizon straightening yielded:

View attachment 758312


More pleasing composition to my eye at least but the 'minimalist' goal was spoiled a bit by that distracting yellow line. Time to get out the healing brush tool (or equivalent). Again with my gentle-touch approach to post, I didn't take it out completely:

View attachment 758313


That's better. Not much colour cast from the filter(s) but the weather made the image almost monochromatic so begged for a black and white conversion.

Depending on the software you use, there are several ways of conducting colour-to-mono conversions. I tend to use the "enable black and white" option in Capture One. This gives the ability to adjust the individual colour channels in the image to provide the effect of having coloured filters in the days of B&W film (e.g. red filter darkens blue sky etc). In this image, I left the channels alone to yield:

View attachment 758314

STEP 3 : Making an Impact

Not a bad minimalist image but a bit meah...not minimalist enough to be 'artistic' and not dramatic enough to be a good landscape shot (in my opinion at least). What can we do to give it a bit of a boost?

Despite the almost monotonous sky, it does have some long-exposure structure so might as well make use of it. Select the sky portion of the image using whatever tools you like (selection mask in Capture One) and boost the contrast in the sky using a CURVES adjustment (darken the dark-to-mid tones of the sky) and add some negative vignette:

View attachment 758315

That's better. But the water now looks a bit flat. There was some low-angle light in the original image reflecting off the water surface so try to enhance that by selecting the water and applying a CURVE adjustment to the water where we lighten the mid-to-highlight tones:

View attachment 758316

And there is the finished image.


As you can hopefully see, there wasn't a lot of post processing involved. In fact the total post processing took literally 10- to 15- minutes, most of which was simply playing with the degree of adjustment at each step until it looked about right to me.

Ultimately the image is more complex than the 'minimalist' image I had in mind at the start of the process but at the end of the day, I'm happy with this particular photo. Some of the other images I took that day conformed more to the 'minimalist' theme I was after (principally as a result of using slight over-exposure to lose even more sky/water detail) but for me the important thing was to produce some satisfying images from a short (1 hour) trip to this location on a wet Sunday afternoon when no-one in their right mind was out and about.


Hope you found this useful or even informative, I've enjoyed doing it.
Thanks for posting. I too am not a big photo editor, so try to get as much right in camera as possible.

I spend too long sat at a computer desk as it is!
 
This is a great kick-off post @anotherscotsman! You know how I love creepy minimalist photos. lol. I am particularly interested because learning to use filters has been on the top of my list for months. Many of you helped me choose the Formatt Hitech set I ended up with. I am still ridiculously busy with work but hope to try this technique before I have to head back to LA.

I was wondering what time of day it was that you took the image or how much daylight was there? Was the sky under full cloud cover in its natural state or was that a result of the long exposure? If you have a non-filtered photo or test shot, would you mind posting it as well?

Also, @kenoh - can you refresh us on the rules? we have 1 mo to post our shot? Loving this thread idea so much.
 
  • Like
Reactions: anotherscotsman
This is a great kick-off post @anotherscotsman! You know how I love creepy minimalist photos. lol. I am particularly interested because learning to use filters has been on the top of my list for months. Many of you helped me choose the Formatt Hitech set I ended up with. I am still ridiculously busy with work but hope to try this technique before I have to head back to LA.

I was wondering what time of day it was that you took the image or how much daylight was there? Was the sky under full cloud cover in its natural state or was that a result of the long exposure? If you have a non-filtered photo or test shot, would you mind posting it as well?

Also, @kenoh - can you refresh us on the rules? we have 1 mo to post our shot? Loving this thread idea so much.

Cheers, glad to be of help.

I didn't put in detailed 'recipe' numbers because they will vary so much from shot to shot depending on conditions.

This shot was taken around 1pm (mid-day) on a very grey, overcast day with some light drizzle and a cold wind. Not bright by any means. The sky was effectively 100% cloud cover hence I wasn't expecting much in the way of exciting sky effects from the outset. I didn't keep the unfiltered shot that I used to set exposure (it looked a bit like the SOOC shot but with lots of wave detail but even less sky detail) but it had an exposure setting of something like 1/200ths at f8, iso100. I have three ND filters: 8-, 10-, and 16-stop. I could probably have got away with using 10-stop ND with this level of light but I'd got the 16-stop out of the bag already and so upped the iso to 400 to bring exposure time down a bit from the 20-minutes it would have required at iso100....laziness.

To get good sky effects with long exposure, the 'best' conditions are with a partially-cloudy sky, say 30-50% cloud cover and a bit of wind to give them movement over the exposure time selected. Well worth paying attention to the direction of cloud movement since it will ultimately play a significant role in your composition.

When you get back to NYC, you could always try something like this:


Manhattan Blue Hour
by another scotsman, on Flickr

an example where there isn't really enough cloud but good for the water calming effect.

In general, the longer the exposure time (within reason), the more minimalist the composition appears.
 
This is a great kick-off post @anotherscotsman! You know how I love creepy minimalist photos. lol. I am particularly interested because learning to use filters has been on the top of my list for months. Many of you helped me choose the Formatt Hitech set I ended up with. I am still ridiculously busy with work but hope to try this technique before I have to head back to LA.

I was wondering what time of day it was that you took the image or how much daylight was there? Was the sky under full cloud cover in its natural state or was that a result of the long exposure? If you have a non-filtered photo or test shot, would you mind posting it as well?

Also, @kenoh - can you refresh us on the rules? we have 1 mo to post our shot? Loving this thread idea so much.
Yes I will post rules like we have for the competition
 
Great walk through and proof (if it were needed) that the Photography forum, with the people who contribute, is just about the best one on MacRumors. :D
 
  • Like
Reactions: MacRy and kenoh
Thanks for posting these and beautiful images. I'm just starting to learn more about filters and long exposure so it's nice to hear other's experience and how you calculate your exposure and adjusted your ISO to make it manageable. I've been going to the botanic gardens to practice on some waterfalls and you definitely only have a small window to get it right so that ISO adjustment could be a big help (maybe it should have been obvious but I definitely didn't think of it at the time!). I'm also really a beginner when it comes to image processing so I really liked the step by step with the images to see the changes. Thanks for taking the time and walking through your thinking I really appreciate it.
 
  • Like
Reactions: jdechko and kenoh
As in is it better to have a 15 stop filter or stack a 5 and a 10 together? I'd say using a 15 stop as the less bits of glass the better.

LOL wasn't even thinking about stacking filters when I posted the question. :)

What I mean to ask is, is there any difference in quality using a static ND vs. a variable ND? Is it better to use static ND filters or variable ND filters, generally speaking?
 
LOL wasn't even thinking about stacking filters when I posted the question. :)

What I mean to ask is, is there any difference in quality using a static ND vs. a variable ND? Is it better to use static ND filters or variable ND filters, generally speaking?
Right. I misunderstood! I can't answer that as I have only used the fixed ones (well I've used graduated and polariser of course).

I'd recommend a good quality brand that use glass over the plastic ones. I use Lee myself.
 
  • Like
Reactions: Mark0 and kenoh
Right. I misunderstood! I can't answer that as I have only used the fixed ones (well I've used graduated and polariser of course).

I'd recommend a good quality brand that use glass over the plastic ones. I use Lee myself.

Okay thanks for the info. And no problem, I didn't ask my question clearly either. :)

Wow, wasn't even aware there was such a thing as a plastic filter. I too would definitely use glass.

Thanks for the recommendation also. :)

Speaking of which, not sure where you all land on the question of whether or not to use a UV filter, but I had opportunity to use some of the Chairo brand last year. This brand was unknown to me at the time (I found them on B&H), and after seeing that they apparently specialize in UV filters, and after watching the video and checking out their data, I decided to purchase some. They have an interesting approach to making their filters which boils down to how well the filter transmits light, for which they assigned a percentage value. Generally, their filters are available at 90, 95, 98 and 99 grades. Those numbers represent the percentage of light transmitted through the filter, and of course the price goes up in direct proportion to the number, and because of certain other factors (aluminum or brass frame, whether or not the top or side is knurled, etc.).

They worked very well for me.

Just FYI, for any who may be interested. :)
 
Fantastic post. Can't upvote this enough!!

@macuser453787 you don't need to use a UV filter with digital cameras. Was a thing with film, but not with digital.

Regarding ND filters, the brand matters (especially with very high density filters). I made a thread about my experiences with Singh-Ray ND filters. I had a bad experience with their 15 stop ND filters. Mixed luck with their vari-ND filters. Switched to Formatt Hitech and it was night and day. Formatt Hitech ND filters are amazing. Very minimal loss in sharpness and very minimal color casts. They are the bomb.

I would add that it's very easy to think about "getting your feet wet" with smaller degrees of ND filters--like 5 stop or 10 stop. To achieve the "look" from the images in this thread you need either 15 or 16 stops of ND. A 5 min exposure is ideal for this type of photography. There are exceptions--I just posted a pic in the POTD thread of ocean waves with a 1 min exposure using a 13 stop ND filter stacked with a circular polarizer filter (which had a combined ND of ~14 stops). The waves were moving fast because of a high wind so I got a nice blur. But for this type of shot you really want ~5min exposure. A 10 stop ND isn't going to cut it. A 14 stop ND isn't going to cut it. Remember that each stop roughly doubles the exposure time (not counting reciprocity failure). A 15 or 16 stop ND filter is usually ideal. You can stack filters to get to 15 or 16 stops, but you may get artifacts depending on the filters you are using or you may introduce vignetting by stacking depending on the lens you are using (more likely with wide angle lenses) or whether you are using screw-in ND filters or using a holder system.

You can gain or lose stops (and thus affect exposure time) independent of the filter by adjusting aperture (f/8 is optimal for sharpness for most lenses, but you can either extend or shorten exposure time by shooting up or down a stop at f/5.6 or f/11--though that changes DOF). You can also adjust ISO to affect the exposure time (though at higher ISO you lose sharpness and contrast--the impact of this varies by camera as some are relatively invariant within a given ISO range).

I would add a few things to the capture portion of the OP.

You need to use a tripod (obviously) and it should be a good tripod. It needs to be stable. A flimsy tripod isn't going to work for this type of photography. A solid head is also important for the same reasons.

In general, turn off any image stabilization that your camera or lens may have.

Always use a remote release. Touching the shutter button introduces blur. For really long exposures it isn't as critical as for shorter exposures, but every little bit trying to get perfect tripod technique helps.

Before applying the ND filter, acquire focus (either with auto focus or manual focus). This should be done after setting your aperture as some lenses change focus with a change in aperture. Then set focus to manual. Then apply the ND filter. With a 16 stop ND filter you will not be able to focus (either AF or manual). Set the focus before applying the ND filter.

My workflow is as follows:

(1) Set up the tripod after finding the optimal shooting position.
(2) Mount the camera to the tripod
(3) Attach remote release to the camera
(4) Tweak the composition without any filters mounted on the lens. Level the camera on the tripod as part of the composition process.
(5) If I'm using a circular polarizer filter, add it to the lens and adjust for desired effect
(6) Set aperture (usually f/8 or f/9)
(7) Set ISO manually to 100
(8) Take exposure reading in aperture priority (or manual)
(9) With a 16 stop ND filter, a 5 min exposure is usually optimal with a 1/250 sec exposure without the filter. I use this as starting place and adjust aperture or ISO as needed to get an optimal exposure at 1/250 sec without the filter.
(10) Once the aperture is set, acquire focus (either with AF or manually). Once focus is acquired, set focus to manual.
(11) Add the ND filter.
(12) Turn off image stabilization if you haven't already.
(13) Set exposure to manual and move it to bulb mode
(14) Turn off long exposure noise reduction if it is on (this is somewhat controversial, but having it on will double your time between exposures and I personally haven't noticed any artifacts shooting with my Sony during the day and exposing to the right--possible it matters with long exposures at night but that isn't what we are talking about here)
(15) Pull out your iPhone (or whatever you are going to use as a stopwatch)
(16) Trip the shutter on your remote release (and hold it down!) while also starting the stopwatch function on your phone.
(17) Hold the shutter open for 5 min (or whatever time you think you want)
(18) Review the pic and make sure you look at the histograms! You want to expose to the right, meaning that the histograms are pushed to the right *without* blowing out highlights. Exposing to the right will give you the most latitude with processing in post. It's okay if it's overexposed overall as long as the highlights aren't blown out.
(19) Adjust exposure time as needed based on what you are seeing in the histogram. Or alternatively tweak the aperture and/or ISO if you aren't close to hitting the 5 min mark (or whatever time the scene you are shooting demands). If the exposure is way off, you may need to use a different ND filter density.
 
Last edited:
Fantastic post. Can't upvote this enough!!

@macuser453787 you don't need to use a UV filter with digital cameras. Was a thing with film, but not with digital.

Regarding ND filters, the brand matters (especially with very high density filters). I made a thread about my experiences with Singh-Ray ND filters. I had a bad experience with their 15 stop ND filters. Mixed luck with their vari-ND filters. Switched to Formatt Hitech and it was night and day. Formatt Hitech ND filters are amazing. Very minimal loss in sharpness and very minimal color casts. They are the bomb.

I would add that it's very easy to think about "getting your feet wet" with smaller degrees of ND filters--like 5 stop or 10 stop. To achieve the "look" from the images in this thread you need either 15 or 16 stops of ND. A 5 min exposure is ideal for this type of photography. There are exceptions--I just posted a pic in the POTD thread of ocean waves with a 1 min exposure using a 13 stop ND filter stacked with a circular polarizer filter (which had a combined ND of ~14 stops). The waves were moving fast because of a high wind so I got a nice blur. But for this type of shot you really want ~5min exposure. A 10 stop ND isn't going to cut it. A 14 stop ND isn't going to cut it. Remember that each stop roughly doubles the exposure time (not counting reciprocity failure). A 15 or 16 stop ND filter is usually ideal. You can stack filters to get to 15 or 16 stops, but you may get artifacts depending on the filters you are using or you may introduce vignetting by stacking depending on the lens you are using (more likely with wide angle lenses) or whether you are using screw-in ND filters or using a holder system.

You can gain or lose stops (and thus affect exposure time) independent of the filter by adjusting aperture (f/8 is optimal for sharpness for most lenses, but you can either extend or shorten exposure time by shooting up or down a stop at f/5.6 or f/11--though that changes DOF). You can also adjust ISO to affect the exposure time (though at higher ISO you lose sharpness and contrast--the impact of this varies by camera as some are relatively invariant within a given ISO range).

I would add a few things to the capture portion of the OP.

You need to use a tripod (obviously) and it should be a good tripod. It needs to be stable. A flimsy tripod isn't going to work for this type of photography. A solid head is also important for the same reasons.

In general, turn off any image stabilization that your camera or lens may have.

Always use a remote release. Touching the shutter button introduces blur. For really long exposures it isn't as critical as for shorter exposures, but every little bit trying to get perfect tripod technique helps.

Before applying the ND filter, acquire focus (either with auto focus or manual focus). This should be done after setting your aperture as some lenses change focus with a change in aperture. Then set focus to manual. Then apply the ND filter. With a 16 stop ND filter you will not be able to focus (either AF or manual). Set the focus before applying the ND filter.

My workflow is as follows:

(1) Set up the tripod after finding the optimal shooting position.
(2) Mount the camera to the tripod
(3) Attach remote release to the camera
(4) Tweak the composition without any filters mounted on the lens. Level the camera on the tripod as part of the composition process.
(5) If I'm using a circular polarizer filter, add it to the lens and adjust for desired effect
(6) Set aperture (usually f/8 or f/9)
(7) Set ISO manually to 100
(8) Take exposure reading in aperture priority (or manual)
(9) With a 16 stop ND filter, a 5 min exposure is usually optimal with a 1/250 sec exposure without the filter. I use this as starting place and adjust aperture or ISO as needed to get an optimal exposure at 1/250 sec without the filter.
(10) Once the aperture is set, acquire focus (either with AF or manually). Once focus is acquired, set focus to manual.
(11) Add the ND filter.
(12) Turn off image stabilization if you haven't already.
(13) Set exposure to manual and move it to bulb mode
(14) Turn off long exposure noise reduction if it is on (this is somewhat controversial, but having it on will double your time between exposures and I personally haven't noticed any artifacts shooting with my Sony during the day and exposing to the right--possible it matters with long exposures at night but that isn't what we are talking about here)
(15) Pull out your iPhone (or whatever you are going to use as a stopwatch)
(16) Trip the shutter on your remote release (and hold it down!) while also starting the stopwatch function on your phone.
(17) Hold the shutter open for 5 min (or whatever time you think you want)
(18) Review the pic and make sure you look at the histograms! You want to expose to the right, meaning that the histograms are pushed to the right *without* blowing out highlights. Exposing to the right will give you the most latitude with processing in post. It's okay if it's overexposed overall as long as the highlights aren't blown out.
(19) Adjust exposure time as needed based on what you are seeing in the histogram. Or alternatively tweak the aperture and/or ISO if you aren't close to hitting the 5 min mark (or whatever time the scene you are shooting demands). If the exposure is way off, you may need to use a different ND filter density.
That's a very thorough list. I'd add the following.
Shoot in RAW. It gives you more leeway in post.

I also use an app from Lee that works out the correct exposure time based on the settings. With a countdown timer it's really useful.
 
Fantastic post. Can't upvote this enough!!

@macuser453787 you don't need to use a UV filter with digital cameras. Was a thing with film, but not with digital.

Regarding ND filters, the brand matters (especially with very high density filters). I made a thread about my experiences with Singh-Ray ND filters. I had a bad experience with their 15 stop ND filters. Mixed luck with their vari-ND filters. Switched to Formatt Hitech and it was night and day. Formatt Hitech ND filters are amazing. Very minimal loss in sharpness and very minimal color casts. They are the bomb.

I would add that it's very easy to think about "getting your feet wet" with smaller degrees of ND filters--like 5 stop or 10 stop. To achieve the "look" from the images in this thread you need either 15 or 16 stops of ND. A 5 min exposure is ideal for this type of photography. There are exceptions--I just posted a pic in the POTD thread of ocean waves with a 1 min exposure using a 13 stop ND filter stacked with a circular polarizer filter (which had a combined ND of ~14 stops). The waves were moving fast because of a high wind so I got a nice blur. But for this type of shot you really want ~5min exposure. A 10 stop ND isn't going to cut it. A 14 stop ND isn't going to cut it. Remember that each stop roughly doubles the exposure time (not counting reciprocity failure). A 15 or 16 stop ND filter is usually ideal. You can stack filters to get to 15 or 16 stops, but you may get artifacts depending on the filters you are using or you may introduce vignetting by stacking depending on the lens you are using (more likely with wide angle lenses) or whether you are using screw-in ND filters or using a holder system.

You can gain or lose stops (and thus affect exposure time) independent of the filter by adjusting aperture (f/8 is optimal for sharpness for most lenses, but you can either extend or shorten exposure time by shooting up or down a stop at f/5.6 or f/11--though that changes DOF). You can also adjust ISO to affect the exposure time (though at higher ISO you lose sharpness and contrast--the impact of this varies by camera as some are relatively invariant within a given ISO range).

I would add a few things to the capture portion of the OP.

You need to use a tripod (obviously) and it should be a good tripod. It needs to be stable. A flimsy tripod isn't going to work for this type of photography. A solid head is also important for the same reasons.

In general, turn off any image stabilization that your camera or lens may have.

Always use a remote release. Touching the shutter button introduces blur. For really long exposures it isn't as critical as for shorter exposures, but every little bit trying to get perfect tripod technique helps.

Before applying the ND filter, acquire focus (either with auto focus or manual focus). This should be done after setting your aperture as some lenses change focus with a change in aperture. Then set focus to manual. Then apply the ND filter. With a 16 stop ND filter you will not be able to focus (either AF or manual). Set the focus before applying the ND filter.

My workflow is as follows:

(1) Set up the tripod after finding the optimal shooting position.
(2) Mount the camera to the tripod
(3) Attach remote release to the camera
(4) Tweak the composition without any filters mounted on the lens. Level the camera on the tripod as part of the composition process.
(5) If I'm using a circular polarizer filter, add it to the lens and adjust for desired effect
(6) Set aperture (usually f/8 or f/9)
(7) Set ISO manually to 100
(8) Take exposure reading in aperture priority (or manual)
(9) With a 16 stop ND filter, a 5 min exposure is usually optimal with a 1/250 sec exposure without the filter. I use this as starting place and adjust aperture or ISO as needed to get an optimal exposure at 1/250 sec without the filter.
(10) Once the aperture is set, acquire focus (either with AF or manually). Once focus is acquired, set focus to manual.
(11) Add the ND filter.
(12) Turn off image stabilization if you haven't already.
(13) Set exposure to manual and move it to bulb mode
(14) Turn off long exposure noise reduction if it is on (this is somewhat controversial, but having it on will double your time between exposures and I personally haven't noticed any artifacts shooting with my Sony during the day and exposing to the right--possible it matters with long exposures at night but that isn't what we are talking about here)
(15) Pull out your iPhone (or whatever you are going to use as a stopwatch)
(16) Trip the shutter on your remote release (and hold it down!) while also starting the stopwatch function on your phone.
(17) Hold the shutter open for 5 min (or whatever time you think you want)
(18) Review the pic and make sure you look at the histograms! You want to expose to the right, meaning that the histograms are pushed to the right *without* blowing out highlights. Exposing to the right will give you the most latitude with processing in post. It's okay if it's overexposed overall as long as the highlights aren't blown out.
(19) Adjust exposure time as needed based on what you are seeing in the histogram. Or alternatively tweak the aperture and/or ISO if you aren't close to hitting the 5 min mark (or whatever time the scene you are shooting demands). If the exposure is way off, you may need to use a different ND filter density.


Mate! you are next in the queue.... pace yourself!!! get that bridge picture perfected... and you are up... so get this text into a new post! ha ha ha...
 
Great post @kallisti and very useful for those wishing the get started with very long exposures and extreme ND's. One suggestion I have is that it might be worth mentioning that reciprocity failure only applies to film and varies with different film types.
 
  • Like
Reactions: kallisti
Fantastic post. Can't upvote this enough!!

@macuser453787 you don't need to use a UV filter with digital cameras. Was a thing with film, but not with digital.

Regarding ND filters, the brand matters (especially with very high density filters). I made a thread about my experiences with Singh-Ray ND filters. I had a bad experience with their 15 stop ND filters. Mixed luck with their vari-ND filters. Switched to Formatt Hitech and it was night and day. Formatt Hitech ND filters are amazing. Very minimal loss in sharpness and very minimal color casts. They are the bomb.

I would add that it's very easy to think about "getting your feet wet" with smaller degrees of ND filters--like 5 stop or 10 stop. To achieve the "look" from the images in this thread you need either 15 or 16 stops of ND. A 5 min exposure is ideal for this type of photography. There are exceptions--I just posted a pic in the POTD thread of ocean waves with a 1 min exposure using a 13 stop ND filter stacked with a circular polarizer filter (which had a combined ND of ~14 stops). The waves were moving fast because of a high wind so I got a nice blur. But for this type of shot you really want ~5min exposure. A 10 stop ND isn't going to cut it. A 14 stop ND isn't going to cut it. Remember that each stop roughly doubles the exposure time (not counting reciprocity failure). A 15 or 16 stop ND filter is usually ideal. You can stack filters to get to 15 or 16 stops, but you may get artifacts depending on the filters you are using or you may introduce vignetting by stacking depending on the lens you are using (more likely with wide angle lenses) or whether you are using screw-in ND filters or using a holder system.

You can gain or lose stops (and thus affect exposure time) independent of the filter by adjusting aperture (f/8 is optimal for sharpness for most lenses, but you can either extend or shorten exposure time by shooting up or down a stop at f/5.6 or f/11--though that changes DOF). You can also adjust ISO to affect the exposure time (though at higher ISO you lose sharpness and contrast--the impact of this varies by camera as some are relatively invariant within a given ISO range).

I would add a few things to the capture portion of the OP.

You need to use a tripod (obviously) and it should be a good tripod. It needs to be stable. A flimsy tripod isn't going to work for this type of photography. A solid head is also important for the same reasons.

In general, turn off any image stabilization that your camera or lens may have.

Always use a remote release. Touching the shutter button introduces blur. For really long exposures it isn't as critical as for shorter exposures, but every little bit trying to get perfect tripod technique helps.

Before applying the ND filter, acquire focus (either with auto focus or manual focus). This should be done after setting your aperture as some lenses change focus with a change in aperture. Then set focus to manual. Then apply the ND filter. With a 16 stop ND filter you will not be able to focus (either AF or manual). Set the focus before applying the ND filter.

My workflow is as follows:

(1) Set up the tripod after finding the optimal shooting position.
(2) Mount the camera to the tripod
(3) Attach remote release to the camera
(4) Tweak the composition without any filters mounted on the lens. Level the camera on the tripod as part of the composition process.
(5) If I'm using a circular polarizer filter, add it to the lens and adjust for desired effect
(6) Set aperture (usually f/8 or f/9)
(7) Set ISO manually to 100
(8) Take exposure reading in aperture priority (or manual)
(9) With a 16 stop ND filter, a 5 min exposure is usually optimal with a 1/250 sec exposure without the filter. I use this as starting place and adjust aperture or ISO as needed to get an optimal exposure at 1/250 sec without the filter.
(10) Once the aperture is set, acquire focus (either with AF or manually). Once focus is acquired, set focus to manual.
(11) Add the ND filter.
(12) Turn off image stabilization if you haven't already.
(13) Set exposure to manual and move it to bulb mode
(14) Turn off long exposure noise reduction if it is on (this is somewhat controversial, but having it on will double your time between exposures and I personally haven't noticed any artifacts shooting with my Sony during the day and exposing to the right--possible it matters with long exposures at night but that isn't what we are talking about here)
(15) Pull out your iPhone (or whatever you are going to use as a stopwatch)
(16) Trip the shutter on your remote release (and hold it down!) while also starting the stopwatch function on your phone.
(17) Hold the shutter open for 5 min (or whatever time you think you want)
(18) Review the pic and make sure you look at the histograms! You want to expose to the right, meaning that the histograms are pushed to the right *without* blowing out highlights. Exposing to the right will give you the most latitude with processing in post. It's okay if it's overexposed overall as long as the highlights aren't blown out.
(19) Adjust exposure time as needed based on what you are seeing in the histogram. Or alternatively tweak the aperture and/or ISO if you aren't close to hitting the 5 min mark (or whatever time the scene you are shooting demands). If the exposure is way off, you may need to use a different ND filter density.

Perfect step-by-step.

Some of the Canon lenses auto-detect tripod mounting and don't need you to switch stabilisation off but I do in any case.

Stacking filters can certainly result in artefacts (multiple air/glass interfaces in the light path) but I regularly use a combination of circular polariser and ND. I've never used a variable ND filter myself since I've seen too many examples of image artefacts (the dreaded X). I can see them being more useful for video than photo applications though.
 
@kenoh posted the great idea for a new thread where the photographer provides a detailed explanation of how they produced a particular photograph of interest.

I was honoured to be asked to kick-off the process with a recent long exposure monochrome posting. Sorry there's no advanced video production here - not much advanced anything to be honest but I hope it shows what can be achieved with relatively little effort.

The software and hardware I used are nothing special in that the same effects can be achieved using a variety of software on any image.

View attachment 758308

Step 1: I like to have in mind what I would like to ultimately achieve before pressing the shutter button. Doesn't always work out the way I'd hoped but I'm flexible enough to try to salvage something from whatever comes out of the camera. In general, I try to get reasonably close to the 'target' in-camera.

Given the sort of image I was after, I chose a day where the tide was predicted to be very high (looked it up on tide charts on the internet) - it was easy for this to coincide with grey, drab weather - not uncommon for here but ideal for what I was looking for.

Step 2: With wellies on, set up the camera (Canon 6D) on the tripod equipped with my favourite Canon 16-35mm f4L. Fitted the Formatt-Hitech 100mm filter holder on the front ready to take both a circular polariser and a neutral density filter. First question: what density to choose? The choice of density really depends on ambient lighting and the degree of motion blur you want to capture. I was looking for as much blur (i.e. no features in the water) as possible which pointed to a very long exposure. The highest ND filter I have is 16-stop but combined with the CPL, this takes the total density to around 17-stops. Plenty.

I find the 'correct' exposure, focus and framing by setting the camera up without the filter attached. Then using simple arithmetic (and using fingers) I calculate the required exposure by doubling the exposure time from the filter-free period once for each additional stop - 1/200 -> 1/100 -> 1/50 -> 1/25.....

Put the camera in BULB mode, set the aperture to f8 to give good sharpness and decent depth of field for the static objects in the frame. Set the image capture to RAW to get as much flexibility in post as possible.

Then attach filter and a remote timer or manual release (to get beyond the 30-sec inbuilt exposure limit in Canon cameras) and hey presto - time to set the exposure started. The 17-stops was too much for iso100, so I increased iso to 400 to bring the exposure down to a manageable 5 minutes.

The image straight out of camera appears (in Capture One or your favourite RAW processor):

View attachment 758309


Step 2: Post Processing.

I have nothing against people who spend hours in post or who take a lot of effort to produce composite images but my personal preference is to try to stay reasonably true to what I see taking into account the effect I want to achieve. Laziness, lack of patience and lack of skill in post also tends to push me in that direction.

A crop to 5x7 format to improve composition and a very slight horizon straightening yielded:

View attachment 758312


More pleasing composition to my eye at least but the 'minimalist' goal was spoiled a bit by that distracting yellow line. Time to get out the healing brush tool (or equivalent). Again with my gentle-touch approach to post, I didn't take it out completely:

View attachment 758313


That's better. Not much colour cast from the filter(s) but the weather made the image almost monochromatic so begged for a black and white conversion.

Depending on the software you use, there are several ways of conducting colour-to-mono conversions. I tend to use the "enable black and white" option in Capture One. This gives the ability to adjust the individual colour channels in the image to provide the effect of having coloured filters in the days of B&W film (e.g. red filter darkens blue sky etc). In this image, I left the channels alone to yield:

View attachment 758314

STEP 3 : Making an Impact

Not a bad minimalist image but a bit meah...not minimalist enough to be 'artistic' and not dramatic enough to be a good landscape shot (in my opinion at least). What can we do to give it a bit of a boost?

Despite the almost monotonous sky, it does have some long-exposure structure so might as well make use of it. Select the sky portion of the image using whatever tools you like (selection mask in Capture One) and boost the contrast in the sky using a CURVES adjustment (darken the dark-to-mid tones of the sky) and add some negative vignette:

View attachment 758315

That's better. But the water now looks a bit flat. There was some low-angle light in the original image reflecting off the water surface so try to enhance that by selecting the water and applying a CURVE adjustment to the water where we lighten the mid-to-highlight tones:

View attachment 758316

And there is the finished image.


As you can hopefully see, there wasn't a lot of post processing involved. In fact the total post processing took literally 10- to 15- minutes, most of which was simply playing with the degree of adjustment at each step until it looked about right to me.

Ultimately the image is more complex than the 'minimalist' image I had in mind at the start of the process but at the end of the day, I'm happy with this particular photo. Some of the other images I took that day conformed more to the 'minimalist' theme I was after (principally as a result of using slight over-exposure to lose even more sky/water detail) but for me the important thing was to produce some satisfying images from a short (1 hour) trip to this location on a wet Sunday afternoon when no-one in their right mind was out and about.


Hope you found this useful or even informative, I've enjoyed doing it.
That was some great tips. Thanks for sharing.

I have to say, I like the road to/from nowhere in the upper part of the picture.
 
That was some great tips. Thanks for sharing.

I have to say, I like the road to/from nowhere in the upper part of the picture.

Cheers, glad it helped.

Funny, I only really noticed that aspect when I got home - could have captured something with the breakwater road as the main feature if I'd thought of it at the time...It shows that you should really spend time looking around you - it's too easy to focus simply on what first takes your fancy!
 
  • Like
Reactions: I7guy and kallisti
Great post @kallisti and very useful for those wishing the get started with very long exposures and extreme ND's. One suggestion I have is that it might be worth mentioning that reciprocity failure only applies to film and varies with different film types.

Interesting. I've read professionals talk about reciprocity failure even with digital. Somewhat academic as in practice I make an initial "best guess" exposure and then review the results on the histogram and adjust as needed for subsequent exposures.
 
  • Like
Reactions: Mark0
Register on MacRumors! This sidebar will go away, and you'll see fewer ads.