Batch Rip Actions for Automator
How-to Automate DVD & Blu-Ray (Backup, Encoding & Tagging) for Mac OS X 10.9 Mavericks
Introduction
Backing up a DVD or Blu-Ray library can be an arduous, time consuming task. Using a GUI tool is a simple task if you do one occasionally, but a lot of us have amassed large collections that would take days, weeks, months or even years to complete.
And, if you’ve ever tried to encode an entire season of TV episodes you know how laborious a project this can be as well: Insert a DVD, rip the disc, choose your encode settings, select and add each title to the queue, process the file, add iTunes metadata; rinse and repeat for each of the discs in the season … and don't even get me started on manually doing this with Blu-ray.
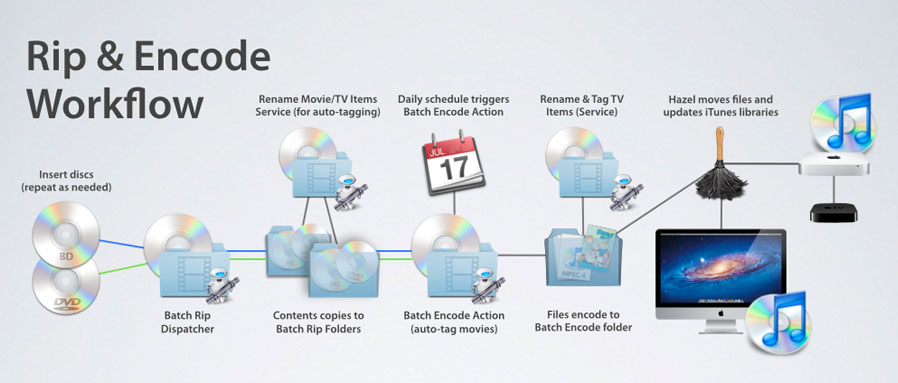
The good news is that most of these tasks can be easily automated to remove the manual intervention required. Just insert a disc and it will rip automagically. When done, pop in another. If you’ve got Mac with two or three optical drives connected, fill em' up and you’ll save yourself some trips. Set a repeating encode schedule, and at midnight HandBrakeCLI will encode each track within the min/max duration you set in your workflow. You can even set it do multiple encodes if you'd like an iPad version, Android version, though you owe it to yourself to get an iPhone 🙂, and an Apple TV 1080p version. All you need to do now is the tagging, but why should you do it? It's a computer after all … why not automate that as well! If you want to get really fancy, you can take your workflow to the next level by using folder actions or Noodlesoft's Hazel to backup your rips, add the finished files to all the iTunes Libraries on your network and stream em' to an Apple TV. Virtually anything is possible with automation.
This tutorial is broken up into components that can be used individually or together to create one, simple, automated batch workflow.
Workflow Components
- Getting Started
- Using Batch Rip to Automate DVD & Blu-Ray Backup
- Renaming Source Files & Folders
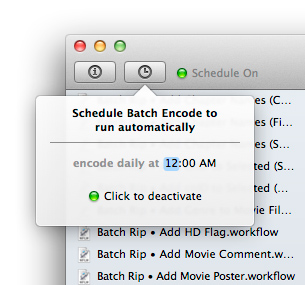
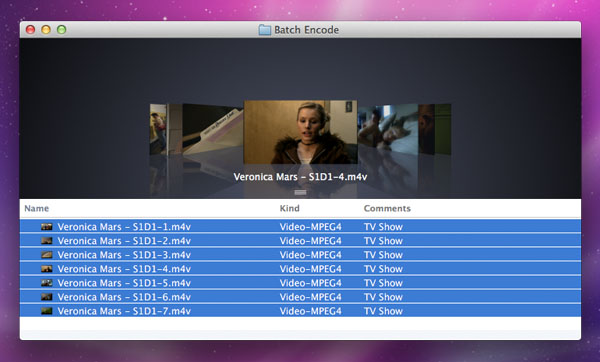
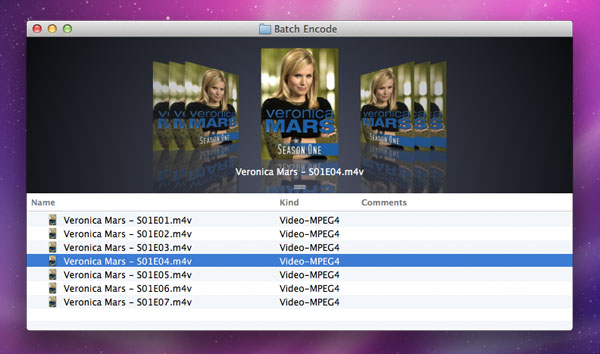
- Using Batch Encode to Automate HandBrake Encoding
- Auto-tagging Movie Files with iTunes Metadata
- Auto-tagging TV Show Files with iTunes Metadata
- Using Hazel to manage your media
Note: This tutorial assumes you have some familiarity with Mac OS X and the ripping/encoding process. The focus of this tutorial is how to AUTOMATE your workflow. It is NOT intended to be A BEGINNERS GUIDE to DVD/BD encoding. If you are new to any of the concepts presented in this tutorial, I highly recommend engaging in some of the fantastic forum threads on the macrumors and handbrake forums to help get you started. Then, return to this tutorial after you have become comfortable with the process and have been successful doing it manually. See the section "Additional Resources" for more info.
About Batch Rip Actions for Automator
Batch Rip Actions for Automator is an application that provides Actions and Workflows to automate the rip and encode process.
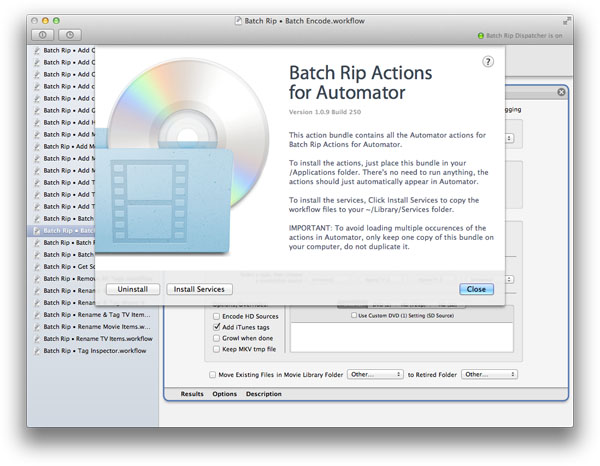
These actions began as a series of scripts that made up my batch rip workflow. When I started writing this tutorial, the focus was to illustrate how to create these scripts and tie them together. However, with the introduction of Snow Leopard, it became clear to me that offering pre-compiled Automator actions and Service workflows would make this a much simpler process.
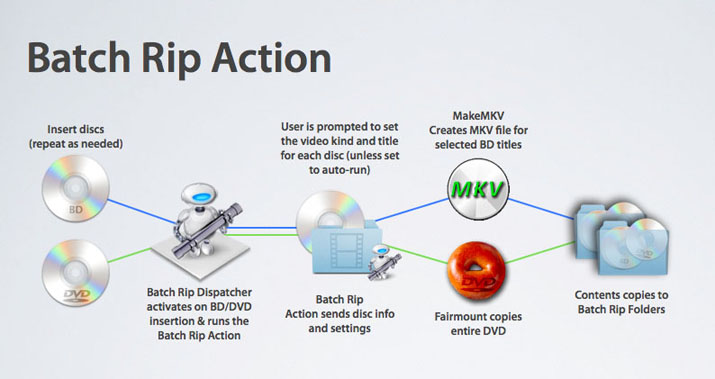
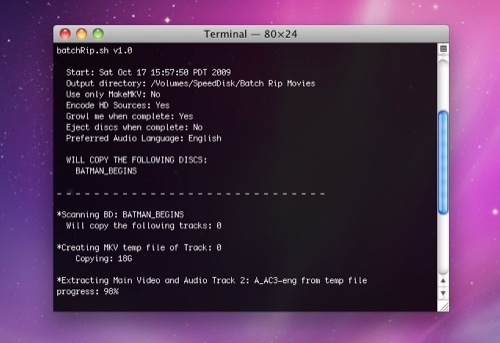
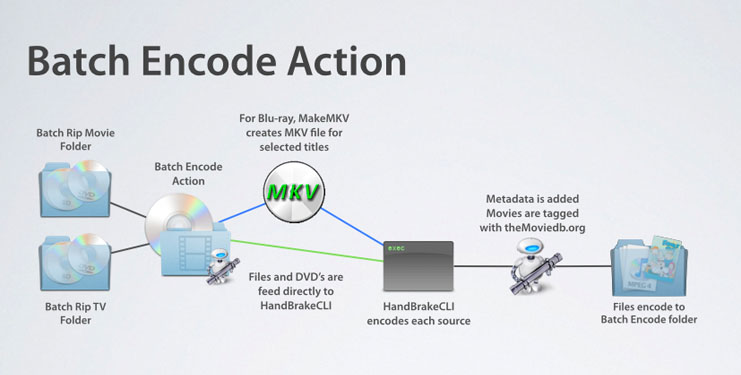
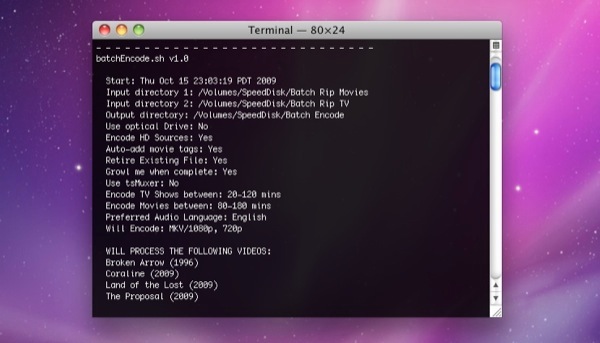
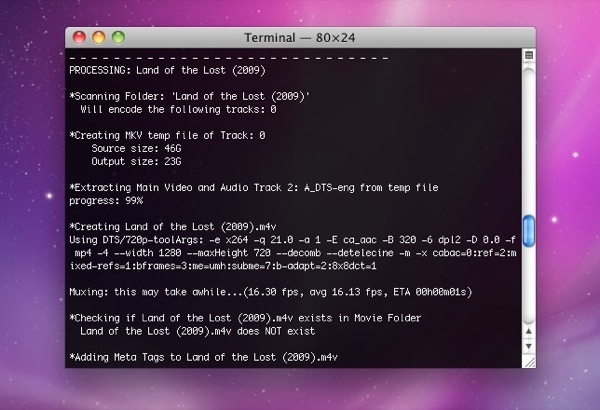
An Automator workflow consists of a sequence of discrete tasks called actions. An Automator action is a kind of functional building block. Each action performs an individual step you might currently do manually‚ such as ripping a disc, changing filenames, encoding files with HandBrake, or tagging files with iTunes metadata. Some actions like Batch Encode, go a step further and perform many operations in one process. For example, with each Blu-ray source it finds … it will create an mkv file, select the main video, audio, and subtitle tracks. Then, send them to HandBrake which will encode it to mp4, then download all the iTunes tags for your title and tag the file. Imagine doing this manually!
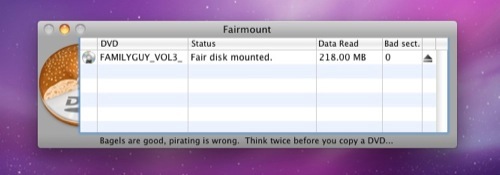
Batch Rip Actions for Automator follows the recommended approach of ripping the complete folder structure of your optical media to your hard drive. For DVD media, this is done with FairMount. For BD media, we use MakeMKV. MakeMKV is still in beta and doesn't fully support BD+ titles and may not work with every disc or drive. If MakeMKV doesn't work for you manually, it's not gonna work with Batch Rip Actions for Automator.
Note: MakeMKV and HandBrake do not support every type of copy-protection and may not work with every disc or drive. The rule is, if it doesn't work for you manually, it's not gonna work with Batch Rip Actions for Automator.
If you encounter a disc that MakeMKV or HandBrake can't copy, I highly recommend trying AnyDVDHD. AnyDVDHD is developed by SlySoft.com and is considered the gold standard for disc backup. The upside to AnyDVDHD is that it fully supports Blu-Ray copying and creates a true backup of the entire disc. The downside is that it is Windows only. AnyDVDHD can be used with the free, open source VirtualBox for Mac, VMware Fusion (recommended) and Parallels.
Once the disc's contents have been ripped to the hard drive, the movies or TV episodes are encoded to an iTunes compatible MP4 format and tagged with metadata iTunes, AppleTV or other devices can manage.
The actions provided in this bundle include:
Batch Rip
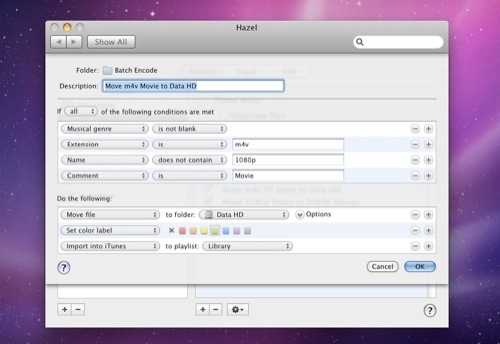
This action copies video DVD and BD discs to a chosen folder correctly named for automatic tagging.
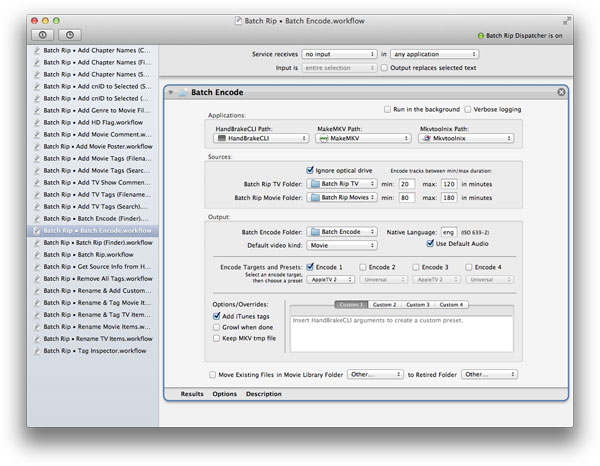
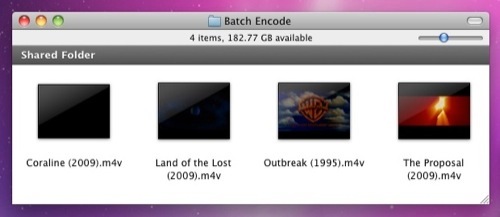
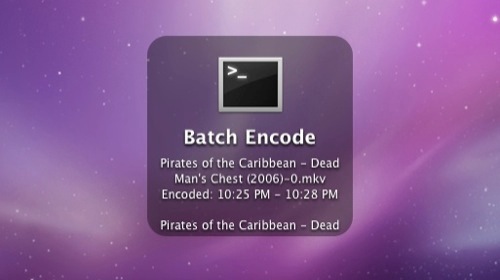
Batch Encode
This action encodes DVD/BD content to m4v/mkv and tags them with iTunes metadata. This action receives input from the Finder, other actions, or batch folders specified in the action panel. Input types: DVD-ROM, BD-ROM, VIDEO_TS, BDMV, m2ts, mkv, mp4, m4v, avi, mpg, and mov. Other options include: Growl notification, multiple encodes, and custom HandBrake settings.
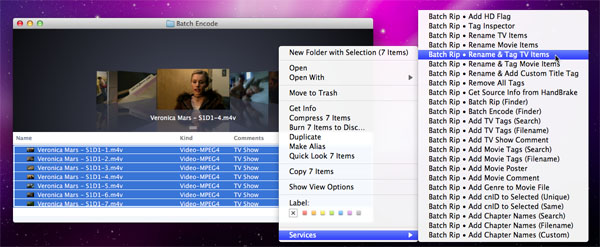
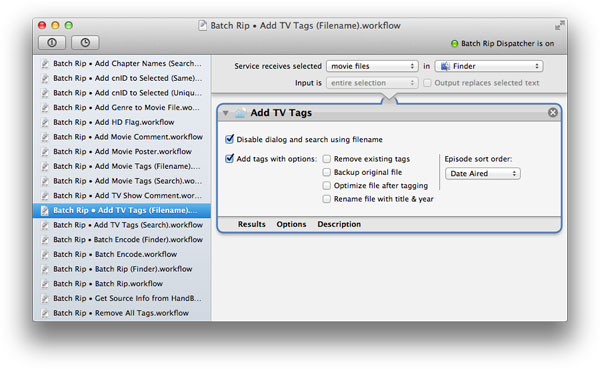
Add TV Tags
This action searches thetvdb.com database and adds iTunes metadata for the specified TV episode mp4/m4v files. Other options include: renaming, removing tags and optimizing.
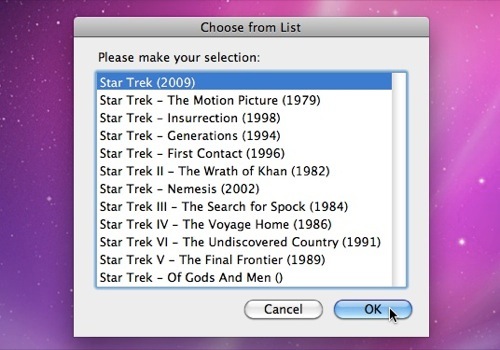
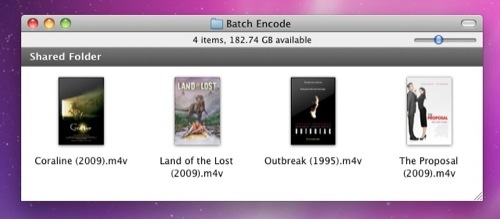
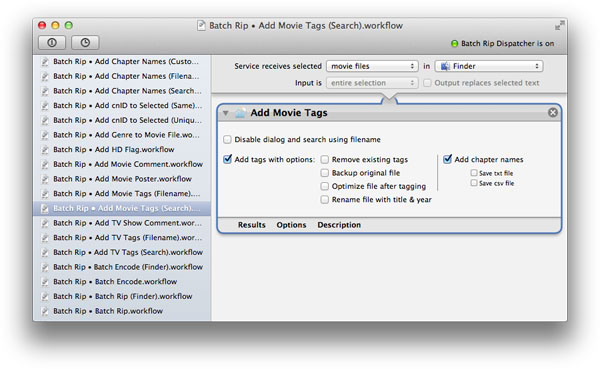
Add Movie Tags
This action searches themoviedb.org and tagchimp.com databases and adds iTunes metadata for the specified mp4/m4v files. Other options include: renaming files and folders, removing tags, optimizing, and managing chapter information.
Add Movie Poster
This action will add cover art to selected files.
Add Genre to Movie File
This action tags mp4 files with a selected iTunes genre.
Tag Inspector
This action displays the iTunes metadata for the input file.
Get Source Info from HandBrake
This action scans each source with HandBrakeCLI and saves the info to a text file.
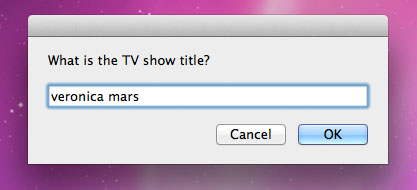
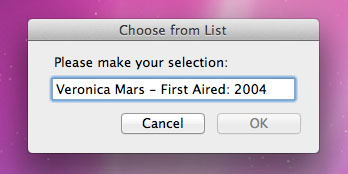
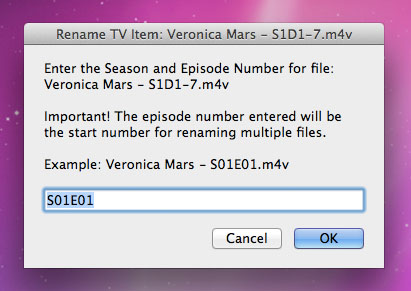
Rename TV Items
This action searches thetvdb.com for shows matching the query and renames items to the selected search result and user specified series, season and episode or disc number.
This tutorial will focus on how to use these actions and their related Automator workflows. But before we get started, we need to install our applications and set up our batch folders.
Getting Started
To complete this tutorial you will need to download and install the following:
Batch Rip Actions for Automator v1.1.1
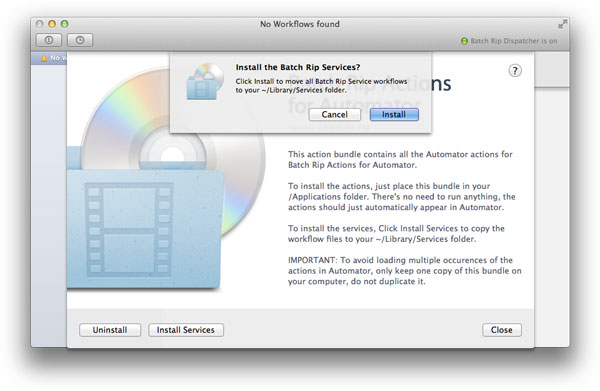
Installing Batch Rip Actions for Automator
- Download the Batch Rip Actions for Automator installer.
- Open the dmg file and Drag the app to your Applications folder.
- Navigate to your Applications folder.
- Double-click the icon to Launch the app.
- Follow the installation instructions to install the related workflow files and create your Batch Rip folders.
What you need to get started
Batch Rip Actions for Automator requires the following applications be installed in your Applications Folder. For convenience, I've provided links to these applications via the Download menu in the menu bar.
MANDATORY
FairMount v1.1
FairMount is a free tool that allows decryption of DVD content on the fly for a convenient access. FairMount does not perform the actual decryption, it simply forwards the data to libdvdcss which is used for decryption - thus, libdvdcss must be installed for FairMount to work.
Note: Fairmount is included in the application bundle.
HandBrakeCLI v0.9.9
HandBrake is an open-source, GPL-licensed, multiplatform, multithreaded DVD to MPEG-4 converter, available for MacOS X, Linux and Windows. The Command Line Interface version of HandBrake is a lot faster and more flexible than the MacGui. Using scripting you can automate HandBrakeCLI to encode your files as a background process using the same parameters you'd set in the GUI. Install in /Applications.
Note: DVD disc input is only supported if libdvdcss is installed.
libdvdcss v1.2.12
libdvdcss is a simple library designed for accessing DVDs like a block device without having to bother about the decryption. libdvdcss must be installed for Fairmount & HandBrake to work with encrypted DVDs. Run the installer and libdvdcss will be installed in your /usr/lib directory.
FOR BLU-RAY/HD ENCODING, YOU'LL NEED THE FOLLOWING:
MakeMKV v1.6.12
MakeMKV is the only mac native app for ripping Blu-ray discs. However, at this time it may not work with every disc or drive. It converts DVDs and BDs into a set of MKV files. MakeMKV has a GUI and a command-line (makemkvcon) interface that's located in the application's bundle. Install in /Applications.
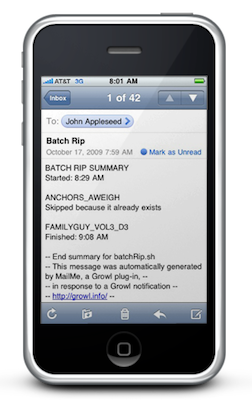
About Growl Support
Growl v1.3
Growl is a notification system for Mac OS X: it allows applications and scripts that support Growl to send you notifications.
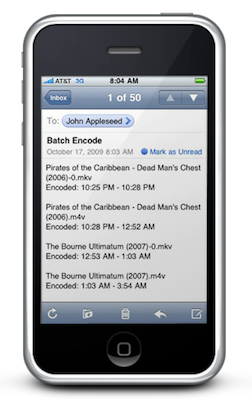
Batch Rip and Batch Encode both contain Growl support. The GrowlNotify command-line tool is needed by these actions to notify the Growl application. GrowlNotify is available from the growl website's general downloads page: Growl's download page.
- Download and install Growl from the Mac App Store.
- Download GrowlNotify
- Double-click the GrowlNotify.pkg to install GrowlNotify.
- Enter your administrator password and growlNotify will then be installed in a hidden directory used for command line tools: /usr/local/bin
- To activate notification by email or speech, navigate to the Growl Preferences and click enable in the GrowlNotify application notification settings.
Managing Your Batch Rip Files and Folders
A well planned folder structure will make your workflow much easier to manage. Most of these workflows rely on consistent paths to the source and destination folders, as well as the paths to the actions and applications themselves. For most users, your files should be processed on your local hard disk. External drives can be used, but in some cases they may slow down the speed of your encoding.
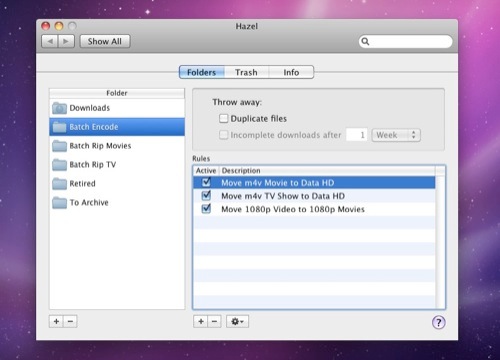
For this tutorial, we'll use your ~/Movies folder as the container for your workflow files and folders. Keeping your workflow under this one directory will make this process much easier. You can then have Hazel or Automator move the finished rips and encoded files to another drive or remote volume after they are done.
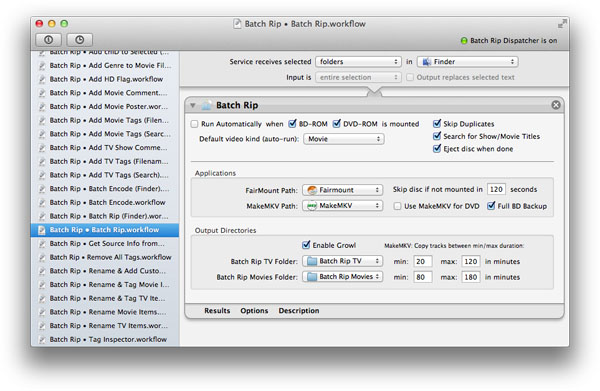
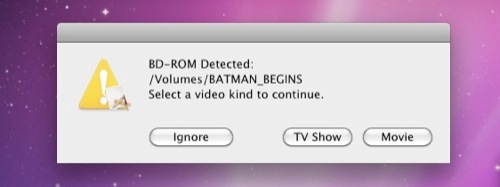
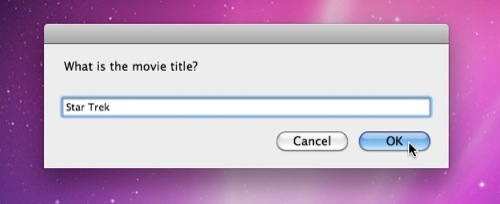
IMPORTANT: These workflows rely on one important piece of information that needs to be set for each disc, Video Kind. Video Kind is a variable we use in the actions to identify whether a disc contains a Movie or TV Show. The easiest way I've found to do this is to simply rip TV Shows to one folder and Movies to another. A script can then determine a disc's "kind" based on its location. The Batch Rip action allows you to set the video kind for each disc inserted. Also included are two Services located in your Services folder that will add the “video kind” as a Spotlight comment to selected files or folders.
With the video kind set, the Batch Encode action will know whether to encode every episode for TV Shows or only the main feature for Movies. You can also set unique min/max durations for each video kind. Video kind also helps for auto-tagging. Auto-tagging during the encoding process only works reliably for movies. TV Shows need to be done as a separate process after the files have been encoded to ensure that all the episodes have been verified, and sorted in order.
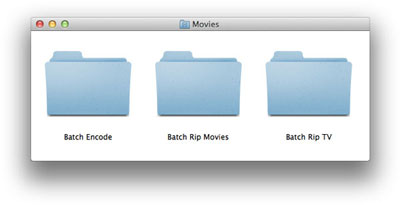
Creating Your Batch Folders
If you chose to have the installer create your Batch Folders during the workflow installation process, they will be located in your ~/Movies directory. If not, follow the steps below to create your Batch Folders:
- Navigate to your ~/Movies folder.
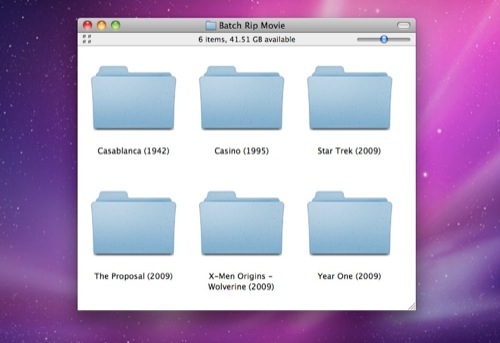
- Create two folders and rename them Batch Rip TV and Batch Rip Movies. These folders will be used as the destination folders for your ripped files when copied from DVDs and BDs using the Batch Rip action. These folders will also be the source folders for the Batch Encode action.
- Create another folder named Batch Encode. This folder will be the destination folder for your final encoded m4v/mkv files when using the Batch Encode action.
Using the Workflow Editor
Batch Rip Actions for Automator includes a series of Automator "Service" workflow files pre-built to work with the actions.
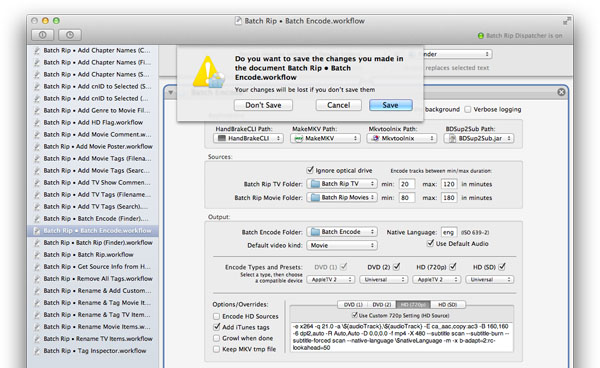
The Actions contained in a workflow can have fields, pop-up menus, checkboxes, and other user-interface elements for configuring the action. Batch Rip Actions for Automator features a Workflow Editor to help you quickly edit and save your workflow options.
To edit a workflow:
- Choose a workflow from the source list on the left side of the Workflow Editor.
- The workflow will open in the layout view on the right side of the window.
- Configure the action as desired.
- To save your changes, Open the File menu and Choose Save.
Using Batch Rip Service Workflows
A Service is a special type of Automator workflow that can be used from another application or the Finder via contextual menus throughout the OS. Some services require input such as movie files. These types of services can be context sensitive, and only appear in the correct application or if the correct type of input is selected.
In this tutorial, there are two ways we run Services:
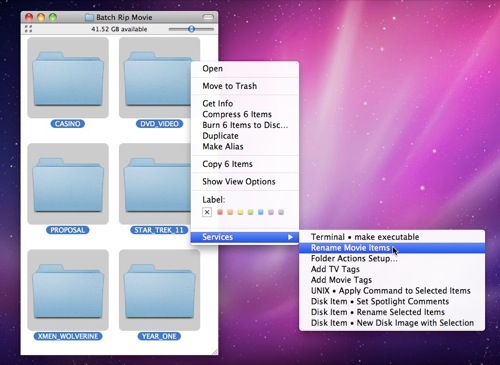
- Open the application menu (to the right of the Apple menu), choose Services, and then choose the service you want to use.
- Open a contextual menu by Control-clicking on an item (or a group of items), choose Services, and then choose the service you want to use.
Tutorial continues below…
Last edited: